零、AJAX
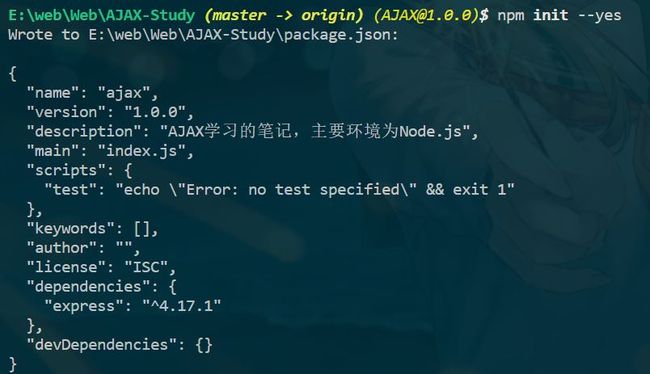
0.0 npm install express
npm i express # 安装 也可以使用cnpm
npm init --yes # 查看是否安装到当前环境中
0.1 express.js
// express.js
const {
response
} = require('express');
const express = require('express');
const app = new express();
//app.post('/server', (request, response) => {
// // 设置响应头 设置允许跨域
// response.setHeader("Access-Control-Allow-Origin", "*");
// // 设置响应体
// response.send("HELLO ZHUBA POST");
// });
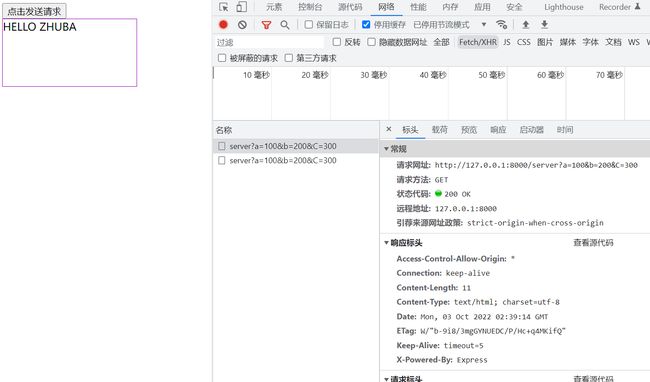
app.post('/server', (request, response) => {
// 设置响应头 设置允许跨域 重点注意此处
response.setHeader("Access-Control-Allow-Origin", "*");
// 设置响应体
response.send("HELLO ZHUBA");
});
app.listen(8000, () => {
console.log("服务已经启动, 8000端口监听中....");
});
// 先运行
0.2 GET-HTML
// GET-HTML
AJAX GET 请求
Test:
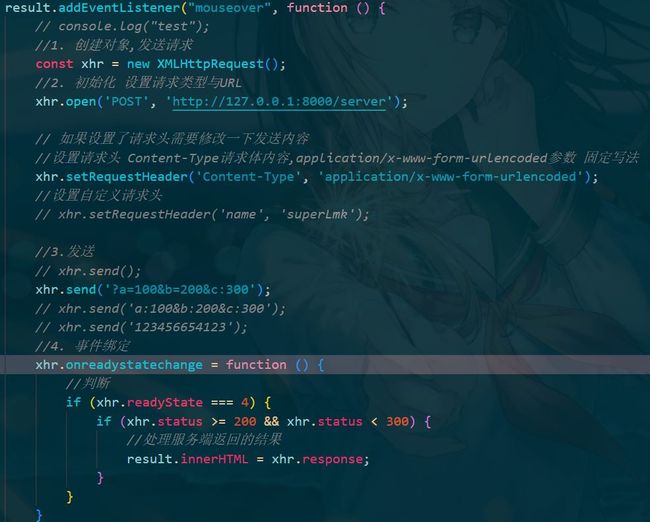
0.3 POST-HTML
需要在express.js中为app添加POST方法(和get一致),并重启启动,(正在运行js脚本修改后需要重新启动)
app.post('/server', (request, response) => {
// 设置响应头 设置允许跨域
response.setHeader("Access-Control-Allow-Origin", "*");
// 设置响应体
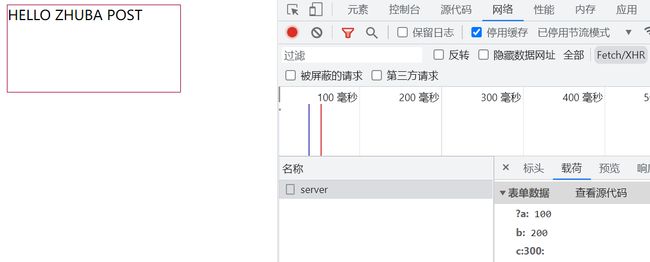
response.send("HELLO ZHUBA POST");
});
// POST-HTML
AJAX POST 请求
注意此处:
Test:
一、导入模块
1.1方法一、下载axios.js,并放入vue工程plugins目录下
在main.js引入axios
import axios from './plugins/axios
在相应页面中使用
 created() {
      const _this = this
      axios.get('http://localhost:8181/book/findAll/0/6').then(function(resp){
        console.log(resp);
        _this.tableData = resp.data.content
        _this.pageSize = resp.data.size
        _this.total = resp.data.totalElements
      })
    }
1.2方法二使用包管理器安装axios
安装
// 注意此时只安装在该工作区
npm install --save axios

cpnm install --save axios
在相应页面声明axios变量
const axios = require('axios');
注意,是在export default外声明全局变量

使用和之前一样在相应页面
1.3方法三直接引入CDN
二、实际应用
2.1以为和风天气API实践:
[和风天气](城市信息查询 - API | 和风天气开发平台 (qweather.com))
2.2数据接口如下:
https://geoapi.qweather.com/v2/city/lookup?location=${city}&key=${key}
// city为字符如'北京'
// key为控制台key

https://devapi.qweather.com/v7/weather/now?location=${data}&key=${key}
// 此处data为前面一个得到的地址的id,如'北京'为:101010100
2.3实现:
// 导入axios
const axios = require("axios");
// 异步函数
async beforeMount() {

}
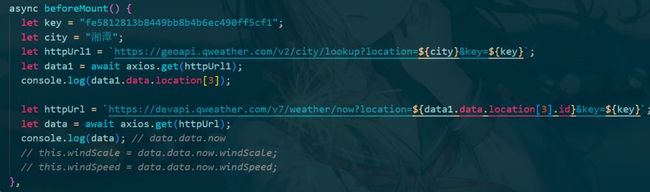
async beforeMount() {
    // 设置好参数此处写死的,可以用Vue传参等
    let key = "fe5812813b8449bb8b4b6ec490ff5cf1";
    let city = "湘潭";


    // 拼接好请求 把其输入浏览器导航有数据即可,结果参考下图
    // https://geoapi.qweather.com/v2/city/lookup?location=湘潭&key=fe5812813b8449bb8b4b6ec490ff5cf1
    let httpUrl1 = `https://geoapi.qweather.com/v2/city/lookup?location=${city}&key=${key}`;
},

async beforeMount() {
    // 设置好参数此处写死的,可以用Vue传参等
    let key = "fe5812813b8449bb8b4b6ec490ff5cf1";
    let city = "湘潭";

    // 拼接好请求 把其输入浏览器导航有数据即可,结果参考下图
    // https://geoapi.qweather.com/v2/city/lookup?location=湘潭&key=fe5812813b8449bb8b4b6ec490ff5cf1
    let httpUrl1 = `https://geoapi.qweather.com/v2/city/lookup?location=${city}&key=${key}`;

    // 发起请求注意此处的await, 不加上,只能得到pending: 初始状态,不是成功或失败状态,如下图
    let data1 = await axios.get(httpUrl1); //  =Promise{}
},
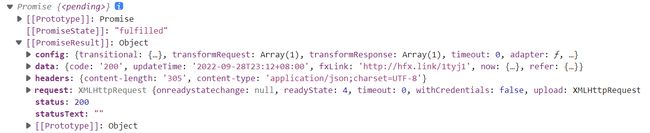
promise 要用then接收或者async await
async beforeMount() {
    // 设置好参数此处写死的,可以用Vue传参等
    let key = "fe5812813b8449bb8b4b6ec490ff5cf1";
    let city = "湘潭";

    // 拼接好请求 把其输入浏览器导航有数据即可,结果参考下图
    // https://geoapi.qweather.com/v2/city/lookup?location=湘潭&key=fe5812813b8449bb8b4b6ec490ff5cf1
    let httpUrl1 = `https://geoapi.qweather.com/v2/city/lookup?location=${city}&key=${key}`;

    // 发起请求注意此处的await, 不加上,只能得到pending: 初始状态,不是成功或失败状态,如下图
    let data1 = await axios.get(httpUrl1);
    // 输出想要的数据,测试一下
    console.log(data);
    console.log(data1.data.location[3]);
},
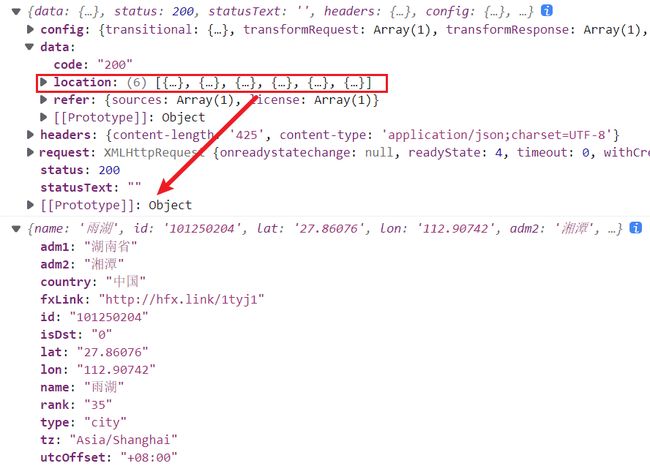
另一个一样。
2.4完整Vue:
obsTime{{ obsTime }}
text:{{ text }}
windDir:{{ windDir }}
windSpeed & windScale::{{ windSpeed }} & {{ windScale }}
三、BUG修复
3.1 Can‘t resolve ‘axios‘ in ‘C:\vue\ xxx
axios在当前项目没安装,项目未安装axios依赖,项目根目录下执行下列指令,来安装axios依赖:
npm install --save axios
// 然后记得在main.js配置
import axios from 'axios'

Vue.prototype.$axios = axios
如果 js-cookie 找不到,还要安装js-cookie:
npm install --save js-cookie
3.2 webpack < 5 used to include polyfills for node.js core modules by default.
3.2.1解决方案
安装 node-polyfill-webpack-plugin
npm install node-polyfill-webpack-plugin
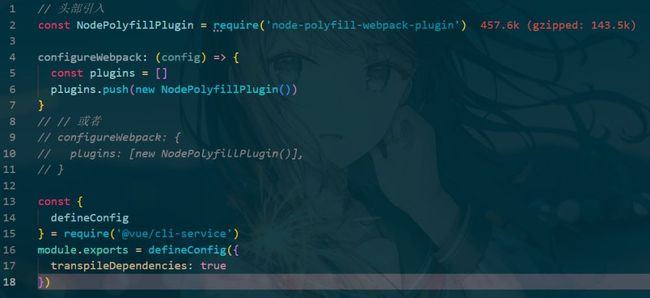
vue.config.js中修改配置
// 头部引入
const NodePolyfillPlugin = require('node-polyfill-webpack-plugin')

configureWebpack: (config) => {
	const plugins = []
	plugins.push(new NodePolyfillPlugin())
}
// // 或者
// configureWebpack: {
//   plugins: [new NodePolyfillPlugin()],
// }
重启项目后成功。
3.2.2原因分析
原因是由于在webpack5中移除了nodejs核心模块的polyfill自动引入,所以需要手动引入,如果打包过程中有使用到nodejs核心模块,webpack会提示进行相应配置。
四、结合Vue
4.1案例
执行 GET 请求
// 为给定 ID 的 user 创建请求
axios.get('/user?ID=12345')
  .then(function (response) {
    console.log(response);
  })
  .catch(function (error) {
    console.log(error);
  });

// 上面的请求也可以这样做
axios.get('/user', {
    params: {
      ID: 12345
    }
  })
  .then(function (response) {
    console.log(response);
  })
  .catch(function (error) {
    console.log(error);
  });
执行 POST 请求
axios.post('/user', {
    firstName: 'Fred',
    lastName: 'Flintstone'
  })
  .then(function (response) {
    console.log(response);
  })
  .catch(function (error) {
    console.log(error);
  });
执行多个并发请求
function getUserAccount() {
  return axios.get('/user/12345');
}

function getUserPermissions() {
  return axios.get('/user/12345/permissions');
}

axios.all([getUserAccount(), getUserPermissions()])
  .then(axios.spread(function (acct, perms) {
    // 两个请求现在都执行完成
  }));
4.2框架整合
vue-axios 基于vuejs 的轻度封装
4.2.1安装vue-axios
cnpm install --save axios vue-axios -g //-g:全局安装
4.2.2加入入口文件
import Vue from 'vue'
import axios from 'axios'
import VueAxios from 'vue-axios'

Vue.use(VueAxios, axios)
4.2.3使用
Vue.axios.get(api).then((response) => {
  console.log(response.data)
})

this.axios.get(api).then((response) => {
  console.log(response.data)
})

this.$http.get(api).then((response) => {
  console.log(response.data)
})
五、插件
5.1.axios-retry
axios-retry Axios 插件 重试失败的请求
5.1.1安装axios-retry
cnpm install axios-retry -g //-g:全局安装
5.1.2使用
// CommonJS
// const axiosRetry = require('axios-retry');

// ES6
import axiosRetry from 'axios-retry';

axiosRetry(axios, { retries: 3 });

axios.get('http://example.com/test') // The first request fails and the second returns 'ok'
  .then(result => {
    result.data; // 'ok'
  });

// Exponential back-off retry delay between requests
axiosRetry(axios, { retryDelay: axiosRetry.exponentialDelay});

// Custom retry delay
axiosRetry(axios, { retryDelay: (retryCount) => {
  return retryCount * 1000;
}});

// 自定义 axios 实例
const client = axios.create({ baseURL: 'http://example.com' });
axiosRetry(client, { retries: 3 });

client.get('/test') // 第一次请求失败,第二次成功
  .then(result => {
    result.data; // 'ok'
  });

// 允许 request-specific 配置
client
  .get('/test', {
    'axios-retry': {
      retries: 0
    }
  })
  .catch(error => { // The first request fails
    error !== undefined
  });
5.1.3测试
克隆这个仓库 然后 执行:
cnpm test
5.2.vue-axios-plugin
Vuejs 项目的 axios 插件
5.2.1 安装
可以通过script标签引入,无需安装:
cnpm install --save vue-axios-plugin -g //-g:全局安装
5.2.2配置入口文件
import Vue from 'Vue'
import VueAxiosPlugin from 'vue-axios-plugin'

Vue.use(VueAxiosPlugin, {
  // 请求拦截处理
  reqHandleFunc: config => config,
  reqErrorFunc: error => Promise.reject(error),
  // 响应拦截处理
  resHandleFunc: response => response,
  resErrorFunc: error => Promise.reject(error)
})
5.2.3 示例
在 Vue 组件上添加了 $http 属性, 它默认提供 get 和 post 方法,使用如下:
this.$http.get(url, data, options).then((response) => {
  console.log(response)
})
this.$http.post(url, data, options).then((response) => {
  console.log(response)
})
也可以通过 this.$axios 来使用 axios 所有的 api 方法,如下:
this.$axios.get(url, data, options).then((response) => {
  console.log(response)
})

this.$axios.post(url, data, options).then((response) => {
  console.log(response)
})
总结
到此这篇关于第一次在Vue中完整使用AJAX请求和axios.js的文章就介绍到这了,更多相关Vue使用AJAX请求和axios.js内容请搜索脚本之家以前的文章或继续浏览下面的相关文章希望大家以后多多支持脚本之家!