ResNet网络详解并使用pytorch搭建模型、并基于迁移学习训练
1.ResNet网络详解
网络中的创新点:
(1)超深的网络结构(突破1000层)
(2)提出residual模块
(3)使用Batch Normalization加速训练(丢弃dropout)
(1)超深的网络结构
如果简单的将一些的卷积和池化层堆叠起来,层数深的网络结构表现反而会越来越差,作者总结了两个问题:
①随着网络的不断加深,梯度消失或梯度爆炸的问题会越来越明显;这类问题可以通过对数据进行标准化处理、权重初始化、Batch Normalization标准化进行解决;
②退化问题(degradation problem):解决了①的问题后,可能仍然存在层数深的效果没有层数少的效果好,在论文中提出了残差结构,可以通过残差结构解决退化问题。
(2)提出residual模块
左图是针对于网络层数较少的网络(原文说是34层)所使用的残差结构,右图是对50/101/152所提出的残差结构。左图所需要的参数大概需要118w,右图所需要的参数大概需要7W。

左图的残差结构的主分支是由两层3x3的卷积层组成,右侧的连接线是shortcut分支也称捷径分支。在主分支上经过一系列卷积层之后得到的特征矩阵与直接通过捷径分支的输入特征矩阵相加,然后再进行ReLU激活。
右图的残差结构与左边相比其输入输出都加上了一个1x1的卷积层,第一个卷积层起降维的作用,第二个卷积层起还原channel维度的作用。
注:为了让主分支上的输出矩阵能够与我们捷径分支上的输出矩阵进行相加,必须保证这两个输出特征矩阵有相同的shape
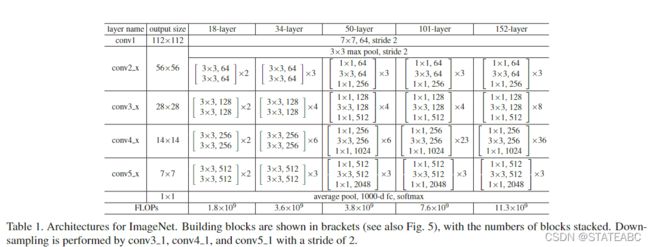
不同深度的ResNet网络结构配置以及ResNet-18网络模型


在ResNet34网络结构图中有一些虚线的残差结构,对于虚线的残差结构,其输入和输出的shape不一样,只有通过虚线残差结构得到输出后,再将其输入到实线残差结构中才能保证实线残差结构的输入特征矩阵和输出特征矩阵的shape一样。
虚线与实线残差结构的不同之处:
(1)第一个3x3卷积层的步长不同,因为需要将特征向量的高和宽从56缩减为28;
(2)卷积核个数不同,因为需要128个卷积核将特征向量的channel从64变为128;
(3)捷径分支增加了一个1x1的卷积核,步长为2,也是要缩减高和宽,增加channel。

对于更深层的残差结构变化同理:
(1)主分支的第一个1x1卷积层起降维作用,将特征矩阵的深度从256降到128;第二个3x3卷积层的步长为2,将特征矩阵的高和宽缩减为28;第三层1x1卷积层将深度增加到512。
(2)捷径分支同样采用1x1的卷积核处理,缩减高和宽,增加深度。

对于18层、34层的网络,通过最大池化下采样后得到的特征矩阵输出是[56x56x64],而其Conv2_x所需要的输入也为[56,56,64],因此不需要在第一层使用虚线残差结构。而对于50层、101层、152层的网络,Conv2_x所需要的输入特征矩阵的shape为[56,56,256],因此其Conv2_x的第一层需要使用虚线残差结构,仅调整特征矩阵的深度,Conv3_x、Conv4_x、Conv5_x的第一层虚线残差结构会调整宽、高、深度。
(3)使用Batch Normalization加速训练
Batch Normalization的目的是使一批(batch)特征矩阵(feature map)满足均值为0,方差为1的分布规律。
原理推荐去看吴恩达老师讲的Batch正则化
也可以看导师的CSDN:
Batch Normalization详解以及pytorch实验
导师提到了使用BN时需要注意的问题:
(1)训练时要将traning参数设置为True,在验证时将trainning参数设置为False。在pytorch中可通过创建模型的model.train()和model.eval()方法控制。
(2)batch size尽可能设置大点,设置小后表现可能很糟糕,设置的越大求的均值和方差越接近整个训练集的均值和方差。
(3)建议将bn层放在卷积层(Conv)和激活层(例如Relu)之间,且卷积层不要使用偏置bias,因为没有用。
2.迁移学习
使用迁移学习的优势:
(1)能够快速的训练出一个理想的结果;
(2)当数据集较小时也能训练出理想的效果。
注:如果使用别人预训练模型参数时,要注意别人的预处理方法。

比如一张图像,通过一系列的卷积层和全连接层搭建了网络结构。这个模型训练完成后,第一个卷积层可能学习到了一些角点信息,卷积层二可能学习到一些纹理信息,随着卷积层的不断加深,后面的卷积层可能学习到识别眼睛、嘴巴等信息。最后通过全连接层将一系列特征进行组合,输出类别概率。
对于浅层的卷积层所学习的信息,有可能不仅在本网络适用,在其他网络也适用。因此可以将学习好的网络的浅层网络的参数迁移到新的网络中,这样新的网络也拥有了识别底层通用特征的能力,就能够更加快速的学习新的数据据的高维特征。
常见的迁移学习方式:
(1)载入权重后训练所有参数;
(2)载入权重后只训练最后几层参数;
(3)载入权重后在原网络基础上再添加一层全连接层,仅训练最后一层全连接层。
3.使用Pytorch搭建ResNet网络
文件结构:
ResNet
  ├── model.py:           ResNet模型搭建
  ├── train.py:           训练脚本
  ├── predict.py:         单张图像预测脚本
  └── batch_predict.py:   批量图像预测脚本
model.py
定义残差结构,上文中提到18层、34层的残差结构与50层、101层、152层的残差结构是不一样的。
定义18层、34层的残差结构
class BasicBlock(nn.Module):                   #定义18层、34层对应的残差结构
    expansion = 1                              #expansion对应残差结构中主分支采用的卷积核个数是否变化

    def __init__(self, in_channel, out_channel, stride=1, downsample=None, **kwargs):    #定义初始函数及残差结构所需要使用的一系列层结构,其中下采样参数downsample对应虚线的残差结构
        super(BasicBlock, self).__init__()
        self.conv1 = nn.Conv2d(in_channels=in_channel, out_channels=out_channel,         #stride等于1时对应实线残差结构,因为当步长为1时卷积不会改变特征矩阵的高和宽
                               kernel_size=3, stride=stride, padding=1, bias=False)      #output=(input-kernel_size+2*padding)/stride+1=(input-3+2*1)/1+1=input(向下取整)
        self.bn1 = nn.BatchNorm2d(out_channel)                                           #stride等于2时对应虚线残差结构,要将特征矩阵的高和宽缩减为原来的一半
        self.relu = nn.ReLU()                                                            #使用BN时不需要使用偏置
        self.conv2 = nn.Conv2d(in_channels=out_channel, out_channels=out_channel,
                               kernel_size=3, stride=1, padding=1, bias=False)
        self.bn2 = nn.BatchNorm2d(out_channel)
        self.downsample = downsample

    def forward(self, x):                           #定义正向传播过程,输入特征矩阵x
        identity = x                                #将x赋值给identity
        if self.downsample is not None:             #如果没有输入下采样函数,那么对应实线的残差结构,就跳过这里
            identity = self.downsample(x)           #如果输入下采样函数不等于None,就将输入特征矩阵x输入到下采样函数中得到捷径分支的输出

        out = self.conv1(x)                         #主分支的输出
        out = self.bn1(out)
        out = self.relu(out)

        out = self.conv2(out)
        out = self.bn2(out)

        out += identity                            #将主分支与捷径分支的输出相加
        out = self.relu(out)

        return out
定义50层、101层、152层的残差结构
class Bottleneck(nn.Module):
    expansion = 4                                            #在50层、101层、152层的残差结构中的第三层卷积层的卷积核个数时第一层、第二层卷积核个数的四倍,所以这里为4

    def __init__(self, in_channel, out_channel, stride=1, downsample=None,                     #定义初始函数及残差结构所需要使用的一系列层结构
                 groups=1, width_per_group=64):
        super(Bottleneck, self).__init__()

        width = int(out_channel * (width_per_group / 64.)) * groups                            #每一层输出特征矩阵深度

        self.conv1 = nn.Conv2d(in_channels=in_channel, out_channels=width,
                               kernel_size=1, stride=1, bias=False)  # squeeze channels
        self.bn1 = nn.BatchNorm2d(width)
        # -----------------------------------------
        self.conv2 = nn.Conv2d(in_channels=width, out_channels=width, groups=groups,
                               kernel_size=3, stride=stride, bias=False, padding=1)            #步长为2,因此这里步长根据传入的stride调整
        self.bn2 = nn.BatchNorm2d(width)
        # -----------------------------------------
        self.conv3 = nn.Conv2d(in_channels=width, out_channels=out_channel*self.expansion,     #卷积核个数为四倍的前一层卷积核个数
                               kernel_size=1, stride=1, bias=False)  # unsqueeze channels
        self.bn3 = nn.BatchNorm2d(out_channel*self.expansion)
        self.relu = nn.ReLU(inplace=True)
        self.downsample = downsample

    def forward(self, x):                      #定义正向传播过程,原理同18层正向传播过程
        identity = x
        if self.downsample is not None:
            identity = self.downsample(x)

        out = self.conv1(x)
        out = self.bn1(out)
        out = self.relu(out)

        out = self.conv2(out)
        out = self.bn2(out)
        out = self.relu(out)

        out = self.conv3(out)
        out = self.bn3(out)

        out += identity
        out = self.relu(out)

        return out
定义ResNet网络
这里要注意的是特征矩阵通道数的转换,可以看导师视频:使用pytorch搭建ResNet
class ResNet(nn.Module):                              #定义ResNet网络

    def __init__(self,
                 block,                               #block对应的为定义的残差结构BasicBlock、Bottleneck
                 blocks_num,                          #列表,对应的为该层所使用的残差结构的数目,如34层的conv2_x中包含了3个、conv3_x中包含了4个
                 num_classes=1000,                    #训练集分类个数
                 include_top=True,                    #方便以后在Resnet基础上搭建更加复杂的网络
                 groups=1,
                 width_per_group=64):
        super(ResNet, self).__init__()
        self.include_top = include_top                #将include_top传入类变量中
        self.in_channel = 64                          #输入特征矩阵的深度(通过maxpool之后的特征矩阵)

        self.groups = groups
        self.width_per_group = width_per_group

        self.conv1 = nn.Conv2d(3, self.in_channel, kernel_size=7, stride=2,        #7x7卷积层
                               padding=3, bias=False)
        self.bn1 = nn.BatchNorm2d(self.in_channel)
        self.relu = nn.ReLU(inplace=True)
        self.maxpool = nn.MaxPool2d(kernel_size=3, stride=2, padding=1)            #最大池化
        self.layer1 = self._make_layer(block, 64, blocks_num[0])                   #对应表格Conv2_x的残差结构,通过_make_layer()函数生成
        self.layer2 = self._make_layer(block, 128, blocks_num[1], stride=2)        #对应表格Conv3_x
        self.layer3 = self._make_layer(block, 256, blocks_num[2], stride=2)        #对应表格Conv4_x
        self.layer4 = self._make_layer(block, 512, blocks_num[3], stride=2)        #对应表格Conv5_x
        if self.include_top:
            self.avgpool = nn.AdaptiveAvgPool2d((1, 1))  # output size = (1, 1)
            self.fc = nn.Linear(512 * block.expansion, num_classes)

        for m in self.modules():
            if isinstance(m, nn.Conv2d):
                nn.init.kaiming_normal_(m.weight, mode='fan_out', nonlinearity='relu')
定义_make_layer
    def _make_layer(self, block, channel, block_num, stride=1):           #定义_make_layer,这里的channel为残差结构中第一个卷积层所使用卷积核的个数
        downsample = None                                                 #对应18、34层
        if stride != 1 or self.in_channel != channel * block.expansion:   #如果步长不等于1或者输入通道不等于channel * block.expansion,即50层以上的
            downsample = nn.Sequential(                                   #则生成下采样函数
                nn.Conv2d(self.in_channel, channel * block.expansion, kernel_size=1, stride=stride, bias=False),
                nn.BatchNorm2d(channel * block.expansion))

        layers = []                                                       #定义列表
        layers.append(block(self.in_channel,                              #将第一层残差结构添加进去
                            channel,
                            downsample=downsample,
                            stride=stride,
                            groups=self.groups,
                            width_per_group=self.width_per_group))
        self.in_channel = channel * block.expansion

        for _ in range(1, block_num):                                     #通过循环将从第二层开始的网络结构组合进去
            layers.append(block(self.in_channel,
                                channel,
                                groups=self.groups,
                                width_per_group=self.width_per_group))

        return nn.Sequential(*layers)                                     #将列表转换成非关键参数传入到nn.Sequential()函数中
定义不同层数的ResNet
def resnet34(num_classes=1000, include_top=True):
    # https://download.pytorch.org/models/resnet34-333f7ec4.pth
    return ResNet(BasicBlock, [3, 4, 6, 3], num_classes=num_classes, include_top=include_top)


def resnet50(num_classes=1000, include_top=True):
    # https://download.pytorch.org/models/resnet50-19c8e357.pth
    return ResNet(Bottleneck, [3, 4, 6, 3], num_classes=num_classes, include_top=include_top)


def resnet101(num_classes=1000, include_top=True):
    # https://download.pytorch.org/models/resnet101-5d3b4d8f.pth
    return ResNet(Bottleneck, [3, 4, 23, 3], num_classes=num_classes, include_top=include_top)
预训练权重下载
由于需要使用迁移学习的方法,就要下载pytorch提供的resnet网络的预训练模型,权重链接为定义的网络下面,这里选择resnet34,将链接复制到地址栏就可以下载。
下载完成后将权重文件放在项目文件中,权重文件名改为resnet34-pre.pth。
数据集
数据集采用花分类数据集:使用pytorch搭建AlexNet并训练花分类数据集
train.py
训练脚本大部分代码同之前vgg、googlenet网络一样,不同之处有:
预处理
    data_transform = {
        "train": transforms.Compose([transforms.RandomResizedCrop(224),
                                     transforms.RandomHorizontalFlip(),
                                     transforms.ToTensor(),
                                     transforms.Normalize([0.485, 0.456, 0.406], [0.229, 0.224, 0.225])]),     #对图像标准化处理时的参数更改成了官网提供的参数
        "val": transforms.Compose([transforms.Resize(256),                          #将最小边缩放到256
                                   transforms.CenterCrop(224),                      #再使用中心裁剪成224x224的图片
                                   transforms.ToTensor(),
                                   transforms.Normalize([0.485, 0.456, 0.406], [0.229, 0.224, 0.225])])}
实例化模型
    net = resnet34()                       #实例化模型,这里并没有传入参数num_classes,也就是实例化后最后一个全连接层有1000个节点
    # load pretrain weights
    # download url: https://download.pytorch.org/models/resnet34-333f7ec4.pth
    model_weight_path = "./resnet34-pre.pth"           #保存权重的路径
    assert os.path.exists(model_weight_path), "file {} does not exist.".format(model_weight_path)   #载入模型权重
    net.load_state_dict(torch.load(model_weight_path, map_location='cpu'))
    # for param in net.parameters():
    #     param.requires_grad = False

    # change fc layer structure
    in_channel = net.fc.in_features            #输入特征矩阵的深度
    net.fc = nn.Linear(in_channel, 5)          #花分类只有5个类别,重新赋值全连接层
    net.to(device)
记得修改自己的数据集路径
    data_root = os.path.abspath(os.path.join(os.getcwd(), "./dataset"))  # get data root path
    image_path = os.path.join(data_root,"flower_data")  # flower data set path
不使用迁移学习
    net = resnet34()                       #实例化模型,这里并没有传入参数num_classes,也就是实例化后最后一个全连接层有1000个节点
    net.to(device)
    #不适用迁移学习可以将下面部分注释掉,然后在net=resnet34()处传入num_classes参数
    model_weight_path = "./resnet34-pre.pth"           #保存权重的路径
    assert os.path.exists(model_weight_path), "file {} does not exist.".format(model_weight_path)   #载入模型权重
    net.load_state_dict(torch.load(model_weight_path, map_location='cpu'))
    # for param in net.parameters():
    #     param.requires_grad = False

    # change fc layer structure
    in_channel = net.fc.in_features            #输入特征矩阵的深度
    net.fc = nn.Linear(in_channel, 5)          #花分类只有5个类别,重新赋值全连接层
predict.py
    data_transform = transforms.Compose(           #要采用和训练方法一样的标准化处理
        [transforms.Resize(256),
         transforms.CenterCrop(224),
         transforms.ToTensor(),
         transforms.Normalize([0.485, 0.456, 0.406], [0.229, 0.224, 0.225])])
    # create model
    model = resnet34(num_classes=5).to(device)                  #实例化时传入类别个数

    # load model weights
    weights_path = "./resNet34.pth"                             #载入训练好的模型参数
导师博客:https://blog.csdn.net/qq_37541097/article/details/103482003
导师github:https://github.com/WZMIAOMIAO/deep-learning-for-image-processing
代码用的导师的,自己又加了些备注,就放在自己的github里了:
https://github.com/Petrichor223/Deep_Learning/tree/master

