【DETR】从无到有的程序试跑过程
DETR论文地址:https://arxiv.org/abs/2005.12872
DETR源码下载:https://github.com/facebookresearch/detr
1. 当我一无所知时,我先去读README
进行中文标注的README,需要的朋友可以留邮箱一起交流一下
1.1 Model Zoo是什么?
官方从数据集上预训练好的模型,包括已经训练好的权重参数,应该可以即拿即用。
Model Zoo这个名词也越看越形象,模型动物园,一般官方提供的模型也不会提供一个,可能是大象类型的,庞大但是准确,也有豹子类型的,轻量但速度快。
机器学习采用相同的网络结构和数据集,训练出来的效果可能会有所差异,这个差异就可能来源于权重初始化的不同。官方的训练方式在计算性能较强的计算机或是多台计算机上进行,训练的次数多,训练出来的效果好,把官方的训练好的权重参数拿来用,一是可以直接看到效果,二是如果自己想训练数据集,把它当作初始化的权重参数效果也可能好。
辅助学习链接:网络可视化工具netron详细安装流程
1.2 Colab是什么?
朋友们,我发现了一个什么宝藏呀!
Colaboratory 是一个免费的 Jupyter 笔记本环境,不需要进行任何设置就可以使用,并且完全在云端运行。
借助 Colaboratory,可以编写和执行代码、保存和共享分析结果,以及利用强大的计算资源,所有这些都可通过浏览器免费使用。
这是给没有GPU以及GPU性能较差的小伙伴一个便利啊!在README中提供的是现成的Colab Notebook提供学习。但是以后可以使用Colaboratory进行训练什么的,慢慢研究。
参考链接
如何正确地使用Google Colab
苦逼学生党的Google Colab使用心得
GPU之nvidia-smi命令详解
2. 大致掌握DETR(Grasp on DETR)
We provide a few notebooks in colab to help you get a grasp on DETR:
DETR’s hands on Colab Notebook: Shows how to load a model from hub, generate predictions, then visualize the attention of the model (similar to the figures of the paper)
Standalone Colab Notebook: In this notebook, we demonstrate how to implement a simplified version of DETR from the grounds up in 50 lines of Python, then visualize the predictions. It is a good starting point if you want to gain better understanding the architecture and poke around before diving in the codebase.
Panoptic Colab Notebook: Demonstrates how to use DETR for panoptic segmentation and plot the predictions.
官方提供了三个Colab Notebook,那我们一个个来看。
- DETR’s hands on Colab Notebook
展示如何下载模型,进行预测。 - Standalone Colab Notebook
简化版本。 - Panoptic Colab Notebook
演示分割任务。
3. 论文和源码
如果前面Colab Notebook的内容只是小菜,下载的源码就是大餐。
我想先尝试运行一下测试的代码,结果没有找到相应的程序,感觉源码写的是一个训练的过程,因此我将"DETR’s hands on Colab Notebook"中的代码复制组成了detect.py文件,进行适当的修改,用于测试运行结果,代码如下:
import glob
import math
import numpy as np

from PIL import Image
import cv2
import requests
import matplotlib.pyplot as plt

import torch
from torch import nn
from torchvision.models import resnet50
import torchvision.transforms as T
import torchvision.models as models
torch.set_grad_enabled(False)

import os

# COCO classes
CLASSES = [
    'N/A', 'person', 'bicycle', 'car', 'motorcycle', 'airplane', 'bus',
    'train', 'truck', 'boat', 'traffic light', 'fire hydrant', 'N/A',
    'stop sign', 'parking meter', 'bench', 'bird', 'cat', 'dog', 'horse',
    'sheep', 'cow', 'elephant', 'bear', 'zebra', 'giraffe', 'N/A', 'backpack',
    'umbrella', 'N/A', 'N/A', 'handbag', 'tie', 'suitcase', 'frisbee', 'skis',
    'snowboard', 'sports ball', 'kite', 'baseball bat', 'baseball glove',
    'skateboard', 'surfboard', 'tennis racket', 'bottle', 'N/A', 'wine glass',
    'cup', 'fork', 'knife', 'spoon', 'bowl', 'banana', 'apple', 'sandwich',
    'orange', 'broccoli', 'carrot', 'hot dog', 'pizza', 'donut', 'cake',
    'chair', 'couch', 'potted plant', 'bed', 'N/A', 'dining table', 'N/A',
    'N/A', 'toilet', 'N/A', 'tv', 'laptop', 'mouse', 'remote', 'keyboard',
    'cell phone', 'microwave', 'oven', 'toaster', 'sink', 'refrigerator', 'N/A',
    'book', 'clock', 'vase', 'scissors', 'teddy bear', 'hair drier',
    'toothbrush'
]

# colors for visualization
COLORS = [[0.000, 0.447, 0.741], [0.850, 0.325, 0.098], [0.929, 0.694, 0.125],
          [0.494, 0.184, 0.556], [0.466, 0.674, 0.188], [0.301, 0.745, 0.933]]

# standard PyTorch mean-std input image normalization
transform = T.Compose([
    T.Resize(800),
    T.ToTensor(),
    T.Normalize([0.485, 0.456, 0.406], [0.229, 0.224, 0.225])
])

# for output bounding box post-processing
def box_cxcywh_to_xyxy(x):
    x_c, y_c, w, h = x.unbind(1)
    b = [(x_c - 0.5 * w), (y_c - 0.5 * h),
         (x_c + 0.5 * w), (y_c + 0.5 * h)]
    return torch.stack(b, dim=1)

def rescale_bboxes(out_bbox, size):
    img_w, img_h = size
    b = box_cxcywh_to_xyxy(out_bbox)
    b = b * torch.tensor([img_w, img_h, img_w, img_h], dtype=torch.float32)
    return b

def plot_results(pil_img, prob, boxes, save_path):
    plt.figure(figsize=(16,10))
    plt.imshow(pil_img)
    ax = plt.gca()
    colors = COLORS * 100
    for p, (xmin, ymin, xmax, ymax), c in zip(prob, boxes.tolist(), colors):
        ax.add_patch(plt.Rectangle((xmin, ymin), xmax - xmin, ymax - ymin,
                                   fill=False, color=c, linewidth=3))
        cl = p.argmax()
        text = f'{CLASSES[cl]}: {p[cl]:0.2f}'
        ax.text(xmin, ymin, text, fontsize=15,
                bbox=dict(facecolor='yellow', alpha=0.5))
    plt.axis('off')
    plt.savefig(save_path)
    # plt.show()


def png2jpg(img_path):
    img = cv2.imread(img_path, 0)
    # w, h = img.shape[::-1]
    infile = img_path
    outfile = os.path.splitext(infile)[0] + ".jpg"
    img = Image.open(infile)
    # img = img.resize((int(w / 2), int(h / 2)), Image.ANTIALIAS) # 修改原图大小
    try:
        if len(img.split()) == 4:
            # prevent IOError: cannot write mode RGBA as BMP
            r, g, b, a = img.split()
            img = Image.merge("RGB", (r, g, b))
            img.convert('RGB').save(outfile, quality=100)
        else:
            img.convert('RGB').save(outfile, quality=100)
        # os.remove(img_path) # 覆盖原文件
        return outfile
    except Exception as e:
        print("PNG to JPG error!", e)


# Step1: 加载模型,会加载到电脑的".cache"文件中
# model = torch.hub.load('facebookresearch/detr', 'detr_resnet50', pretrained=True)
# model.eval();
# 从本地加载,还是会从网上下
model = torch.hub.load(r'./','detr_resnet50', pretrained=True, source='local')
model.eval();


# Step2: 循环读取文件中的图片,文件位置为'./data/images',并将文件保存
# golb.golb会返回匹配路径下所有符合的patten,以列表的形式返回
paths = glob.glob(os.path.join(r'./data/images', '*.*'))
print(paths)

for path in paths:
    # 问题1:无法读取png图像
    if os.path.splitext(path)[1] == ".png":
    # 问题1解1:用imread读取png
        im = cv2.imread(path)
        im = Image.fromarray(cv2.cvtColor(im,cv2.COLOR_BGR2RGB))
    # 问题1解2:将png转换为jpg,但感觉可能解1会更快一点,且该方法画质有损明显
    #     png2jpg(path)
    #     im = Image.open(os.path.splitext(path)[0] + '.jpg')
    else:
        im = Image.open(path)

    # mean-std normalize the input image (batch-size: 1)
    img = transform(im).unsqueeze(0)

    # propagate through the model
    outputs = model(img)

    # keep only predictions with 0.7+ confidence
    probas = outputs['pred_logits'].softmax(-1)[0, :, :-1]
    keep = probas.max(-1).values > 0.9

    # convert boxes from [0; 1] to image scales
    bboxes_scaled = rescale_bboxes(outputs['pred_boxes'][0, keep], im.size)

    img_save_path = r'./runs/detect/' + os.path.splitext(os.path.split(path)[1])[0] + '.jpg'
    plot_results(im, probas[keep], bboxes_scaled, img_save_path)
以下是几点说明:
-
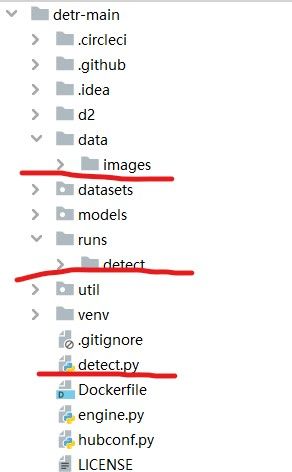
需要创建存放待测试图片的文件夹‘data/images/‘和运行结果完后的文件夹’runs/detect/’,如文件夹名不相同,需修改代码第108和136行,文件夹创建情况如下图:

-
图片格式jpg或png都可,有一个函数实现png到jpg的转换。
4. 效果
【参考链接】
DETR源码
windows10复现DEtection TRansformers(DETR)并实现自己的数据集
python路径拼接os.path.join()函数的用法
python代码
python-基础语法-glob.glob()
OpenCV读取图片与PIL读取图片的差别
Python-png转换成jpg
Image.ANTIALIAS
Python PIL Image.split()用法及代码示例
单张图像变换大小—— img.resize()
Python脚本3:分割路径,获得后缀,文件名等等
python遍历文件夹中的所有jpg文件
Image.open读取PNG文件变成灰度图片
[-] 加入colab的使用心得
[-] 加入DETR检测视频
