【无标题】
win10系统安装VSCode及配置OpenCV开发环境
文章目录
-
- @[TOC](文章目录)
- 前言
- 一、下载MinGW并配置环境变量
- 二、下载Cmake并配置环境变量
- 三、安装VSCode
- 四、下载配置opencv
-
- 4.1 CMake Configure and Generate OpenCV
- 4.2 Make
- 4.3 Install
- 五、VSCode配置OpenCV
- 总结
文章目录
-
- @[TOC](文章目录)
- 前言
- 一、下载MinGW并配置环境变量
- 二、下载Cmake并配置环境变量
- 三、安装VSCode
- 四、下载配置opencv
-
- 4.1 CMake Configure and Generate OpenCV
- 4.2 Make
- 4.3 Install
- 五、VSCode配置OpenCV
- 总结
前言
图像处理越来越热门,OpenCV是学习图像处理最好资源库,Window下怎么快速配置OpenCV开发环境,就是入门人首先面对的问题
下面就以Window10配置OpenCV开发环境为例
系统:Window10
开发IDE:VSCode
库文件:OpenCV
一、下载MinGW并配置环境变量
点击这里MingGW下载MingGW到本地。
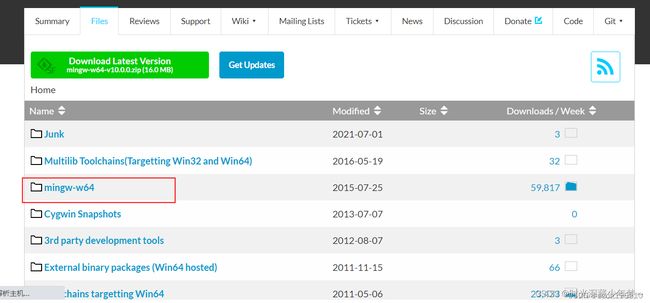
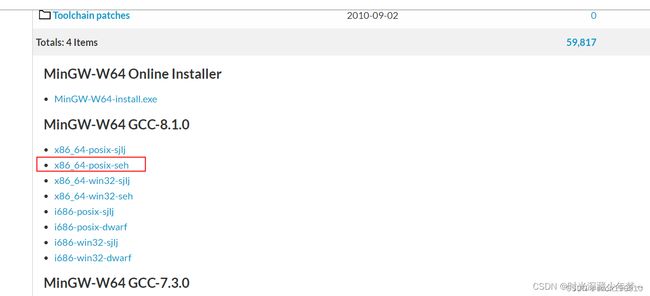
下载后解压到一个路径下,解压路径视为安装路径,解压文件夹名称可改为mingw64
PS:这里的路径最好是不含空格、特殊字符或中文,以免在4.2步骤的make过程中出错
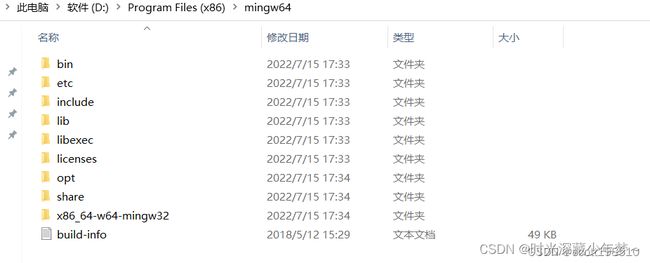
添加环境变量D:\Program Files (x86)\mingw64\bin
重新启动一个cmd窗口,执行gcc -v查看版本信息,如果有正确输出版本信息则说明配置成功
二、下载Cmake并配置环境变量
点击这里Cmake下载Cmake

下载后解压到一个路径下,解压路径视为安装路径,解压文件夹名称可改为cmake-3.24.0-rc3-windows-x86_64。
PS:这里的路径最好是不含空格、特殊字符或中文,以免在4.2步骤的make过程中出错
添加环境变量D:\Program Files (x86)\cmake-3.24.0-rc3-windows-x86_64\bin
重新启动一个cmd窗口,执行gcc -v查看版本信息,如果有正确输出版本信息则说明配置成功。

三、安装VSCode
点击这里VSCode下载VSCode

下载完成后直接安装。具体配置可参考vscode配置。
四、下载配置opencv
4.1 CMake Configure and Generate OpenCV
点击这里OpenCV下载相应版本,选择版本4.5.3避免新版本不稳定。
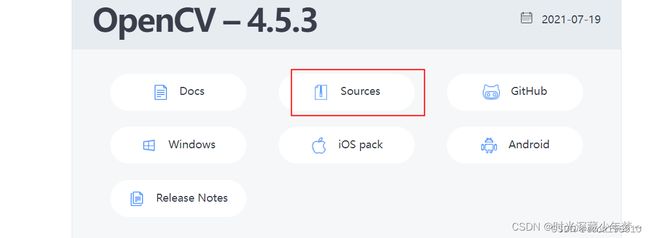
解压到指定目录,这里以目录D:\opencv为例, 并新建一个文件夹D:\opencv\build\x64\mingw
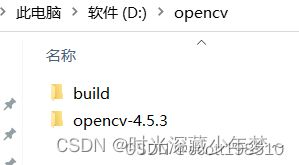
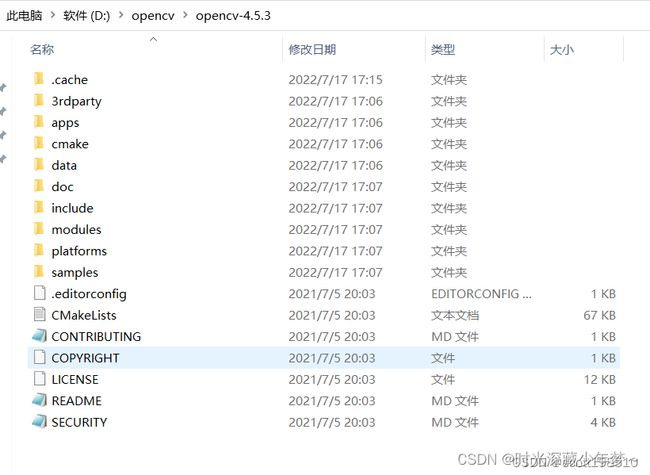
重新启动一个cmd窗口 执行cmake-gui.exe,弹窗cmake配置窗口。
首先需要输入source code路径和build the binaries路径,就是前面解压的OpenCV路径和新建的mingw目录,
然后点击左下角的Configure按钮,弹出如下窗口,选择MinGW Makefiles,点击Finish按钮


点击Finish按钮,系统就会开始检查配置,下方的控制台会开始打印调试信息,等待结束。
结束后,cmake可能会显示一片红,此时请再次点击Configure,结束后将屏幕中仍然为红的选项勾掉,然后再配置,直到没有红色为止。
在执行完后,勾选BUILD_opencv_world,WITH_OPENGL和BUILD_EXAMPLES,不勾选WITH_IPP、WITH_MSMF和ENABLE_PRECOMPILED_HEADERS(如果有的话),CPU_DISPATCH选空。
然后点击Generate,准备生成最终的Makefile.
注意:对于上述配置过程中如果遇到 CMake编译OpenCV时opencv_ffmpeg.dll等下载失败的话,可参考这篇文档opencv_ffmpeg.dll处理参考,简单而言就是在构建目录下的CMakeDownloadLog文件中找出对应的cmake文件路径,在网页上另存为 ffmpeg_version.cmake 文件(后缀cmake,不是txt),将此cmake文件放入 D:\opencv\build\x64\mingw\3rdparty\ffmpeg(没有ffmpeg可新建)https://raw.githubusercontent.com/opencv/opencv_3rdparty/213fcd5d4897319a83207406036c4a5957fba010/ffmpeg/ffmpeg_version.cmake
然后再次重复上述configure和generate步骤直到下载完成。
————————————————
版权声明:本文为CSDN博主「scott198510」的原创文章,遵循CC 4.0 BY-SA版权协议,转载请附上原文出处链接及本声明。
原文链接:https://blog.csdn.net/scott198510/article/details/125843447
4.2 Make
上述配置完成后,可以执行编译命令生成执行程序。在D:\opencv\build\x64\mingw路径下进入cmd窗口,执行如下命令:
minGW32-make -j 4
如果电脑配置较好可改用命令minGW32-make -j 8,执行速度更快些
PS:如果前面的mingw64或cmake安装在带空格的路径下,可能会出错,所以前面建议存放在无空格及中文字符的目录下
4.3 Install
前面一步没有错误后就继续执行如下命令:
minGW32-make install
这时会生成一个install目录D:\opencv\build\x64\mingw\install
最后都执行成功后,把下面路径添加到环境变量中
D:\opencv\build\x64\mingw\bin
五、VSCode配置OpenCV
5.1配置c_cpp_properties.json
在vscode界面下,按下Ctrl+Shift+P打开vscode的内置命令块,输入C++ Configurations,找到下图这个选项:
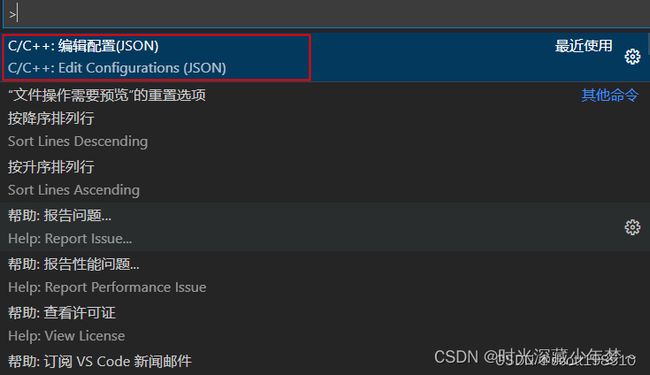
按下回车,vscode便会在当前工作目录生成一个.vscode文件夹,其中创建一个c_cpp_properties.json这样的配置模板文件。找到"includePath"这一项,填入正在使用的编译器的include目录即可实现配置c_cpp_properties.json如下。
{
    "configurations": [
        {
            "name": "Win32",
            "includePath": [
                "${workspaceFolder}/**",
                "D:/Program Files (x86)/mingw64/include/**",
                "D:/opencv/build/x64/mingw/install/include",
                "D:/opencv/build/x64/mingw/install/include/opencv2"
            ],
            "defines": [
                "_DEBUG",
                "UNICODE",
                "_UNICODE"
            ],
            "compilerPath": "D:\\Program Files (x86)\\mingw64\\bin\\g++.exe",
            "cStandard": "c11",
            "cppStandard": "c++11",
            "intelliSenseMode": "windows-gcc-x64"
        }
    ],
    "version": 4
}
5.2配置launch.json
在vscode 主菜单 运行/添加配置 弹出的窗口中选择gdb启动,然后配置launch.json
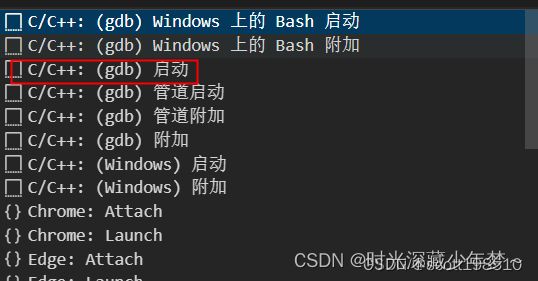
{
    "version": "0.2.0",
    "configurations": [
        {
            "name": "opencv4.5.3 debuge",
            "type": "cppdbg",
            "request": "launch",
            "program": "${workspaceFolder}\\${fileBasenameNoExtension}.exe",
            "args": [],
            "stopAtEntry": false,  //这里如果为 false,则说明调试直接运行。(反之则停止)
            "cwd": "${workspaceFolder}",
            "environment": [],
            "externalConsole": true, //是否调用外部cmd
            "MIMode": "gdb",
            "miDebuggerPath": "D:/Program Files (x86)/mingw64/bin/gdb.exe",
            "setupCommands": [
                {
                    "description": "为 gdb 启用整齐打印",
                    "text": "-enable-pretty-printing",
                    "ignoreFailures": false
                }
            ],
            "preLaunchTask": "opencv4.5.3 compile task"
        }
    ]
}
5.3配置task.json
在vscode主菜单 终端(T)/配置任务 弹出窗口配置如下task.json
{
	"version": "2.0.0",
	"tasks": [
		{
			"type": "cppbuild",
			"label": "opencv4.5.3", //任务名称,要和launch.json的"preLaunchTask"字段对应
			"command": "D:\\Program Files (x86)\\mingw64\\bin\\g++.exe", //编译器路径
			"args": [
				"-g", //控制台编译时输入的-g,表示生成调试有关信息,编译生成可执行文件调试
				"-std=c++11",
        		"-fexec-charset=GBK",// 令mingw按GBK编码⽣成exe⽂件 GBK
        		"-finput-charset=UTF-8",// 令mingw按UTF-8编码处理(此参数可以不设置)//
				"${file}",//要编译的文件,默认只能编译单个文件
				"-o", //指定生成的可执行文件的名字,编译不加 -o 默认生成就是a.exe
				"${fileDirname}\\${fileBasenameNoExtension}.exe",
                "-I","D:/opencv/build/x64/mingw/install/include",
                "-I","D:/opencv/build/x64/mingw/install/include/opencv2",
				"-L","D:/opencv/build/x64/mingw/bin",
				"-l","libopencv_world453"

			],
			"options": {
				"cwd": "${workspaceFolder}"  //当前工作目录
			},
			"problemMatcher": [
				"$gcc"
			],
			"group": {
				"kind": "build",
				"isDefault": true // 开启编译快捷键, ctrl + shift + B
			},
			"detail": "编译器: D:\\Program Files (x86)\\mingw64\\bin\\g++.exe"
		}
	]
}
其中,-I(大写i)表示导入头文件文件夹,-L表示依赖库导入,-l(小写L)表示依赖库中dll文件的名称,dll的名称要按照下载的opencv库里的内容加以修改,libopencv_worldxxx.dll,该文件是所有依赖的集成体,不再需要一些文档里所说的一条一条添加各个独立的dll。
5.4安装code-runner插件
如果不采用上述配置方式,可安装code-runner插件,则无需上述三个文件。

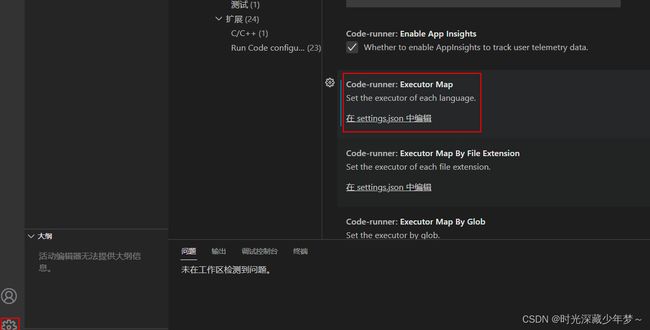

在左侧“扩展”安装code-runner后 左下角 管理/设置 搜索code-runner将Code-runner: Executor Map 对应settings.json中的cpp内容改为如下
“cpp”: “cd $dir && g++ $fileName -o $fileNameWithoutExt -std=c++14 -I D:\opencv\build\x64\mingw\install\include -L D:\opencv\build\x64\mingw\bin -l libopencv_world453 && d i r dir dirfileNameWithoutExt”,
5.5测试运行
配置完成后,新建一个cpp文件编译运行测试效果。输出窗口/ Ctrl +shift +B 编译生成exe文件,然后右上角 “ 运行C/C++程序” 对应三个配置文件的配置方式,或 Run code 对应第二种配置方式。
g++ “.\openCV\example0.cpp” -o “.\openCV\example0.exe”
终端窗口提示 fatal error: opencv2/opencv.hpp: No such file or directory
这需要在终端窗口对应的编译环境下修改相关的配置如下
6.2终端窗口运行出现乱码
中文的windows下的cmd默认使用GBK的编码, 每次需要的时候只要在VSCode终端输入命令:chcp 65001, 切换代码页到使用UTF-8就可以解决中文代码的问题,如果每次修改比较麻烦。
在命令窗口powershell 下使用命令编译运行代码,若源文件含中文会出现乱码,可在文件/首选项/设置,右上角打开设置 修改setting.json后重新启动新的powershell再次运行即消除乱码。
{
    "workbench.colorTheme": "Default Dark+",
    "terminal.integrated.profiles.windows": {
        "Command Prompt": {
            "path": "C:\\Windows\\System32\\cmd.exe",
            "args": ["-NoExit", "/K", "chcp 65001"]
        },
        "PowerShell": {
            "source": "PowerShell",
            "args": ["-NoExit", "/C", "chcp 65001"]
        }
    },
    "terminal.integrated.defaultProfile.windows": "PowerShell",

    "code-runner.executorMap": {
        "javascript": "node",
        "java": "cd $dir && javac $fileName && java $fileNameWithoutExt",
        "c": "cd $dir && gcc $fileName -o $fileNameWithoutExt && $dir$fileNameWithoutExt",
        "cpp": "cd $dir && g++ $fileName -o $fileNameWithoutExt -std=c++14 -I D:/opencv/build/x64/mingw/install/include -I D:/opencv/build/x64/mingw/install/include/opencv2 -L D:/opencv/build/x64/mingw/bin -l libopencv_world453 && $dir$fileNameWithoutExt",
        "objective-c": "cd $dir && gcc -framework Cocoa $fileName -o $fileNameWithoutExt && $dir$fileNameWithoutExt",
        "php": "php",
        "python": "python -u",
        "perl": "perl",
        "perl6": "perl6",
        "ruby": "ruby",
        "go": "go run",
        "lua": "lua",
        "groovy": "groovy",
        "powershell": "powershell -ExecutionPolicy ByPass -File",
        "bat": "cmd /c",
        "shellscript": "bash",
        "fsharp": "fsi",
        "csharp": "scriptcs",
        "vbscript": "cscript //Nologo",
        "typescript": "ts-node",
        "coffeescript": "coffee",
        "scala": "scala",
        "swift": "swift",
        "julia": "julia",
        "crystal": "crystal",
        "ocaml": "ocaml",
        "r": "Rscript",
        "applescript": "osascript",
        "clojure": "lein exec",
        "haxe": "haxe --cwd $dirWithoutTrailingSlash --run $fileNameWithoutExt",
        "rust": "cd $dir && rustc $fileName && $dir$fileNameWithoutExt",
        "racket": "racket",
        "scheme": "csi -script",
        "ahk": "autohotkey",
        "autoit": "autoit3",
        "dart": "dart",
        "pascal": "cd $dir && fpc $fileName && $dir$fileNameWithoutExt",
        "d": "cd $dir && dmd $fileName && $dir$fileNameWithoutExt",
        "haskell": "runhaskell",
        "nim": "nim compile --verbosity:0 --hints:off --run",
        "lisp": "sbcl --script",
        "kit": "kitc --run",
        "v": "v run",
        "sass": "sass --style expanded",
        "scss": "scss --style expanded",
        "less": "cd $dir && lessc $fileName $fileNameWithoutExt.css",
        "FortranFreeForm": "cd $dir && gfortran $fileName -o $fileNameWithoutExt && $dir$fileNameWithoutExt",
        "fortran-modern": "cd $dir && gfortran $fileName -o $fileNameWithoutExt && $dir$fileNameWithoutExt",
        "fortran_fixed-form": "cd $dir && gfortran $fileName -o $fileNameWithoutExt && $dir$fileNameWithoutExt",
        "fortran": "cd $dir && gfortran $fileName -o $fileNameWithoutExt && $dir$fileNameWithoutExt",
        "sml": "cd $dir && sml $fileName"
    }
}
————————————————
版权声明:本文为CSDN博主「scott198510」的原创文章,遵循CC 4.0 BY-SA版权协议,转载请附上原文出处链接及本声明。
原文链接:https://blog.csdn.net/scott198510/article/details/125843447
总结
提示:这里对文章进行总结:
例如:以上就是今天要讲的内容,本文仅仅简单介绍了pandas的使用,而pandas提供了大量能使我们快速便捷地处理数据的函数和方法。
