吴恩达深度神经网络笔记—TensorFlow入门
TensorFlow入门
了解一个深度学习框架,它将允许您更容易地构建神经网络。像TensorFlow、PaddlePaddle、Torch、Caffe、Keras等机器学习框架可以显著加速机器学习的开发。
学习TensorFlow这个框架:
- 初始化变量
- 建立一个会话
- 训练的算法
- 实现一个神经网络
导入TensorFlow库
import math
import numpy as np
import h5py
import matplotlib.pyplot as plt
import tensorflow as tf
from tensorflow.python.framework import ops
from tf_utils import load_dataset, random_mini_batches, convert_to_one_hot, predict

%matplotlib inline
tf.compat.v1.disable_eager_execution()# 保证sess.run()能够正常运行
np.random.seed(1)
导入了相关的库,将要完成不同的应用,现在看一下下面的计算损失的公式:

y_hat = tf.constant(36, name='y_hat')            # Define y_hat constant. Set to 36.
y = tf.constant(39, name='y')                    # Define y. Set to 39

loss = tf.Variable((y - y_hat)**2, name='loss')  # Create a variable for the loss

init = tf.compat.v1.global_variables_initializer()         # When init is run later (session.run(init)),
                                                 # the loss variable will be initialized and ready to be computed
with tf.compat.v1.Session() as session:                    # Create a session and print the output
    session.run(init)                            # Initializes the variables
    print(session.run(loss))                     # Prints the loss
运行结果:
9
如果发生:module ‘tensorflow’ has no attribute 'Session’等等问题,出现这个问题的原因是所用的tensorflow版本不支持session,版本对不上只需要在代码中加compat.v1
无法执行sess.run()的原因也是tensorflow版本2.0无法兼容版本1.0.添加tf.compat.v1.disable_eager_execution()
分析上述代码。在TensorFlow中编写和运行程序有以下步骤:
- 创建Tensorflow变量(此时,尚未直接计算)
- 实现Tensorflow变量之间的操作定义
- 初始化Tensorflow变量
- 创建Session
- 运行Session,此时,之前编写操作都会在这一步运行。
因此,当我们为损失创建一个变量时,我们只是将损失定义为其他量的函数,而没有计算其值。为了计算它,我们必须运行init=tf. global_variable_initializer()。这初始化了loss变量,在最后一行,我们终于可以求出loss的值并输出它的值。
例子:
a = tf.constant(2)
b = tf.constant(10)
c = tf.multiply(a,b)
print(c)
运行结果:
Tensor("Mul:0", shape=(), dtype=int32)
我们并没有看到结果20,不过我们得到了一个Tensor类型的变量,没有维度,数字类型为int32。我们之前所做的一切都只是把这些东西放到了一个“计算图(computation graph)”中,而我们还没有开始运行这个计算图,为了实际计算这两个数字,我们需要创建一个会话并运行它:
sess = tf.compat.v1.Session()
print(sess.run(c))
结果:
20
总之,记住要初始化变量,创建会话并在会话中运行操作
接下来,我们需要了解一下占位符(placeholders)。占位符是一个对象,它的值只能在稍后指定,要指定占位符的值,可以使用一个feed字典(feed_dict变量)来传入,接下来,我们为x创建一个占位符,这将允许我们在稍后运行会话时传入一个数字。
x = tf.compat.v1.placeholder(tf.int64, name = 'x')
print(sess.run(2 * x, feed_dict = {x: 3}))
sess.close()
结果:
6
当你第一次定义x时,你不需要为它指定一个值。占位符只是一个变量,您只会在以后运行会话时将数据分配给它。我们说,在运行会话时将数据提供给这些占位符。
事情是这样的:当你指定一个计算所需的操作时,你就是在告诉TensorFlow如何构造一个计算图。计算图可以有一些占位符,稍后您将指定其值。最后,当您运行会话时,您正在告诉TensorFlow执行计算图。
线性函数
通过计算下面的等式开始这个编程练习:=+,在那里和都是随机矩阵,b是随机向量。
计算+,,,都是从随机正态分布中得出的。W的形状为(4,3),X为(3,1),b为(4,1)。举个例子,下面是你如何定义一个形状为(3,1)的常量X:
X = tf.constant(np.random.randn(3,1), name = “X”)
def linear_function():

    np.random.seed(1)

    W = tf.constant(np.random.randn(4,3), name = "W")
    X = tf.constant(np.random.randn(3,1), name = "X")
    b = tf.constant(np.random.randn(4,1), name = "b")
    y = tf.add(tf.matmul(W,X),b)

    sess = tf.compat.v1.Session()
    result = sess.run(y)
    sess.close()

    return result
结果:
result = [[-1.98748544]
 [-2.76826248]
 [-0.78635415]
 [-2.77463846]]
sigmoid函数
实现了线性函数,TensorFlow提供了多种常用的神经网络的函数比如tf.softmax和 tf.sigmoid。使用占位符变量x,当运行这个session的时候,我们需要使用使用feed字典来输入z,我们将创建占位符变量x,使用tf.sigmoid来定义操作符,最后运行session,我们会用到下面的代码:
- tf.placeholder(tf.float32, name = “…”)
- tf.sigmoid(…)
- sess.run(…, feed_dict = {x: z})
可以使用两种方法来创建并使用session
sess = tf.Session()
result = sess.run(..., feed_dict = {...})
sess.close()
with tf.Session() as sess:
    result = sess.run(..., feed_dict = {...})
def sigmoid(z):

    x = tf.compat.v1.placeholder(tf.float32, name = 'x')

    sigmoid = tf.sigmoid(x)


    sess = tf.compat.v1.Session()
    result = sess.run(sigmoid, feed_dict = {x:z})
    sess.close()
    #可替换为:
    #with tf.Session() as sess:
    #	result = sess.run(sigmoid, feed_dict = {x:z})

    return result
测试:
print ("sigmoid(0) = " + str(sigmoid(0)))
print ("sigmoid(12) = " + str(sigmoid(12)))
结果:
sigmoid(0) = 0.5
sigmoid(12) = 0.99999386
损失函数
可以使用内置函数计算神经网络的成本。因此,不需要编写代码来计算成本函数的a[2](i)和yi

可以在tensorflow中的一行代码中完成它!
tf.nn.sigmoid_cross_entropy_with_logits(logits = …, labels = …)
你的代码应该输入z,计算sigmoid(得到 a),然后计算交叉熵成本J ,所有的步骤都可以通过一次调用上述代码实现。
def cost(logits, labels):

    z = tf.compat.v1.placeholder(tf.float32, name = 'z')
    y = tf.compat.v1.placeholder(tf.float32, name = 'y')

    loss = tf.nn.sigmoid_cross_entropy_with_logits(logits=z,  labels=y)

    sess = tf.compat.v1.Session()

    cost = sess.run(loss,feed_dict = {z:logits,y:labels})

    sess.close()

    return cost
测试:
logits = sigmoid(np.array([0.2,0.4,0.7,0.9]))
cost = cost(logits, np.array([0,0,1,1]))
print ("cost = " + str(cost))
结果:
cost = [1.0053873 1.0366408 0.41385433 0.39956617]
独热编码(0、1编码)
在深度学习中,很多时候你会得到一个y向量,其中的数字从0到C-1,其中C是类的数量。如果C为例4,那么你可能有以下的y向量,你需要转换如下:
 这被称为“one hot”编码,因为在转换后的表示中,每列中只有一个元素是“hot”(意味着设置为1)。要在numpy中进行这种转换,可能需要编写几行代码。在tensorflow中,你可以使用一行代码:
tf.one_hot(labels, depth, axis)
实现下面的函数,取标签的一个向量和类C的总数,并返回一个热编码。
def one_hot_matrix(labels, C):

    C = tf.constant(C,name = "C")

    hot = tf.one_hot(labels,C,axis=0)

    sess = tf.compat.v1.Session()

    one_hot = sess.run(hot)

    sess.close()

    return one_hot
axis = 0按列,1按行
测试:
labels = np.array([1,2,3,0,2,1])
one_hot = one_hot_matrix(labels, C = 4)
print ("one_hot = " + str(one_hot))
结果:
one_hot = [[0. 0. 0. 1. 0. 0.]
 [1. 0. 0. 0. 0. 1.]
 [0. 1. 0. 0. 1. 0.]
 [0. 0. 1. 0. 0. 0.]]
初始化为0和1
现在我们将学习如何用0或者1初始化一个向量,我们要用到tf.ones()和tf.zeros(),给定这些函数一个维度值那么它们将会返回全是1或0的满足条件的向量/矩阵。
def ones(shape):

    ones = tf.ones(shape)

    sess = tf.compat.v1.Session()

    ones = sess.run(ones)

    sess.close()

    return ones
测试:
print ("ones = " + str(ones([3])))
结果:
ones = [1. 1. 1.]
使用TensorFlow构建你的第一个神经网络
实现TensorFlow模型有两部分:
- 创建计算图
- 运行计算图
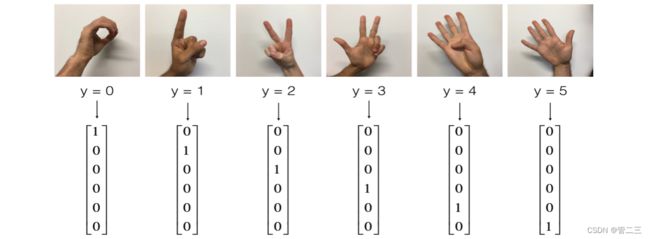
建立一个手语识别模型,数据集如下:
训练集:有从0到5的数字的1080张图片(64x64像素),每个数字拥有180张图片。
测试集:有从0到5的数字的120张图片(64x64像素),每个数字拥有5张图片。
下面是每个数字的样本,以及我们如何表示标签的解释。这些都是原始图片,我们实际上用的是64 * 64像素的图片。

加载数据集
X_train_orig, Y_train_orig, X_test_orig, Y_test_orig, classes = load_dataset()
数据集归一化,标签转化为独热向量
# 每一列就是一个例子
X_train_flatten = X_train_orig.reshape(X_train_orig.shape[0], -1).T
X_test_flatten = X_test_orig.reshape(X_test_orig.shape[0], -1).T
# 归一化
X_train = X_train_flatten/255.
X_test = X_test_flatten/255.
# y转化为独热矩阵
Y_train = convert_to_one_hot(Y_train_orig, 6)
Y_test = convert_to_one_hot(Y_test_orig, 6)
目标是建立一个能够高精度识别符号的算法。为此,您将构建一个TensorFlow模型,它与您之前在numpy中为cat识别构建的模型几乎相同(但现在使用softmax输出)。这是一个比较numpy实现和tensorflow实现的好机会。
目前的模型是:LINEAR -> RELU -> LINEAR -> RELU -> LINEAR -> SOFTMAX,SIGMOID输出层已经转换为SOFTMAX。当有两个以上的类时,一个SOFTMAX层将SIGMOID一般化。
创建placeholders
为x,y创建占位符
def create_placeholders(n_x, n_y):

    X = tf.compat.v1.placeholder(tf.float32,[n_x, None],name="X")
    Y = tf.compat.v1.placeholder(tf.float32,[n_y, None],name="Y")

    return X, Y
测试:
X, Y = create_placeholders(12288, 6)
print ("X = " + str(X))
print ("Y = " + str(Y))
结果:
X = Tensor("X_27:0", shape=(12288, None), dtype=float32)
Y = Tensor("Y_5:0", shape=(12288, None), dtype=float32)
初始化参数
实现下面的函数来初始化tensorflow中的参数。您将使用Xavier初始化表示权重,使用Zero初始化表示偏差。这些形状如下所示。举个例子,为了帮助你,对于W1和b1你可以使用:
W1 = tf.get_variable(“W1”, [25,12288], initializer = tf.contrib.layers.xavier_initializer(seed = 1))
b1 = tf.get_variable(“b1”, [25,1], initializer = tf.zeros_initializer())
def initialize_parameters():

    tf.compat.v1.set_random_seed(1)

    W1 = tf.compat.v1.get_variable("W1",[25, 12288],initializer = tf.keras.initializers.glorot_normal(seed = 1))
    b1 = tf.compat.v1.get_variable("b1", [25,1], initializer = tf.zeros_initializer())
    W2 = tf.compat.v1.get_variable("W2",[12, 25],initializer = tf.keras.initializers.glorot_normal(seed = 1))
    b2 = tf.compat.v1.get_variable("b2", [12, 1], initializer = tf.zeros_initializer())
    W3 = tf.compat.v1.get_variable("W3",[6, 12],initializer = tf.keras.initializers.glorot_normal(seed = 1))
    b3 = tf.compat.v1.get_variable("b3", [6, 1], initializer = tf.zeros_initializer())

    parameters = {"W1": W1,
                  "b1": b1,
                  "W2": W2,
                  "b2": b2,
                  "W3": W3,
                  "b3": b3}

    return parameters
如果是tf2的版本,contrib已经被舍弃了,可以将tf.contrib.layers.xavier_initializer更换为tf.keras.initializers.glorot_normal,编译器相关算法完全相同
测试:
tf.compat.v1.reset_default_graph()
with tf.compat.v1.Session() as sess:
    parameters = initialize_parameters()
    print("W1 = " + str(parameters["W1"]))
    print("b1 = " + str(parameters["b1"]))
    print("W2 = " + str(parameters["W2"]))
    print("b2 = " + str(parameters["b2"]))
结果:
W1 = <tf.Variable 'W1:0' shape=(25, 12288) dtype=float32>
b1 = <tf.Variable 'b1:0' shape=(25, 1) dtype=float32>
W2 = <tf.Variable 'W2:0' shape=(12, 25) dtype=float32>
b2 = <tf.Variable 'b2:0' shape=(12, 1) dtype=float32>
前向传播
我们将要在TensorFlow中实现前向传播,该函数将接受一个字典参数并完成前向传播。
def forward_propagation(X, parameters):

    W1 = parameters['W1']
    b1 = parameters['b1']
    W2 = parameters['W2']
    b2 = parameters['b2']
    W3 = parameters['W3']
    b3 = parameters['b3']

    Z1 = tf.add(tf.matmul(W1,X),b1)
    a1 = tf.nn.relu(Z1)
    Z2 = tf.add(tf.matmul(W2,a1),b2)
    a2 = tf.nn.relu(Z2)
    Z3 = tf.add(tf.matmul(W3,a2),b3)

    return Z3
测试:
tf.compat.v1.reset_default_graph()

with tf.compat.v1.Session() as sess:
    X, Y = create_placeholders(12288, 6)
    parameters = initialize_parameters()
    Z3 = forward_propagation(X, parameters)
    print("Z3 = " + str(Z3))
结果:
Z3 = Tensor("Add_2:0", shape=(6, None), dtype=float32)
损失函数
如前所述,成本很容易计算:
tf.reduce_mean(tf.nn.softmax_cross_entropy_with_logits(logits = …, labels = …))
def compute_cost(Z3, Y):

    logits = tf.transpose(Z3)
    labels = tf.transpose(Y)

    cost = tf.reduce_mean(tf.nn.softmax_cross_entropy_with_logits(logits = logits, labels = labels))

    return cost
测试:
tf.compat.v1.reset_default_graph()

with tf.compat.v1.Session() as sess:
    X, Y = create_placeholders(12288, 6)
    parameters = initialize_parameters()
    Z3 = forward_propagation(X, parameters)
    cost = compute_cost(Z3, Y)
    print("cost = " + str(cost))
结果:
cost = Tensor("Mean:0", shape=(), dtype=float32)
反向传播与参数更新
得益于编程框架,所有反向传播和参数更新都在1行代码中处理。计算成本函数后,将创建一个“optimizer”对象。 运行tf.session时,必须将此对象与成本函数一起调用,当被调用时,它将使用所选择的方法和学习速率对给定成本进行优化。
对于梯度下降:
optimizer = tf.train.GradientDescentOptimizer(learning_rate = learning_rate).minimize(cost)
优化:
_ , c = sess.run([optimizer, cost], feed_dict={X: minibatch_X, Y: minibatch_Y})
_ 作为一次性变量来存储我们稍后不需要使用的值。
构建模型
def model(X_train, Y_train, X_test, Y_test, learning_rate = 0.0001,
          num_epochs = 1500, minibatch_size = 32, print_cost = True):

    ops.reset_default_graph()                         # to be able to rerun the model without overwriting tf variables
    tf.compat.v1.set_random_seed(1)                             # to keep consistent results
    seed = 3                                          # to keep consistent results
    (n_x, m) = X_train.shape                          # (n_x: input size, m : number of examples in the train set)
    n_y = Y_train.shape[0]                            # n_y : output size
    costs = []                                        # To keep track of the cost

    X, Y = create_placeholders(n_x, n_y)

    parameters = initialize_parameters()

    Z3 = forward_propagation(X, parameters)

    cost = compute_cost(Z3, Y)

    optimizer = tf.compat.v1.train.GradientDescentOptimizer(learning_rate = learning_rate).minimize(cost)

    init = tf.compat.v1.global_variables_initializer()

    with tf.compat.v1.Session() as sess:

        sess.run(init)

        for epoch in range(num_epochs):

            epoch_cost = 0.                       # Defines a cost related to an epoch
            num_minibatches = int(m / minibatch_size) # number of minibatches of size minibatch_size in the train set
            seed = seed + 1
            minibatches = random_mini_batches(X_train, Y_train, minibatch_size, seed)

            for minibatch in minibatches:

                (minibatch_X, minibatch_Y) = minibatch

                _ , minibatch_cost = sess.run([optimizer, cost], feed_dict={X: minibatch_X, Y: minibatch_Y})

                epoch_cost += minibatch_cost / num_minibatches

            if print_cost == True and epoch % 100 == 0:
                print ("Cost after epoch %i: %f" % (epoch, epoch_cost))
            if print_cost == True and epoch % 5 == 0:
                costs.append(epoch_cost)

        plt.plot(np.squeeze(costs))
        plt.ylabel('cost')
        plt.xlabel('iterations (per tens)')
        plt.title("Learning rate =" + str(learning_rate))
        plt.show()

        parameters = sess.run(parameters)
        print ("Parameters have been trained!")

        correct_prediction = tf.equal(tf.argmax(Z3), tf.argmax(Y))

        accuracy = tf.reduce_mean(tf.cast(correct_prediction, "float"))

        print ("Train Accuracy:", accuracy.eval({X: X_train, Y: Y_train}))
        print ("Test Accuracy:", accuracy.eval({X: X_test, Y: Y_test}))

        return parameters
运行:
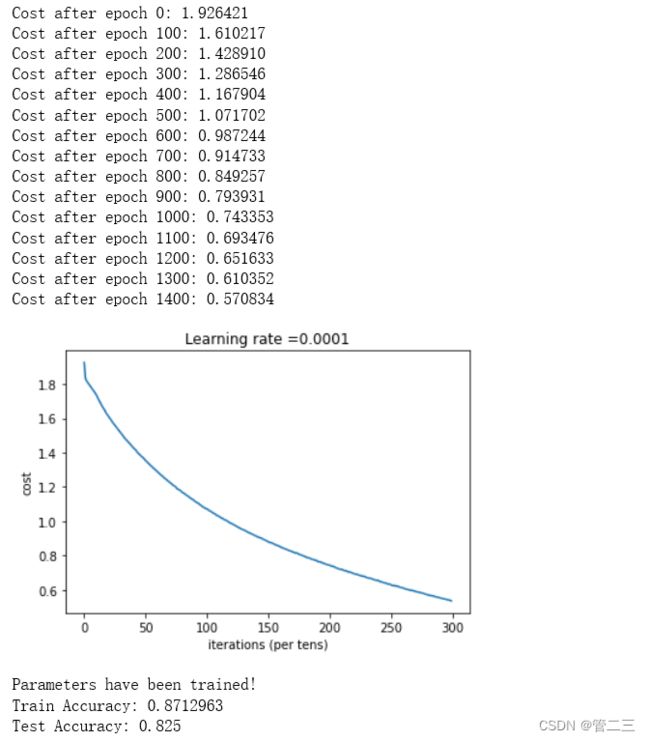
parameters = model(X_train, Y_train, X_test, Y_test)
