NVIDIA显卡驱动旧版本下载安装+CUDA下载+cudnn下载+解决CUDNN_STATUS_INTERNAL_ERROR+Failed to call ThenRnnForward
重新装显卡驱动431版本+CUDA+cudnn,解决CUDNN_STATUS_INTERNAL_ERROR+Failed to call ThenRnnForward with model config错误
- 1. 程序出的错误
-
-
- 1. CUDNN_STATUS_INTERNAL_ERROR
- 2.Failed to call ThenRnnForward with model config
-
- 2. 显卡驱动降版本及下载低版本方法
-
- 1)首先卸载原高版本的显卡驱动
- 2)下载低版本的方法:前提:知道具体要下载的版本
- 3. CUDA+cudnn下载及安装
-
-
- 1)NVIDIA与CUDA版本对应关系
- 2)GPU和CUDA+cudnn版本匹配查询
- 3)CUDA+cudnn官网下载地址
-
- 4 安装Anaconda+添加国内镜像
-
-
- 安装Anaconda
- 添加国内镜像
-
- 5 安装tensorflow-gpu=2.3
- 6 安装pydot的同时安装graphviz-2.38
重新配置 华硕2080Ti+CUDA10.1+cudnn7.6+431.60显卡驱动
1. 程序出的错误
程序跑十几个或者几百个Epoch后出现以下错误,后面有具体内容
1. CUDNN_STATUS_INTERNAL_ERROR
CUDNN_STATUS_INTERNAL_ERROR
Check failed: status == CUDNN_STATUS_SUCCESS (7 vs. 0)Failed to set cuDNN stream.
2021-02-17 23:11:16.512092: E tensorflow/stream_executor/dnn.cc:616] CUDNN_STATUS_EXECUTION_FAILED
in tensorflow/stream_executor/cuda/cuda_dnn.cc(2049): 'cudnnRNNBackwardWeights( cudnn.handle(), rnn_desc.handle(), model_dims.max_seq_length, input_desc.handles(), input_data.opaque(), input_h_desc.handle(), input_h_data.opaque(), output_desc.handles(), output_data.opaque(), workspace.opaque(), workspace.size(), rnn_desc.params_handle(), params_backprop_data->opaque(), reserve_space_data->opaque(), reserve_space_data->size())'
2021-02-17 23:11:16.512120: F tensorflow/stream_executor/cuda/cuda_dnn.cc:190] Check failed: status == CUDNN_STATUS_SUCCESS (7 vs. 0)Failed to set cuDNN stream.
2021-02-17 23:11:16.512663: W tensorf
Process finished with exit code -1073740791 (0xC0000409)
2.Failed to call ThenRnnForward with model config
循环神经网络代码是RNN+RNN的形式,如图,中间设计拼接函数:layers.concatenate()

tensorflow.python.framework.errors_impl.InternalError: Failed to call ThenRnnForward with model config: [rnn_mode, rnn_input_mode, rnn_direction_mode]: 3, 0, 0 , [num_layers, input_size, num_units, dir_count, max_seq_length, batch_size, cell_num_units]: [1, 1, 8, 1, 200, 1000, 0]
Epoch 19/5000
13/13 - 0s - loss: 3.4908 - rc1_loss: 0.4597 - rs1_loss: 0.5614 - rc2_loss: 0.8750 - rs2_loss: 1.5947 - rc1_accuracy: 0.1037 - rs1_accuracy: 0.1252 - rc2_accuracy: 0.0384 - rs2_accuracy: 0.0628
Epoch 20/5000
13/13 - 0s - loss: 3.3443 - rc1_loss: 0.4318 - rs1_loss: 0.5309 - rc2_loss: 0.8040 - rs2_loss: 1.5776 - rc1_accuracy: 0.1124 - rs1_accuracy: 0.1254 - rc2_accuracy: 0.0429 - rs2_accuracy: 0.0663
Epoch 21/5000
2021-02-18 20:34:41.296881: E tensorflow/stream_executor/dnn.cc:616] CUDNN_STATUS_INTERNAL_ERROR
in tensorflow/stream_executor/cuda/cuda_dnn.cc(1892): 'cudnnRNNForwardTraining( cudnn.handle(), rnn_desc.handle(), model_dims.max_seq_length, input_desc.handles(), input_data.opaque(), input_h_desc.handle(), input_h_data.opaque(), input_c_desc.handle(), input_c_data.opaque(), rnn_desc.params_handle(), params.opaque(), output_desc.handles(), output_data->opaque(), output_h_desc.handle(), output_h_data->opaque(), output_c_desc.handle(), output_c_data->opaque(), workspace.opaque(), workspace.size(), reserve_space.opaque(), reserve_space.size())'
2021-02-18 20:34:41.297557: W tensorflow/core/framework/op_kernel.cc:1767] OP_REQUIRES failed at cudnn_rnn_ops.cc:1517 : Internal: Failed to call ThenRnnForward with model config: [rnn_mode, rnn_input_mode, rnn_direction_mode]: 3, 0, 0 , [num_layers, input_size, num_units, dir_count, max_seq_length, batch_size, cell_num_units]: [1, 1, 8, 1, 200, 1000, 0]
Traceback (most recent call last):
  File "D:/Users/cici/ProjectWork/1MatlabWorks/CGLE/三孤子/TS_PD_3SMPredict2/MainmultLSTM02.py", line 138, in <module>
    callbacks=Mycallback.LRschedule(0.93, 18)
  File "C:\Users\OFC\Anaconda3\envs\tf23\lib\site-packages\tensorflow\python\keras\engine\training.py", line 108, in _method_wrapper
    return method(self, *args, **kwargs)
  File "C:\Users\OFC\Anaconda3\envs\tf23\lib\site-packages\tensorflow\python\keras\engine\training.py", line 1098, in fit
    tmp_logs = train_function(iterator)
  File "C:\Users\OFC\Anaconda3\envs\tf23\lib\site-packages\tensorflow\python\eager\def_function.py", line 780, in __call__
    result = self._call(*args, **kwds)
  File "C:\Users\OFC\Anaconda3\envs\tf23\lib\site-packages\tensorflow\python\eager\def_function.py", line 807, in _call
    return self._stateless_fn(*args, **kwds)  # pylint: disable=not-callable
  File "C:\Users\OFC\Anaconda3\envs\tf23\lib\site-packages\tensorflow\python\eager\function.py", line 2829, in __call__
    return graph_function._filtered_call(args, kwargs)  # pylint: disable=protected-access
  File "C:\Users\OFC\Anaconda3\envs\tf23\lib\site-packages\tensorflow\python\eager\function.py", line 1848, in _filtered_call
    cancellation_manager=cancellation_manager)
  File "C:\Users\OFC\Anaconda3\envs\tf23\lib\site-packages\tensorflow\python\eager\function.py", line 1924, in _call_flat
    ctx, args, cancellation_manager=cancellation_manager))
  File "C:\Users\OFC\Anaconda3\envs\tf23\lib\site-packages\tensorflow\python\eager\function.py", line 550, in call
    ctx=ctx)
  File "C:\Users\OFC\Anaconda3\envs\tf23\lib\site-packages\tensorflow\python\eager\execute.py", line 60, in quick_execute
    inputs, attrs, num_outputs)
tensorflow.python.framework.errors_impl.InternalError:    Failed to call ThenRnnForward with model config: [rnn_mode, rnn_input_mode, rnn_direction_mode]: 3, 0, 0 , [num_layers, input_size, num_units, dir_count, max_seq_length, batch_size, cell_num_units]: [1, 1, 8, 1, 200, 1000, 0]
	 [[{{node CudnnRNN}}]]
	 [[Multi_model1/gru_2/PartitionedCall]] [Op:__inference_train_function_17546]
出错后本人做了以下改进
(1)将程序中的LSTM的隐藏神经元减少32-----8,可能是超出了GPU运算空间。
(2)结构是多输入多输出,连接多输出用了拼接函数, 在concatenate后添加激活函数有几率不报错,仍然有问题啊。
 out1 = layers.concatenate([x0, x], axis=-1)
 out1 = Activation('relu')(out1 )
(3)成功方法: 卸载了高版本的显卡驱动,以及更新后的Anaconda,CUDA,cudnn等,重新按照华硕2080Ti+CUDA10.1+cudnn7.6+431.60显卡驱动配置
2. 显卡驱动降版本及下载低版本方法
根据https://www.cnblogs.com/xiaojieshisilang/p/13636648.html
提供的方法,降低显卡驱动版本。
1)首先卸载原高版本的显卡驱动
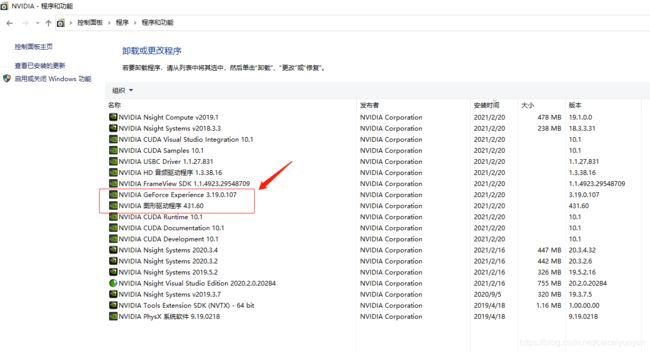
卸载原先版本,本人安装431版本一直出错,无法安装成功,且每次重启后452版本的显卡驱动又会自动安装上,需要先卸载NVIDIA。后面有如何下载431版本显卡驱动的方法。
在控制面板的程序中卸载如框中的两个程序(截图中为已经安装成功后的,只是为了表示需要卸载哪些才能重新安装),卸载后重启,再安装431.60-desktop-win10-64bit-international-dch-whql.exe(后面详解)

2)下载低版本的方法:前提:知道具体要下载的版本
下面是根据已知版本下载方法。
1) 首先进入NVIDIA官网
https://www.nvidia.cn/geforce/drivers/
2)根据自己电脑选择搜索驱动程序

下滑,点击任意版本的获取下载

获取下载后,右击立即下载,然后选择复制链接

3)修改下载链接
将链接复制到搜索框中(2021/2/20号最新版本显卡驱动下载链接如下)
https://cn.download.nvidia.com/Windows/461.40/461.40-desktop-win10-64bit-international-dch-whql.exe
假设安装431.60版本,则修改版本如下,回车,开始下载
https://us.download.nvidia.cn/Windows/431.60/431.60-desktop-win10-64bit-international-dch-whql.exe
最后正常安装后重启即可。
3. CUDA+cudnn下载及安装
1)NVIDIA与CUDA版本对应关系
链接:https://docs.nvidia.com/cuda/cuda-toolkit-release-notes/index.html

2)GPU和CUDA+cudnn版本匹配查询
链接: https://tensorflow.google.cn/install/source_windows#gpu

3)CUDA+cudnn官网下载地址
CUDA下载地址:https://developer.nvidia.com/cuda-toolkit-archive
下载10.1版本
cudnn下载地址:https://developer.nvidia.com/rdp/cudnn-archive
下载7.6.5版本
将cudnn-10.1-windows10-x64-v7.6.5.32解压后复制到安装的CUDA路径下
同样正常安装即可。重启
4 安装Anaconda+添加国内镜像
安装Anaconda
本人安装回之前的Anaconda旧版本:Anaconda3-5.2.0-Windows-x86_64.exe
试过安装最新版本的Anaconda(2021/2/20号官网最新),但是在安装tensorflow2.3时一直安装不对。还是用回旧版本吧。
添加国内镜像
一直听说清华镜像失效,所以添加以下中科大的镜像吧
conda config --add channels https://mirrors.ustc.edu.cn/anaconda/pkgs/main/
conda config --add channels https://mirrors.ustc.edu.cn/anaconda/pkgs/free/
conda config --add channels https://mirrors.ustc.edu.cn/anaconda/cloud/conda-forge/
conda config --set show_channel_urls: yes
更新conda:conda update -n base conda
5 安装tensorflow-gpu=2.3
1)首先创建虚拟环境
conda create -n tf23 python=3.7
- 激活虚拟环境
conda activate tf23
3)安装tensorflow2.3
pip install tensorflow-gpu=2.3
4)安装cudatoolkit
conda install cudatoolkit=10.1
5) 安装cudnn=7.6.5/7.6.4
conda install cudnn=7.6.5
或者
conda install cudnn=7.6.4
若cudnn安装失败,根据warning,删除conda路径(C:\Users\OFC\Anaconda3\pkgs\)下的cudnn压缩安装包,根据提示重启,重新按照以上方法安装cudnn
6)测试
python
import tensorflow as tf
print(tf.__version__)
print(tf.test.is_gpu_available())
显示ture,安装成功
6 安装pydot的同时安装graphviz-2.38
在以上添加了国内镜像后安装pydot是不会自动安装graphviz-2.38的。需要先删除添加的镜像,再conda安装pydot,如下:
# 删源(换回conda的默认源)
conda config --remove-key channels
# 删源后才能找到graphviz-2.38安装包
conda install pydot
# 安装pydot-ng才能正常使用
pip install pydot-ng