LDA主题提取+可视化分析(PyLDAavis)
文本评论分析包括很多步骤,本文讲述的是主题提取+结果可视化分析,“可视化分析部分”较多内容借鉴于这篇博文,大家可以去他那里看看,当然这位博主中也有一个问题我觉得很多小伙伴会遇到,我也是找了很多资料,最后好不容易搞定的,我会发在下面。
1、LDA主题提取——分词
import re
import jieba as jb
import gensim
from gensim import models
import pyLDAvis.gensim_models
from gensim import corpora
from gensim.models import LdaModel
from gensim.corpora import Dictionary
import codecs


def stopwordslist(filepath):
    stopwords = [line.strip() for line in open(filepath, 'r', encoding='utf-8').readlines()]
    return stopwords


# 对句子进行分词
def seg_sentence(sentence):
    sentence = re.sub(u'[0-9\.]+', u'', sentence)
    jb.add_word('光线摄影学院')  # 这里是加入用户自定义的词来补充jieba词典。
    jb.add_word('曾兰老师')  # 同样,如果你想删除哪个特定的未登录词,就先把它加上然后放进停用词表里。
    jb.add_word('网页链接')
    jb.add_word('微博视频')
    jb.add_word('发布了头条文章')
    jb.add_word('青春有你')
    jb.add_word('青你')
    sentence_seged = jb.cut(sentence.strip())
    stopwords = stopwordslist(r"C:\Users\28493\OneDrive\桌面\word2vec实战教学\jieba_dict\stopwords.txt")  # 这里加载停用词的路径
    outstr = ''
    for word in sentence_seged:
        if word not in stopwords and word.__len__() > 1:
            if word != '\t':
                outstr += word
                outstr += " "
    return outstr


inputs = open(r"C:\Users\28493\OneDrive\桌面\LDA主题提取\京东评价.txt", 'r', encoding='utf-8')

outputs = open('京东评价.txt', 'w', encoding='utf-8')
for line in inputs:
    line_seg = seg_sentence(line)  # 这里的返回值是字符串
    outputs.write(line_seg + '\n')
outputs.close()
inputs.close()
2、LDA主题提取——主题提取
train = []

fp = codecs.open('京东评价.txt', 'r', encoding='utf8')
for line in fp:
    if line != '':
        line = line.split()
        train.append([w for w in line])

dictionary = corpora.Dictionary(train)

corpus = [dictionary.doc2bow(text) for text in train]

lda = LdaModel(corpus=corpus, id2word=dictionary, num_topics=3, passes=60)
# num_topics:主题数目
# passes:训练伦次
# num_words:每个主题下输出的term的数目

for topic in lda.print_topics(num_words=10):
    termNumber = topic[0]
    print(topic[0], ':', sep='')
    listOfTerms = topic[1].split('+')
    for term in listOfTerms:
        listItems = term.split('*')
        print('  ', listItems[1], '(', listItems[0], ')', sep='')
3、可视化分析——pyLDAvis使用
d = pyLDAvis.gensim_models.prepare(lda, corpus, dictionary)
pyLDAvis.show(d)
d = pyLDAvis.gensim.prepare(lda, corpus, dictionary)
这里会直接以网页的形式呈现,如果你像把这个结果保存下来,不用每次运行一遍才能得到结果的话,它还可以输出个网址
pyLDAvis.save_html(d, 'lda_pass10.html') # 将结果保存为该html文件在这里,有个很难搞的问题,我搞了很久
就是他会报错这个,这其实是源码的问题,不是我们上述代码的问题,解决方法如下。首先先找到你们pycharm中例如pandas、numpy、sklearn等库所在的位置
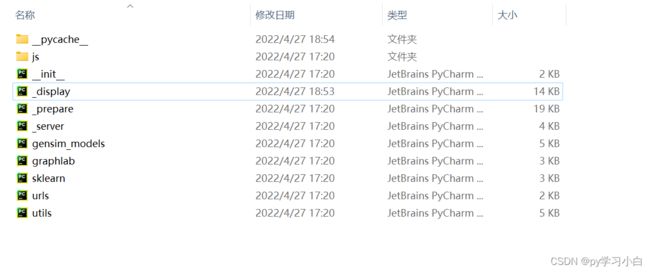
比如我的就在这里,因为我是按照anaconda安装的,所以很多安装包都会安装在这里,所以要在这里找到pyLDAvis包。
找到之后,出现下列源文件
我们找到"_display"这个文件,打开它,找到这个 show 函数
最后将show 函数中的 local 选项设置为 False 就行了。
最后会输出这样的网页版画面,
其中,左边三个圈圈是主题,右边的是主题对应的词语,至于哪个词语对主题影响最大,那就用参数 ![]() 来表示,
来表示,
如果λ接近1,那么在该主题下更频繁出现的词,跟主题更相关;
如果λ越接近0,那么该主题下更特殊、更独有(exclusive)的词,跟主题更相关
此外,本文程序也会输出一个网址,可以把这个结果直接保存下来用到你的文档作业中


