AX620A运行yolov5s自训练模型全过程记录(windows)
AX620A运行yolov5s自训练模型全过程记录(windows)
文章目录
- AX620A运行yolov5s自训练模型全过程记录(windows)
- 前言
- 一、搭建模型转换环境(使用GPU加速)
- 二、转换yolov5自训练模型
- 三、板上测试
前言
上一篇文章《ubuntu22.04搭建AX620A官方例程开发环境》记录了AX620A开发环境的搭建,这段时间板子终于到手了,尝试了一下怎么跑自己训练的yolov5模型,将整个过程记录一下。
一、搭建模型转换环境(使用GPU加速)
模型转换工具名称叫做Pulsar工具链,官方提供了docker容器环境。因为我十分懒得装一台ubuntu实体机,所以一切操作都想办法在windows下实现的~~~
- 安装Windows平台的
Docker-Desktop客户端
下载地址:点这里
无脑安装就行了,没有什么特别操作
安装好后,打开Docker-Desktop,程序会初始化和启动,然后就可以打开cmd输入命令拉取工具链镜像了
docker pull sipeed/pulsar
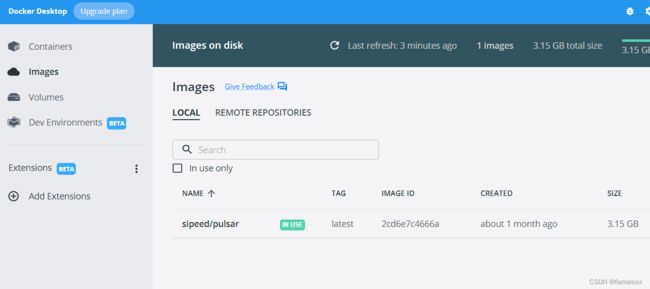
- 下载镜像成功后,应该能在Docker-Desktop的images列表中看到了

- 原本到这里就可以直接启动容器来转换模型了,不过突然看到工具链是支持
gpu加速的,但镜像里面没有安装相应的cuda环境,所以这里就要一番折腾了。
思路是:安装WSL2——安装ubuntu子系统——子系统内安装nVidia CUDA toolkit——再安装nvidia-docker。这一番操作后,以后在windows cmd下启动的容器(需加上“--gpus all”参数),就都带上完整的cuda环境了。
- 使用WSL2安装ubuntu20.04
恕我一直孤陋寡闻,直到这时才知道原来windows下有这么个方便的东西,以前一直只会装虚拟机…
WSL2具体怎么开启百度一下,反正我的win10更新到最新版本操作没遇到什么问题。
(1) 查看windows平台可支持的linux子系统列表
wsl --list --online
以下是可安装的有效分发的列表。
请使用“wsl --install -d <分发>”安装。

NAME            FRIENDLY NAME
Ubuntu          Ubuntu
Debian          Debian GNU/Linux
kali-linux      Kali Linux Rolling
openSUSE-42     openSUSE Leap 42
SLES-12         SUSE Linux Enterprise Server v12
Ubuntu-16.04    Ubuntu 16.04 LTS
Ubuntu-18.04    Ubuntu 18.04 LTS
Ubuntu-20.04    Ubuntu 20.04 LTS
(2) 设置每个安装的发行版默认用WSL2启动
$ wsl --set-default-version 2
(3) 安装Ubuntu20.04
$ wsl --install -d Ubuntu-20.04
(4) 设置默认子系统为Ubuntu20.04
$ wsl --setdefault Ubuntu-20.04
(5) 查看子系统信息,星号为缺省系统
$ wsl -l -v
  NAME                   STATE           VERSION
* Ubuntu-20.04           Stopped         2
  docker-desktop-data    Running         2
  docker-desktop         Running         2
- ubuntu22.04下安装cuda
以下操作均在windows的子系统ubuntu终端输入,逐条执行
wget https://developer.download.nvidia.com/compute/cuda/repos/wsl-ubuntu/x86_64/cuda-wsl-ubuntu.pin

sudo mv cuda-wsl-ubuntu.pin /etc/apt/preferences.d/cuda-repository-pin-600

wget https://developer.download.nvidia.com/compute/cuda/11.7.0/local_installers/cuda-repo-wsl-ubuntu-11-7-local_11.7.0-1_amd64.deb

sudo dpkg -i cuda-repo-wsl-ubuntu-11-7-local_11.7.0-1_amd64.deb

sudo cp /var/cuda-repo-wsl-ubuntu-11-7-local/cuda-B81839D3-keyring.gpg /usr/share/keyrings/

sudo apt-get update

sudo apt-get -y install cuda
- ubuntu22.04下安装nvidia-docker
distribution=$(. /etc/os-release;echo $ID$VERSION_ID)

curl -s -L https://nvidia.github.io/nvidia-docker/gpgkey | sudo apt-key add -

curl -s -L https://nvidia.github.io/nvidia-docker/$distribution/nvidia-docker.list | sudo tee
/etc/apt/sources.list.d/nvidia-docker.list

sudo apt-get update

sudo apt-get install -y nvidia-docker2
至此,cuda的相关环境就安装好了,可以在ubuntu的终端下输入:nvidia-smi确认显卡是否有识别到
- 启动容器
在windows的cmd终端中,输入以下命令来启动pulsar容器
docker run -it --net host --gpus all --shm-size 12g -v D:\ax620_data:/data sipeed/pulsar --name ax620
其中:
--gpus all要加上,容器才能使用gpu。
--shm-size 12g 指定容器使用内存,根据你实际内存大小来确定。我这个数值转换yolov5s的模型没有问题。
--name ax620指定容器名称,以后在cmd下输入:docker start ax620 && docker attach ax620就可以方便进入容器环境内。
D:\ax620_data:/data 将本地硬盘指定路径映射到容器的/data目录。这个文件夹需要存放模型转换用到的工程,可以到这里下载
二、转换yolov5自训练模型
- yolov5使用的是最新的V6.2版,按照标准流程训练出来pt模型文件后,使用export.py导出为onnx格式
python export.py --weights yourModel.pt --simplify --include onnx
- 要将onnx三个输出层的后处理去掉,因为这部分的处理将在ax620程序里面实现处理。可参考这位大哥的文章《爱芯元智AX620A部署yolov5 6.0模型实录》。具体处理的python代码如下:
import onnx

input_path = r"D:\ax620_data\model\yourModel.onnx"
output_path = r"D:\ax620_data\model\yourModel_rip.onnx"
input_names = ["images"]
output_names = ["onnx::Reshape_326","onnx::Reshape_364","onnx::Reshape_402"]

onnx.utils.extract_model(input_path, output_path, input_names, output_names)
注意这里的三个层的名称Reshape_326、Reshape_364、Reshape_402可能和你的模型里面是不一样的,具体使用netron工具来确认。得到了以下结尾的模型。注:我这里最后的一个输出形状是1x18x20x20,因为我的模型只有一个识别种类(4+1+1)* 3 = 18

- 去到pulsar容器环境进行模型转换,onnx->joint,输入
pulsar build --input model/yourModel_rip.onnx --output model/yourModel.joint --config config/yolov5s.prototxt --output_config config/output_config.prototxt
其中:
yolov5s.prototxt这个配置文件需要到爱芯元智的百度网盘下载:到这里下载- 随机选取1000张你训练集的图片,打包成
coco_1000.tar,放到容器/data/dataset目录内,作为量化校准用
模型转换比较慢。即使用到了gpu加速,也需要好几分钟。最后将在容器的/data/model目录下生成你的joint模型文件
- 模型仿真与对分。测试模型转换后与原来onnx的精度差别。可以看出三个输出的余弦相似度都很高,精度误差很小。
pulsar run model/yourModel_rip.onnx  model/yourModel.joint --input images/test.jpg --config config/output_config.prototxt
 --output_gt gt/

...(运行过程省略)
[.func_wrappers.pulsar_run.compare>:82] Score compare table:
------------------------  ----------------  ------------------
Layer: onnx::Reshape_326  2-norm RE: 4.08%  cosine-sim: 0.9994
Layer: onnx::Reshape_364  2-norm RE: 4.49%  cosine-sim: 0.9991
Layer: onnx::Reshape_402  2-norm RE: 6.77%  cosine-sim: 0.9981
------------------------  ----------------  ------------------
三、板上测试
- 通过AXERA-TECH/ax-samples 仓库构建自己的测试程序。
因为是自训练模型,我的模型只有1个类别,官方的yolov5测试程序是使用coco数据集的80分类的,需要做一点调整。
- 在examples目录下,复制
ax_yolov5s_steps.cc另存为ax_yolov5s_my.cc - 修改
ax-samples/examples/base/detection.hpp,新增一个generate_proposals_n函数,cls_num就是模型类别数
static void generate_proposals_n(int cls_num, int stride, const float* feat, float prob_threshold, std::vector<Object>& objects,
                                       int letterbox_cols, int letterbox_rows, const float* anchors, float prob_threshold_unsigmoid)
    {
        int anchor_num = 3;
        int feat_w = letterbox_cols / stride;
        int feat_h = letterbox_rows / stride;
        // int cls_num = 80;
        int anchor_group;
        if (stride == 8)
            anchor_group = 1;
        if (stride == 16)
            anchor_group = 2;
        if (stride == 32)
            anchor_group = 3;

        auto feature_ptr = feat;

        for (int h = 0; h <= feat_h - 1; h++)
        {
            for (int w = 0; w <= feat_w - 1; w++)
            {
                for (int a = 0; a <= anchor_num - 1; a++)
                {
                    if (feature_ptr[4] < prob_threshold_unsigmoid)
                    {
                        feature_ptr += (cls_num + 5);
                        continue;
                    }

                    //process cls score
                    int class_index = 0;
                    float class_score = -FLT_MAX;
                    for (int s = 0; s <= cls_num - 1; s++)
                    {
                        float score = feature_ptr[s + 5];
                        if (score > class_score)
                        {
                            class_index = s;
                            class_score = score;
                        }
                    }
                    //process box score
                    float box_score = feature_ptr[4];
                    float final_score = sigmoid(box_score) * sigmoid(class_score);

                    if (final_score >= prob_threshold)
                    {
                        float dx = sigmoid(feature_ptr[0]);
                        float dy = sigmoid(feature_ptr[1]);
                        float dw = sigmoid(feature_ptr[2]);
                        float dh = sigmoid(feature_ptr[3]);
                        float pred_cx = (dx * 2.0f - 0.5f + w) * stride;
                        float pred_cy = (dy * 2.0f - 0.5f + h) * stride;
                        float anchor_w = anchors[(anchor_group - 1) * 6 + a * 2 + 0];
                        float anchor_h = anchors[(anchor_group - 1) * 6 + a * 2 + 1];
                        float pred_w = dw * dw * 4.0f * anchor_w;
                        float pred_h = dh * dh * 4.0f * anchor_h;
                        float x0 = pred_cx - pred_w * 0.5f;
                        float y0 = pred_cy - pred_h * 0.5f;
                        float x1 = pred_cx + pred_w * 0.5f;
                        float y1 = pred_cy + pred_h * 0.5f;

                        Object obj;
                        obj.rect.x = x0;
                        obj.rect.y = y0;
                        obj.rect.width = x1 - x0;
                        obj.rect.height = y1 - y0;
                        obj.label = class_index;
                        obj.prob = final_score;
                        objects.push_back(obj);
                    }

                    feature_ptr += (cls_num + 5);
                }
            }
        }
    }
- 修改
ax_yolov5s_my.cc
44行 const char* CLASS_NAMES[] = {"piggy"};		//修改模型类别名称

252行   for (uint32_t i = 0; i < io_info->nOutputSize; ++i)
        {
            auto& output = io_info->pOutputs[i];
            auto& info = joint_io_arr.pOutputs[i];

            auto ptr = (float*)info.pVirAddr;

            int32_t stride = (1 << i) * 8;
            // det::generate_proposals_255(stride, ptr, PROB_THRESHOLD, proposals, input_w, input_h, ANCHORS, prob_threshold_unsigmoid);
            // 使用新的generate_proposals_n对预测框进行解码
            det::generate_proposals_n(1, stride, ptr, PROB_THRESHOLD, proposals, input_w, input_h, ANCHORS, prob_threshold_unsigmoid);
        }
- 修改
ax-samples/examples/CMakeLists.txt文件,在101行下新增
101行 axera_example (ax_crnn                  ax_crnn_steps.cc)
      axera_example (ax_yolov5_my             ax_yolov5s_my.cc)		//增加编译源文件
else() # ax630a support
      axera_example (ax_classification        ax_classification_steps.cc)
      axera_example (ax_yolov5s               ax_yolov5s_steps.cc)
      axera_example (ax_yolo_fastest          ax_yolo_fastest_steps.cc)
      axera_example (ax_yolov3                ax_yolov3_steps.cc)
endif()
- 对工程进行交叉编译或者板上直接编译,生成
ax_yolov5_my可执行程序文件
- 将程序和joint模型文件拷到板上同一目录内,执行:
 ./ax_yolov5_my -m yourModel.joint -i /home/images/test.jpg

--------------------------------------
[INFO]: Virtual npu mode is 1_1

Tools version: 0.6.1.14
4111370
run over: output len 3
--------------------------------------
Create handle took 470.84 ms (neu 21.46 ms, axe 0.00 ms, overhead 449.38 ms)
--------------------------------------
Repeat 1 times, avg time 25.28 ms, max_time 25.28 ms, min_time 25.28 ms
--------------------------------------
detection num: 6
 0:  97%, [ 198,   97,  437,  328], piggy
 0:  96%, [  35,  190,  260,  377], piggy
 0:  95%, [ 575,  166,  811,  478], piggy
 0:  93%, [ 526,   47,  630,  228], piggy
 0:  91%, [ 191,   55,  301,  197], piggy
 0:  76%, [   0,  223,   57,  324], piggy
[AX_SYS_LOG] Waiting thread(2971660832) to exit
[AX_SYS_LOG] AX_Log2ConsoleRoutine terminated!!!
exit[AX_SYS_LOG] join thread(2971660832) ret:0
可以看到,即使此时分了一半算力给isp,yolov5s单张图片的推理时间可以去到25ms,那是相当给力了!