IPv6与VoIP——配置Cisco CME实现VoIP实验
作者简介:一名在校云计算网络运维学生、每天分享网络运维的学习经验、和学习笔记。
座右铭:低头赶路,敬事如仪
个人主页:网络豆的主页
目录
前言
一.配置Cisco CME实现VoIP
1.实验环境
2.需要设备
Cisco P Communicator 电话软件提取:
3.配置步骤如下。
4.实验命令
Cisco P Communicator 电话软件安装步骤
前言
本章将会讲解VoIP中的一个有趣的实验,配置Cisco CME实现VoIP。感觉非常有趣~可以了解一下。
一.配置Cisco CME实现VoIP
1.实验环境
在计算机上安装Cisco P Cormunicator 电话软件,实现Volp功能
2.需要设备
一台路由器,一台交换机,两台win7虚拟机,GNS3模拟器,Cisco P Communicator 电话软件
Cisco P Communicator 电话软件提取:
链接:http:// https://pan.baidu.com/s/1kAMCdxhFp3N0ra1xxiUiyQ?pwd=yj11
提取码: yj11
3.配置步骤如下。
(1)首先在计算机上安装Java虚撤机,然后安装Cisco P Communicator 电话软件。
(2)在路由器上配置Cisoo CVE
4.实验命令
R1 (config) #interface f0/0
R1 (config-if) #ip add 192.168.1.254 255.255.255.0 //基本配置
R1 (config-if) #no shut
R1 (config-if) #exit
R1 (config) #hostname CME
CME (config)#telephony-service //开启CME服务
CME(config-telephony) #max-ephones 10
//定义最大用户数量,不能高于设备最大授权数
CME(config-telephony)#max-dn 10 //定义允许注册的最大线路数
CME(config-telephony)#keepalive 10 //定义保持时间为10s
CME(config-telephony)fip source-address 192.168.1.254 port 2000
//定义注册使用的服务器地址和端口
CME(config-telephony)#system message Jb-Aptech company
//定义待机画面显示的消息内容
CME(config-telephony)fexit
CME (config) fephone-dn 1 //进入线路1
CME(config-ephone-dn)#number 8868 //定义电话号码
CME (config-ephone-dn) #name Teacher.sun //定义号码描述,用于来电显示
CME (config-ephone-dn) #exit
CME(config) tephone-dn 2 //定义线路2
CME (config-ephone-dn) #number 8888
CME (config-ephone-dn)#name Teacher.zhang
CME (config-ephone-dn)#exit
CME (config) #ephone 1 //绑定ephone1的MAc地址
CME (config-ephone) #mac-address 0000.aaaa.0001
//因为现在使用的是 Cisco IP Communicator软件,所以绑定计算机的MAC,如果使用
//Cisco的硬件语音电话,如Cisco IP Phone 7935,话机的背面会有该话机的MAC
CME(config-ephone)# type cIPC
//定义电话类型,cIPC指的是CiscoIP Communicator
CME(config-ephone)#button 1:1 //绑定第一个号码为调用ephone-dn1中的号码
CME(config-ephone)#exit
CME(config)#ephone 2
CME(config-ephone)#mac-address 0000.bbbb.0002 //绑定ephonel的MAc地址
CME(config-ephone) #type cIPC
CME (config-ephone) #button 1:2 //绑定第二个号码为调用ephone-dn 2中的号码
CME (config-ephone) #exit
CME#clock set 11:18:00 8 oct 2011 //设置时间,便于电话与设备同步
CME(config)#telephony-service
CME(config-telephony)#create cnf-files //生成XML文件
Creating CNF files
CME (config-telephony)#exit
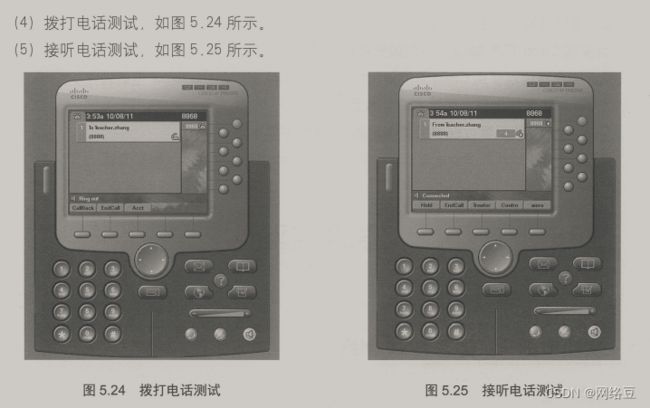
配置客户端 Cisco P Comrunicator 软件。在“配置”→“网络配置”菜单中,选择网卡
填写服务器地址,进行注册。
Cisco P Communicator 电话软件安装步骤
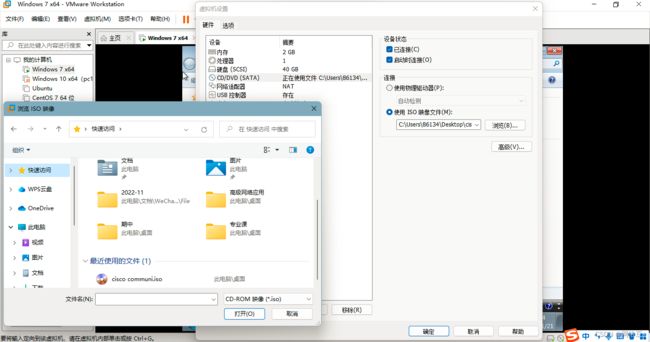
打开虚拟机插入Cisco P Communicator.ISO
打开计算机,选择DVD驱动器
选择此安装包
拖到桌面解压安装
安装这个软件包
安装成功后将会自动重启
安装完成
创作不易,求关注,点赞,收藏,谢谢~


