基于MindSpore的Transformer网络实现
基于MindSpore的Transformer网络实现
网络模型介绍
1、背景
自从Attention机制提出以来,加入Attention机制的seq2seq模型在各个任务上都有了提升,但是还是存在着两个主要的问题:
- 传统的基于RNN的Seq2Seq模型难以处理长序列的句子,存在信息丢失情况。
- 每个时间步的输出需要依赖于前面时间步的输出,使模型没有办法并行训练,效率低。
Transformer网络的出现解决了上述问题。在目标检测发展历史中,多阶段检测(比如RCNN)最终演变成EndtoEnd检测(比如YOLO系列),证明了深度神经网络强大的拟合能力,针对目标检测来说,完全可以将分类和边框位置同时训练。同理,实验表明,在自然语言处理中,时序依赖信息也完全可以通过Transformer结构来训练迭代学习到。自然语言处理也从传统的RNN的Seq2Seq模型演变成Transformer模型,这就是Transformer的地位。
2、网络框架
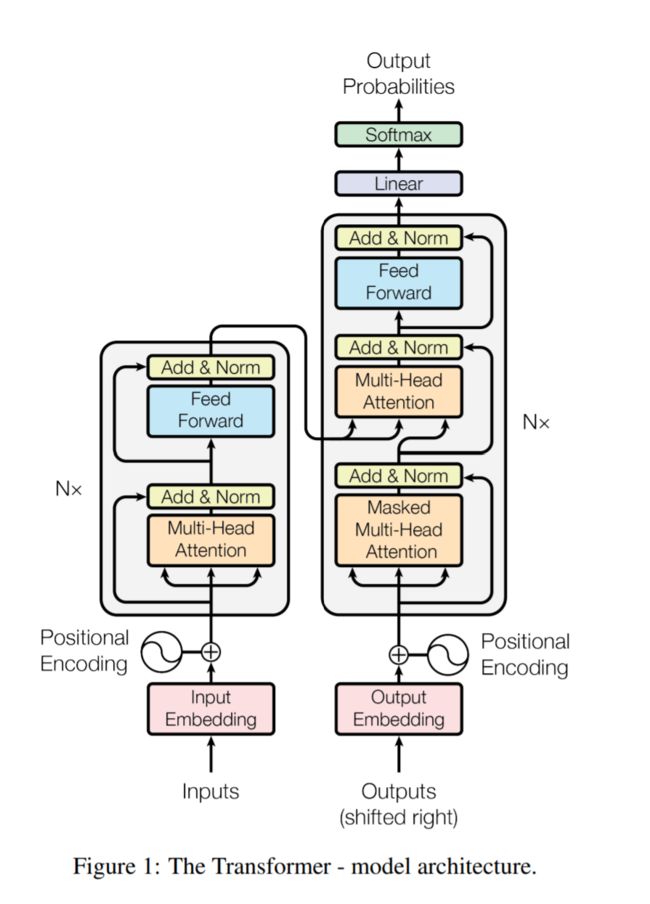
Transformer分为Encoder和Decoder两部分,Figure1中左半边为Encoder、右半边为Decoder。
2.1 Encoder
输入单词首先编码成词向量a(Input Embedding),然后直接和该单词在语句中的位置编码向量b(Positional Encoding)相加得到c。c向量输入到一个Muti-Head Attention + Add & Norm + Feed Forward + Add & Norm的Block中(对应Figure 1 中Nx中包含的组件)得到向量d,d再输入到Nx Block中。论文中,N的值为6,表明重复次数为6。最终输出向量e。下面详细解释下Nx Block中得各个组件。
Muti-Head Attention
准确来说,Transformer中Attention分为Self Attention和Context Attention。在Encoder中为Self Attention,在Decoder中为Self Attention和Context Attention。其实Self Attention就是Context Attention的一种特例,当 Source = Target时,Context Attention即变为Self Attention。
在机器翻译中,Encoder中的Self Attention机制使训练句子内单词间产生联系,Decoder 中的Context Attention使Target单词和所有Source单词产生联系。
举一个简单的机器翻译例子:
Source: The cat can not cross the street, because it is too tired.
Target: 这只猫不能穿过街道,因为猫太累了。
其中在Encoder使用Self Attention训练后,针对单词it,单词cat对它产生的注意力要大于其他单词,那么在翻译时,就可以正确识别it代表cat,而不会错误的翻译成street对应的翻文。这就是Encoder 中使用Self Attention的某一方面作用。针对Encoder中的每一个单词,它都会输出Encoder中其他单词对它的Attention值,这个Attention值是通过迭代学习出来的。
在Decoder中使用Context Attention训练后,Source中"cat"这个单词对Target中的"猫"产生最大的注意力,这样"cat"会正确的被翻译成"猫"。
同理,Decoder中的Self Attention作用与Encoder中的Self Attention 作用是类似的。我们注意到在Decoder中有两个Attention结构,Masked Multi-Head Attention与Multi-Head Attention。关于Decoder中的Attention结构,将在Decoder部分进行讲解。
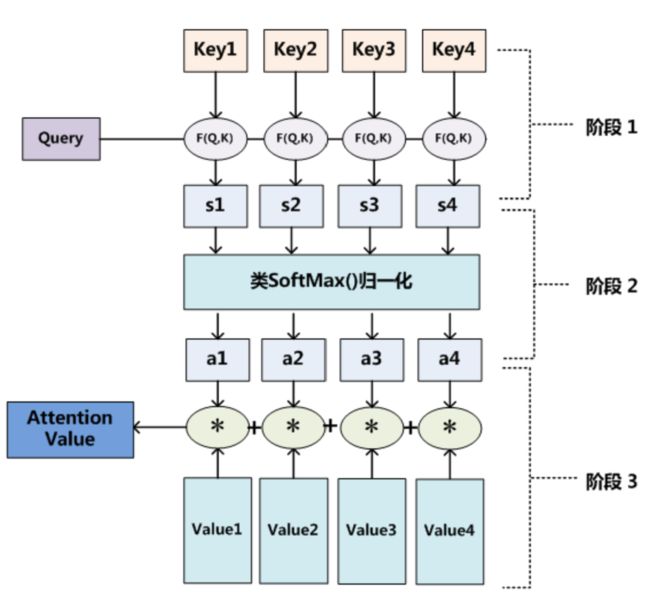
将Attention抽象出来,流程图如下:
从上述流程图可以看出,Attention计算主要包含三个步骤:
- 根据Query和Key计算权重系数。
- 将计算的权重系数进行SoftMax操作
- 根据SoftMax归一化后的权重系数对Value进行加权求和。
上述步骤中涉及的Query向量、Key向量、Value向量是通过该单词的词向量分别和WQ矩阵、WK矩阵、WV矩阵相乘得来的。便于理解可以认为这些矩阵类似于卷积核的作用,它们的权重随机初始,它们的最终权重是通过不断迭代学习出来的。那么在推理的时候,一个单词的词向量分别与WQ矩阵、WK矩阵、WV矩阵相乘,得到Query向量、Key向量、Value向量,就可以得到出其他词对该词的Attention值。在翻译的时候,对该词Attention值最大的词就是它对应的译文。由于篇幅有限,此处不对Attention详细论述。我们知道计算Attention值时,只要正确得到Query向量、Key向量、Value向量即可。代码实现其实很简单。
所谓Muti-Head Attention其实类比CNN中的卷积核的个数就很好理解了。我们知道CNN中卷积核的个数决定通道数,每层通道数代表了不同的特征。那么Muti-Head Attention中每一个Head类似于一个卷积核,可以从不同角度提取特征。然后所有Head提取的特征拼接在一起输出。代码实现也很非常容易,针对每一个词向量,给它分配WQ、...,WQN,WK、...,WKN,WV、...,WVN权重矩阵,然后就可以得到相对应的Query向量、Key向量、Value向量,代入Attention计算公式即可以得到多头Attention向量。
Add & Norm
Add代表了Residual Connection,是为了解决多层神经网络训练困难的问题。Norm则代表了Layer Normalization,通过对层的激活值的归一化,可以加速模型的训练过程,使其更快的收敛。
Feed Forward
全连接前向网络,包括两个线性变换和一个ReLU激活输出:
Positional Encoding
位置编码其实很好理解。在自然语言处理中,同一个词语位置不同,其他词对它产生的注意力是不同的。还是以之前那个例子来简单分析下:这只猫不能穿过街道,因为猫太累了。
针对第一个"猫","不能穿过"这个组合应该对其有最大的注意力。针对第二个"猫", "太累了"这个组合应该对其有最大的注意力。加入位置信息,其实就相当于多增加一个维度的特征,有利于网络更好的区分不同位置的单词。
论文中位置编码计算公式如下:
其中pos是指当前词在句子中的位置,i是指向量中每个值的index,可以看出,在偶数位置,使用正弦编码,在奇数位置,使用余弦编码,最后把这个Positional Encoding与词向量的值相加,作为输入送到下一层。
2.2 Decoder
Decoder和Encoder大同小异,主要区别是两个不同的Muti-Head Attention。Masked Muti-Head Attention 是带了Mask的Self Attention。Mask的作用是让Decoder在t时刻看不见t时刻之后的信息。这个其实也很好理解。在神经网络训练中,训练和推理的前向运算应该要是一样的,训练中的反向主要用于更新权重参数,使训练的前向输出越来越接近真实值。拿机器翻译这个任务来举例,在推理时,Decoder在t时刻只能看到t时刻之前的信息。因为我们的翻译是顺序翻译的。所以在训练时,使用Mask掩盖t时刻之后的信息,这样我们的训练和推理的前向运算就保持了一致。Decorder中另外一个Muti-Head Attention,我们称之为Context Attention。和Self Attention中Query向量、Key向量、Value向量均由相同的源产生(要么都由Source产生、要么都由Target产生)不同,它的Query向量是Decorder中产生的(Target),而Key向量、Value向量是Encoder的输出产生的(Source)。Decorder中的Context Attention使decoder的每一个位置都可以attend到输入序列的每一个位置。
需要注意的是Encoder的最终输出是分为相等的N份送到Decoder中的Nx结构中去的,在论文中,N取值为6。从Transformer网络结构图中也可以很清晰的看出来。
2.3 损失函数
Transformer中的损失函数其实比较简单,使用了常用的交叉熵损失函数。
为了便于理解,我们还是用上文中提到的机器翻译例子。
Source: The cat can not cross the street, because it is too tired.
Target: 这只猫不能穿过街道,因为猫太累了。
当我们输入Source后,模型输出的第一个应该是"这",所以Decorder输出应该要与"这"越接近越好。
目标词"这"会用one-hot向量来表示,而我们的输出经过Softmax之后,是一个概率分布,我们希望这个概率分布和这个one-hot向量越接近越好,就变成了计算它们之间的cross entroy,希望它的值越小越好。我们最终希望Target中所有的cross entroy值越小越好,这就确定了损失函数,就可以梯度下降。
在训练过程还有一个技巧,就是在训练时给Decorder看正确答案,比如在Decorder输出"猫"时,不用管Decorder前面两个输出的什么,直接将"这"和"只"输入进去,然后期望它输出"猫"。这个技巧叫做Teacher Forcing,实验证明这种训练方式有较好的效果。
代码流程介绍
项目地址:models: Models of MindSpore - Gitee.com
程序入口
程序入口为train.py 下面介绍下主要流程。
首先是读取一些配置信息,主要包括选择平台、选择训练模式(单卡还是多卡)等。
    if config.device_target == "Ascend":
        ms.set_context(mode=ms.GRAPH_MODE, device_target=config.device_target, device_id=get_device_id())
    else:
        ms.set_context(mode=ms.GRAPH_MODE, device_target=config.device_target)
    ms.set_context(reserve_class_name_in_scope=False)
然后创建数据集。
    dataset = create_transformer_dataset(rank_size=device_num,
                                         rank_id=rank_id,
                                         do_shuffle=config.do_shuffle,
                                         dataset_path=config.data_path,
                                         bucket_boundaries=config.bucket_boundaries,
                                         device_target=config.device_target)
定义带loss的网络。
netwithloss = TransformerNetworkWithLoss(config, True)定义学习率以及优化器。
    learning_rate = config.lr_schedule.learning_rate if config.device_target == "Ascend" else 1.0
    lr = Tensor(create_dynamic_lr(schedule="constant*rsqrt_hidden*linear_warmup*rsqrt_decay",
                                  training_steps=dataset.get_dataset_size()*config.epoch_size,
                                  learning_rate=learning_rate,
                                  warmup_steps=config.lr_schedule.warmup_steps,
                                  hidden_size=hidden_size,
                                  start_decay_step=config.lr_schedule.start_decay_step,
                                  min_lr=config.lr_schedule.min_lr), ms.float32)

    if config.device_target == "GPU" and config.transformer_network == "large":
        optimizer = Adam(netwithloss.trainable_params(), lr, beta2=config.optimizer_adam_beta2)
    else:
        optimizer = Adam(netwithloss.trainable_params(), lr)
定义网络反向以及使用MindSpore的高级接口MindSpore.Model进行训练。
    netwithgrads = TransformerTrainOneStepCell(netwithloss, optimizer=optimizer)
    netwithgrads.set_train(True)
    model = Model(netwithgrads)
    model.train(config.epoch_size, dataset, callbacks=callbacks, dataset_sink_mode=False)
总的来说,主程序还是比较简单。下面重点介绍Transformer网络中的一些关键技术,是怎么用代码实现的,帮助大家更好的了解Transformer网络。
Transformer网络
首先分析下transformer_model.py这个文件。
class EmbeddingLookup(nn.Cell):EmbeddingLookup类的主要功能是创建词汇表,它的核心代码其实只有一行。
self.embedding_table = Parameter(normal_weight([vocab_size, embedding_size], embedding_size))首先,词汇表是一个Parameter类型,说明它里面的值是通过不断迭代学习得到的(效果就是相似的词,它们的词向量相似度很高)。它的shape为[vocal_size, embedding_size],其中vocal_size代表所有词汇的总个数,代码中设置其为36560,是经过BPE编码得到的。embedding_size就是每一个词用多少维度的向量表示,代码中它设置它的值为512。有了词汇表,就可以通过查表的方式得到每一个词的词向量,对应于网络框架图中的 Input Embedding。
def position_encoding(length,depth,min_timescale=1,max_timescale=1e4):position_encoding函数是位置编码函数,对应网络框架图中的Positional Encoding。它在偶数位置使用sin函数编码,在奇数位置使用cos函数编码。在实际实现时,用到了一个e的换底公式:e^logx = x。核心代码如下:
    depth = depth // 2
    positions = np.arange(length, dtype=np.float32)
    log_timescale_increment = (np.log(max_timescale / min_timescale) / (depth - 1))
    inv_timescales = min_timescale * np.exp(np.arange(depth, dtype=np.float32) * -log_timescale_increment)
    scaled_time = np.expand_dims(positions, 1) * np.expand_dims(inv_timescales, 0)
x = np.concatenate([np.sin(scaled_time), np.cos(scaled_time)], axis=1)EmbeddingPostprocessor类就是实现将词向量和位置编码向量直接相加的功能。
        output = self.multiply(word_embeddings, self.scores_mul)

        # add position embeddings
        position_embeddings = self.position_embedding_table[0:input_len:1, ::]
        position_embeddings = self.expand_dims(position_embeddings, 0)
output = self.add(output, position_embeddings)多头注意力机制在MultiheadAttention类中实现,首先设置Q、K、V矩阵。
        self.query_layer = nn.Dense(from_tensor_width,
                                    units,
                                    activation=query_act,
                                    has_bias=False,
                                    weight_init=weight_variable([units, from_tensor_width])).to_float(compute_type)
        self.key_layer = nn.Dense(to_tensor_width,
                                  units,
                                  activation=key_act,
                                  has_bias=False,
                                  weight_init=weight_variable([units, to_tensor_width])).to_float(compute_type)
        self.value_layer = nn.Dense(to_tensor_width,
                                    units,
                                    activation=value_act,
                                    has_bias=False,
                                    weight_init=weight_variable([units, to_tensor_width])).to_float(compute_type)
从代码中可以知道,Q、K、V都是Parameter类型, 它们的值是通过不断迭代学习到的, shape为[units, from_tensor_width]。代码中设置它的shape为[512, 64]。
输入的词向量和Q、K、V相乘后得到q,k,v向量。q和k做点积后经过softmax输出。
attention_scores = self.matmul_trans_b(query_layer, key_layer)
attention_probs = self.softmax(attention_scores)
softmax的输出和v向量相乘得到attention值向量。
context_layer = self.matmul(attention_probs, value_layer)由于篇幅有限,不逐行对代码进行分析,在此只梳理下相关代码的主流程。
SelfAttention类中按顺序调用MultiheadAttention类、LayerPreprocess类(Layer Norm)、LayerPostprocess类(Redual Layer)。对应网络框架图中的 MultiheadAttention -> Add & Norm流图。LayerPreprocess类实现Layer Normalization方法,它可以有效的促进网络学习。
self.layernorm = nn.LayerNorm((in_channels,))LayerPostprocess类实现一个残差结构,能有效解决梯度消失的问题。
self.add = ops.Add()
output = self.add(output, input_tensor)
网络结构图中的Feed Forward -> Add & Norm流图 在FeedForward类中实现,核心代码如下:
        output = self.preprocess(input_tensor)
        output = self.conv1(output)
        if self.use_dropout:
            output = self.dropout(output)
        output = self.conv2(output)
        output = self.postprocess(output, input_tensor)
先进行Layer Normalization 然后经过两个全连接层,最后加上残差结构输出。
EncoderCell类就是顺序调用SelfAttention类与FeedForward类。
        attention_output = self.attention(hidden_states, hidden_states, attention_mask, seq_length, seq_length)
output = self.feedforward(attention_output)TransformerEncoder类的功能是重复构造EncoderCell类,然后顺序连接起来,对应网络框架图中的Encoder部分的Nx结构,实际上是重复了6次。
        layers = []
        for _ in range(num_hidden_layers):
            layer = EncoderCell(batch_size=batch_size,
                                hidden_size=hidden_size,
                                num_attention_heads=num_attention_heads,
                                intermediate_size=intermediate_size,
                                attention_probs_dropout_prob=attention_probs_dropout_prob,
                                use_one_hot_embeddings=use_one_hot_embeddings,
                                initializer_range=initializer_range,
                                hidden_dropout_prob=hidden_dropout_prob,
                                hidden_act=hidden_act,
                                compute_type=compute_type)
            layers.append(layer)
        self.layers = nn.CellList(layers)
num_attention_heads的值为6,通过nn.CellList顺序连接起来。
DecoderCell类中包含两种Attention类型,Self Attention和Cross Attention以及FeedForward类。区分Self Attention和Cross Attention的标志是query向量和key向量是否是由同一向量得到的。
        attention_output = self.self_attention(hidden_states, hidden_states, attention_mask, seq_length, seq_length)
        # cross-attention with ln, res
        attention_output = self.cross_attention(attention_output, enc_states, enc_attention_mask,
                                                seq_length, enc_seq_length)
        # feed forward with ln, res
output = self.feedforward(attention_output)TransformerDecoder类的功能是重复构造DecoderCell类,然后顺序连接起来,对应网络框架图中的Decoder部分的Nx结构,实际上是重复了6次。
        layers = []
        for _ in range(num_hidden_layers):
            layer = DecoderCell(batch_size=batch_size,
                                hidden_size=hidden_size,
                                num_attention_heads=num_attention_heads,
                                intermediate_size=intermediate_size,
                                attention_probs_dropout_prob=attention_probs_dropout_prob,
                                use_one_hot_embeddings=use_one_hot_embeddings,
                                initializer_range=initializer_range,
                                hidden_dropout_prob=hidden_dropout_prob,
                                hidden_act=hidden_act,
                                compute_type=compute_type)
            layers.append(layer)
self.layers = nn.CellList(layers)CreateAttentionMaskFromInputMask类实现Mask Self Attention中的Mask功能。在Decoder中的Self Attention 称为Mask Self Attention,在t时刻只能看到t时刻之前的信息,不不能看到t时刻之后的信息。
input_shape = self.shape(input_mask)
shape_right = (input_shape[0], 1, input_shape[1])
shape_left = input_shape + (1,)

input_mask = self.cast(input_mask, ms.float32)
mask_left = self.reshape(input_mask, shape_left)
mask_right = self.reshape(input_mask, shape_right)
attention_mask = self.batch_matmul(mask_left, mask_right)PredLogProbs类实现SoftMax功能,使Decoder最终的输出是各个词的输出概率。对应网络框架图中Decoder部分最后输出之前的SoftMax部分。
self.log_softmax = nn.LogSoftmax(axis=-1)
logits = self.matmul(input_tensor, output_weights)
logits = self.cast(logits, self.dtype)
log_probs = self.log_softmax(logits)
TransformerDecoderStep类就是将DecoderStep各个组件连接起来,从网络框架图中的outputs 到 Output Probabilities。由于各个组件实现的类已经都分析过,在此不再做详细的解释。
TransformerModel类将Encoder和Decoder连接起来,实现从输入到输出的端到端流程。
至此transformer_model.py中的类已经介绍完。
最后简单分析下transformer_for_train.py这个文件。
TransformerTrainingLoss类自定义损失函数。
flat_shape = (self.batch_size * seq_length,)
label_ids = self.reshape(label_ids, flat_shape)
label_weights = self.cast(self.reshape(label_weights, flat_shape), ms.float32)
one_hot_labels = self.onehot(label_ids, self.vocab_size, self.on_value, self.off_value)

per_example_loss = self.neg(self.reduce_sum(prediction_scores * one_hot_labels, self.last_idx))
numerator = self.reduce_sum(label_weights * per_example_loss, ())
denominator = self.reduce_sum(label_weights, ()) + \
              self.cast(ops.tuple_to_array((1e-5,)), ms.float32)
loss = numerator / denominatorTransformerNetworkWithLoss类根据网络输出的预测值和真实标签计算损失。
prediction_scores = self.transformer(source_ids, source_mask, target_ids, target_mask)
seq_length = self.shape(source_ids)[1]
total_loss = self.loss(prediction_scores, label_ids, label_weights, seq_length)TransformerTrainOneStepCell类继承nn.TrainOneStepCell,作用是给网络加上优化器,可以认为是自定义nn.TrainOneStepCell功能,详细作用可以参考nn.TrainOneStepCell
至此代码主要流程已经介绍完毕。
训练和推理
由于篇幅有限,在此不做详细介绍。可以参考Transformer介绍,其中介绍比较详细。
总结
- Transformer使用Self Attention机制解决了传统的基于RNN的Seq2Seq模型难以处理长序列的句子,存在信息丢失情况以及无法并行训练(时序依赖)的问题。
- Transformer包含Encoder和Decoder两部分,其中Encoder单元和Decoder单元重复了N次(N可以设置,论文中N值为6)。
- Encoder单元包括Multi-Head Attention(多头Self Attention结构)、Layer Norm + Residual、Feed Forward(前馈神经网络)。
- Decoder单元包括Masked Multi-Head Attention(带掩膜的多头Self Attention结构)、Multi-Head Attention(多头Cross Attention结构)、Layer Norm + Residual、Feed Forward(前馈神经网络)
- Self Attention核心是得到是query向量、key向量、v向量,它们是词向量分别和Wq权重矩阵、Wk权重矩阵、Wv权重矩阵相乘得到的。这些权重矩阵通过迭代不断更新。
- Multi-Head Attention可以理解为多个卷积核(一个Self Attention类比为一个卷积核),不同卷积核得到不同特征通道,代表不同维度的特征。
- Positional Encoding在偶数位置使用正弦编码,在奇数位置使用余弦编码,然后直接和Embedding相加,作用是提供了时序信息。
- Embedding + Positional Encoding + N(论文中取值为6) x Encoder单元构成Encoder。
- Embedding + Positional Encoding + N (论文中取值为6)x Decoder单元 + Linear + Softmax构成Decoder。
- Decoder经过SoftMax为概率输出,它与真实one-hot标签的交叉熵损失构成损失函数。


