| #导入相关依赖库
import os
os.environ['DEVICE_ID'] = '0'
import numpy as np
from matplotlib import pyplot as plt
from easydict import EasyDict as edict
import mindspore as ms
import mindspore.context as context
import mindspore.dataset as ds
import mindspore.dataset.transforms.c_transforms as C
import mindspore.dataset.transforms.vision.c_transforms as CV
from mindspore.nn.metrics import Accuracy
from mindspore.dataset.transforms.vision import Inter
from mindspore import nn, Tensor
from mindspore.train import Model
from mindspore.train.callback import ModelCheckpoint, CheckpointConfig, LossMonitor, TimeMonitor
from mindspore.train.serialization import load_checkpoint, load_param_into_net
context.set_context(mode=context.GRAPH_MODE, device_target='Ascend')
|
| 1 2 3 4 5 6 7 8 9 10 11 12 13 |
#配置参数
cfg = edict({
'num_classes': 10,
'lr': 0.01,
'momentum': 0.9,
'epoch_size': 10,
'batch_size': 32,
'buffer_size': 1000,
'image_height': 28,
'image_width': 28,
#'save_checkpoint_steps': 1875,
#'keep_checkpoint_max': 10,
})
|
导入实验数据集 MNIST是一个手写数字数据集,训练集包含60000张手写数字,测试集包含10000张手写数字,共10类。可在MNIST数据集的官网下载数据集,解压到当前代码目录下。MindSpore的dataset模块有专门用于读取和解析Mnist数据集的源数据集,可直接读取并生成训练集和测试集。 步骤 1 加载并查看数据集
| 1 2 3 4 5 6 7 8 |
ds_train = ds.MnistDataset(os.path.join(r'./MNIST', "train"))
ds_test = ds.MnistDataset(os.path.join(r'./MNIST', "test"))
print('训练数据集数量:',ds_train.get_dataset_size())
print('测试数据集数量:',ds_test.get_dataset_size())
image=ds_train.create_dict_iterator().get_next()
print('图像长/宽/通道数:',image['image'].shape)
print('一张图像的标签样式:',image['label']) #一共10类,用0-9的数字表达类别。
|
输出结果:  步骤 2 生成测试集和训练集 创建数据集,为训练集设定Batch Size,这是因为我们通常会采用小批量梯度下降法(MBGD)来训练网络,所以batch size作为一个非常重要的超参数需要提前设定好。在本代码中,batch size为128,意味着每一次更新参数,我们都用128个样本的平均损失值来进行更新。
| 1 2 3 4 5 6 7 8 9 10 11 12 13 14 15 16 17 18 19 20 |
DATA_DIR_TRAIN = "MNIST/train" # 训练集信息
DATA_DIR_TEST = "MNIST/test" # 测试集信息
def create_dataset(training=True, num_epoch=10, batch_size=128, resize=(28, 28),rescale=1/(255*0.3081), shift=-0.1307/0.3081, buffer_size=64):
ds = ms.dataset.MnistDataset(DATA_DIR_TRAIN if training else DATA_DIR_TEST)
# define map operations
resize_op = CV.Resize(resize)
rescale_op = CV.Rescale(rescale, shift)
hwc2chw_op = CV.HWC2CHW()
# apply map operations on images
ds = ds.map(input_columns="image", operations=[resize_op, rescale_op, hwc2chw_op])
ds = ds.map(input_columns="label", operations=C.TypeCast(ms.int32))
ds = ds.shuffle(buffer_size=buffer_size)
ds = ds.batch(batch_size, drop_remainder=True)
ds = ds.repeat(num_epoch)
return ds
|
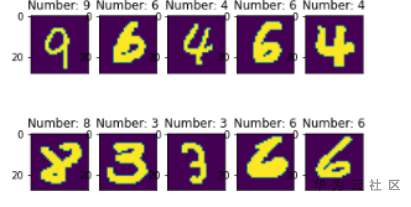
步骤 3 查看数据
| 1 2 3 4 5 6 7 8 9 10 11 12 |
#显示前10张图片以及对应标签,检查图片是否是正确的数据集
ds = create_dataset(training=False)
data = ds.create_dict_iterator().get_next()
images = data['image']
labels = data['label']
for i in range(1,11):
plt.subplot(2, 5, i)
plt.imshow(np.squeeze(images[i]))
plt.title('Number: %s' % labels[i])
plt.xticks([])
plt.show()
|
输出结果: 
模型搭建与训练 手写数字图像数据集准备完成,接下来我们就需要构建训练模型,本实验采用的是全连接神经网络算法,所以我们首先需要建立初始化的神经网络。 步骤 1 创建网络 手写数字图像数据集准备完成,接下来我们就需要构建训练模型,本实验采用的是全连接神经网络算法,所以我们首先需要建立初始化的神经网络。nn.cell能够用来组成网络模型;模型包括5个卷积层和RELU激活函数,一个全连接输出层并使用softmax进行多分类,共分成(0-9)10类
| 1 2 3 4 5 6 7 8 9 10 11 12 13 14 15 16 17 18 19 20 21 |
class ForwardNN(nn.Cell):
def __init__(self):
super(ForwardNN, self).__init__()
self.flatten = nn.Flatten()
self.relu = nn.ReLU()
self.fc1 = nn.Dense(784, 512, activation='relu')
self.fc2 = nn.Dense(512, 256, activation='relu')
self.fc3 = nn.Dense(256, 128, activation='relu')
self.fc4 = nn.Dense(128, 64, activation='relu')
self.fc5 = nn.Dense(64, 32, activation='relu')
self.fc6 = nn.Dense(32, 10, activation='softmax')
def construct(self, input_x):
output = self.flatten(input_x)
output = self.fc1(output)
output = self.fc2(output)
output = self.fc3(output)
output = self.fc4(output)
output = self.fc5(output)
output = self.fc6(output)
return output
|
步骤 2 设定参数 指定模型所需的损失函数、评估指标、优化器等参数。
| 1 2 3 4 5 6 7 8 |
lr = 0.001
num_epoch = 10
momentum = 0.9
net = ForwardNN()
loss = nn.loss.SoftmaxCrossEntropyWithLogits(is_grad=False, sparse=True, reduction='mean')
metrics={"Accuracy": Accuracy()}
opt = nn.Adam(net.trainable_params(), lr)
|
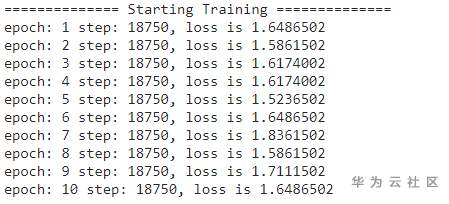
步骤 3 训练模型并保存 将创建好的网络、损失函数、评估指标、优化器等参数装入模型中对模型进行训练。
| 1 2 3 4 5 6 7 8 9 |
ds_eval = create_dataset(os.path.join(r'./MNIST', "test"), batch_size=32)
model = Model(net, loss, opt, metrics)
config_ck = CheckpointConfig(save_checkpoint_steps=1875, keep_checkpoint_max=10)
ckpoint_cb = ModelCheckpoint(prefix="checkpoint_lenet", config=config_ck)
#训练模型
ds_train = create_dataset(os.path.join(r'./MNIST', "train"), batch_size=32)
print("============== Starting Training ==============")
model.train(num_epoch, ds_train,callbacks=[LossMonitor()],dataset_sink_mode=True)
|
输出结果: 
模型评估 利用模型对测试集的数据进行预测,并与标签对比,用准确率accuarcy进行评估。
| 1 2 3 4 5 |
#使用测试集评估模型,打印总体准确率
metrics=model.eval(ds_eval)
loss_cb = LossMonitor(per_print_times=1)
time_cb = TimeMonitor(data_size=ds_train.get_dataset_size())
print(metrics)
|
输出结果: 
实验总结 本章提供了一个基于华为ModelArts平台的手写体图像识别实验。展示了如何构建全连接网络实现图像识别的全流程。 |


