- 预览文档,了解vuex4.0与vuex3.0的差异
- 安装依赖
"dependencies": {
    "vuex": "^4.0.2",
    "vuex-persistedstate": "^4.1.0",
  },
-
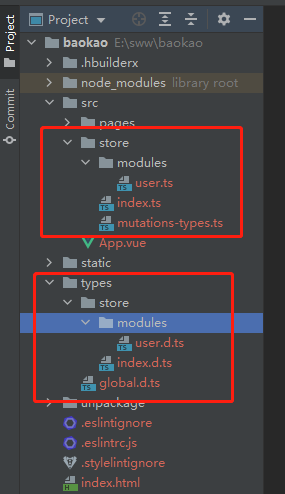
在src路径下创建store文件夹,目录结构如图

-
创建根节点state、模块state数据类型
declare namespace TStore {
interface State {
systemInfo: string;
}
}
declare namespace TStore {
type UserInfo = {
name: string
}
interface User {
info: UserInfo
}
}
- 封装state,生成store实例
export const UPDATE_SYSTEM_INFO = "UPDATE_SYSTEM_INFO";
export const USER_UPDATE_INFO = "USER_UPDATE_INFO";
import { Module } from "vuex";
import { USER_UPDATE_INFO } from "@/store/mutations-types";
const UserModule: Module<TStore.User, TStore.State> = {
namespaced: true,
state: {
info: {
name: "sww",
},
},
mutations: {
[USER_UPDATE_INFO](state: TStore.User, info: TStore.UserInfo) {
state.info = { ...info };
},
},
};
export default UserModule;
import { InjectionKey } from "vue";
import { createStore, useStore as baseUseStore, Store } from "vuex";
import createPersistedState from "vuex-persistedstate";
import UserModule from "@/store/modules/user";
import { UPDATE_SYSTEM_INFO } from "@/store/mutations-types";
export interface StoreStateTypes extends TStore.State {
user: TStore.User;
}
export const key: InjectionKey<Store<TStore.State>> = Symbol();
export const store = createStore<TStore.State>({
state: {
systemInfo: "systemInfo",
},
mutations: {
[UPDATE_SYSTEM_INFO](state: TStore.State, systemInfo: string) {
state.systemInfo = systemInfo;
},
},
modules: {
user: UserModule,
},
plugins: [
createPersistedState({
key: "uni-app-vuex",
storage: {
getItem: (key: string) => uni.getStorageSync(key),
setItem: (key: string, value: any) => uni.setStorageSync(key, value),
removeItem: (key: string) => uni.removeStorageSync(key),
},
}),
],
});
export function useStore<T = StoreStateTypes>() {
return baseUseStore<T>(key);
}
- main.ts中注册 store
import { createApp } from 'vue'
import App from './App.vue'
import { store, key } from '@/store'
const app = createApp(App)
app.use(store, key)
app.mount('#app')
- 页面中使用
<script lang="ts">
import { defineComponent, ref, computed } from "vue";
import { useStore } from "@/store";
export default defineComponent({
setup() {
const store = useStore();
const systemInfo = computed(() => store.state.systemInfo);
const userInfo = computed(() => store.state.user.info);
const title = ref("uni app1");
return {
title,
systemInfo,
userInfo,
};
},
});
</script>
</script>
- 如果不使用组合式api,想通过$store调用,也需进行全局的声明
import { ComponentCustomProperties } from "vue";
import { Store } from "vuex";
import { StoreStateTypes } from "@/store";
declare module "@vue/runtime-core" {
interface ComponentCustomProperties {
$store: Store<StoreStateTypes>;
}
}
