Net: ConvTranspose2d
本文中主要讲解PyTorch中的转置卷积、逆卷积、微步卷积: ConvTranspose2d函数
本文目录
- ConvTranspose2d
-
- 实例1: stride=1 padding=0
- 实例2: stride=2 padding=0
- 实例3: stride=1 padding=1
- 实例4: stride=2 padding=1
- 实例总结
- output_padding
ConvTranspose2d
nn.ConvTranspose2d(in_channels, out_channels, kernel_size, stride=1, padding=0, output_padding=0, groups=1, bias=True, dilation=1, padding_mode='zeros', device=None, dtype=None)
此函数作一个反卷积操作,与Conv2d相反,此操作将图像的特征维度压缩,尺寸放大
输出的长和宽的计算
H o u t = ( H i n − 1 ) ∗ s t r i d e [ 0 ] − 2 ∗ p a d d i n g [ 0 ] + d i l a t i o n [ 0 ] ∗ ( k e r n e l _ s i z e [ 0 ] − 1 ) + o u t p u t p a d d i n g [ 0 ] + 1 W o u t = ( W i n − 1 ) ∗ s t r i d e [ 1 ] − 2 ∗ p a d d i n g [ 1 ] + d i l a t i o n [ 1 ] ∗ ( k e r n e l _ s i z e [ 1 ] − 1 ) + o u t p u t p a d d i n g [ 1 ] + 1 H_{out} = (H_{in}-1)*stride[0]-2*padding[0]+dilation[0]*(kernel\_size[0]-1)+output_padding[0]+1 \\ W_{out} = (W_{in}-1)*stride[1]-2*padding[1]+dilation[1]*(kernel\_size[1]-1)+output_padding[1]+1 Hout=(Hin−1)∗stride[0]−2∗padding[0]+dilation[0]∗(kernel_size[0]−1)+outputpadding[0]+1Wout=(Win−1)∗stride[1]−2∗padding[1]+dilation[1]∗(kernel_size[1]−1)+outputpadding[1]+1
参数的含义
- in_channels ([int]) – 输入图像通道数
- out_channels ([int])– 输出图像通道数
- kernel_size ([int] or [tuple]) – 卷积核的大小
- stride ([int] or [tuple], optional) – 输入图片之间的间隔. Default: 1
- padding ([int], [tuple]or [str], optional) – 卷积核与输入边缘相交的pixel. Default: 0(即相交一个单位)
- output_padding ([int] or [tuple], optional) – Additional size added to one side of each dimension in the output shape. Default: 0
- groups ([int], optional) – Number of blocked connections from input channels to output channels. Default: 1
- bias ([bool], optional) – If
True, adds a learnable bias to the output. Default:True - dilation ([int] or [tuple], optional) – Spacing between kernel elements. Default: 1
注意:这里的padding和stride与Conv2d的不同
- padding:卷积核向中心移动的步数,即当padding为0时,卷积核在卷积的时候移动到最边缘时与输入相交一个单位,当padding为1时,卷积核在卷积的时候移动到最边缘时与输入相交两个单位,即向内部多移动了一个单位
- stride:输入彼此之间的距离,stride默认为1,即输入之间彼此相距一个单位,当stride为2时,输入之间会额外散开一个单位,即输入之间相距两个单位(即任意一个输入pixel需要移动两次才能到达最近的pixel)
ConvTranspose2d是Conv2d的逆操作,当不知道如何使用时,可以直接将参数设为:你的Conv2d的参数如何,ConvTranspose2d的参数不变就可以回到最初输入时的状态
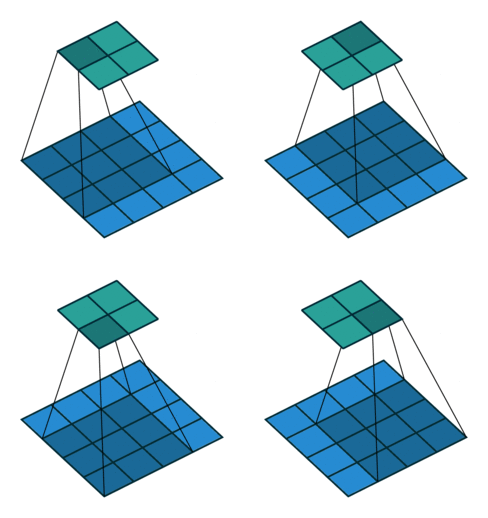
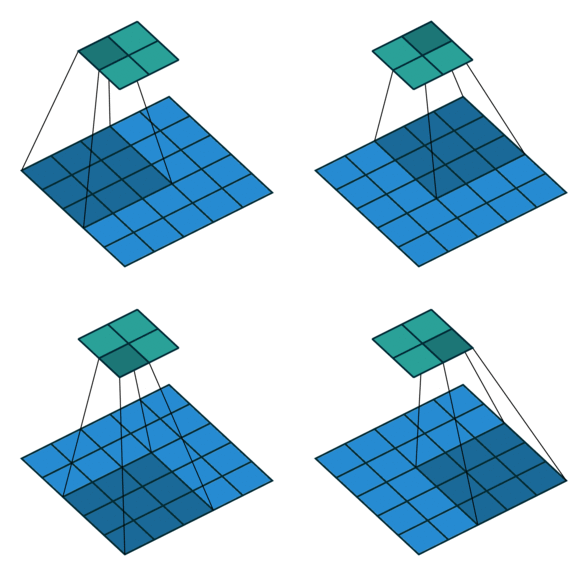
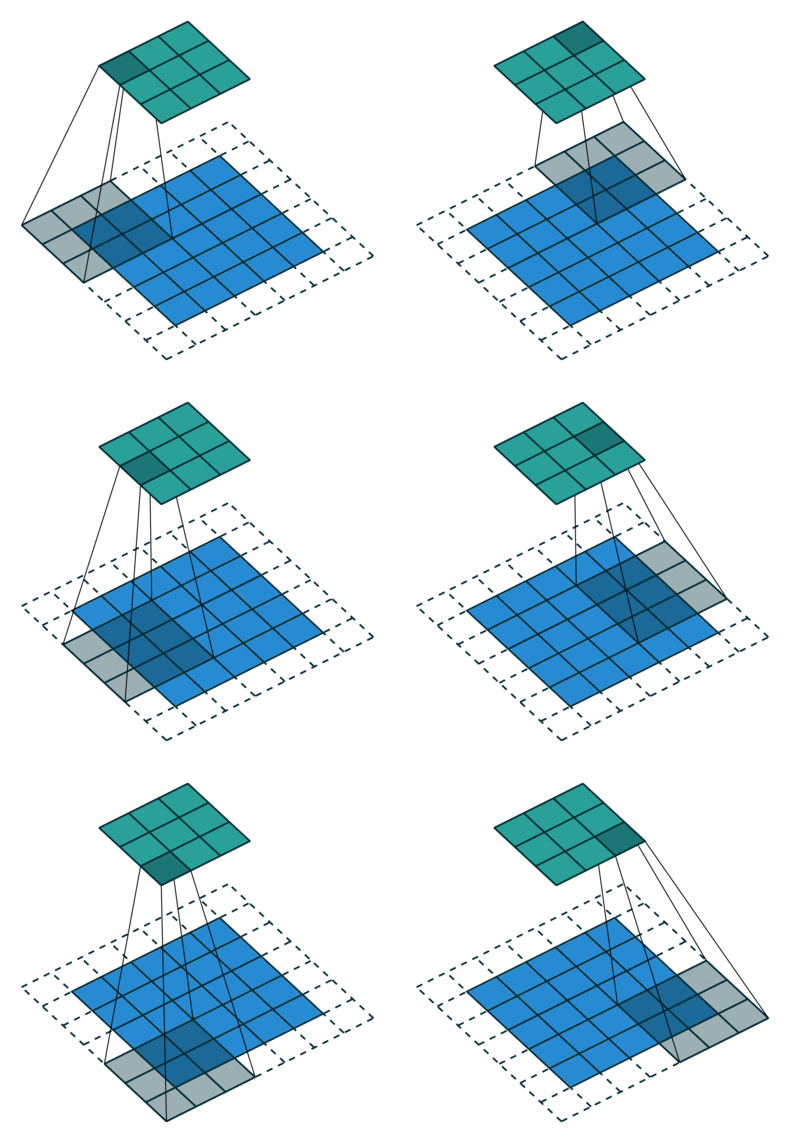
当然我们不能不知道他的原理,在假设已知Conv2d如何操作的基础上,我们通过三个例子来介绍一下ConvTranspose2d的具体操作过程,图源GitHub
实例1: stride=1 padding=0
在默认情况下ConvTranspose2d将feature map进行kernal size-1的padding
看以下例子,(4, 4)的图片经过Conv变成了(2, 2),当我们对他进行stride=1,padding=0的ConTranspose2d的时候,默认已经进行了kernel size-1=2的padding操作,然后其他不变:kernel size=3,stride=1和padding=0
# input
input = torch.ones((1, 1, 4, 4), dtype=torch.float)
# conv
conv = nn.Conv2d(1, 1, 3, stride=1, padding=0, bias=False)
conv.weight = torch.nn.Parameter(torch.ones(1,1,3,3))
output = conv(input)
# convTranspose
trans = nn.ConvTranspose2d(1, 1, 3, stride=1, padding=0, bias=False)
trans.weight = torch.nn.Parameter(torch.ones(1,1,3,3))
trans(output)
'''
input---------------------
tensor([[[[1., 1., 1., 1.],
          [1., 1., 1., 1.],
          [1., 1., 1., 1.],
          [1., 1., 1., 1.]]]])
conv ---------------------
tensor([[[[9., 9.],
          [9., 9.]]]], grad_fn=)
trans---------------------
tensor([[[[ 9., 18., 18.,  9.],
          [18., 36., 36., 18.],
          [18., 36., 36., 18.],
          [ 9., 18., 18.,  9.]]]], grad_fn=)
'''
 |
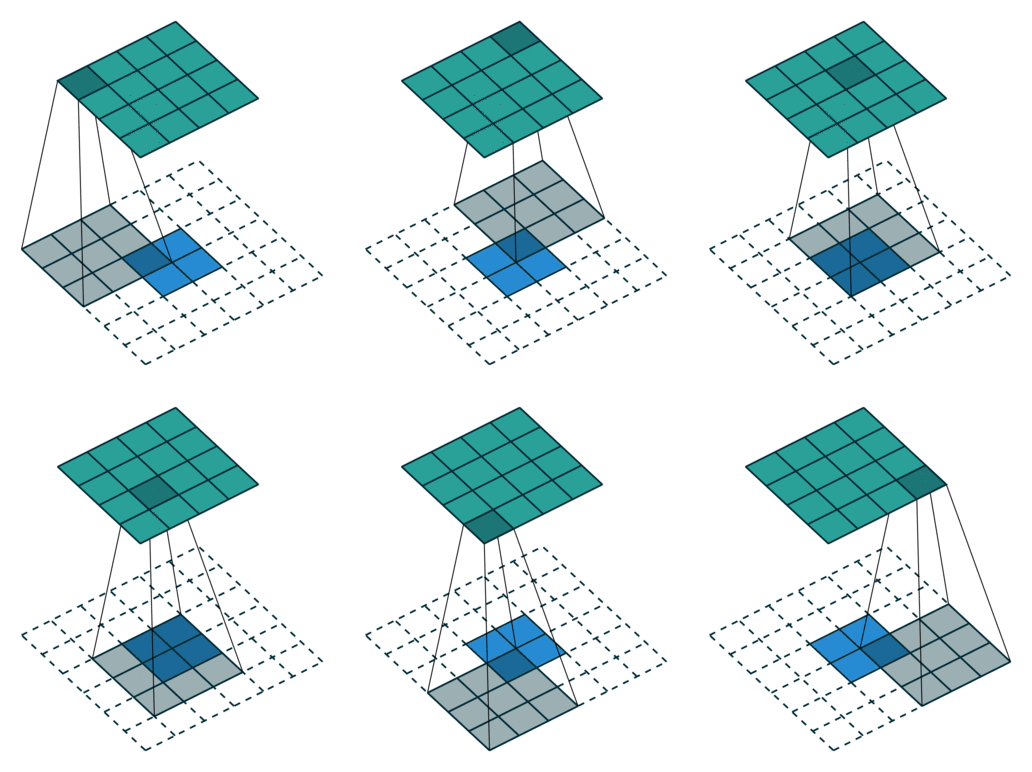 |
实例2: stride=2 padding=0
这里我们将stride从1变为2,如下图所示,对于Conv来说他的变化是卷积核移动的距离变为2,对于ConvTranspose来说变化是feature map中像素之间的距离+1,而默认的kernal size-1的padding不变
# input
input = torch.ones((1, 1, 5, 5), dtype=torch.float)
# conv
conv = nn.Conv2d(1, 1, 3, stride=2, padding=0, bias=False)
conv.weight = torch.nn.Parameter(torch.ones(1,1,3,3))
output = conv(input)
# convTranspose
'''
input---------------------
tensor([[[[1., 1., 1., 1., 1.],
          [1., 1., 1., 1., 1.],
          [1., 1., 1., 1., 1.],
          [1., 1., 1., 1., 1.],
          [1., 1., 1., 1., 1.]]]])
conv ---------------------
tensor([[[[9., 9.],
          [9., 9.]]]], grad_fn=)
trans---------------------
tensor([[[[ 9.,  9., 18.,  9.,  9.],
          [ 9.,  9., 18.,  9.,  9.],
          [18., 18., 36., 18., 18.],
          [ 9.,  9., 18.,  9.,  9.],
          [ 9.,  9., 18.,  9.,  9.]]]], grad_fn=)
'''
 |
 |
实例3: stride=1 padding=1
我们将stride不变,padding变为1,对于Conv来说每条边加入了填充,我们看一下对于ConvTranspose的变化,默认的我们对其进行kernal size-1的填充,这里本应该填充为2,但是由于我们的padding=1,所以我们的填充为2-1=1即只进行1个填充
# input
input = torch.ones((1, 1, 5, 5), dtype=torch.float)
# conv
conv = nn.Conv2d(1, 1, 3, stride=1, padding=1, bias=False)
conv.weight = torch.nn.Parameter(torch.ones(1,1,3,3))
output = conv(input)
# convTranspose
trans = nn.ConvTranspose2d(1, 1, 3, stride=1, padding=1, bias=False)
trans.weight = torch.nn.Parameter(torch.ones(1,1,3,3))
'''
input---------------------
tensor([[[[1., 1., 1., 1., 1.],
          [1., 1., 1., 1., 1.],
          [1., 1., 1., 1., 1.],
          [1., 1., 1., 1., 1.],
          [1., 1., 1., 1., 1.]]]])
conv ---------------------
tensor([[[[4., 6., 6., 6., 4.],
          [6., 9., 9., 9., 6.],
          [6., 9., 9., 9., 6.],
          [6., 9., 9., 9., 6.],
          [4., 6., 6., 6., 4.]]]], grad_fn=)
trans---------------------
tensor([[[[25., 40., 45., 40., 25.],
          [40., 64., 72., 64., 40.],
          [45., 72., 81., 72., 45.],
          [40., 64., 72., 64., 40.],
          [25., 40., 45., 40., 25.]]]], grad_fn=)
'''
 |
 |
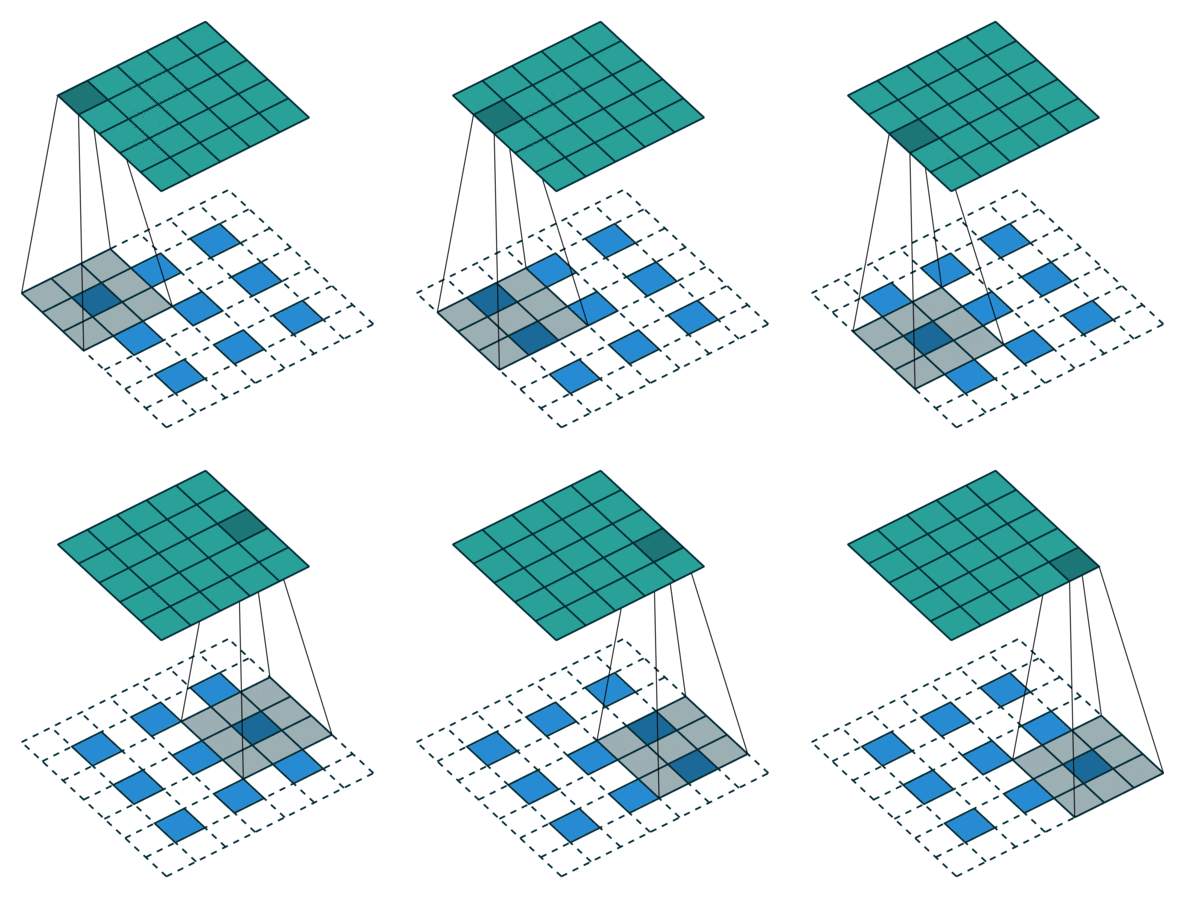
实例4: stride=2 padding=1
这里我们融合了实例2和实例3的特点:既包含了stride的变化也包含了padding的变化,直接看图,对于Conv我们很容易理解,对于ConvTranspose,stride依旧是将feature map的像素之间距离+1,padding也像上面例子一样,本身默认的填充是kernal size-1=2,这里变为2-1=1,然后填充区域是在feature map分开之后的基础上进行的
 |
 |
实例总结
经过上面的例子我们可以了解到以下参数
- stride=1 padding=0: 此情况下,对于Conv表示步长为1,填充为0,而对于ConvTranspose则为feature map不变的情况下进行默认的kernal size-1的padding
- stride:对于Conv就是卷积核移动的距离,对于ConvTranspose是输入的feature map的像素之间的间隔
- padding: 对于Conv是原图四条边填充的大小,对于ConvTranspose本身默认填充kernal size-1,现在变为kernel size-1-padding
- in_channels out_channels kernel_size: Conv与ConvTranspose相同
output_padding
我的一个简单理解是:output padding用来保证通过ConvTranspose之后生成的特征图和通过Conv之前输出的特征图的维度相同
Feature_in → Conv Other Operation ConvTranspose → Feature_out
其中size(feature_in) = size(feature_out)
在ConvTranspose2d中有一个output_padding参数,这里给出Stack Overflow的解释
这里简单讲解一下,就是说对于两个相同的输入一个为(7, 7),一个为(8, 8),当我们对他进行Conv操作时得到的feature map大小相同均为(3, 3)
# input
input1 = torch.ones((1, 1, 7, 7), dtype=torch.float)
input2 = torch.ones((1, 1, 8, 8), dtype=torch.float)
# conv
conv = nn.Conv2d(1, 1, 3, stride=2, bias=False)
conv.weight = torch.nn.Parameter(torch.ones(1,1,3,3))
conv(input1)
conv(input2)
'''
conv ---------------------
tensor([[[[9., 9., 9.],
          [9., 9., 9.],
          [9., 9., 9.]]]], grad_fn=)
conv ---------------------
tensor([[[[9., 9., 9.],
          [9., 9., 9.],
          [9., 9., 9.]]]], grad_fn=)
'''
但是如果我们想将它们恢复到原来的大小怎么办呢?如果我们将输出的(3, 3)的feature map直接输入到ConvTranspose中输出是(7, 7)的图片,如果我们想输出(8, 8)的怎么办呢?就要用到output padding方法,从下面例子我们可以看出,output padding将最终的输出进行了补零操作**(其实我没看到文档中说的怎么做的,只是从例子中看到的是补零)**
# no output padding
trans1 = nn.ConvTranspose2d(1, 1, 3, stride=2, bias=False)
trans1.weight = torch.nn.Parameter(torch.ones(1,1,3,3))
trans1(output)
# with output padding
trans2 = nn.ConvTranspose2d(1, 1, 3, stride=2, output_padding=1, bias=False)
trans2.weight = torch.nn.Parameter(torch.ones(1,1,3,3))
trans2(output)
'''
tensor([[[[ 9.,  9., 18.,  9., 18.,  9.,  9.],
          [ 9.,  9., 18.,  9., 18.,  9.,  9.],
          [18., 18., 36., 18., 36., 18., 18.],
          [ 9.,  9., 18.,  9., 18.,  9.,  9.],
          [18., 18., 36., 18., 36., 18., 18.],
          [ 9.,  9., 18.,  9., 18.,  9.,  9.],
          [ 9.,  9., 18.,  9., 18.,  9.,  9.]]]],
          grad_fn=)
tensor([[[[ 9.,  9., 18.,  9., 18.,  9.,  9.,  0.],
          [ 9.,  9., 18.,  9., 18.,  9.,  9.,  0.],
          [18., 18., 36., 18., 36., 18., 18.,  0.],
          [ 9.,  9., 18.,  9., 18.,  9.,  9.,  0.],
          [18., 18., 36., 18., 36., 18., 18.,  0.],
          [ 9.,  9., 18.,  9., 18.,  9.,  9.,  0.],
          [ 9.,  9., 18.,  9., 18.,  9.,  9.,  0.],
          [ 0.,  0.,  0.,  0.,  0.,  0.,  0.,  0.]]]],
          grad_fn=)
'''