NLP实战:面向中文电子病历的命名实体识别
一.前言
本篇文章是关于NLP中的中文命名实体识别(Named Entity Recognition,NER)的实战项目,该项目利用了大型预训练语言模型BERT和BiLSTM神经网络结构来进行NER任务,文章详细介绍了NER的概念、数据集的预处理、模型的设计与实现。话不多说,直接上干货。
二.命名实体识别基础
2.1 什么是命名实体识别?
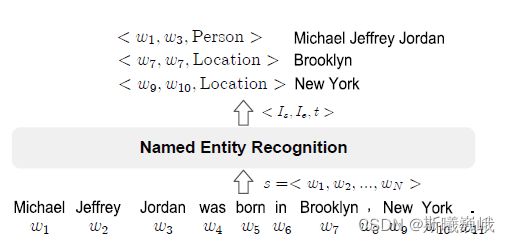
命名实体识别旨在抽取非结构化文本中的命名实体(文本中具有特定意义的实体),例如人名、地名、组织名。NER是众多NLP应用的基础,包括知识图谱、信息检索、文本理解等等。
说具体点,命名实体识别指从文本中识别出实体的边界以及实体的类型,其中实体的类型需要提前预定义好。NER的数学定义为:给定文本序列 s = < w 1 , w 2 , . . . , w N > s = Michalel Jeffrey Jordan、Brooklyn、New York,其类别分别为Person、Location、Location。
2.2 评价指标
命名实体识别性能的评价可以从两个维度来进行:
- 单个实体类别
- 所有实体类别
在单个实体类别上,通常使用精确率(percision)、召回率(recall)和F1分数(F1-score)。
在所有实体类别上,通常使用可以定义两组不同的指标:
- 指标1:宏精确率(macro-P)、宏召回率(macro-R)和宏F1(macro-F1)
- 指标2:微精确率(micro-P)、微召回率(micro-R)和微F1(micro-F1)
其中宏F1主要受到稀有类别的影响,而微F1主要受到大类实体的影响。
限于篇幅,就不介绍严格指标和松弛指标这两个概念了,有兴趣的可以自己去看一下。
在实体对识别结果和真实标签进行测量时,可以调用seqeval库来计算这些指标,该库的安装命令为:
pip install seqeval
三.数据集预处理
3.1 数据集说明
本次实战的数据集来源于CCKS2019的测评任务——面向中文电子病历的医疗实体识别及属性抽取。(数据集官方开源地址请点这里)。在该测评任务中实际包含了两个子任务:医疗命名实体识别、医疗实体及属性抽取。本文只做了医疗命名实体识别这一块,即subtask1,该子任务的数据集分为两部分:
- 训练集:
subtask1_training_part1.txt和subtask1_training_part2.txt; - 测试集:
subtask1_test_set_with_answer.json。
在每个文档中,每行都为1个json对象。每个对象都包含原始中文文本(通过originalText键来获取)和对应的实体集(通过entities来获取),下面是实体集中的一个实体的示例:
{"label_type": "药物", "overlap": 0, "start_pos": 470, "end_pos": 473}
其中
label_type表示实体类别;start_pos表示实体的开始索引;end_pos表示实体的结束索引。
整个数据集的实体类别如下所示,我将每个中文实体类别都通过一个字典映射为英文:
entity_types = {
    '疾病和诊断': 'Disease&Dianonsis',
    '影像检查': 'Check',
    '实验室检验': 'Inspection',
    '手术': 'Surgery',
    '药物': 'Medicine',
    '解剖部位': 'AnatomicalSite'
}
3.2 预处理
3.2.1 数据集重新划分
在本文中,只有训练集和测试集。按照机器学习的划分思路,最好有一个验证集(NLP中成为开发集)。为此,我采取的措施是固定测试集不变,从训练集中拆分出一个验证集来,我选取了训练集样本(json对象)的 30 % 30\% 30%来作为验证集。
3.2.2 处理为BIO序列
划分完数据集,本文将原始数据集处理为BIO序列。简单地说就是根据实体类型来为文本中的每个字符贴标签,在NER中每个实体类型可以分为两种标签,假设实体类型为Ntype,则该实体的开头字符标签为B-Ntype,中间字符串标签为I-Ntype,其它不属于实体的字符都标注为O。对应于此概念,该数据集包含如下标签类型:
LABEL = ("O", "B-Disease&Dianonsis", "I-Disease&Dianonsis", "B-Check",
         "I-Check", "B-Inspection", "I-Inspection", "B-Surgery", "I-Surgery",
         "B-Medicine", "I-Medicine", "B-AnatomicalSite", "I-AnatomicalSite")
处理为BIO序列算法步骤为:对于每个样本,首先创建与其文本字符数长度相同的标签序列,标签序列中全为'O'标签。然后遍历该文本对应的实体集,读取每个实体的开始索引start_pos和结束索引end_pos,将标签序列中开始索引处的标签替换为B-实体类型,将标签序列中 [ s t a r t _ p o s + 1 , e n d _ p o s ) [start\_pos + 1, end\_pos) [start_pos+1,end_pos)处的标签替换为I-实体类型。
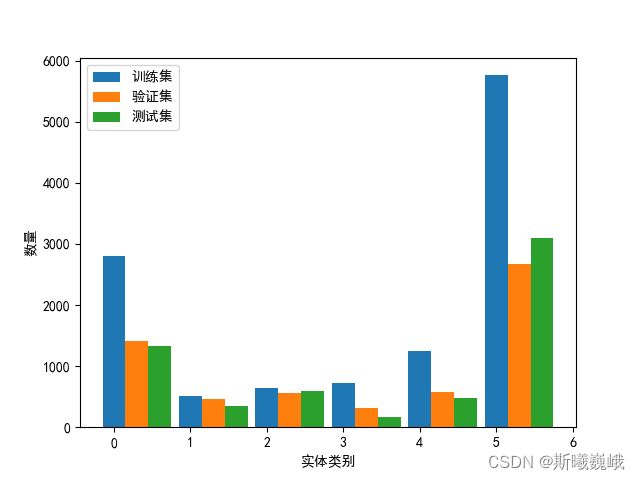
在处理为BIO序列的过程中,顺便统计了一下训练集、验证集和测试集三部分中各类实体的数量,其可视化结果如下所示:
横轴中:0疾病和诊断、1影像检查、2实验室检验、3手术、4药物、5解剖部位
3.2.3 预处理源码
上述预处理过程的源码展示如下:
import json

entity_types = {
    '疾病和诊断': 'Disease&Dianonsis',
    '影像检查': 'Check',
    '实验室检验': 'Inspection',
    '手术': 'Surgery',
    '药物': 'Medicine',
    '解剖部位': 'AnatomicalSite'
}


def load_org_dataset(data_path):
    """
    加载原始数据集
    """
    datasets = []
    with open(data_path, "r", encoding="utf-8-sig") as fp:
        for sample in fp.readlines():
            js_data = json.loads(sample)
            datasets.append(js_data)
    return datasets


def to_bio_sequence(datasets, save_path):
    """
    处理为BIO序列
    """
    entity_nums = {k: 0 for k in entity_types.keys()}
    bios = []
    for data in datasets:
        cur_text = data.get('originalText')
        entities = data.get('entities')
        cur_label = ['O'] * len(cur_text)
        for entity in entities:
            # 读取中文标签,并转化为英文标签
            label_type = entity.get('label_type')
            entity_nums[label_type] += 1
            entity_type = entity_types.get(label_type)
            # 读取实体在文本中的位置
            start_pos = entity.get('start_pos')
            end_pos = entity.get('end_pos')
            # 根据实体的位置和类型将标签序列中相应位置该为对应的实体
            cur_label[start_pos] = 'B-' + entity_type
            for idx in range(start_pos + 1, end_pos):
                cur_label[idx] = 'I-' + entity_type

        # 将字符与标签添加到bio序列中,并去掉多余的空格
        for c, l in zip(cur_text, cur_label):
            # 过滤空格
            if c == " ":
                continue
            bios.extend(f"{c}\t{l}\n")
            # 从句号处分开
            if c in ["。", ";"]:
                bios.append('\n')

    print(entity_nums)
    with open(save_path, "w", encoding="utf-8") as fp:
        fp.writelines(bios)


if __name__ == "__main__":
    # 加载原始数据集
    train_org_path = "yidu-s4k/subtask1_training_part1.txt"
    train_org_path1 = "yidu-s4k/subtask1_training_part2.txt"
    test_org_path = "yidu-s4k/subtask1_test_set_with_answer.json"
    train_dataset = load_org_dataset(train_org_path)
    train_dataset.extend(load_org_dataset(train_org_path1))
    test_dataset = load_org_dataset(test_org_path)
    # 截取训练集的30%作为验证集
    train_size = int(len(train_dataset) * 0.7)
    # 处理为BIO序列
    train_path = "processed/train.txt"
    dev_path = "processed/dev.txt"
    test_path = "processed/test.txt"
    to_bio_sequence(train_dataset[:train_size], train_path)
    to_bio_sequence(train_dataset[train_size:], dev_path)
    to_bio_sequence(test_dataset, test_path)
四.模型实现
4.1 自定义数据集类
在Pytorch中可以继承torch.utils.data.Dataset类来定义自己的数据集,然后调用DataLoader()函数来批量加载数据,本文针对BIO序列的自定义数据集如下所示。在本次实验中,没有像之前几篇文章一样使用类似Word2Vec之类的词嵌入,而是采用了Hugging Face提供的bert-base-chinese-ws模型,自从BERT横空出世之后,大规模预训练语言模型在各种NLP任务上开始屠榜。限于篇幅,本文不展开讲了,感兴趣的可以自己去研读一下,这也是现在NLP中比较火的词向量获取方式了。
import torch
import torch.utils.data as data
from torch.utils.data import DataLoader
from transformers import BertTokenizerFast

LABEL = ("O", "B-Disease&Dianonsis", "I-Disease&Dianonsis", "B-Check",
         "I-Check", "B-Inspection", "I-Inspection", "B-Surgery", "I-Surgery",
         "B-Medicine", "I-Medicine", "B-AnatomicalSite", "I-AnatomicalSite")

# 标签到idx的映射
tag2idx = {tag: idx for idx, tag in enumerate(LABEL)}
# idx到标签的映射
idx2tag = {idx: tag for idx, tag in enumerate(LABEL)}


class YiduS4K(data.Dataset):
    def __init__(self, data_path, pretrained_path, maxlen=256):
        super().__init__()
        self.maxlen = maxlen  # 句子的最大长度
        self.buildingDataset(data_path)
        self.tokenizer = BertTokenizerFast.from_pretrained(pretrained_path)
        # 序列开始标签id
        self.cls_id = self.tokenizer.convert_tokens_to_ids("[CLS]")
        # 序列开始标签id
        self.sep_id = self.tokenizer.convert_tokens_to_ids("[SEP]")

    def __len__(self, ):
        return len(self.dataset)

    def __getitem__(self, index):
        words, tags = self.dataset[index]
        x, y = [], []
        for w, t in zip(words, tags):
            xx = self.tokenizer.encode(w, add_special_tokens=False)
            yy = tag2idx[t]
            x.extend(xx)
            y.append(yy)
        x = [self.cls_id] + x[:self.maxlen - 2] + [self.sep_id]
        y = [0] + y[:self.maxlen - 2] + [0]

        return x, y

    def buildingDataset(self, data_path):
        """
        构建数据集
        """
        self.dataset = []
        with open(data_path, "r", encoding="utf-8") as fp:
            content = fp.read()
        sentences = content.split("\n\n")
        for sentence in sentences:
            cur_text, cur_label = [], []
            for pair in sentence.split("\n"):
                if not pair:
                    continue
                c, l = pair.split("\t")
                cur_text.append(c)
                cur_label.append(l)
            if not cur_text:
                continue
            self.dataset.append([cur_text, cur_label])

        self.dataset.sort(key=lambda x: len(x[0]))


def padding(batch):
    """
    填充样本使得长度与batch中最长的样本一致
    """
    # 获取batch中最长的句子长度
    maxlen = max([len(sample[0]) for sample in batch])
    x, y = [], []
    # 0: [PAD]
    for sample in batch:
        x.append(sample[0] + [0] * (maxlen - len(sample[0])))
        y.append(sample[1] + [0] * (maxlen - len(sample[1])))
    f = torch.LongTensor
    return f(x), f(y)


if __name__ == "__main__":
    pass
注:bert-base-chinese-ws的下载可以通过如下命令:
git lfs install
git clone https://huggingface.co/ckiplab/bert-base-chinese-ws
4.2 模型设计
本次实验的模型为Bert-BiLSTM,输入首先通过BERT层获取词向量,然后使用BiLSTM来提取双向语义信息,最后基于此来对每个字进行分类。下面的本实验的模型示意图(图是我本科毕设模型魔改出来的,毕设实际使用的模型比这个复杂一点)。
模型的实现源码如下:
import torch
import torch.nn as nn
from transformers import AutoModel


class BertBilstm(nn.Module):
    def __init__(self,
                 output_size,
                 embed_size,
                 num_layers,
                 hidden_size,
                 drop_prob,
                 pretrained_path="bert-base-chinese-ws"):
        super(BertBilstm, self).__init__()
        self.output_size = output_size
        # 加载Bert预训练模型
        self.bert = AutoModel.from_pretrained(pretrained_path)
        # 定义BiLSTM层
        self.bilstm = nn.LSTM(bidirectional=True,
                              num_layers=num_layers,
                              input_size=embed_size,
                              hidden_size=hidden_size,
                              batch_first=True,
                              dropout=drop_prob)
        # 定义全连接层
        self.fc = nn.Linear(2 * hidden_size, output_size)

    def forward(self, x):
        # Bert模型太大,参数固定住
        with torch.no_grad():
            embed_x = self.bert(x)[0]
        lstmout, _ = self.bilstm(embed_x)
        return self.fc(lstmout)


if __name__ == "__main__":
    pass
五.实验及结果展示
5.1 实验设置
本次实验的环境为:
操作系统: Win10
Python版本:
Pytorch版本: 1.8
主要依赖库: seqeval-1.2.2, transformers-4.17.0
本次实验的参数设置如下所示(限于时间原因没有调参):
params = {
    'pretrained_path': "bert-base-chinese-ws",
    "lr": 0.001,
    "batch_size": 64,
    "epochs": 10,
    "output_size": len(LABEL),
    "embed_size": 768,
    "hidden_size": 256,
    "num_layers": 1,
    "drop_prob": 0.5
}
本实验采用的训练模式为,在训练集上进行模型参数的更新,然后通过验证集来筛选一个最佳的模型,最后在这个最佳的模型上对测试集进行测评。
5.2 实验结果展示
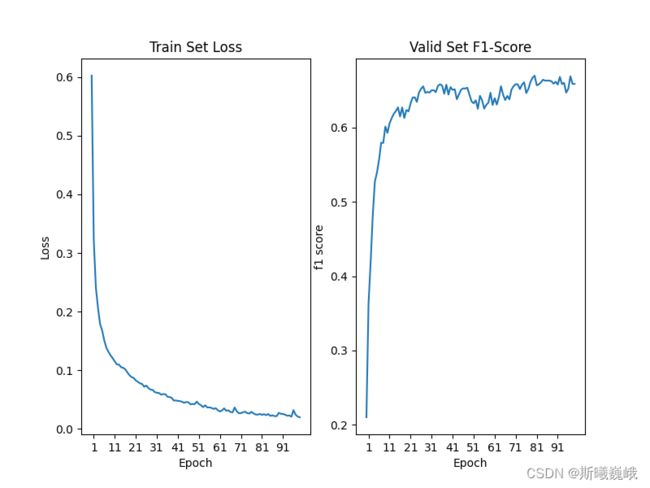
首先展示训练集上的loss以及验证集上的f1-score随训练的epoch的变化情况:
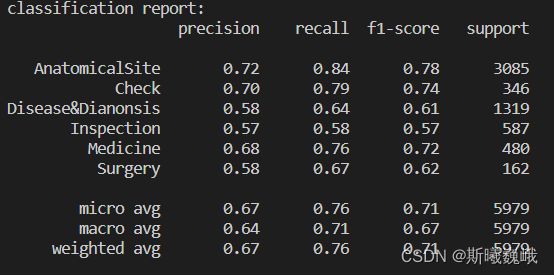
然后展示的是在测试集上单个类别,以及所有类别的整体实验结果:
单看这一结果可以看出不同类别实体的识别准确率差异还是比较大的。
六.结语
完整项目源码:获取地址
参考资料:
- A Survey on Deep Learning for Named Entity Recognition(2.1和2.2节参考)
- ckiplab/bert-base-chinese-ws
以上便是本文的全部内容,要是觉得不错的话,可以点个赞或关注一下博主,你们的支持是博主进步的不竭动力,当然要是有问题的话也敬请批评指正!!!


