【ViT详解】Vision Transformer网络结构及代码解读

论文链接:https://arxiv.org/abs/2010.11929
源码地址:https://github.com/google-research/vision_transformer
前言
本周再次跟着沐神重读了一遍视觉领域里程碑式文献ViT,每次读都有一些新理解和思考,故记录于此,以备查阅。
ViT最重要的贡献是将Transformer的基本范式应用到了cv领域,并且通过一系列实验验证了这种思路的可操作性,引出了继卷积神经网络、图神经网络之后的cv领域的另一重磅基础模型,更为建立统一的多模态模型开辟了一条新路。
Invision, attention is either applied in conjunction with convolutional networks, or used to replace certain components of convolutional networks while keeping their overall structure in place. We show that this reliance on CNNs is not necessary and a pure transformer applied directly to sequences of image patches can perform very well on image classification tasks.
1 网络结构

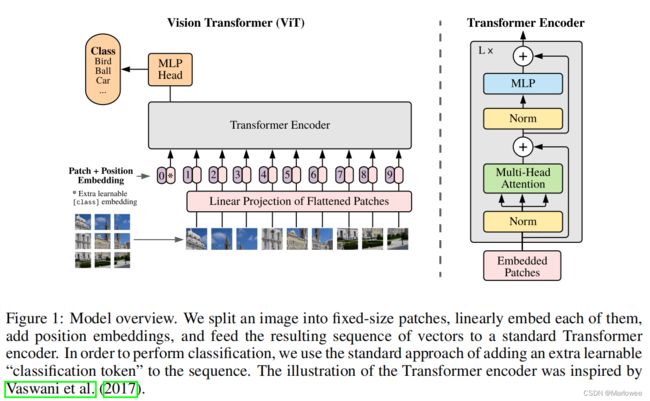
上图就是原文中作者所展示的ViT网络结构图,可以看到除了将图片打成patch进行输入之外,其余操作与NLP的流程并无太大差距,接下来咱们就主要根据上图中的流程讨论一下ViT的图片分类原理。
1.1 image2patch:图像转为图像块
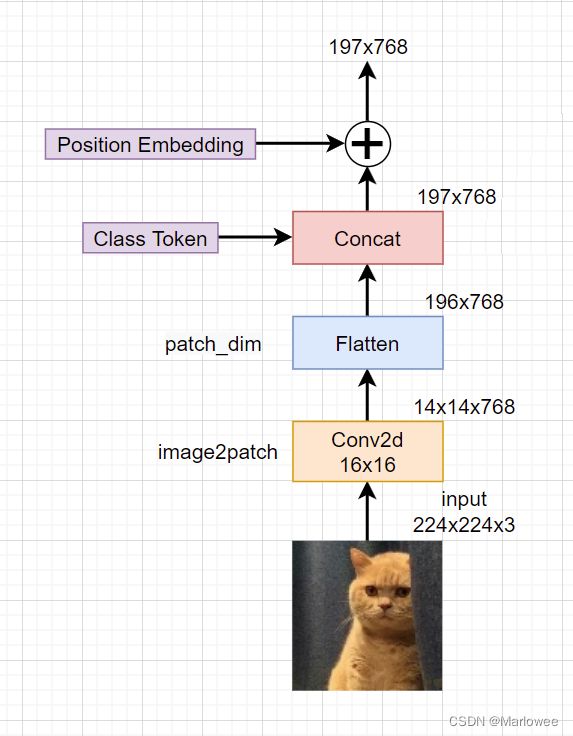
网络结构中清晰展示了输入图像经过裁切变成一系列patch(图片块),成为网络的原始输入这一操作。假设原始输入的图片数据是 H x W x C,我们需要对图片按块切割得到patch输入,假设图片块大小为P1 x P2,则最终的块数量N为:N = (H/P1)x(W/P2)。在此过程中我们需要注意以下几点:
- H、W必须分别被P1、P2整除,否则网络会直接抛出异常。
- 每个patch都会进行扁平化操作,由原来三维的
Cx(HxP1)x(WxP2)变成二维的(HxW)x(P1xP2xC)。其中HxW相当于NLP词序列中的token,(P1xP2xC)相当于最大序列维度。这一步既是为了降低由输入图像尺度变化带来的高复杂度消耗,也是为了适应Transformer架构针对图像做出的改变,并且可以看到源码中的操作正好跟我们的理解对应起来了
# Rearrange函数使用爱因斯坦表达式进行维度转换,具体用法读者可自行查阅
self.image2patch =Rearrange('b c (h p1) (w p2) -> b (h w) (p1 p2 c)', p1 = patch_height, p2 = patch_width)
1.2 patch_dim:维度映射
在某些情况下我们希望使用合适的维度来描述每一个patch,这就需要再对得到的(P1xP2xC)进行映射,所以ViT在这里添加了一个全连接层来进行patch维度的缩放:
self.to_patch_embedding = nn.Sequential(
            Rearrange('b c (h p1) (w p2) -> b (h w) (p1 p2 c)', p1 = patch_height, p2 = patch_width),
            nn.Linear(patch_dim, dim),# 维度缩放
        )
1.3 position_embedding:嵌入位置信息
与NLP中的操作一致,当我们输入词序列时,为了标记每个词在序列中的位置,我们会使用特定的公式为其添加位置信息,一般是通过特定公式得到位置信息后直接与原始的词序列相加,例如Transformer中的position embedding采用如下公式:

position embedding代码注解:
class PositionalEncoding(nn.Module):
    def __init__(self, d_model, dropout, max_len=5000):
        """
        :param d_model: pe编码维度,一般与word embedding相同,方便相加
        :param dropout: dorp out
        :param max_len: 语料库中最长句子的长度,即word embedding中的L
        """
        super(PositionalEncoding, self).__init__()
        # 定义drop out
        self.dropout = nn.Dropout(p=dropout)
        # 计算pe编码
        pe = torch.zeros(max_len, d_model) # 建立空表,每行代表一个词的位置,每列代表一个编码位
        position = torch.arange(0, max_len).unsqueeze(1) # 建个arrange表示词的位置以便公式计算,size=(max_len,1)
        div_term = torch.exp(torch.arange(0, d_model, 2) *    # 计算公式中10000**(2i/d_model)
                             -(math.log(10000.0) / d_model))
        pe[:, 0::2] = torch.sin(position * div_term)  # 计算偶数维度的pe值
        pe[:, 1::2] = torch.cos(position * div_term)  # 计算奇数维度的pe值
        pe = pe.unsqueeze(0)  # size=(1, L, d_model),为了后续与word_embedding相加,意为batch维度下的操作相同
        self.register_buffer('pe', pe)  # pe值是不参加训练的

    def forward(self, x):
        # 输入的最终编码 = word_embedding + positional_embedding
        x = x + Variable(self.pe[:, :x.size(1)],requires_grad=False) #size = [batch, L, d_model]
        return self.dropout(x) # size = [batch, L, d_model]
通过position embedding这种方式,我们实现了对词序列的位置信息添加,这也就是网络结构中Patch+Position Embedding的意义。
1.4 cls_token:嵌入类别信息
传统的Transformer采用Seq2Seq的形式,但在Vision Transformer中我们只模拟编码部分,缺少了解码部分,所以为了确定唯一的分类头输入,作者等人增加了一个可学习的cls token,以此来作为最终输入分类头的向量,通过concat的方式与原一维图片块向量进行拼接,故其size为(1x1xdim)。由于此处单独添加了分类输入头,所以最终输入的序列长度变为(HxW+1)x(P1xP2xC)。
上述四项操作的具体内部细节如下图所示:

1.5 Transformer Encoder
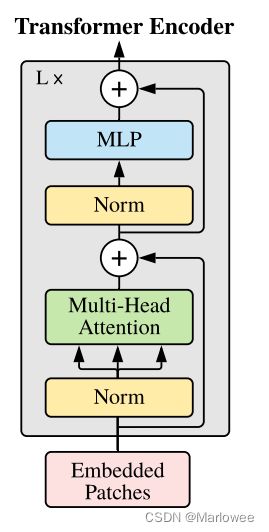
网络结构的主体部分是编码器,网络通过不断地堆叠编码器达到较好的分类效果,其内部结构如下图所示:

嵌入位置信息和类别信息的输入首先要经过一个Layer Norm处理,在进入Multi-Head Attention层前通过变换(生成了Q、K、V三个向量,之后的操作与Transformer并无二致,在计算QxK的时候我们可以把两向量内积看做计算图片块之间的关联性(与Transformer中计算词向量相似度类似),获得注意力权值后再scale到V,接着通过MLP层获得Encoder部分的输出(这里可以进行多次Encoder Block叠加,如上图所示)。与Transformer类似,多头的意义在于可以促进模型学习全方位、多层次、多角度的信息,学习更丰富的信息特征,对于同一张图片来说,每个人看到的、注意到的部分都会存在一定差异,而在图像中的多头恰恰是把这些差异综合起来进行学习。
1.6 MLP
结束了Transformer Encoder,就到了我们最终的分类处理部分,在之前我们进行Encoder的时候通过concat的方式多加了一个用于分类的可学习向量,这时我们把这个向量取出来输入到MLP Head中,即经过Layer Normal --> 全连接 --> GELU --> 全连接,我们得到了最终的输出。
2 代码解析
2.1 库依赖
import torch
from torch import nn

from einops import rearrange, repeat
from einops.layers.torch import Rearrange
2.2 主体结构
class ViT(nn.Module):
    def __init__(self, *, image_size, patch_size, num_classes, dim, depth, heads, mlp_dim, pool = 'cls', channels = 3, dim_head = 64, dropout = 0., emb_dropout = 0.):
        super().__init__()
        image_height, image_width = pair(image_size)
        patch_height, patch_width = pair(patch_size)

        assert image_height % patch_height == 0 and image_width % patch_width == 0, 'Image dimensions must be divisible by the patch size.'

        num_patches = (image_height // patch_height) * (image_width // patch_width)
        patch_dim = channels * patch_height * patch_width
        assert pool in {'cls', 'mean'}, 'pool type must be either cls (cls token) or mean (mean pooling)'

        self.to_patch_embedding = nn.Sequential(
            Rearrange('b c (h p1) (w p2) -> b (h w) (p1 p2 c)', p1 = patch_height, p2 = patch_width),
            nn.Linear(patch_dim, dim),
        )

        self.pos_embedding = nn.Parameter(torch.randn(1, num_patches + 1, dim))
        self.cls_token = nn.Parameter(torch.randn(1, 1, dim))
        self.dropout = nn.Dropout(emb_dropout)

        self.transformer = Transformer(dim, depth, heads, dim_head, mlp_dim, dropout)

        self.pool = pool
        self.to_latent = nn.Identity()

        self.mlp_head = nn.Sequential(
            nn.LayerNorm(dim),
            nn.Linear(dim, num_classes)
        )

    def forward(self, img):
        x = self.to_patch_embedding(img)
        b, n, _ = x.shape

        cls_tokens = repeat(self.cls_token, '() n d -> b n d', b = b)
        x = torch.cat((cls_tokens, x), dim=1)
        x += self.pos_embedding[:, :(n + 1)]
        x = self.dropout(x)

        x = self.transformer(x)

        x = x.mean(dim = 1) if self.pool == 'mean' else x[:, 0]

        x = self.to_latent(x)
        return self.mlp_head(x)
2.3 Transformer
class Transformer(nn.Module):
    def __init__(self, dim, depth, heads, dim_head, mlp_dim, dropout = 0.):
        super().__init__()
        self.layers = nn.ModuleList([])
        for _ in range(depth):
            self.layers.append(nn.ModuleList([
                PreNorm(dim, Attention(dim, heads = heads, dim_head = dim_head, dropout = dropout)),
                PreNorm(dim, FeedForward(dim, mlp_dim, dropout = dropout))
            ]))
    def forward(self, x):
        for attn, ff in self.layers:
            x = attn(x) + x
            x = ff(x) + x
        return x
2.4 Attention
class Attention(nn.Module):
    def __init__(self, dim, heads = 8, dim_head = 64, dropout = 0.):
        super().__init__()
        inner_dim = dim_head *  heads
        project_out = not (heads == 1 and dim_head == dim)

        self.heads = heads
        self.scale = dim_head ** -0.5

        self.attend = nn.Softmax(dim = -1)
        self.to_qkv = nn.Linear(dim, inner_dim * 3, bias = False)

        self.to_out = nn.Sequential(
            nn.Linear(inner_dim, dim),
            nn.Dropout(dropout)
        ) if project_out else nn.Identity()

    def forward(self, x):
        qkv = self.to_qkv(x).chunk(3, dim = -1)
        q, k, v = map(lambda t: rearrange(t, 'b n (h d) -> b h n d', h = self.heads), qkv)

        dots = torch.matmul(q, k.transpose(-1, -2)) * self.scale

        attn = self.attend(dots)

        out = torch.matmul(attn, v)
        out = rearrange(out, 'b h n d -> b n (h d)')
        return self.to_out(out)