python、C++ 中通过OpenCV的DNN模块使用YoloV4
目录
1 Python环境下调用
2 C++环境下调用(编写CMakeLists.txt文件)
2.1 OpenCV安装
2.2 程序编写
2.2.1 main.cpp
2.2.2 Detection.h
2.2.3 Detection.cpp
2.2.4 CMakeLists.txt
2.3 编译和测试
1 Python环境下调用
这个较为简单,唯一注意要点是安装的opencv-python版本要对,以下代码仅支持4.4.0.XX系列OpenCV版本,4.5.0版本OpenCV没有getUnconnectedOutLayersNames()这个属性。
完整代码如下:
import numpy as np
import time
import cv2

if cv2.__version__ != '4.4.0':
    print("opencv版本不支持! 本程序语法仅支持4.4.0系列OpenCV")


LABELS = open("coco.names").read().strip().split("\n")
np.random.seed(666)
COLORS = np.random.randint(0, 255, size=(len(LABELS), 3), dtype="uint8")
# 导入 YOLO 配置和权重文件并加载网络:
net = cv2.dnn_DetectionModel('/home/ym/ym2021/yolov4.cfg', '/home/ym/ym2021/yolov4.weights')
# 获取 YOLO 未连接的输出图层
layer = net.getUnconnectedOutLayersNames()
image = cv2.imread('1.jpg')
# 获取图片尺寸
(H, W) = image.shape[:2]
# 从输入图像构造一个 blob,然后执行 YOLO 对象检测器的前向传递,给我们边界盒和相关概率
blob = cv2.dnn.blobFromImage(image, 1/255.0, (416, 416),
                             swapRB=True, crop=False)
net.setInput(blob)
start = time.time()
# 前向传递,获得信息
layerOutputs = net.forward(layer)
# 用于得出检测时间
end = time.time()
print("YOLO took {:.6f} seconds".format(end - start))

boxes = []
confidences = []
classIDs = []

# 循环提取每个输出层
for output in layerOutputs:
    # 循环提取每个框
    for detection in output:
        # 提取当前目标的类 ID 和置信度
        scores = detection[5:]
        classID = np.argmax(scores)
        confidence = scores[classID]
        # 通过确保检测概率大于最小概率来过滤弱预测
        if confidence > 0.5:
            # 将边界框坐标相对于图像的大小进行缩放,YOLO 返回的是边界框的中心(x, y)坐标,
            # 后面是边界框的宽度和高度
            box = detection[0:4] * np.array([W, H, W, H])
            (centerX, centerY, width, height) = box.astype("int")
            # 转换出边框左上角坐标
            x = int(centerX - (width / 2))
            y = int(centerY - (height / 2))
            # 更新边界框坐标、置信度和类 id 的列表
            boxes.append([x, y, int(width), int(height)])
            confidences.append(float(confidence))
            classIDs.append(classID)
# 非最大值抑制,确定唯一边框
idxs = cv2.dnn.NMSBoxes(boxes, confidences, 0.5, 0.3)
# 确定每个对象至少有一个框存在
if len(idxs) > 0:
    # 循环画出保存的边框
    for i in idxs.flatten():
        # 提取坐标和宽度
        (x, y) = (boxes[i][0], boxes[i][1])
        (w, h) = (boxes[i][2], boxes[i][3])
        # 画出边框和标签
        color = [int(c) for c in COLORS[classIDs[i]]]
        cv2.rectangle(image, (x, y), (x + w, y + h), color, 1, lineType=cv2.LINE_AA)
        text = "{}: {:.4f}".format(LABELS[classIDs[i]], confidences[i])
        cv2.putText(image, text, (x, y - 5), cv2.FONT_HERSHEY_SIMPLEX,
            0.5, color, 1, lineType=cv2.LINE_AA)
cv2.imshow("Tag", image)
cv2.waitKey(0)
2 C++环境下调用(编写CMakeLists.txt文件)
2.1 OpenCV安装
C++环境下编译安装OpenCV 4.5.1和OpenCV_Contrib库,参考我《ubuntu + oepncv + PCL + realsenseSDK + ROS + OpenVino开发环境搭建》https://blog.csdn.net/weixin_42118657/article/details/114527831
2.2 程序编写
程序结构如下:
- main.cpp
- Detection.cpp
- Detection.h
- CMakeLists.txt
- build文件夹
2.2.1 main.cpp
#include "Detection.h"

#include

using namespace std;
using namespace cv;
using namespace dnn;

void TestDetection()
{
    string image_path = "/data/1.jpg";
    string save_path = "result.jpg";
    Mat img = imread(image_path);
    cout << "width: " << img.cols << endl;
    cout << "height: " << img.rows << endl;

    Detection detection = Detection();
    detection.Initialize(img.cols, img.rows);
    detection.Detecting(img);
    imwrite(save_path, detection.GetFrame());
    return;
}

int main()
{
    TestDetection();
    return 0;
}
2.2.2 Detection.h
#pragma once
#ifndef __DETECTION_H__
#define __DETECTION_H__

#include
#include
#include
#include
#include
#include
#include

using namespace std;
using namespace cv;
using namespace dnn;

class Detection
{
public:
    //构造、析构函数
    Detection();
    ~Detection();
    //初始化函数
    void Initialize(int width, int height);
    //读取网络模型
    void ReadModel();
    //行人与车辆检测
    bool Detecting(Mat frame);
    //获取网络输出层名称
    vector GetOutputsNames();
    //对输出进行处理,使用NMS选出最合适的框
    void PostProcess();
    //画检测结果
    void Drawer();
    //画出检测框和相关信息
    void DrawBoxes(int classId, float conf, int left, int top, int right, int bottom);
    //获取Mat对象
    Mat GetFrame();
    //获取图像宽度
    int GetResWidth();
    //获取图像高度
    int GetResHeight();

private:
    //图像属性
    int m_width;  //图像宽度
    int m_height; //图像高度
    //网络处理相关
    Net m_model;            //网络模型
    Mat m_frame;            //每一帧
    Mat m_blob;             //从每一帧创建一个4D的blob用于网络输入
    vector m_outs;     //网络输出
    vector m_confs;  //置信度
    vector m_boxes;   //检测框左上角坐标、宽、高
    vector m_classIds; //类别id
    vector m_perfIndx; //非极大阈值处理后边界框的下标
    //检测超参数
    int m_inpWidth;           //网络输入图像宽度
    int m_inpHeight;          //网络输入图像高度
    float m_confThro;         //置信度阈值
    float m_NMSThro;          //NMS非极大抑制阈值
    vector m_classes; //类别名称

private:
    //内存释放
    void Dump();
};

#endif
2.2.3 Detection.cpp
#include "Detection.h"

using namespace cv;
using namespace dnn;

//构造函数,成员变量初始化
Detection::Detection()
{
    //图像属性
    m_width = 0;
    m_height = 0;
    m_inpWidth = 416;
    m_inpHeight = 416;

    //其他成员变量
    m_confThro = 0.25;
    m_NMSThro = 0.4;

    //网络模型加载
    ReadModel();
}

//析构函数
Detection::~Detection()
{
    Dump();
}

//内存释放
void Detection::Dump()
{
    //网络输出相关清零
    m_outs.clear();
    m_boxes.clear();
    m_confs.clear();
    m_classIds.clear();
    m_perfIndx.clear();
}

//初始化函数
void Detection::Initialize(int width, int height)
{
    //图像属性
    m_width = width;
    m_height = height;
}

//读取网络模型和类别
void Detection::ReadModel()
{
    string classesFile = "/data/coco.names";
    String modelConfig = "/data/yolov4.cfg";
    String modelWeights = "/data/yolov4.weights";
    //加载类别名
    ifstream ifs(classesFile.c_str());
    string line;
    while (getline(ifs, line))
        m_classes.push_back(line);
    //加载网络模型
    m_model = readNetFromDarknet(modelConfig, modelWeights);
    m_model.setPreferableBackend(DNN_BACKEND_OPENCV);
    m_model.setPreferableTarget(DNN_TARGET_OPENCL);
}

//行人与车辆检测
bool Detection::Detecting(Mat frame)
{
    m_frame = frame.clone();

    //创建4D的blob用于网络输入
    blobFromImage(m_frame, m_blob, 1 / 255.0, Size(m_inpWidth, m_inpHeight), Scalar(0, 0, 0), true, false);

    //设置网络输入
    m_model.setInput(m_blob);

    //前向预测得到网络输出,forward需要知道输出层,这里用了一个函数找到输出层
    m_model.forward(m_outs, GetOutputsNames());

    //使用非极大抑制NMS删除置信度较低的边界框
    PostProcess();

    //画检测框
    Drawer();

    return true;
}

//获取网络输出层名称
vector Detection::GetOutputsNames()
{
    static vector names;
    if (names.empty())
    {
        //得到输出层索引号
        vector outLayers = m_model.getUnconnectedOutLayers();

        //得到网络中所有层名称
        vector layersNames = m_model.getLayerNames();

        //获取输出层名称
        names.resize(outLayers.size());
        for (int i = 0; i < outLayers.size(); ++i)
            names[i] = layersNames[outLayers[i] - 1];
    }
    return names;
}

//使用非极大抑制NMS去除置信度较低的边界框
void Detection::PostProcess()
{
    for (int num = 0; num < m_outs.size(); num++)
    {
        Point Position;
        double confidence;

        //得到每个输出的数据
        float *data = (float *)m_outs[num].data;
        for (int j = 0; j < m_outs[num].rows; j++, data += m_outs[num].cols)
        {
            //得到该输出的所有类别的
            Mat scores = m_outs[num].row(j).colRange(5, m_outs[num].cols);

            //获取最大置信度对应的值和位置
            minMaxLoc(scores, 0, &confidence, 0, &Position);

            //对置信度大于阈值的边界框进行相关计算和保存
            if (confidence > m_confThro)
            {
                //data[0],data[1],data[2],data[3]都是相对于原图像的比例
                int centerX = (int)(data[0] * m_width);
                int centerY = (int)(data[1] * m_height);
                int width = (int)(data[2] * m_width);
                int height = (int)(data[3] * m_height);
                int left = centerX - width / 2;
                int top = centerY - height / 2;
                //保存信息
                m_classIds.push_back(Position.x);
                m_confs.push_back((float)confidence);
                m_boxes.push_back(Rect(left, top, width, height));
            }
        }
    }
    //非极大值抑制,以消除具有较低置信度的冗余重叠框
    NMSBoxes(m_boxes, m_confs, m_confThro, m_NMSThro, m_perfIndx);
}

//画出检测结果
void Detection::Drawer()
{
    //获取所有最佳检测框信息
    for (int i = 0; i < m_perfIndx.size(); i++)
    {
        int idx = m_perfIndx[i];
        Rect box = m_boxes[idx];
        DrawBoxes(m_classIds[idx], m_confs[idx], box.x, box.y,
                  box.x + box.width, box.y + box.height);
    }
}

//画出检测框和相关信息
void Detection::DrawBoxes(int classId, float conf, int left, int top, int right, int bottom)
{
    //画检测框
    rectangle(m_frame, Point(left, top), Point(right, bottom), Scalar(255, 178, 50), 3);

    //该检测框对应的类别和置信度
    string label = format("%.2f", conf);
    if (!m_classes.empty())
    {
        CV_Assert(classId < (int)m_classes.size());
        label = m_classes[classId] + ":" + label;
    }

    //将标签显示在检测框顶部
    int baseLine;
    Size labelSize = getTextSize(label, FONT_HERSHEY_SIMPLEX, 0.5, 1, &baseLine);
    top = max(top, labelSize.height);
    rectangle(m_frame, Point(left, top - round(1.5 * labelSize.height)), Point(left + round(1.5 * labelSize.width), top + baseLine), Scalar(255, 255, 255), FILLED);
    putText(m_frame, label, Point(left, top), FONT_HERSHEY_SIMPLEX, 0.75, Scalar(0, 0, 0), 1);
}

//获取Mat对象
Mat Detection::GetFrame()
{
    return m_frame;
}

//获取结果图像宽度
int Detection::GetResWidth()
{
    return m_width;
}

//获取结果图像高度
int Detection::GetResHeight()
{
    return m_height;
}
2.2.4 CMakeLists.txt
cmake_minimum_required(VERSION 3.10)

project(yolo4_test)

set(CMAKE_CXX_STANDARD 11)

# Add block directories
set(DETECTION Detection.cpp)
add_executable(yolo4_test main.cpp ${DETECTION})

#寻找opencv库
find_package(OpenCV REQUIRED)

#添加头文件
include_directories(${OpenCV_INCLUDE_DIRS})
#链接Opencv库
target_link_libraries(yolo4_test ${OpenCV_LIBS} )
2.3 编译和测试
- cd 到源码目录
- mkdir build
- cd build
- cmake ..
- make
- ./yolo4_test(运行在build文件夹生成的可执行文件yolo4_test)
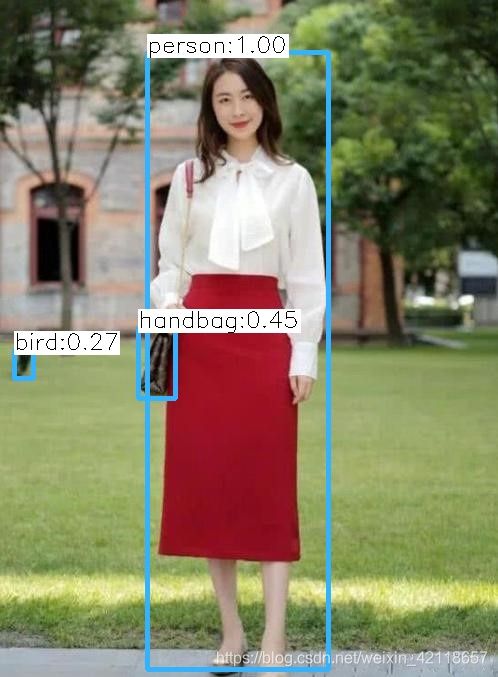
结果如下:
