如何编译并调试NVDLA编译器源码
如何编译并调试NVDLA编译器源码
- 一.NVDLA编译器
-
- 1.1 什么是NVDLA?
- 1.2 NVDLA软件栈是如何工作的
- 1.3 NVDLA 软件栈存在的问题
- 1.4 基于Tengine AI推理框架的NVDLA前端扩展
- 二.如何编译和调试源码
-
- 2.1 在docker容器中运行 nvdla compiler
- 2.2 在ubuntu16.04上编译并运行nvdla compiler
- 三.源码调试技巧
-
- 3.1 基于GDB的调试方法
-
- 3.1.1 配置gdb
- 3.1.2 启动gdb调试compiler源码
- 3.2 在ubuntu16.04下配置vscode
-
- 3.2.1 安装包
- 3.2.2 安装方式
- 四.总结与展望
一.NVDLA编译器
1.1 什么是NVDLA?
NVDLA简单来说就是英伟达公司开源的AI处理器框架。NVDLA处理器主要包括Convolution Core,SDP,CDP,PDP等几个部分,分别进行卷积,线性运算,池化运算等等。可以单个模块工作,也可以多个模块协同工作。比如说Convlotion卷积得到的结果可以作为SDP的输入进行relu计算。
为了让NVDLA的硬件可以更高效的配置,官方还开源了配套的软件工具链。
- compiler 编译器
- runtime 运行时
- kmd 内核驱动程序
其中compiler就是本文要介绍的重点,笔者是研0进入实验室接触的编译器项目。苦于开发经验不足,在大型项目的开发和源码阅读调试上走了很多的弯路,本文主要记录了compiler源码阅读的一些心得和实践经验!
1.2 NVDLA软件栈是如何工作的
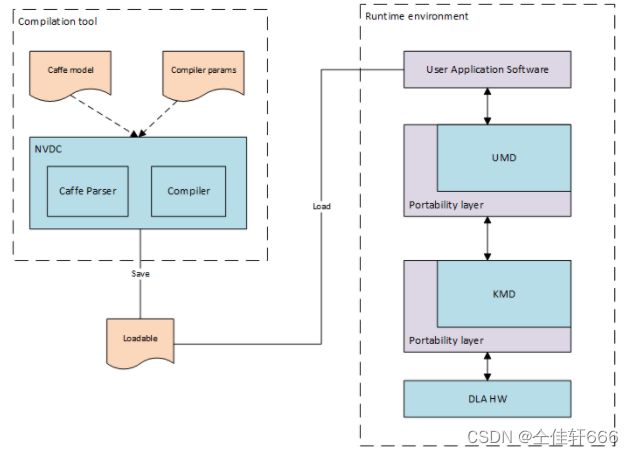
- NVDLA编译器主要是将市面上主流框架描述的神经网络模型层层抽象,最后生成硬件可识别的Loadable中间文件。
- Loadable文件递交给NVDLA的runtime部分进行tensor的内存空间开辟和神经网络超参数与不同网络层之间依赖的关系的变量的传递。
- NVDLA runtime将和内核驱动程序KMD 通过IOCTL接口进行传输,完成由用户态到内核态的信息传递。KMD读取已经写入内存的参数信息。
- 根据runtime提供的参数信息逐层使能硬件,进行NVDLA硬件层的读写。NVDLA硬件层通过中断的方式通知内核驱动程序做出下一步反应。
1.3 NVDLA 软件栈存在的问题
- NVDLA的编译器的前端只能完成Caffe框架的神经网络模型的转换。而市面上主流框架如Pytorch,TensorFlow无法通过编译的方式进行网络推理算法的调度。除非对硬件寄存器读写十分熟悉,否则无法进行网络的读写。
- NVDLA软件栈代码可读性差,二次开发难度大。
1.4 基于Tengine AI推理框架的NVDLA前端扩展
参考链接:基于Tengine的开源加速器工具链
扩展思路:
- Tengine框架将不同前端神经网络框架如onnx,pytorch,tensorflow等等统一表示为TMFILE中间图表示。由Tengine自主开发的编译器前端将TMFILE转换为一层IR(中间层表示)。
- NVDLA 编译器也有多级IR设计,Network,不带硬件信息的网络图层表示,带硬件信息的网络图层表示。
- Tengine为开发者预留了后端添加的接口。开发者要做的工作就是将完成Tengine IR到 NVDLA IR的映射工作。pups://www.bilibili.com/video/BV1z44y1478k/?spm_id_from=333.337.search-card.all.click&vd_source=3eb6e78095bdeff2f58268779ccf30d7)
优势与问题:
- NVDLA官方的工具链 compile,runtime,前端网路都是分散的。需要用户自行调用相关库。Tengine完成NVDLA后端扩展后,可以直接从网路到后端方便用户的使用。
- NVDLA的算子有限只能进行conv,relu,pool等算子的运算。随着网络结构越来越复杂。NVDLA显然不能满足需求,Tengine可以将不满足NVDLA的算子切图给CPU进行运算。
- NVDLA只支持8bit运算。而主流网络架构一般为fp32类型这就需要量化。NVDLA官方的量化方法参考Tensorrt,但是内部有许多bug。且环境依赖复杂。Tengine的量化工具简单易用,提供了量化与反量化接口有助于用户二次开发 。
二.如何编译和调试源码
2.1 在docker容器中运行 nvdla compiler
如何使用docker请参考笔者的另一篇博客https://mp.csdn.net/mp_blog/creation/editor/121117430
你可以直接从官方提供的docker源下载docker镜像:
docker pull nvdla/vp
根据笔者实践在官方的docker容器中compiler可以正常运行,但是runtime会出现一些未知的错误,若要调试runtime程序请下载另外一个docker镜像具体操作步骤参考如下链接。
https://github.com/cahz/nvdla-vp-docker
第一步启动镜像:
docker run -it esatu/nvdla-vp
第二部从网络上获取测试文件运行nvdla compiler
cd /usr/local/nvdla-compiler/
wget https://www.esp.cs.columbia.edu/docs/thirdparty_acc/lenet_mnist.prototxt
wget https://www.esp.cs.columbia.edu/docs/thirdparty_acc/lenet_mnist.caffemodel
wget https://www.esp.cs.columbia.edu/docs/thirdparty_acc/lenet_mnist.json
wget https://github.com/nvdla/sw/raw/master/regression/images/digits/seven.pgm
./nvdla_compiler --prototxt lenet_mnist.prototxt --caffemodel lenet_mnist.caffemodel --profile fast-math --cprecision int8 --configtarget nv_small --calibtable lenet_mnist.json --quantizationMode per-filter --informat nchw
mv fast-math.nvdla seven.pgm /usr/local/vp/sw
这是运行nvdla compiler最简单的方法,如果你想在自己的主机或者是开发板上编译运行编译器请参考下面这种方法。
2.2 在ubuntu16.04上编译并运行nvdla compiler
- 拉取代码:
git clone https://github.com/LeiWang1999/ZYNQ-NVDLA
- 编译protobuf(不同处理器架构的protobuf库需要重新编译主要是把网络模型读入)
cd ~/ZYNQ-NVDLA/umd/external/protobuf-2.6/
apt-get install -y autoconf automake libtool
autoscan & aclocal & autoconf
automake --add-missing
./configure --prefix /usr/local #否则可能会找不到编译的libprotobuf.a
make -j `nproc`
make install
cp /usr/local/lib/libprotobuf.a ~/ZYNQ-NVDLA/umd/apps/compiler/
- 编译compiler
cd ~/ZYNQ-NVDLA/umd/
make -j `nproc` TOP=${PWD} TOOLCHAIN_PREFIX=/usr/bin/ compiler #PWD为项目所在路径
编译的可执行文件在目录的out文件夹下,直接运行可能会找不到动态库。可以定义库文件搜索路径。也可以将把libnvdla_compiler.so拷贝到nvdla_compiler的目录下即可。
export LD_LIBRARY_PATH=/$PWD$/umd/out/core/src/compiler/libnvdla_compiler/
- 运行编译器
./nvdla_compiler -h
出现如下命令,则编译器可以正常运行。
Usage: ./nvdla_compiler [-options] --prototxt <prototxt_file> --caffemodel <caffemodel_file>
where options include:
    -h                                                          print this help message
    -o <outputpath>                                             outputs wisdom files in 'outputpath' directory
    --profile <basic|default|performance|fast-math>             computation profile (default: fast-math)
    --cprecision <fp16|int8>                                    compute precision (default: fp16)
    --configtarget <opendla-full|opendla-large|opendla-small>   target platform (default: nv_full)
    --calibtable <int8 calib file>                              calibration table for INT8 networks (default: 0.00787)
    --quantizationMode <per-kernel|per-filter>                  quantization mode for INT8 (default: per-kernel)
    --batch                                                     batch size (default: 1)
    --informat <ncxhwx|nchw|nhwc>                               input data format (default: nhwc)
三.源码调试技巧
3.1 基于GDB的调试方法
3.1.1 配置gdb
在阅读一个陌生的代码的时候,在代码中的关键部位打断点,观察变量的输入和输出无疑是很好的一个办法。
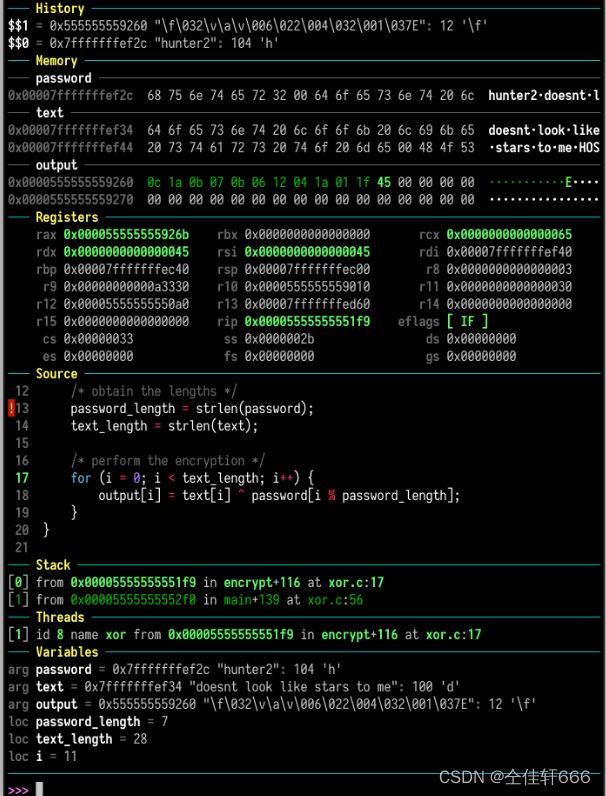
因为nvdla代码是运行在linux环境下的,如果运行在嵌入式板卡上可能连图形界面都没有。所以我们要放弃对IDE的依赖打造一个轻量级的代码调试环境。很显然,GDB在某种特殊条件下唯一选择。本节将介绍如何配置GDB,让GDB拥有和IDE一样炫酷的效果。
参考开源配置:https://github.com/cyrus-and/gdb-dashboard
配置方法也很简单,只需要,将配置写入.gdbinit文件
wget -P ~ https://git.io/.gdbinit
- 输出
- 汇编代码
- 内存地址
- 断点位置
- 源码
- 变量展示
- shell交互
3.1.2 启动gdb调试compiler源码
- step one gdb +可执行文件
gdb ./nvdla_compiler
- step two 设置main函数读入参数
set args --prototxt ~/lenet-mnist-caffe/lenet/lenet.prototxt --caffemodel ~/lenet-mnist-caffe/lenet/lenet.caffemodel --cprecision int8 --calibtable ~/lenet-mnist-caffe/lenet.int8.json --configtarget nv_small #根据个人参数修改
- step three 设置断点
b 源代码文件名:行数
或者
b 函数名
tips:因为源代码在动态库里,需要先使用r命令运行一次加载动态库,然后gdb软件能识别动态库中的源文件。
- step four 使用r全速运行,使用n执行下一个指令,使用s进入函数,使用p打印变量
3.2 在ubuntu16.04下配置vscode
vscode是一个集大成的IDE,你可以在其中配置任意功能。作为一个嵌入式开发者,我们的工作环境一般是在linux上完成的。下面我将介绍一下在linux下配置vscode的方法。
3.2.1 安装包
x86架构linux版本:
链接:https://pan.baidu.com/s/1c2b3QG2yUSywUZj8GOjaTA
提取码:1999
3.2.2 安装方式
dpkg -i 安装包路径
四.总结与展望
因为篇幅有限,源码分析就不在这篇文章阐述了。基于上述方法,相信你已经掌握了compiler的调试技巧,或者说是任意大型项目的调试方法。源码解析和fpga验证方法将在不久后更新,记得关注博主噢!

