使用IDEA创建spring boot项目以及介绍
目录
- 文章介绍
- spring boot 简介
- 微服务
- 环境准备
- spring boot 之Hello world
- hello world 之探究
-
- 主程序
- IDEA使用Spring 快速创建spring boot工程
- 遇到的问题
-
- IDEAsetting找不到
- macOS配置环境
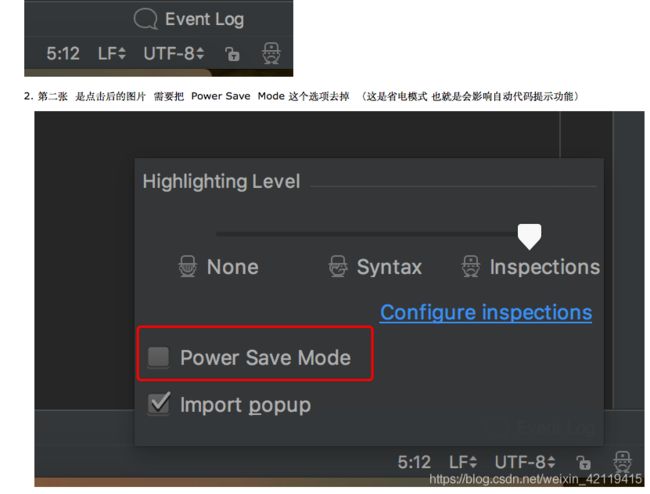
- IDEA完全没有代码提示
文章介绍
本文为我学习日志,记录学习过程。整体章节分为16章
- spring boot 入门
- 配置
- spring boot 与日志
- 与web开发
- 与Docker
- 与数据访问
- 与启动配置原理
- spring boot自定义starters
- spring boot与缓存
- 与消息
- 与检索
- 与任务
- 与安全
- 与分布式
- 与开发热部署
- 与监控管理
spring boot 简介
作用:帮我们很快的简单的创建一个独立的产品级别的应用
优点:
- 快速创建
- 使用嵌入式的Servlet容器,应用无需打包成war
- starters(启动器)自动依赖于版本控制
- 大量的自动配置,简化开发,可以修改默认值
- 无需配置xml,无代码生成,开箱即用
- 准备生产环境的运行时应用监控
- 于云计算的天然集成
缺点: - 入门容易,精通难(需要掌握spring底层非常了解)
J2EE开发的一站式部署
微服务
背景:Martion fowler的博客,设计思想
微服务是一种架构风格,开发一个应用时应为一组小型服务的组合;通过http方式进行互通;每一个功能元素最终都是一个可独立替换可独立升级的软件单元。
单体应用:ALL IN ONE
环境准备
jdk1.8
maven3.0
IEDA2019
spring boot 2.1.5
maven:给mavensetting.xml文件添加代码
<profile>
      <id>jdk-1.8id>

      <activation>
      	<activeByDefault>trueactiveByDefault>
        <jdk>1.8jdk>
      activation>

      <properties>
      	<maven.compiler.source>1.8maven.compiler.source>
      	<maven.compiler.target>1.8maven.compiler.target>
      	<maven.compiler.compilerVersion>1.8maven.compiler.compilerVersion>
      properties>
    profile>
spring boot 之Hello world
实现一个功能:浏览器发送一个hello请求,服务器接受服务器请求,相应Hello World字符串;
<parent>
        <groupId>org.springframework.bootgroupId>
        <artifactId>spring-boot-starter-parentartifactId>
        <version>2.1.5.RELEASEversion>
        <relativePath/>
    parent>

    <dependencies>
        <dependency>
            <groupId>org.springframework.bootgroupId>
            <artifactId>spring-boot-starter-webartifactId>
        dependency>
    dependencies>
- 编写主程序
package ink.poesy;

import org.springframework.boot.SpringApplication;
import org.springframework.boot.autoconfigure.SpringBootApplication;

@SpringBootApplication
public class HelloSpringBootApplication {
    public static void main(String[] args) {
        SpringApplication.run(HelloSpringBootApplication.class,args);
    }
}
- 编写相关的Controller和servlet
package ink.poesy.controller;

import org.springframework.stereotype.Controller;
import org.springframework.web.bind.annotation.RequestMapping;
import org.springframework.web.bind.annotation.ResponseBody;

@Controller
public class HelloController {
    @ResponseBody//目的是为了把hello world返回给请求
    @RequestMapping("/hello")
    public String hello(){
        return "Hello world!";
    }
}
- 直接运行主程序访问localhost:8080/hello打印出Hello world!
- 简化部署工作
<build>
        <plugins>
            <plugin>
                <groupId>org.springframework.bootgroupId>
                <artifactId>spring-boot-maven-pluginartifactId>
            plugin>
        plugins>
    build>
直接使用这个工具就可以进行打包
hello world 之探究
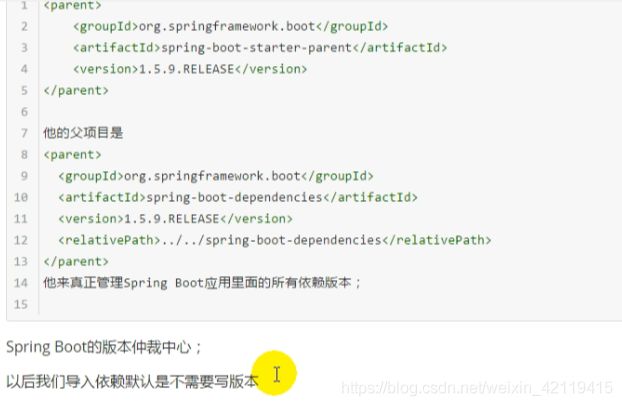
spring-boot-starter-web依赖:帮我们导入web模块正常运行所依赖的组件
spring boot 将所有的功能场景抽取出来,做成一个个Starters启动器,只需要在项目里面引入这些starter相关的场景的所有依赖都会导入进来,要用什么功能就导入什么场景的启动器。
主程序
核心注解:@SpringbootApplication标注在某个类上说明这个类是springboot的主配置类
@Target({ElementType.TYPE})
@Retention(RetentionPolicy.RUNTIME)
@Documented
@Inherited
@SpringBootConfiguration
@EnableAutoConfiguration
@ComponentScan(
    excludeFilters = {@Filter(
    type = FilterType.CUSTOM,
    classes = {TypeExcludeFilter.class}
), @Filter(
    type = FilterType.CUSTOM,
    classes = {AutoConfigurationExcludeFilter.class}
)}
)
public @interface SpringBootApplication {
解释:
@SpringBootConfiguration:Spring boot的配置类
标注某个类上,表示这是一个spirng boot配置类:
@Configuration:配置类上标注这个注解:
配置类----配置文件;配置类也是容器组件中的一个;@Component
@EnableAutoConfiguration:开启自动配置功能
以前我们需要配置的东西,spring boot帮我们自动配置,这个注解告诉spring boot开启自动配置功能;这样自动配置才能生效。
进入到这个注解中我们看到使用:
@AutoConfigurationPackage:自动配置包
下面@Import:给容器导入一个组件;
@Import(EnableAutoConfigurationImportSelector.class);给容器中导入组件nableAutoConfigurationImportSelector.class:导入那些组件选择器:将所有导入的组件以全类名的方式返回,这些组件就会被添加到容器中;最终会给容器中导入非常多的自动配置类(xxxAutoCOnfiguration);就是给容器中导入这个场景需要的所有组件,并配置好这些组件;有了这些自动配置类,免去我们手动编写配置和注入功能组件等工作;
作用:将主配置类(@SpringBootConfiguration标注的类)的所在包及下面所有自曝里面的所有组件扫描到spring容器;
@ComponentScan
IDEA使用Spring 快速创建spring boot工程
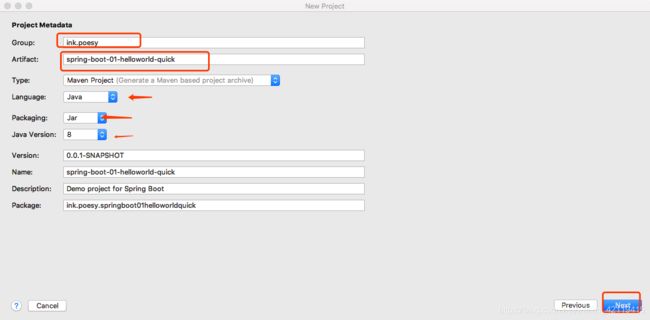
使用Spring boot

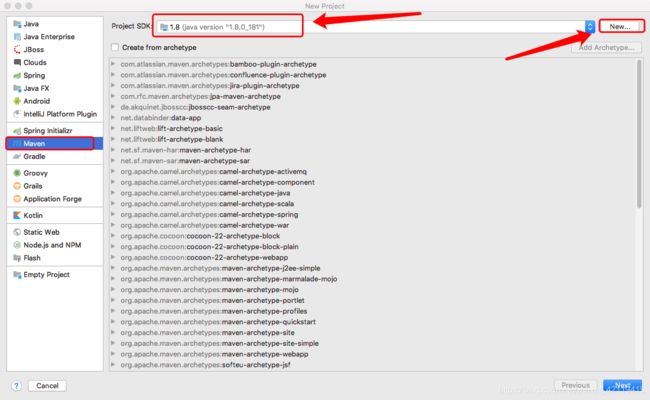
下一步,创建项目
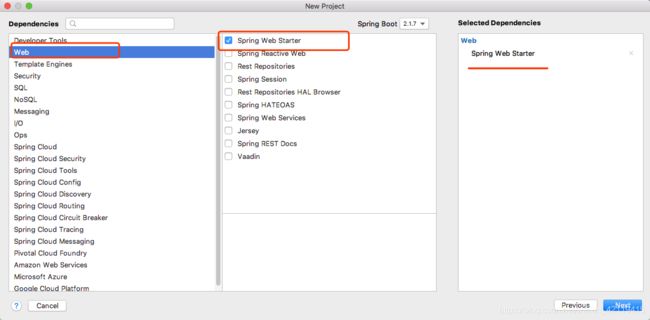
选择模块,导入场景,需要导入相关功能的依赖。
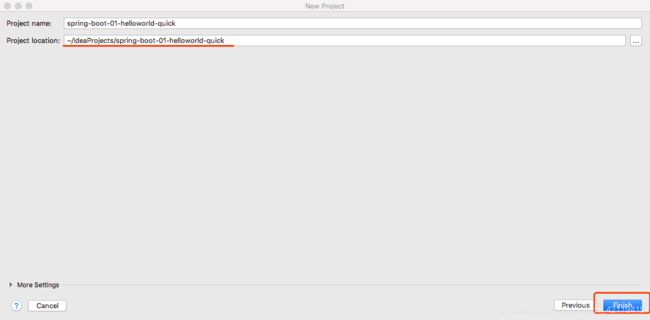
配置项目路径
选择自动加载
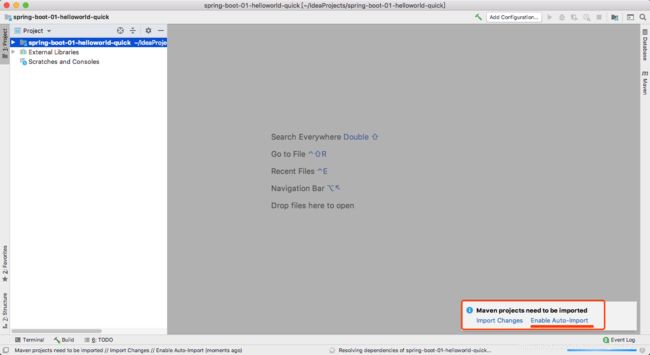
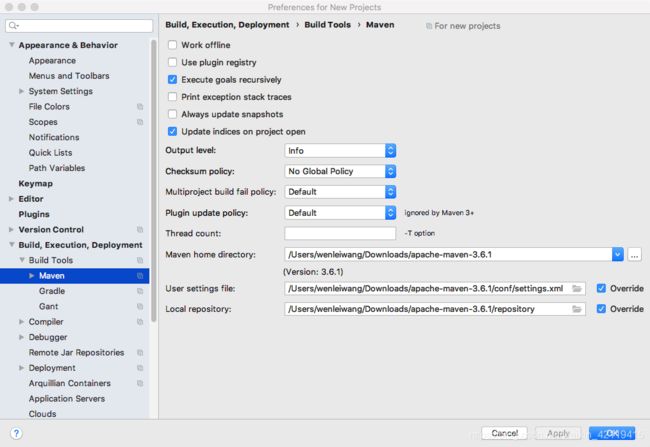
我这里需要修改Maven配置
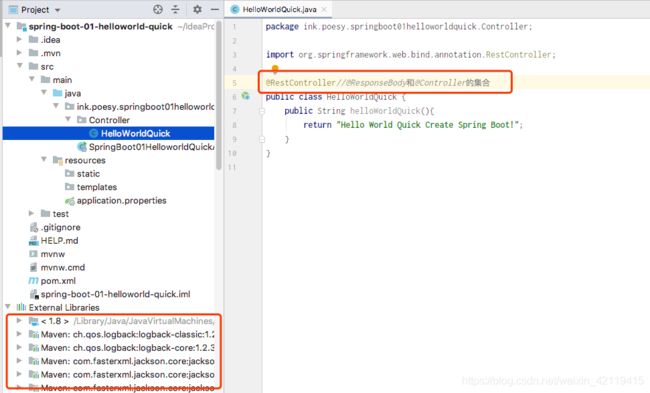
package ink.poesy.springboot01helloworldquick.Controller;

import org.springframework.web.bind.annotation.RestController;

@RestController//@ResponseBody和@Controller的集合
public class HelloWorldQuick {
	@RequestMapping("hello")//这句上面截图忘记了
    public String helloWorldQuick(){
        return "Hello World Quick Create Spring Boot!";
    }
}
- 主程序已经生成好了,我们只需要编写我们自己的逻辑
- resources文件夹中的目录结构
Static:保存所有的静态资源;js css images;
templates:保存所有的模版页面;(Spring boot默认jar包使用嵌入式Tomcat,默认不支持JSP页面);可以使用模版引擎(freemarker、thymelef);
application.properties:修改默认配置
遇到的问题
IDEAsetting找不到
因为新换了macOS系统使用苹果系统的IDEA没找见setting,不能配置maven
macOS配置环境
没有配置maven环境变量导致项目找不到maven库

这里还遇到了配置环境变量时创建bash_profile文件导致全部环境变量不可用,解决方案
- 在命令窗口章节书写下面命令,保证命令暂时起作用
export PATH=/usr/local/sbin:/usr/local/bin:/sbin:/bin:/usr/sbin:/usr/bin:/root/bin - 编辑.bash_profile文件
vim ~/.bash_profile - 点击i进入编辑命令
- 添加上边那句话到文件
- 按esc退出编辑命令,输入
:填写wq保存退出 - 关闭命令窗口,重新进入输入命令。
