【MMDet Note】MMDetection中Neck之FPN代码理解与解读
文章目录
- 前言
- 一、总概
- 二、代码解读
-
- 1.FPN类
- 2.def forward
- 总结
前言
mmdetection/mmdet/models/necks/fpn.py中FPN类的个人理解与解读。
一、总概
本文以mmdetection/configs/base/models/retinanet_r50_fpn.py中的RetinaNet配置参数为例进行分析。
以下是RetinaNet模型的Neck参数配置:
neck=dict(
	type='FPN',
    # in_channal对应ResNet输出的4个尺度特征图channel数
	in_channels=[256, 512, 1024, 2048],
    # FPN 输出的每个尺度输出特征图通道
	out_channels=256,
    # in_channels对应的特征图从index=1开始用,即FPN用了后三个特征图
	start_level=1,
    # 额外输出层的特征图来源
	add_extra_convs='on_input',
    # FPN 输出特征图个数为5, stride = 8,16,32,64,128
	num_outs=5),
二、代码解读
1.FPN类

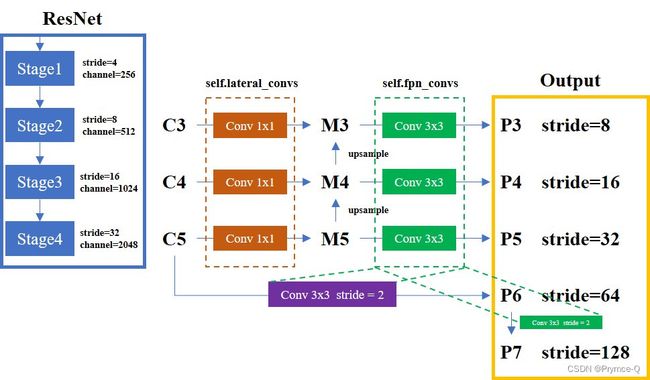
代码的标注#都是以RetinaNet的config为例的哦~~代码解读与图片中的内容是互相对应的!!!
@NECKS.register_module()
class FPN(BaseModule):
    def __init__(self,
                 in_channels,             # RetinaNet为例 [256, 512, 1024, 2048]
                 out_channels,            # 256
                 num_outs,                # 5
                 start_level=0,           # 1
                 end_level=-1,
                 add_extra_convs=False,   # 'on_input'
                 relu_before_extra_convs=False,
                 no_norm_on_lateral=False,
                 conv_cfg=None,
                 norm_cfg=None,
                 act_cfg=None,
                 upsample_cfg=dict(mode='nearest'),
                 init_cfg=dict(
                     type='Xavier', layer='Conv2d', distribution='uniform')):
        super(FPN, self).__init__(init_cfg)
        assert isinstance(in_channels, list)
        self.in_channels = in_channels                              # self.in_channels = [256, 512, 1024, 2048]
        self.out_channels = out_channels                            # self.out_channels = 256    对应图中M3-M5的channel数为256
        self.num_ins = len(in_channels)                             # self.num_ins = 4
        self.num_outs = num_outs                                    # self.num_outs = 5     对应图中P3-P7
        # 下面4个参数对于结构理解关系不大
        self.relu_before_extra_convs = relu_before_extra_convs
        self.no_norm_on_lateral = no_norm_on_lateral
        self.fp16_enabled = False
        self.upsample_cfg = upsample_cfg.copy() # 上采样参数

        if end_level == -1 or end_level == self.num_ins - 1:
            self.backbone_end_level = self.num_ins                  # self.backbone_end_level = 4
            assert num_outs >= self.num_ins - start_level
        else:
            # if end_level is not the last level, no extra level is allowed
            self.backbone_end_level = end_level + 1
            assert end_level < self.num_ins
            assert num_outs == end_level - start_level + 1
        self.start_level = start_level                              # self.start_level = 1
        self.end_level = end_level                                  # self.end_level = -1
        self.add_extra_convs = add_extra_convs                      # self.add_extra_convs = 'on_input'
        assert isinstance(add_extra_convs, (str, bool))
        if isinstance(add_extra_convs, str):
            # Extra_convs_source choices: 'on_input', 'on_lateral', 'on_output'
            assert add_extra_convs in ('on_input', 'on_lateral', 'on_output')
        elif add_extra_convs:  # True
            self.add_extra_convs = 'on_input'


        self.lateral_convs = nn.ModuleList()        # 对应图中橙色虚线框
        self.fpn_convs = nn.ModuleList()            # 对应图中绿色虚线框

        for i in range(self.start_level, self.backbone_end_level):    # start_level = 1, backbone_end_level = 4,整体数量为3
            # 构造conv 1x1,对应图中3个橙色矩阵
            l_conv = ConvModule(
                in_channels[i],
                out_channels,
                1,      # kernel_size = 1
                conv_cfg=conv_cfg,
                norm_cfg=norm_cfg if not self.no_norm_on_lateral else None,
                act_cfg=act_cfg,
                inplace=False)
            # 构造conv 3x3,对应图中3个绿色矩阵
            fpn_conv = ConvModule(
                out_channels,
                out_channels,
                3,
                padding=1,
                conv_cfg=conv_cfg,
                norm_cfg=norm_cfg,
                act_cfg=act_cfg,
                inplace=False)

            self.lateral_convs.append(l_conv)
            self.fpn_convs.append(fpn_conv)

        # 添加额外的conv level (e.g., RetinaNet)
        extra_levels = num_outs - self.backbone_end_level + self.start_level    # extra_levels = 5 - 4 + 1 = 2
        # 其实不论怎么样这个extra_levels都会>=1(当前理解的也就是,在默认情况下图中的Output中的绿色矩形始终存在)
        if self.add_extra_convs and extra_levels >= 1:
            for i in range(extra_levels):    # 2
                if i == 0 and self.add_extra_convs == 'on_input':                # 当i == 0时,满足条件
                    in_channels = self.in_channels[self.backbone_end_level - 1]  # 当i == 0时,in_channels = in_channels[3] 也即2048,此时构造的对应图中紫色的矩阵
                else:                                                            # 当i == 0时,in_channels = 256
                    in_channels = out_channels
                # 构造conv 3x3, stride=2
                extra_fpn_conv = ConvModule(
                    in_channels,
                    out_channels,
                    3,
                    stride=2,
                    padding=1,
                    conv_cfg=conv_cfg,
                    norm_cfg=norm_cfg,
                    act_cfg=act_cfg,
                    inplace=False)
                self.fpn_convs.append(extra_fpn_conv)
        # 因此RetinaNet最终fpn_convs中有5块Conv块,即对应图中绿色虚线框关联的内容有5块
2.def forward
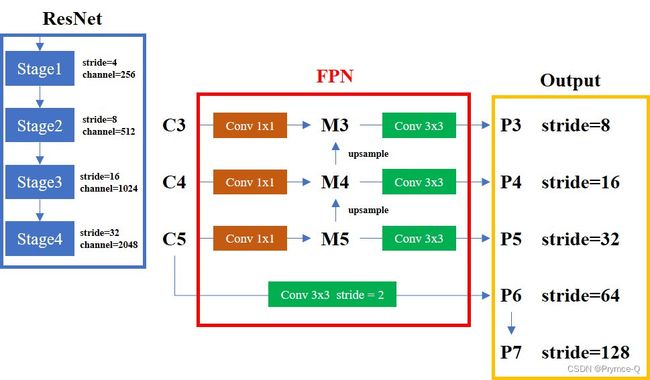
这里重新贴一下上面的图,代码解读与图片中的内容是互相对应的!!!

    @auto_fp16()
    def forward(self, inputs):
        """Forward function."""
        assert len(inputs) == len(self.in_channels)

        # laterals 用来记录每一次计算后的输出值,可以理解成是一个临时变量temp
        laterals = [
            lateral_conv(inputs[i + self.start_level])              # self.start_level = 1,inputs[i + 1]为C3-C5的输入
            for i, lateral_conv in enumerate(self.lateral_convs)
        ]
        # 此时,laterals 已经记录了C3-C5经过conv 1x1之后得到的M3-M5值(还未upsample)

        # build top-down path
        used_backbone_levels = len(laterals)                # 3
        for i in range(used_backbone_levels - 1, 0, -1):    # i in [2,1]
            # In some cases, fixing `scale factor` (e.g. 2) is preferred, but
            #  it cannot co-exist with `size` in `F.interpolate`.
            if 'scale_factor' in self.upsample_cfg:
                # fix runtime error of "+=" inplace operation in PyTorch 1.10
                laterals[i - 1] = laterals[i - 1] + F.interpolate(
                    laterals[i], **self.upsample_cfg)
            else:
                # 这里也就是upsample与相加的操作,可以理解成经过“upsample”与“+”的操作后,才得到真正的M3-M5的值
                prev_shape = laterals[i - 1].shape[2:]
                laterals[i - 1] = laterals[i - 1] + F.interpolate(
                    laterals[i], size=prev_shape, **self.upsample_cfg)
        # 此时,laterals 记录了经过upsample之后得到的新M3-M5值


        # 建立 outputs
        # part 1: from original levels 此处out对应P3-P5
        outs = [
            self.fpn_convs[i](laterals[i]) for i in range(used_backbone_levels)   # used_backbone_levels = 3
        ]
        # part 2: add extra levels
        if self.num_outs > len(outs):       # self.num_outs = 5
            # use max pool to get more levels on top of outputs
            # (e.g., Faster R-CNN, Mask R-CNN)
            if not self.add_extra_convs:     # self.add_extra_convs = 'on_input'
                for i in range(self.num_outs - used_backbone_levels):
                    outs.append(F.max_pool2d(outs[-1], 1, stride=2))
            # add conv layers on top of original feature maps (RetinaNet)
            else:
                if self.add_extra_convs == 'on_input':             # 满足条件
                    extra_source = inputs[self.backbone_end_level - 1]  # self.backbone_end_level - 1 = 3 , extra_source 对应图中的C5
                elif self.add_extra_convs == 'on_lateral':
                    extra_source = laterals[-1]
                elif self.add_extra_convs == 'on_output':
                    extra_source = outs[-1]
                else:
                    raise NotImplementedError
                # 此处outs增加P6
                outs.append(self.fpn_convs[used_backbone_levels](extra_source))   # self.fpn_convs[used_backbone_levels]对应图中紫色的矩阵
                for i in range(used_backbone_levels + 1, self.num_outs): # i in [4]
                    if self.relu_before_extra_convs:
                        outs.append(self.fpn_convs[i](F.relu(outs[-1])))
                    else:
                        # 此处out增加P7
                        outs.append(self.fpn_convs[i](outs[-1]))  # self.fpn_convs[i]对应con3x3,stride=2     outs[-1]对应P6     这里也对应了之前提到的“在默认情况下图中的Output中的绿色矩形始终存在”
        return tuple(outs)
总结
本文仅代表个人理解,若有不足,欢迎批评指正。
参考:
【夜深人静读MM】MMdetection框架之Neck中的FPN解读
轻松掌握 MMDetection 中常用算法(一):RetinaNet 及配置详解
