VGGNet简介及VGG13实现cifar100分类
目录
VGGNet简介
VGGNet简介
VGG的创新之处
VGG的缺点
VGG13实现cifar100分类
cifar100
tensorflow实现VGG13
VGGNet简介
VGGNet简介
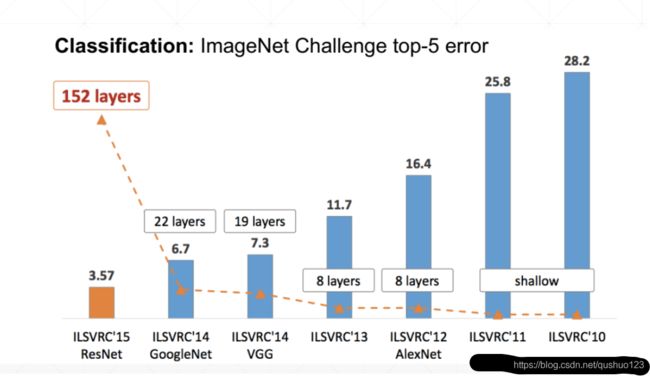
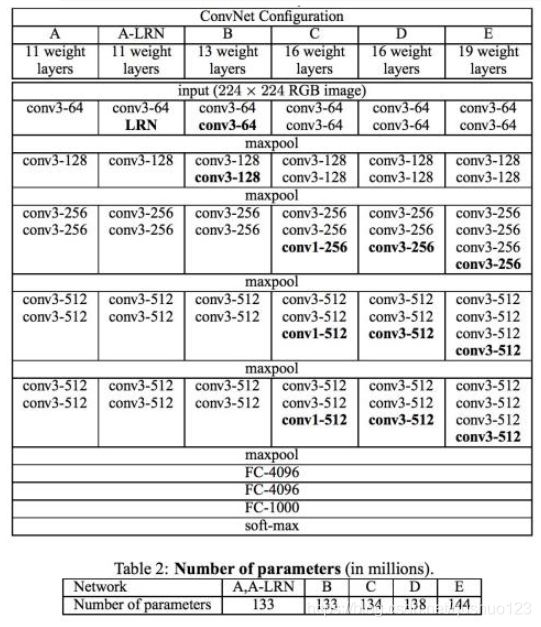
VGGNet由牛津大学计算机视觉组合和Google DeepMind公司研究员一起研发的深度卷积神经网络。VGG名字来源于Visual Geometry Group, Department of Engineering Science, University of Oxford。它探索了卷积神经网络的深度和其性能之间的关系,通过反复的堆叠3*3的小型卷积核和2*2的最大池化层,成功的构建了16~19层深的卷积神经网络。VGGNet获得了ILSVRC 2014年识别比赛的亚军,在top5上的错误率为7.3%。目前为止,VGGNet大多被用来提取图像的特征。
下图是前几年ImageNet识别比赛的效果,可以看到2014年的冠军是被GoogLeNet拿到(为了纪念深度学习三驾马车之一的Yann LeCun提出的LeNet)。相比于2012年横空出世的具有启发意义的AlexNet来说,也降低了9.1%的错误率。当然对于最实用的残差神经网络ResNet还是有点差距的,因此现在大多用VGG来提取特征,不是简单的用于识别与分类。
VGG的网络结构图和参数表如下:
VGG的创新之处
1、采用3*3卷积核等较小的卷积核代替7*7等较大的卷积核。采用三个3*3的卷积核可以达到7*7卷积核的效果,即3个3*3的卷积核的整体感受野与7*7的相当,但总共只需要3*3*3=27个参数,而7*7的需要49个参数,也就是说参数量可以减少将近一倍。同时一个7*7的卷积层后面跟一个非线性层,而三个3*3的每个后面跟一个非线性层,总共有三个,因此还可以增加网络深度和表达能力。
2、首次采用了1*1的卷积核。1*1卷积核并没有造成图像大小变化,但会引入非线性函数,因此可以提高表达能力。而且还能进行降维。
VGG的缺点
1、VGG某种意义上仍属于传统的卷积网络,因此当层数过深时,就会出现参数过大,训练困难的局面。
2、VGG达到19层时便已经饱和,继续增加网络深度效果并不会变好。
因此,ResNet产生,网络深度无限叠加成为了可能。
VGG13实现cifar100分类
cifar100
CIFAR数据集是 Visual Dictionary(Teaching computers to recognize objects) 的子集,由三个教授收集,主要来自google和各类搜索引擎的图片。
这个数据集和cifar10类似,它有100个类,每个类包含600个图像,600个图像中有500个训练图像和100个测试图像。100类实际是由20个类(每个类又包含5个子类)构成(5*20=100)。
tensorflow实现VGG13
VGG13是指共有13个层,其中十个卷积层,三个全连接层,在每两个卷积层后面会跟一个池化层,当然每个卷积层跟一个非线性层也是必不可少的。
下面介绍一下代码的关键处理步骤,完整代码会在最后给出。
定义卷积层:
#定义卷积层
conv_layers = [ # 5 units of conv + max pooling
    # unit 1
    layers.Conv2D(64, kernel_size=[3, 3], padding="same", activation=tf.nn.relu),
    layers.Conv2D(64, kernel_size=[3, 3], padding="same", activation=tf.nn.relu),
    layers.MaxPool2D(pool_size=[2, 2], strides=2, padding='same'),

    # unit 2
    layers.Conv2D(128, kernel_size=[3, 3], padding="same", activation=tf.nn.relu),
    layers.Conv2D(128, kernel_size=[3, 3], padding="same", activation=tf.nn.relu),
    layers.MaxPool2D(pool_size=[2, 2], strides=2, padding='same'),

    # unit 3
    layers.Conv2D(256, kernel_size=[3, 3], padding="same", activation=tf.nn.relu),
    layers.Conv2D(256, kernel_size=[3, 3], padding="same", activation=tf.nn.relu),
    layers.MaxPool2D(pool_size=[2, 2], strides=2, padding='same'),

    # unit 4
    layers.Conv2D(512, kernel_size=[3, 3], padding="same", activation=tf.nn.relu),
    layers.Conv2D(512, kernel_size=[3, 3], padding="same", activation=tf.nn.relu),
    layers.MaxPool2D(pool_size=[2, 2], strides=2, padding='same'),

    # unit 5
    layers.Conv2D(512, kernel_size=[3, 3], padding="same", activation=tf.nn.relu),
    layers.Conv2D(512, kernel_size=[3, 3], padding="same", activation=tf.nn.relu),
    layers.MaxPool2D(pool_size=[2, 2], strides=2, padding='same')

]
定义三个全连接层(包括输出):
fc_net = Sequential([
        layers.Dense(256, activation=tf.nn.relu),
        layers.Dense(128, activation=tf.nn.relu),
        layers.Dense(100, activation=None),
    ])
定义卷积层和全连接层输入的shape,指定优化器及学习率,最后将两个层融合:
conv_net.build(input_shape=[None, 32, 32, 3])
    fc_net.build(input_shape=[None, 512])
    optimizer = optimizers.Adam(lr=1e-4)

    variables = conv_net.trainable_variables + fc_net.trainable_variables
其他部分就是一些加载数据,数据处理等常用的技巧,不再赘述,完整代码如下:
import  tensorflow as tf
from    tensorflow.keras import layers, optimizers, datasets, Sequential
import  os


os.environ['TF_CPP_MIN_LOG_LEVEL']='2'
tf.random.set_seed(2345)

conv_layers = [ # 5 units of conv + max pooling
    # unit 1
    layers.Conv2D(64, kernel_size=[3, 3], padding="same", activation=tf.nn.relu),
    layers.Conv2D(64, kernel_size=[3, 3], padding="same", activation=tf.nn.relu),
    layers.MaxPool2D(pool_size=[2, 2], strides=2, padding='same'),

    # unit 2
    layers.Conv2D(128, kernel_size=[3, 3], padding="same", activation=tf.nn.relu),
    layers.Conv2D(128, kernel_size=[3, 3], padding="same", activation=tf.nn.relu),
    layers.MaxPool2D(pool_size=[2, 2], strides=2, padding='same'),

    # unit 3
    layers.Conv2D(256, kernel_size=[3, 3], padding="same", activation=tf.nn.relu),
    layers.Conv2D(256, kernel_size=[3, 3], padding="same", activation=tf.nn.relu),
    layers.MaxPool2D(pool_size=[2, 2], strides=2, padding='same'),

    # unit 4
    layers.Conv2D(512, kernel_size=[3, 3], padding="same", activation=tf.nn.relu),
    layers.Conv2D(512, kernel_size=[3, 3], padding="same", activation=tf.nn.relu),
    layers.MaxPool2D(pool_size=[2, 2], strides=2, padding='same'),

    # unit 5
    layers.Conv2D(512, kernel_size=[3, 3], padding="same", activation=tf.nn.relu),
    layers.Conv2D(512, kernel_size=[3, 3], padding="same", activation=tf.nn.relu),
    layers.MaxPool2D(pool_size=[2, 2], strides=2, padding='same')

]


def preprocess(x, y):
    x = tf.cast(x, dtype=tf.float32) / 255.
    y = tf.cast(y, dtype=tf.int32)
    return x,y


(x,y), (x_test, y_test) = datasets.cifar100.load_data()
y = tf.squeeze(y, axis=1)
y_test = tf.squeeze(y_test, axis=1)


train_db = tf.data.Dataset.from_tensor_slices((x,y))
train_db = train_db.shuffle(1000).map(preprocess).batch(128)
test_db = tf.data.Dataset.from_tensor_slices((x_test,y_test))
test_db = test_db.map(preprocess).batch(64)

def main():

    conv_net = Sequential(conv_layers)

    fc_net = Sequential([
        layers.Dense(256, activation=tf.nn.relu),
        layers.Dense(128, activation=tf.nn.relu),
        layers.Dense(100, activation=None),
    ])

    conv_net.build(input_shape=[None, 32, 32, 3])
    fc_net.build(input_shape=[None, 512])
    optimizer = optimizers.Adam(lr=1e-4)

    variables = conv_net.trainable_variables + fc_net.trainable_variables

    for epoch in range(100):

        for step, (x,y) in enumerate(train_db):

            with tf.GradientTape() as tape:
                out = conv_net(x)
                out = tf.reshape(out, [-1, 512])
                logits = fc_net(out)
                y_onehot = tf.one_hot(y, depth=100)
                loss = tf.losses.categorical_crossentropy(y_onehot, logits, from_logits=True)
                loss = tf.reduce_mean(loss)

            grads = tape.gradient(loss, variables)
            optimizer.apply_gradients(zip(grads, variables))

            if step %100 == 0:
                print(epoch, step, 'loss:', float(loss))


        total_num = 0
        total_correct = 0
        for x,y in test_db:

            out = conv_net(x)
            out = tf.reshape(out, [-1, 512])
            logits = fc_net(out)
            prob = tf.nn.softmax(logits, axis=1)
            pred = tf.argmax(prob, axis=1)
            pred = tf.cast(pred, dtype=tf.int32)

            correct = tf.cast(tf.equal(pred, y), dtype=tf.int32)
            correct = tf.reduce_sum(correct)

            total_num += x.shape[0]
            total_correct += int(correct)

        acc = total_correct / total_num
        print(epoch, 'acc:', acc)


if __name__ == '__main__':
    main()
结果展示:
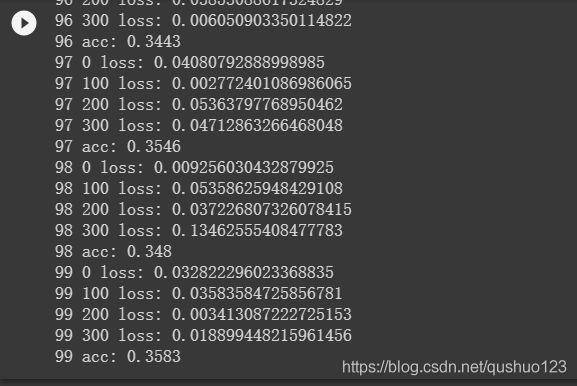
可以看到,损失是逐步减小的,准确率也在提升。我们设置的epoch是100,但训练时间较长,因此只训练到第17个epoch就停止了,结果如下:
由于cifar100算是比较复杂的数据集,而VGG13比VGG19浅,再加上VGGNet本身的缺陷,所以最终识别率也就35%多点。
同样的结构,放到cifar10上跑,结果可以达到75%多点,证明网络结构还有可优化之处。


