XGboost调参_自己练习
主要参考:https://blog.csdn.net/kicilove/article/details/78413112#comments
https://wuhuhu800.github.io/2018/02/28/XGboost_param_share/#xgboost%E7%9A%84%E5%8F%82%E6%95%B0

开始:
导入库,加载数据
import pandas as pd
import numpy as np
import xgboost as xgb
from xgboost.sklearn import XGBClassifier
from sklearn import metrics
from sklearn.model_selection import GridSearchCV
from sklearn.model_selection import train_test_split
import matplotlib.pyplot as plt
plt.rcParams['figure.figsize']=(12.0,4.0)

train = pd.read_csv("C:\\Users\\Nihil\\Documents\\pythonlearn\\data\\train_modified.csv")

target='Disbursed' # Disbursed的值就是二元分类的输出
IDcol = 'ID'#写成格式方便对比
x_columns = [x for x in train.columns if x not in [target, IDcol]]
X_train = train[x_columns]
y_train = train['Disbursed']
关于rcParams的用法参考Matplotlib中plt.rcParams用法(设置图像细节)
以上代码采用两种形式的XGBoost:
xgb -原生,可将使用该库中的特定函数“cv”,在每一步迭代中使用交叉验证。并返回理想的树数量。
但交叉验证很慢,所以可以import另一种:
XGBClassifier - XGBoost的sklearn封装。为了用GridSearchCV调整其他参数。
找迭代1:定义一个modelfit函数,建立XGBoost models并进行交叉验证
def modelfit(alg, useTrainCV=True, cv_folds=5, early_stopping_rounds=50):
    if useTrainCV:
        xgb_param = alg.get_xgb_params()
        xgtrain = xgb.DMatrix(X_train,label=y_train)
        cvresult = xgb.cv(xgb_param, xgtrain, num_boost_round=alg.get_params()['n_estimators'], nfold=cv_folds,
            metrics='auc', early_stopping_rounds=early_stopping_rounds, verbose_eval=False)
        alg.set_params(n_estimators=cvresult.shape[0])

    alg.fit(X_train,y_train,eval_metric='auc')
    dtrain_predictions = alg.predict(X_train)
    dtrain_predprob = alg.predict_proba(X_train)[:, 1]
    acc = metrics.accuracy_score(y_train.values,dtrain_predictions)
    auc = metrics.roc_auc_score(y_train,dtrain_predprob)
    print("Accuracy is {:.4f}".format(acc))
    print('Best number of trees ={}'.format(cvresult.shape[0]))#输出树的数量
    print("AUC Score(Train) is {:.4f}".format(auc))
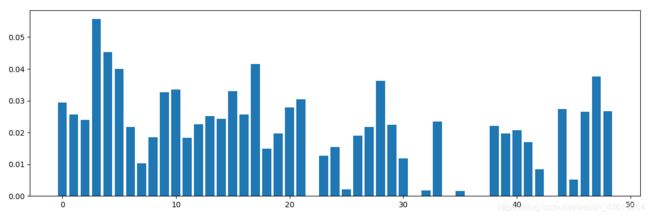
画出特征重要性
    print(alg.feature_importances_)
    plt.bar(range(len(alg.feature_importances_)),alg.feature_importances_)
    plt.show()
另一种,推荐使用
    feat_imp = pd.Series(alg.get_booster().get_fscore()).sort_values(ascending=False)
    feat_imp.plot(kind='bar',title='Feature Important')
    plt.ylabel('Feature Importance Score')
    plt.show()
参照:用xgboost模型对特征重要性进行排序
有几个地方:
- alg.set_params(n_estimators=cvresult.shape[0])
cvresult.shape[0]和alg.get_params()[‘n_estimators’]值一样
在numpy里.shape[0]代表行数,shape[1]代表列数。
参照numpy.array 的shape属性理解 - dtrain_predprob = alg.predict_proba(X_train)[:, 1]
属于第二类的概率
predict predict_proba区别的小例子 - Format格式化
format 格式化函数
用Early Stop
修改了一下代码
这一段参照:https://www.yuque.com/zhaoshijun/md/mtx7ty
import pandas as pd
import numpy as np
import xgboost as xgb
from xgboost.sklearn import XGBClassifier
from sklearn import metrics
from sklearn.model_selection import GridSearchCV
from sklearn.model_selection import train_test_split
from sklearn.datasets import load_breast_cancer
import matplotlib.pyplot as plt
plt.rcParams['figure.figsize']=(12.0,4.0)


data = pd.read_csv("C:\\Users\\Nihil\\Documents\\pythonlearn\\data\\train_modified.csv")

target='Disbursed' # Disbursed的值就是二元分类的输出
IDcol = 'ID'#写成格式方便对比

x_columns = [x for x in data.columns if x not in [target, IDcol]]
X = data[x_columns]
y = data['Disbursed']
X_train, X_test, y_train, y_test = train_test_split(X, y, test_size=0.3,random_state=1)


model = XGBClassifier(max_depth=5,subsample=0.8,objective='binary:logistic',n_estimators=1000,learning_rate=0.01)
eval_set = [(X_train,y_train),(X_test,y_test)]
model.fit(X_train,y_train,eval_metric=["error","logloss"],early_stopping_rounds=15,eval_set=eval_set,verbose=True)

#运行结果
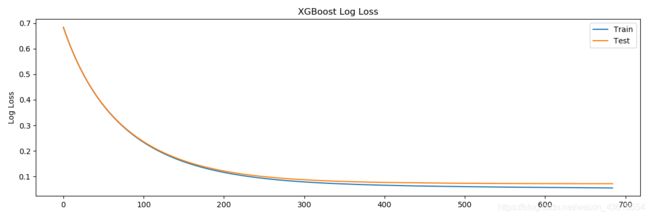
Stopping. Best iteration:
[675]	validation_0-error:0.015643	validation_0-logloss:0.055574	validation_1-error:0.016667	validation_1-logloss:0.071903
作图
results = model.evals_result()
epochs = len(results['validation_0']['error'])
x_axis = range(0, epochs)
# plot log loss
fig, ax = plt.subplots()
ax.plot(x_axis, results['validation_0']['logloss'], label='Train')
ax.plot(x_axis, results['validation_1']['logloss'], label='Test')
ax.legend()
plt.ylabel('Log Loss')
plt.title('XGBoost Log Loss')
plt.show()
# plot classification error
fig, ax = plt.subplots()
ax.plot(x_axis, results['validation_0']['error'], label='Train')
ax.plot(x_axis, results['validation_1']['error'], label='Test')
ax.legend()
plt.ylabel('Classification Error')
plt.title('XGBoost Classification Error')
plt.show()
Stopping. Best iteration:
[84]	validation_0-error:0.015429	validation_0-logloss:0.051999	validation_1-error:0.016667	validation_1-logloss:0.071925

学习率为0.1,
accuracy is 98.33%
参数调优的一般流程
1.较高的学习速率(learning rate)
一般情况:0.1
不同情况的理想学习速率:0.05~0.3
方式:利用cv,得到理想的决策树数量
2.已知学习速率和决策树数量,
进行决策树特定参数调优(max_depth, min_child_weight, gamma, subsample, colsample_bytree)
3.正则化参数的调优。(lambda, alpha)
**目的:**降低模型的复杂度,从而提高模型的表现。
4.开始低学习速率,确定理想参数
- Step1:确定学习速率和tree_based 参数调优的估计器数目
https://blog.csdn.net/han_xiaoyang/article/details/52665396这篇文章里的推荐取值:

选定基准参数,没有经验其实也可以用官方默认值的。
xgb1 = XGBClassifier(
    learning_rate=0.1,
    n_estimators=1000,
    max_depth=5,
    min_child_weight=1,
    gamma=0,
    subsample=0.8,
    colsample_bytree=0.8,
    objective='binary:logistic',
    scale_pos_weight=1,
    nthread=4,
    seed=27
)
modelfit(xgb1)
涉及到的一些参数:
-objective[默认reg:linear]
常用值:
· reg:linear:线性回归
· reg:logistic:逻辑回归
· binary:logistic 二分类的逻辑回归,返回预测的概率
· binary:logitraw:二分类逻辑回归,输出是逻辑为0/1的前一步的分数
· multi:softmax:用于Xgboost 做多分类问题,需要设置num_class(分类的个数)
· multi:softprob:和softmax一样,但是返回的是每个数据属于各个类别的概率。
· rank:pairwise:让Xgboost 做排名任务,通过最小化(Learn to rank的一种方法)
#运行结果:
Accuracy is 0.9841
Best number of trees =92
AUC Score(Train) is 0.9356
Step2: max_depth 和 min_weight 参数调优
对最终结果影响较大。
首先,粗调参数,
再小氛围微调。
param_test1 = {
    'max_depth':range(3,10,2),
    'min_child_weight':range(1,6,2)
}
model = XGBClassifier(learning_rate=0.1,n_estimators=92,max_depth=5,min_child_weight=1,gamma=0,subsample=0.8,colsample_bytree=0.8,
                      objective='binary:logistic',nthread=4,scale_pos_weight=1,seed=27)
gsearch1 = GridSearchCV(estimator=model,param_grid=param_test1,scoring='roc_auc',iid=False,cv=5)
gsearch1.fit(X_train,y_train)

print('每次运行迭代结果{}'.format(gsearch1.param_grid))
print('参数的最佳取值{}'.format(gsearch1.best_params_))
print('最佳模型得分{}'.format(gsearch1.best_score_))
结果:
每次运行迭代结果{'max_depth': range(3, 10, 2), 'min_child_weight': range(1, 6, 2)}
参数的最佳取值{'max_depth': 5, 'min_child_weight': 3}
最佳模型得分0.8212938262195122
可以看出,理想的’max_depth’取值为 5, 'min_child_weight’取值为3,在此范围内进行进一步调整。
param_test2 = {
    'max_depth':[4,5,6],
    'min_child_weight':[2,3,4]
}

model = XGBClassifier(learning_rate=0.1,n_estimators=92,max_depth=5,min_child_weight=1,gamma=0,subsample=0.8,colsample_bytree=0.8,
                      objective='binary:logistic',nthread=4,scale_pos_weight=1,seed=27)
gsearch2 = GridSearchCV(estimator=model,param_grid=param_test2,scoring='roc_auc',iid=False,cv=5)
gsearch2.fit(X_train,y_train)

print('每次运行迭代结果{}'.format(gsearch2.param_grid))
print('参数的最佳取值{}'.format(gsearch2.best_params_))
print('最佳模型得分{}'.format(gsearch2.best_score_))

#运行结果
每次运行迭代结果{'max_depth': [4, 5, 6], 'min_child_weight': [2, 3, 4]}
参数的最佳取值{'max_depth': 4, 'min_child_weight': 3}
最佳模型得分0.8220885734247967
至此,我们得到max_depth的理想取值为4,min_child_weight的理想取值为3。同时,我们还能看到cv的得分有了小小一点提高。
需要注意的一点是,随着模型表现的提升,进一步提升的难度是指数级上升的,尤其是你的表现已经接近完美的时候。
当然啦,你会发现,虽然min_child_weight的理想取值是3,但是我们还没尝试过大于3的取值。像下面这样,就可以尝试其它值。
param_test2b = {
    'min_child_weight':range(3,7,1)
}

model = XGBClassifier(learning_rate=0.1,n_estimators=92,max_depth=4,min_child_weight=1,gamma=0,subsample=0.8,colsample_bytree=0.8,
                      objective='binary:logistic',nthread=4,scale_pos_weight=1,seed=27)
gsearch2b = GridSearchCV(estimator=model,param_grid=param_test2b,scoring='roc_auc',iid=False,cv=5)
gsearch2b.fit(X_train,y_train)

print('每次运行迭代结果{}'.format(gsearch2b.param_grid))
print('参数的最佳取值{}'.format(gsearch2b.best_params_))
print('最佳模型得分{}'.format(gsearch2b.best_score_))

#运行结果
每次运行迭代结果{'min_child_weight': range(3, 7)}
参数的最佳取值{'min_child_weight': 3}
最佳模型得分0.8220885734247967
莫得变化,就是3了。
Step3:gamma参数调优
在已经调整好其它参数的基础上,我们可以进行gamma参数的调优了。Gamma参数取值范围可以很大,设取值范围设置为5。
param_test3 = {
    'gamma':[i/10.0 for i in range(0,5)]
}

model = XGBClassifier(learning_rate=0.1,n_estimators=92,max_depth=4,min_child_weight=3,gamma=0,subsample=0.8,colsample_bytree=0.8,
                      objective='binary:logistic',nthread=4,scale_pos_weight=1,seed=27)
gsearch3 = GridSearchCV(estimator=model,param_grid=param_test3,scoring='roc_auc',iid=False,cv=5)
gsearch3.fit(X_train,y_train)

print('每次运行迭代结果{}'.format(gsearch3.param_grid))
print('参数的最佳取值{}'.format(gsearch3.best_params_))
print('最佳模型得分{}'.format(gsearch3.best_score_))

#运行结果
每次运行迭代结果{'gamma': [0.0, 0.1, 0.2, 0.3, 0.4]}
参数的最佳取值{'gamma': 0.0}
最佳模型得分0.8220885734247967
一开始的值是合理的。所以,最终得到的参数是
xgb2 = XGBClassifier(learning_rate=0.1,n_estimators=92,max_depth=4,min_child_weight=3,gamma=0,subsample=0.8,colsample_bytree=0.8,
                      objective='binary:logistic',nthread=4,scale_pos_weight=1,seed=27)
modelfit(xgb2)
运行结果为
Accuracy is 0.9840
Best number of trees =92
AUC Score(Train) is 0.8978
呃,分数反而下降了…
接着按照84调:
model = XGBClassifier(learning_rate=0.02,n_estimators=84,max_depth=6,min_child_weight=5,gamma=0,subsample=0.8,colsample_bytree=0.8,
                      objective='binary:logistic',nthread=4,scale_pos_weight=1,seed=27)
model.fit(X_train,y_train)
y_pre = model.predict(X_test)
y_pro = model.predict_proba(X_test)[:,1]


acc = metrics.accuracy_score(y_test,y_pre)
auc = metrics.roc_auc_score(y_test,y_pro)
print("Accuracy is {:.4f}".format(acc))
print("AUC Score(Train) is {:.4f}".format(auc))

#运行结果
Accuracy is 0.9833
AUC Score(Train) is 0.8169
step4.调整subsample 和colsample_bytree
param_test5 = {
 'subsample':[i/100.0 for i in range(75,90,5)],
 'colsample_bytree':[i/100.0 for i in range(75,90,5)]
}
model = XGBClassifier(learning_rate=0.02,n_estimators=84,max_depth=6,min_child_weight=5,gamma=0,subsample=0.8,colsample_bytree=0.8,
                      objective='binary:logistic',nthread=4,scale_pos_weight=1,seed=27)
gsearch5 = GridSearchCV(estimator = model, param_grid = param_test5, scoring='roc_auc',iid=False, cv=5)
gsearch5.fit(X_train,y_train)
print('每次运行迭代结果{}'.format(gsearch5.param_grid))
print('参数的最佳取值{}'.format(gsearch5.best_params_))
print('最佳模型得分{}'.format(gsearch5.best_score_))

#运行结果
每次运行迭代结果{'subsample': [0.75, 0.8, 0.85], 'colsample_bytree': [0.75, 0.8, 0.85]}
参数的最佳取值{'colsample_bytree': 0.8, 'subsample': 0.8}
最佳模型得分0.8187269098825702
没有变化
step5.调整正则化参数
param_test6 = {
 'reg_alpha':[1e-5, 1e-2, 0.1, 1, 100]
}
model = XGBClassifier(learning_rate=0.02,n_estimators=84,max_depth=6,min_child_weight=5,gamma=0,subsample=0.8,colsample_bytree=0.8,
                      objective='binary:logistic',nthread=4,scale_pos_weight=1,seed=27)
gsearch6 = GridSearchCV(estimator =model, param_grid = param_test6, scoring='roc_auc',iid=False, cv=5)

gsearch6.fit(X_train,y_train)
print('每次运行迭代结果{}'.format(gsearch6.param_grid))
print('参数的最佳取值{}'.format(gsearch6.best_params_))
print('最佳模型得分{}'.format(gsearch6.best_score_))

#运行结果
每次运行迭代结果{'reg_alpha': [1e-05, 0.01, 0.1, 1, 100]}
参数的最佳取值{'reg_alpha': 1e-05}
最佳模型得分0.8187269098825702
没有变化


