Ubuntu20.04 配置tensorflow环境
Ubuntu20.04配置tensorflow
1、英伟达驱动安装
英伟达官网:
NVIDIA 引领人工智能计算 | NVIDIA
右上角“驱动程序”,选择下载
删除原有驱动
sudo apt-get remove --purge nvidia*禁用nouveau
sudo gedit /etc/modprobe.d/blacklist.conf文件中添加
blacklist nouveau
blacklist lbm-nouveau
options nouveau modeset=0
alias nouveau off
alias lbm-nouveau off
关闭nouveau:
echo options nouveau modeset=0 | sudo tee -a /etc/modprobe.d/nouveau-kms.conf
重启电脑
update-initramfs -u
reboot
验证是否禁用成功,无输出即为成功
lsmod | grep nouveau安装 NVIDIA 显卡驱动
安装g++依赖:不安装会出错
sudo apt install gcc g++ make参考https://www.cnblogs.com/zhaoyingjie/p/15380694.html
-no-x-check:安装驱动时关闭X服务
-no-nouveau-check:安装驱动时禁用nouveau
-no-opengl-files:只安装驱动文件,不安装OpenGL文件
sudo service lightdm stop      //这个是关闭图形界面,不执行会出错。
#给权限
sudo chmod  a+x NVIDIA-Linux-x86_64-418.56.run


sudo ./NVIDIA-Linux-x86_64-396.18.run -no-x-check -no-nouveau-check -no-opengl-files
 //只有禁用opengl这样安装才不会出现循环登陆的问题
sudo ./NVIDIA-Linux-x86_64-396.18.run
##其实直接sudu或者su->sh就行,可以选项里自己选
如果提示 unit lightdm.service not loaded
则先安装LightDm:
sudo apt install lightdm安装完毕后跳出一个界面,选择lightdm,再
sudo service lightdm stop安装过程中的选项
The distibution......----->Continue
EORRY:unable....'cc'....'gcc'----->OK
WARNING:unable to find .....32bit.....------>OK
AN incom....------>install and overwrite
would you like to run ....nvidia-xconfig......------>NO
Install of .....LInexx86_64.....----->OK
Installation has failed. Please see the file
'/var/log/nvidia-installer.log' for details. You may find
suggestions on fixing installation problems in the README available
on the Linux driver download page at www.nvidia.com.
打开图形界面
sudo service lightdm start      //这个是打开图形界面
#验证
nvidia-smi
验证
nvidia-smi2、cuda安装
直接sudo sh 安装包.run
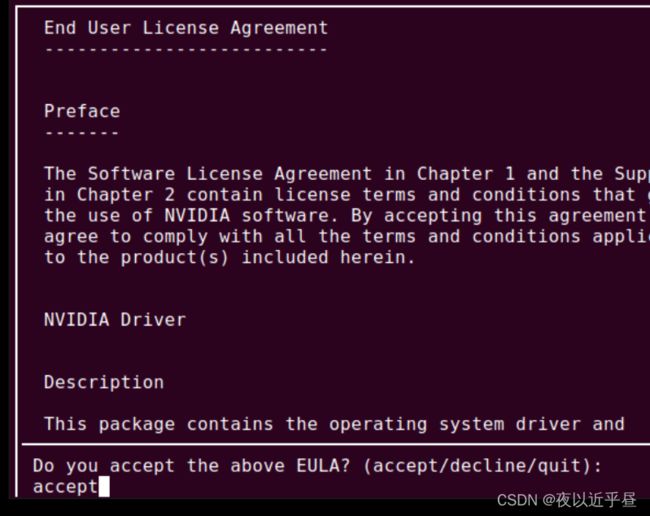
输入accept
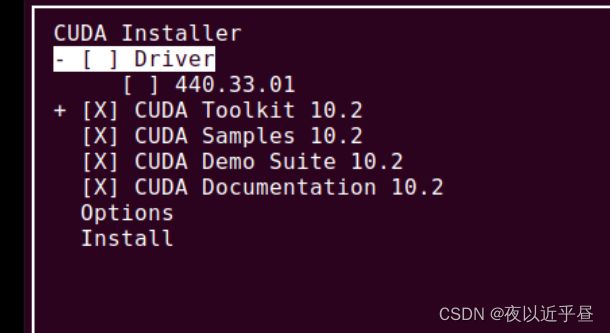
上图,前边装了驱动,第一个选项可以不装,剩下四个可选,tookit必须装
sudo sh cuda_10.2.89_440.33.01_linux.run安装完会提示加入环境变量的一个path...一个lib...,复制下来贴到下边文件里
输入gedit ~/.bashrc命令打开文件,在文件结尾输入以下语句,保存
export PATH=/usr/local/cuda-10.2/bin${PATH:+:${PATH}}
export LD_LIBRARY_PATH=/usr/local/cuda-10.2/lib64${LD_LIBRARY_PATH:+:${LD_LIBRARY_PATH}}
更新环境变量
source ~/.bashrc验证
nvcc -V 3、cudnn安装
百度搜索‘cudnn下载’
cuDNN Archive | NVIDIA Developer
英特尔芯片选x86_64,local install for linux
下载解压,
cuda/include/cudnn.h文件复制到usr/local/cuda/include文件夹,将cuda/lib64/下所有文件复制到/usr/local/cuda/lib64文件夹中,并添加读取权限
sudo chmod a+r /usr/local/cuda/include/cudnn.h /usr/local/cuda/lib64/libcudnn*4、anaconda安装
下载包,一定在home下安装,否则会安装到root路径下
bash Anaconda3-5.3.1-Linux-x86_64.sh加入环境变量
sudo gedit ~/.bashrc添加
export PATH="/home/your_username/anaconda3/bin:$PATH"重启环境变量
source ~/.bashrc5、tensorflow和kera
conda查看源
conda config --show-sourcesconda换源
# 中科大镜像源
conda config --add channels https://mirrors.ustc.edu.cn/anaconda/pkgs/main/
conda config --add channels https://mirrors.ustc.edu.cn/anaconda/pkgs/free/
conda config --add channels https://mirrors.ustc.edu.cn/anaconda/cloud/conda-forge/
conda config --add channels https://mirrors.ustc.edu.cn/anaconda/cloud/msys2/
conda config --add channels https://mirrors.ustc.edu.cn/anaconda/cloud/bioconda/
conda config --add channels https://mirrors.ustc.edu.cn/anaconda/cloud/menpo/
conda config --add channels https://mirrors.ustc.edu.cn/anaconda/cloud/
# 北京外国语大学源
conda config --add channels  https://mirrors.bfsu.edu.cn/anaconda/pkgs/main
conda config --add channels  https://mirrors.bfsu.edu.cn/anaconda/pkgs/free
conda config --add channels  https://mirrors.bfsu.edu.cn/anaconda/pkgs/r
conda config --add channels  https://mirrors.bfsu.edu.cn/anaconda/pkgs/pro
conda config --add channels  https://mirrors.bfsu.edu.cn/anaconda/pkgs/msys2
#清华源
conda config --add channels  https://mirrors.tuna.tsinghua.edu.cn/anaconda/pkgs/main
conda config --add channels  https://mirrors.tuna.tsinghua.edu.cn/anaconda/pkgs/free
conda config --add channels  https://mirrors.tuna.tsinghua.edu.cn/anaconda/pkgs/r
conda config --add channels  https://mirrors.tuna.tsinghua.edu.cn/anaconda/pkgs/pro
conda config --add channels  https://mirrors.tuna.tsinghua.edu.cn/anaconda/pkgs/msys2
#pytorch镜像
conda config --add channels https://mirrors.tuna.tsinghua.edu.cn/anaconda/cloud/pytorch/
linux下的换源可直接修改文件
将以上配置文件写在~/.condarc中vim ~/.condarc
sudo gedit ~/.condarcchannels:
- https://mirrors.tuna.tsinghua.edu.cn/anaconda/pkgs/main/
- https://mirrors.tuna.tsinghua.edu.cn/anaconda/pkgs/free/
- https://mirrors.tuna.tsinghua.edu.cn/anaconda/cloud/conda-forge/
- https://mirrors.tuna.tsinghua.edu.cn/anaconda/cloud/pytorch/
ssl_verify: true补充:
中国科学技术大学 USTC Mirror
channels:
  - https://mirrors.ustc.edu.cn/anaconda/pkgs/main/
  - https://mirrors.ustc.edu.cn/anaconda/pkgs/free/
  - https://mirrors.ustc.edu.cn/anaconda/cloud/conda-forge/
ssl_verify: true
上海交通大学开源镜像站
channels:
  - https://mirrors.sjtug.sjtu.edu.cn/anaconda/pkgs/main/
  - https://mirrors.sjtug.sjtu.edu.cn/anaconda/pkgs/free/
  - https://mirrors.sjtug.sjtu.edu.cn/anaconda/cloud/conda-forge/
ssl_verify: true
创建conda虚拟环境
conda create --name tf python=3.8 -y配置jupyter notebook公网访问
参考
设置 jupyter notebook 外网远程访问 - 泡沫° - 博客园
pip install jupyter notebook生成notebook 配置文件
linux默认情况下,配置文件 ~/.jupyter/jupyter_notebook_config.py 并不存在,需要自行创建。使用下列命令生成配置文件
jupyter notebook --generate-config

#输出
Writing default config to: /home/ldq/.jupyter/jupyter_notebook_config.py
windows下的做法,运行cmd,然后输入下面的命令,会生成配置文件,windows的jupyter_notebook_config.py路径在C:\Users\Administrator\.jupyter\
生成完这个配置文件后,我们接下来就是要生成一个密码,要不然谁都会可以访问这个jupyter notebook。
2. 生成密码
自动生成
从 jupyter notebook 5.0 版本开始,提供了一个命令来设置密码:jupyter notebook password,生成的密码存储在 jupyter_notebook_config.json。在windows下是运行cmd,命令是一样的
$ jupyter notebook password

##
Enter password:
Verify password:
[NotebookPasswordApp] Wrote hashed password to /home/ldq/.jupyter/jupyter_notebook_config.json
然后我们打开 jupyter_notebook_config.json把里面的sha1或argon2的值 复制出来,红色内容即为要复制的内容,一这不要复制我这里的哦,如下所示:
{
  "NotebookApp": {
    "password": "argon2:$argon2id$v=19$m=10240,t=10,p=8$papAj0Mf23hTag3KcnbQNA$qvc/MzhuJUaq6JGOc6dN0w"
  }
}然后打开文件jupyter_notebook_config.py,查找c.NotebookApp.password,然后把前面的#号去掉,去掉#时要让命令顶格才能生效
再把刚刚复制sha1值粘贴进去。这样打开jupyter notebook就需要密码啦,这个密码就是你刚刚设置的密码
3.修改配置文件
在 jupyter_notebook_config.py 中找到下面的行,取消注释就是把这几行代码最前面的#号去掉并修改。
c.NotebookApp.ip='*'       #在所有的网卡接口上开启服务

c.NotebookApp.port =8888 #可自行指定一个端口, 访问时使用该端口7777

c.NotebookApp.allow_remote_access = True  #允许远程
注:如果购买的是阿里云的服务器,或者腾讯云的服务器,一定要在控制台里面的安全组里添加相对应的端口,另外windows服务器的话,一定要在防火墙里也添加相对应的端口,否则会造成无法访问。
4.修改jupyter notebook默认工作路径
在jupyter_notebook_config.py文件中查找c.NotebookApp.notebook_dir,把前面的注释符号#号去掉,然后把后面的路径改成自己想设置成的路径,如下所示:
c.NotebookApp.notebook_dir = 'D:\\JupyterProject'指定端口运行--port 1111
jupyter notebook --no-browser --port 6000 --ip=192.168.1.103后台挂起
nohup jupyter notebook > ./jupyter.log 2>&1 & # 后台静默运行
打开 ./jupyter.log,找到访问路径,将地址改成主机对应的 IP,即可正常访问。
想关掉后台运行的 Jupyter Notebook,可运行 ps -a,知道对应的 PID,然后 kill -9 $PID
如果退出了 SSH 连接,下次连接想关闭后台的 Jupyter Notebook,运行 ps -ef | grep jupyter-notebook,然后 kill -9 $PID
nohup jupyter notebook --port 9999 > ./jupyter.log 2>&1 &
nohup jupyter notebook --no-browser --port 9999 > ./jupyter.log 2>&1 &
#查看进程号
ps -ef | grep jupyter-notebook
#关进程
kill -9 $PID

