TextCNN的简单理解及其conv1d实现
近期在使用深度学习做文本分类的任务的时候了解到了TextCNN算法,之前一直使用较多的是LSTM。TextCNN 是利用卷积神经网络对文本进行分类的算法,由 Yoon Kim 在2014年的 “Convolutional Neural Networks for Sentence Classification” 文章中提出.
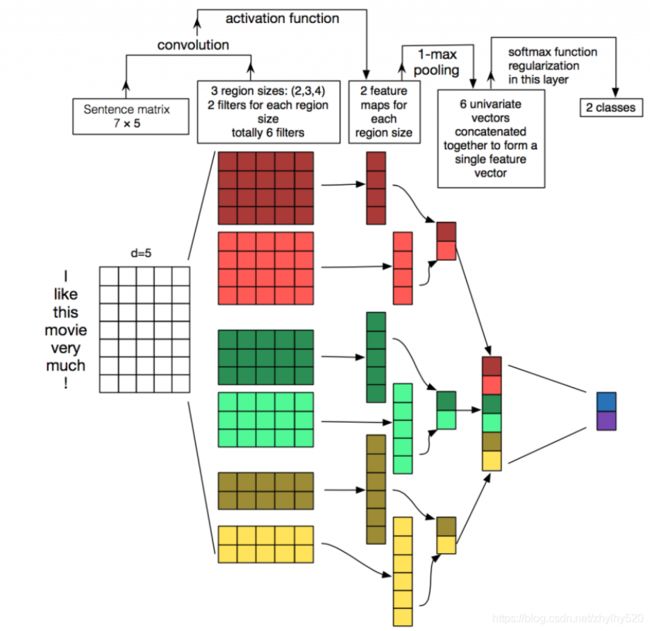
1.举个小例子,如下图
简而言之,TextCNN的主要作用就是通过CNN来有效提取提取出文本的特征,然后再进行深度神经网络训练,最终达到对文本进行分类的目的。
对于上图来说,输入“I like this movie very much !”,这句话一共有7个单词,每个单词的词向量维度为5。name这句话形成的文本矩阵大小为7*5。接着我们来看卷积核,在这里卷积核的宽即为词向量的维度(即为5),卷积核的长即每一步跨越单词的数量。上面的7*5矩阵,在卷积核长度为2,3,4。那么卷积核的大小为2*5,3*5和4*5,步长为1,那么经过卷积以后以前的7*5词文本矩阵分别变为6*1,5*1和4*1的矩阵。再进行最大池化,分别取上述卷积后矩阵的最大值,再拼接在一起即得到最后的表示文本特征的向量。在上图中,每个尺寸的卷积核各有2个,一共有3个不同的卷积核,故最后形成6*1的文本向量。接着将文本向量带入到深度神经网络进行分本分类。
2.conv1d简单实现
class PictureTextCNNConfig(object):
    """LSTM配置参数"""
    """在这里卷积核的个数为100,尺寸为2*200,3*200,4*200"""
    def __init__(self):
        self.dimensions = 200
        self.maxSeqLength = 250
        self.batchSize = 64
        self.hidden_dim = 128
        self.num_classes = 2
        self.num_filters = 100
        self.kernel_size1 = 2
        self.kernel_size2 = 3
        self.kernel_size3 = 4
        self.dropout_keep_prob = 0.5
        self.learning_rate = 1e-3
        self.word2vectors = []
        self.num_epochs = 100
        self.save_per_batch = 100
        self.print_per_batch = 100
class PictureTextCNN(object):
    """文本分类,CNN模型"""
    def __init__(self,config):
        self.config = config
        self.input_x = tf.placeholder(tf.int32, shape=[self.config.batchSize, self.config.maxSeqLength], name='input_x')
        self.input_y = tf.placeholder(tf.int32, shape=[self.config.batchSize, self.config.num_classes], name='input_y')
        self.keep_prob = tf.placeholder(tf.float32, name='keep_prob')
        self.cnn()
    def cnn(self):
        """CNN模型"""
        with tf.device('/cpu:0'):
            embedding_inputs = tf.nn.embedding_lookup(self.config.word2vectors, self.input_x)
            embedding_inputs = tf.cast(embedding_inputs, tf.float32)
        with tf.name_scope("cnn"):
            # CNN layer
            # conv1d对文本向量进行卷积
            conv1 = tf.layers.conv1d(embedding_inputs, self.config.num_filters, self.config.kernel_size1, name='conv1')
            # global max pooling
            #可以设置多个不同的k_size然后对其进行拼接,tf.concat即可
            gmp1 = tf.reduce_max(conv1, reduction_indices=[1], name='gmp1')

            conv2 = tf.layers.conv1d(embedding_inputs,self.config.num_filters,self.config.kernel_size2,name='conv2')
            gmp2 = tf.reduce_max(conv2,reduction_indices=[1],name = 'gmp2')

            conv3 = tf.layers.conv1d(embedding_inputs, self.config.num_filters, self.config.kernel_size3, name='conv3')
            gmp3 = tf.reduce_max(conv3, reduction_indices=[1], name='gmp3')
            #实现不同卷积核下的文本特征的连接
            gmp = tf.concat([gmp1,gmp2,gmp3],1)


        with tf.name_scope("score"):
            # 全连接层,后面接dropout以及relu激活
            fc = tf.layers.dense(gmp,self.config.hidden_dim,name='fc1')
            #使用dropput防止过拟合
            fc = tf.contrib.layers.dropout(fc, self.keep_prob)
            fc = tf.nn.relu(fc)
            # 分类器
            self.logits = tf.layers.dense(fc, self.config.num_classes, name='fc2')
            self.y_pred_cls = tf.argmax(tf.nn.softmax(self.logits), 1)  # 预测类别

        with tf.name_scope("optimize"):
            # 损失函数,交叉熵
            cross_entropy = tf.nn.softmax_cross_entropy_with_logits(logits=self.logits, labels=self.input_y)
            self.loss = tf.reduce_mean(cross_entropy)
            # 优化器
            self.optimizer = tf.train.AdamOptimizer(learning_rate=self.config.learning_rate).minimize(self.loss)

        with tf.name_scope("accuracy"):
            # 准确率
            correct_pred = tf.equal(tf.argmax(self.input_y, 1), self.y_pred_cls)
            self.accuracy = tf.reduce_mean(tf.cast(correct_pred, tf.float32))
在原论文中使用来l2_loss来防止过拟合,在这里我们使用的是dropout.在实际应用中,dropout数值、卷积核的尺寸以及卷积核的个数都可以进行调整。
