SRGAN 图像超分辨率重建(Keras)
文章目录
- 前言
- 一、SRGAN
-
- 1.训练步骤
- 2.生成器
- 3.判别器
- 二、其他准备
-
- 1.数据读取
- 2.VGG19提取特征
- 4.训练过程代码
- 5. 预测过程
- 参考链接
前言
SRGAN 网络是用GAN网络来实现图像超分辨率重建的网络。训练完网络后。只用生成器来重建低分辨率图像。网络结构主要使用生成器(Generator)和判别器(Discriminator)。训练过程不太稳定。一般用于卫星图像,遥感图像的图像重建,人脸图像超分重建。
这里我们使用的高分辨率的数据集 (DIV2K)
数据集下载链接:链接:https://pan.baidu.com/s/1UBle5Cu74TRifcAVz14cDg 提取码:luly
github代码地址:https://github.com/jiantenggei/srgan
重制版代码仓库:https://github.com/jiantenggei/Srgan_
一、SRGAN
1.训练步骤
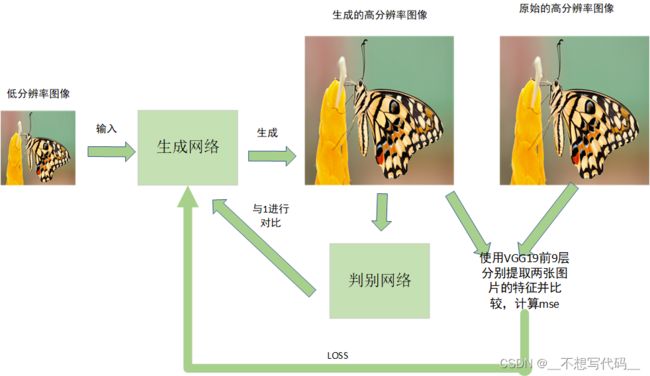
训练步骤如下:
(1) 将低分辨率输入到生成网络,生成高分辨率图像。
(2) 将高分辨率图像输入的判别网络判别真假,与0和1进行对比
(3) 将原始高分辨率图像和生成的高分辨率图像分别用VGG19 的前9层提取特征,将提取的特征计算loss。
(4). 将loss返回给生成器继续训练。
这就是SRGAN 的训练流程了。 接下来我们一一去实现上述步骤。
2.生成器
生成器网络结构如下图所示:

生成器主要有两部分构成,第一部分是residual block 残差块(图中红色方块),第二部分是上采样部分(图中蓝色方块)用来上采样特征图。
残差块:包含一个两个3x3的卷积 BN,PReLu
上采样:使用UpSampling2D,这里可能与原模型不同实现
生成器代码如下所示:
# 生成器中的残差块
def res_block_gen(x, kernal_size, filters, strides):

    gen = x

    x = Conv2D(filters = filters, kernel_size = kernal_size, strides = strides, padding = "same")(x)
    x = BatchNormalization(momentum = 0.5)(x)
    # Using Parametric ReLU
    x = PReLU(alpha_initializer='zeros', alpha_regularizer=None, alpha_constraint=None, shared_axes=[1,2])(x)
    x = Conv2D(filters = filters, kernel_size = kernal_size, strides = strides, padding = "same")(x)
    x = BatchNormalization(momentum = 0.5)(x)

    x = add([gen, x])

    return x

#上采样样块
def up_sampling_block(x, kernal_size, filters, strides):
    x = Conv2D(filters = filters, kernel_size = kernal_size, strides = strides, padding = "same")(x)
    x = UpSampling2D(size = 2)(x)
    x = LeakyReLU(alpha = 0.2)(x)

    return x
#--------------------------------------
# 亚像素卷积上采样块
# 生成器 还是用的 UpSampling2D
# 如果有需要可以自己更改
# -------------------------------------
def SubpixelConv2D(input_shape, scale=4):
    def subpixel_shape(input_shape):
        dims = [input_shape[0],input_shape[1] * scale,input_shape[2] * scale,int(input_shape[3] / (scale ** 2))]
        output_shape = tuple(dims)
        return output_shape

    def subpixel(x):
        return tf.compat.v1.depth_to_space(x, scale)

    return Lambda(subpixel, output_shape=subpixel_shape)

def Generator(input_shape=[128,128,3]):
    gen_input = Input(input_shape)
    x = Conv2D(filters = 64, kernel_size = 9, strides = 1, padding = "same")(gen_input)
    x = PReLU(alpha_initializer='zeros', alpha_regularizer=None, alpha_constraint=None, shared_axes=[1,2])(x)

    gen_x = x

    # 16 个残差快
    for index in range(16):
            x = res_block_gen(x, 3, 64, 1)

    x = Conv2D(filters = 64, kernel_size = 3, strides = 1, padding = "same")(x)
    x = BatchNormalization(momentum = 0.5)(x)
    x = add([gen_x, x])

	#两个上采样 -> 放大四倍
    for index in range(2):
        x = up_sampling_block(x, 3, 256, 1)

    x = Conv2D(filters = 3, kernel_size = 9, strides = 1, padding = "same")(x)
    x = Activation('tanh')(x)

    generator_x = Model(inputs = gen_input, outputs = x)

    return generator_x
3.判别器
判别器主要用于判断生成图片的真假。与0和1比较,1代表真图片,0代表假图片。这里的0和1 是与判别器输出大小想用的向量,而不是单纯的0,1,判别器网络结果如下所示:

判别网络由一个个包含卷积、BN、和LeakyRelu 激活函数的块组成,最后输出1或0, 实际上就相当于是一个二分类的分类网络,代码如下所示:
#判别器中的卷积块
def discriminator_block(x, filters, kernel_size, strides):

    x = Conv2D(filters = filters, kernel_size = kernel_size, strides = strides, padding = "same")(x)
    x = BatchNormalization(momentum = 0.5)(x)
    x = LeakyReLU(alpha = 0.2)(x)

    return x

def Discriminator(image_shape=[512,512,3]):

        dis_input = Input(image_shape)

        x = Conv2D(filters = 64, kernel_size = 3, strides = 1, padding = "same")(dis_input)
        x = LeakyReLU(alpha = 0.2)(x)

        x = discriminator_block(x, 64, 3, 2)
        x = discriminator_block(x, 128, 3, 1)
        x = discriminator_block(x, 128, 3, 2)
        x = discriminator_block(x, 256, 3, 1)
        x = discriminator_block(x, 256, 3, 2)
        x = discriminator_block(x, 512, 3, 1)
        x = discriminator_block(x, 512, 3, 2)

        #x = Flatten()(x) # 这里采用Flatten 太浪费现存了 改为 全局池化
        x = GlobalAveragePooling2D()(x)
        x = Dense(1024)(x)
        x = LeakyReLU(alpha = 0.2)(x)

        x = Dense(1)(x)
        x = Activation('sigmoid')(x)

        discriminator_x = Model(inputs = dis_input, outputs = x)

        return discriminator_x
网络主要分为生成器和判别器,训练时相互对抗,以达到一个很好的平衡为目的。
二、其他准备
1.数据读取
训练时,输入的高分辨率图像一般为很大的图片。需要将其随机裁剪为预设的大小。再将裁剪的图像,下采样作为低分辨率图像。代码过长,不全部贴出来了。
class SRganDataset(keras.utils.Sequence):
    def __init__(self, train_lines, lr_shape, hr_shape, batch_size):
        super(SRganDataset, self).__init__()

        self.train_lines    = train_lines
        self.train_batches  = len(train_lines)

        self.lr_shape       = lr_shape
        self.hr_shape       = hr_shape

        self.batch_size     = batch_size

    def __len__(self):
        return math.ceil(self.train_batches / float(self.batch_size))

    def __getitem__(self, index):
        if index == 0:
            self.on_epoch_begin()

        images_l = []
        images_h = []
        for i in range(index * self.batch_size, (index + 1) * self.batch_size):
            i = i % self.train_batches

            image_origin = Image.open(self.train_lines[i].split()[0])
            if self.rand()<.5:
                img_h = self.get_random_data(image_origin, self.hr_shape)
            else:
                img_h = self.random_crop(image_origin, self.hr_shape[1], self.hr_shape[0])
            img_l = img_h.resize((self.lr_shape[1], self.lr_shape[0]), Image.BICUBIC)

            img_h = preprocess_input(np.array(img_h, dtype=np.float32), [0.5,0.5,0.5], [0.5,0.5,0.5])
            img_l = preprocess_input(np.array(img_l, dtype=np.float32), [0.5,0.5,0.5], [0.5,0.5,0.5])

            images_h.append(img_h)
            images_l.append(img_l)
        return np.array(images_l), np.array(images_h)

    def on_epoch_begin(self):
        shuffle(self.train_lines)

    def rand(self, a=0, b=1):
        return np.random.rand()*(b-a) + a
2.VGG19提取特征
VGG19提取生成高分辨率的图像特征与真实高分辨率图像特征进行比较。计算LOSS。
class VGG_LOSS(object):

    def __init__(self, image_shape):

        self.image_shape = image_shape

    # 用VGG19 计算 高清图和生成的高清图之间的差别
    def vgg_loss(self, y_true, y_pred):

        vgg19 = VGG19(include_top=False, weights='imagenet', input_shape=self.image_shape)
        vgg19.trainable = False
        # Make trainable as False
        for l in vgg19.layers:
            l.trainable = False
        model = Model(inputs=vgg19.input, outputs=vgg19.get_layer('block5_conv4').output)
        model.trainable = False

        return K.mean(K.square(model(y_true) - model(y_pred)))
4.训练过程代码
def train(epochs, batch_size, model_save_dir):

    train_annotation_path = 'dataset.txt'
    #下采样倍数
    downscale_factor = 4

    #输入图片形状
    hr_shape = (384,384,3)
    #加载数据集
    with open(train_annotation_path, encoding='utf-8') as f:
         train_lines = f.readlines()
    #计算 生成图片 和 原高清图 之间的loss
    loss = VGG_LOSS(hr_shape)
    #打乱
    random.shuffle(train_lines)
    batch_count = int(len(train_lines)/ batch_size)
    lr_shape = (hr_shape[0]//downscale_factor, hr_shape[1]//downscale_factor, hr_shape[2])

    generator = Generator(lr_shape)
    discriminator = Discriminator(hr_shape)

    optimizer =tf.optimizers.Adam(lr=1E-4, beta_1=0.9, beta_2=0.999, epsilon=1e-08)
    generator.compile(loss=loss.vgg_loss, optimizer=optimizer)
    discriminator.compile(loss="binary_crossentropy", optimizer=optimizer)
    gen                 = SRganDataset(train_lines, lr_shape[:2], hr_shape[:2], batch_size)
    gan = get_gan(discriminator, lr_shape, generator, optimizer,loss.vgg_loss)
    loss_file = open(model_save_dir + 'losses.txt' , 'w+')
    loss_file.close()

    for epoch in range(0,epochs):
        print ('-'*15, 'Epoch %d' % epoch, '-'*15)
        with tqdm(total=batch_count,desc=f'Epoch {epoch + 1}/{epochs}',postfix=dict,mininterval=0.3) as pbar:
            for iteration, batch in enumerate(gen):
                if iteration >= batch_count:
                    break
                imgs_lr, imgs_hr        = batch
                #生成器生成图片
                gen_img = generator.predict(imgs_lr)

                real_data_Y = np.ones(batch_size) - np.random.random_sample(batch_size)*0.2
                fake_data_Y = np.random.random_sample(batch_size)*0.2

                discriminator.trainable = True

                d_loss_real = discriminator.train_on_batch(imgs_hr, real_data_Y)
                d_loss_fake = discriminator.train_on_batch(gen_img, fake_data_Y)
                discriminator_loss = 0.5 * np.add(d_loss_fake, d_loss_real)


                gan_Y = np.ones(batch_size) - np.random.random_sample(batch_size)*0.2
                discriminator.trainable = False
                gan_loss = gan.train_on_batch(imgs_lr, [imgs_hr,gan_Y])
                pbar.set_postfix(**{'G_loss'        : gan_loss[0] ,
                                    'D_loss'        : discriminator_loss,
                                    'PSNR'          : gan_loss[4]
                                    },)
                pbar.update(1)
            print("discriminator_loss : %f" % discriminator_loss)
            print("gan_loss :", gan_loss)
            gan_loss = str(gan_loss)

            loss_file = open(model_save_dir + 'losses.txt' , 'a')
            loss_file.write('epoch%d : gan_loss = %s ; discriminator_loss = %f\n' %(epoch, gan_loss, discriminator_loss) )
            loss_file.close()


            show_result(epoch,generator,imgs_lr,imgs_hr)

            generator.save(model_save_dir + 'gen_model%d.h5' % epoch)
            discriminator.save(model_save_dir + 'dis_model%d.h5' % epoch)
训练时,在目录result 目录下会出现这样的图片。

lr_images : 低分辨率图
Fake_Hr_Images:生成的高分辨率图像
True_Hr_Images:远高分图像
5. 预测过程
预测部分代码:
from pickle import NONE
from PIL import Image
import cv2
import numpy as np
import matplotlib.pyplot as plt
from nets.nets import Generator
before_image = Image.open(r"0.jpg")

before_image = before_image.convert("RGB")
gen_model = Generator([None,None,3])
gen_model.load_weights('loss\gen_model99.h5')
# gen_model.summary()
new_img = Image.new('RGB', before_image.size, (128, 128, 128))
new_img.paste(before_image)
# plt.imshow(new_img)
# plt.show()

new_image = np.array(new_img)/127.5 - 1
# 三维变4维  因为神经网络的输入是四维的
new_image = np.expand_dims(new_image, axis=0)  # [batch_size,w,h,c]
fake = (gen_model.predict(new_image)*0.5 + 0.5)*255
#将np array 形式的图片转换为unit8  把数据转换为图
fake = Image.fromarray(np.uint8(fake[0]))

fake.save("out.png")
titles = ['Generated', 'Original']
plt.subplot(1, 2, 1)
plt.imshow(before_image)
plt.subplot(1, 2, 2)
plt.imshow(fake)
plt.show()
参考链接
https://github.com/bubbliiiing/srgan-keras
https://github.com/deepak112/Keras-SRGAN
https://github.com/JustinhoCHN/SRGAN_Wasserstein

