《spring 实战 第四版》第二 、三章 spring 的bean装配
文章目录
- 电子书以及项目完整源代码
- 1. spring 装配bean 的三种方式
-
- (1) 自动化装配bean(隐式)
- (2) 通过java代码装配bean(显式)
- (3)通过XML装配bean(显式)
-
- a. 构造器注入对象引用
- b. 构造器注入字面量(变量)
- c. 构造器注入集合(只能通过 注入)
- d. 属性注入
- e. 属性注入字面量(变量)
- f. 属性注入集合
- JavaConfig 和 xml 配置 的混合使用
-
- 在JavaConfig中引用xml配置
- 在xml配置中引用 JavaConfig
- 2. 高级装配
-
- 配置profile bean
-
- 通过@Profile注解配置profile
- 在XML中配置profile
- 激活profile
- 指定 profile 进行测试
- 有条件地装配bean
-
- 概述
- @Conditional
- 例子说明
- 处理自动装配bean 的歧义性
-
- 使用@Primary 标识“喜欢”
- 使用@Qualifier 标识限定词
- bean的作用域
- 运行时属性注入
-
- 注入外部源的值 @PropertySource
- 【TODO】spring表达式语言SpEL
电子书以及项目完整源代码
请戳我
1. spring 装配bean 的三种方式
(1) 自动化装配bean(隐式)
- 适用对象:组件类
@Component(“rename”) @Named(“rename”) 声明组件类,并重命名
- 适用对象:配置类
@ComponentScan 在java config类上使用,启用spring的组件扫描并创建bean,默认当前包。
@ComponentScan(basePackages = {“com.system”,“com.video”}) 设置扫描指定的一个或多个基础包(全限定包名)
@ComponentScan(basePackageClasses = {“XXPlayer.class”,“XXPlayer.class”}) 指定一个或多个类所在的包作为扫描的基础包
(在IDEA,当bean装配过程没有匹配到或者出现多个bean匹配接口将编译错误)
- 适用对象:controller类或者测试类
@ContextConfiguration(classes = XXConfig.class) 声明在XXConfig 这个配置类中加载配置
- @Autowire @ Inject 将bean注入当前类
可应用于所依赖的类声明上,即bean装配到该声明上
构造器或者setter以及其他方法上,即bean将尝试装配到方法参数所声明的依赖。
当没有匹配到bean,将抛出异常
@Autowire(required = false) 当没有匹配的Bean时,bean将会处于未匹配状态,即null
- 缺陷是无法实现第三方库组件的装配
因为无法在第三方类库修改源码,即无法添加相应的装配bean注解
MediaPlayer.java
public interface MediaPlayer {

   void play();
}
CompactDisc.java
public interface CompactDisc {
   void play();
}
CDPlayer.java
@Component
public class CDPlayer implements MediaPlayer{

   private CompactDisc compactDisc;

   public CDPlayer(CompactDisc compactDisc){
       this.compactDisc = compactDisc;
   }
   public void play() {
       compactDisc.play() ;
   }
}
SgtPeppers.java
@Component  //声明为组件类
public class SgtPeppers implements CompactDisc {

   public void play() {
       System.out.println("SgtPeppers");
   }
}
配置类 CDPlayerConfig.java
//声明配置类
@Configuration
//启用组件扫描
@ComponentScan(basePackageClasses = {CDPlayer.class})//包名或者类名
public class CDPlayerConfig {

}
也可以通过 xml 文件开启组件扫描
<beans xmlns="http://www.springframework.org/schema/beans"
       xmlns:xsi="http://www.w3.org/2001/XMLSchema-instance"
       xsi:schemaLocation="http://www.springframework.org/schema/beans
       http://www.springframework.org/schema/beans/spring-beans.xsd">

    <context:component-scan base-package="soundSystem">

beans>
测试类 CompactDiscTest.java
@RunWith(SpringJUnit4ClassRunner.class)
@ContextConfiguration(classes = CDPlayerConfig.class) //声明使用的配置类加载配置
public class CompactDiscTest {
   @Autowired
   private CompactDisc compactDisc;

   @Autowired
   private MediaPlayer mediaPlayer;

   @Test
   public void beanTest(){
       assertNotNull(mediaPlayer);
       assertNotNull(compactDisc);
   }
}
(2) 通过java代码装配bean(显式)
JavaConfig 往往放在单独的包中,与应用逻辑代码分开
- @Configuration 表明该类是配置类,功能是生产bean,故不应该侵入业务代码
- @Bean 表明返回的对象将注册为spring应用上下文中的bean,默认id是方法名。 可通过name属性重命名。
( PS:@Autowired 声明的对象名与该ID保持一致)
@Configuration
public class CDPlayerConfig{
    @Bean(name = "sgtPeppers")
    public CompactDisc sgtPeppers(){
        return new SgtPeppers();
    }

    @Bean
    public CDPlayer cdPlayer(){
       return new CDPlayer(sgtPeppers());
    }

    //以下sgtPeppers()返回上面spring通过@Bean(name = "sgtPeppers")创建的bean,同样的otherCDPlayer()也如此
    //在这种方式下,注入的bean的@Bean方法sgtPeppers()需要同一个配置类声明
    @Bean
    public CDPlayer otherCDPlayer(){
        return new CDPlayer(sgtPeppers());
    }

    //这种方式是最佳选择,自动装配一个CompactDisc到配置方法中
    //这里的 CompactDisc bean 创建方式可以是当前配置类(或其他配置类),XML文件和自动扫描装配 bean
    @Bean
    public CDPlayer cdPlayer(CompactDisc compactDisc){
        return new CDPlayer(compactDisc);
    }

}
- cdPlayer()中调用的sgtPlayer()方法已经用@Bean注解,Spring将会拦截所有对他的调用,并确保直接返回该方法所创建的bean,而不是每次都对其进行实际的调用来创建新的对象。
- spring 中的bean都是单例的
(3)通过XML装配bean(显式)
通过这个元素,spring调用对应类的默认构造器创建bean
a. 构造器注入对象引用
- 构造器注入
<beans xmlns="http://www.springframework.org/schema/beans"
xmlns:xsi="http://www.w3.org/2001/XMLSchema-instance"
xsi:schemaLocation="http://www.springframework.org/schema/beans
http://www.springframework.org/schema/beans/spring-beans.xsd">
- C-命名空间注入
<beans xmlns="http://www.springframework.org/schema/beans"
xmlns:c="http://www.springframework.org/schema/c"
xmlns:xsi="http://www.w3.org/2001/XMLSchema-instance"
xsi:schemaLocation="http://www.springframework.org/schema/beans
http://www.springframework.org/schema/beans/spring-beans.xsd">
<bean id="compactDisc" class="codingdojo.parkingboy.spring.auto_bean.SgtPeppers"/>
b. 构造器注入字面量(变量)
以上都是类对象注入构造器,下面介绍字面量(变量)的注入
BlankDisc.java
public class BlankDisc implements CompactDisc {
    private String title;
    private String artist;
    public BlankDisc(String title,String artist){
        this.title = title;
        this.artist = artist;
    }
    public void play() {
        System.out.println("Playing" + title + "by" + artist);
    }
}
- 注入
<bean id="blankDisc" class="codingdojo.parkingboy.spring.xml_bean.BlankDisc">
        <constructor-arg index="0" value="gentle music"/>
        <constructor-arg index="1" value="Jason"/>
    bean>
- c 命名空间注入
<bean id="blankDisc" class="codingdojo.parkingboy.spring.xml_bean.BlankDisc"
        c:artist="gentle music" c:title="Jason"/>
c. 构造器注入集合(只能通过 注入)
BlankDisc.java
public class BlankDisc implements CompactDisc {
    private List<String> songs;

    public BlankDisc(List<String> songs){
        this.songs =songs
    }
    public void play() {
        for(String song:songs){
            System.out.println("Playing" + song);
        }

    }
}
<bean id="blankDisc" class="codingdojo.parkingboy.spring.xml_bean.BlankDisc">
        <constructor-arg >
            <list>
                <value>Avalue>
                <value>Bvalue>
                <value>Cvalue>
            list>
        constructor-arg>
bean>
注入对象引用的集合
public CDPlayer(List<CompactDisc> ads){....}
<bean id="blankDisc" class="codingdojo.parkingboy.spring.xml_bean.BlankDisc">
        <constructor-arg >
            <list>


            list>
        constructor-arg>
bean>
d. 属性注入
前面我们都是使用构造器注入的方式,一般来说:强依赖(必不可少的)使用构造器注入,可选性依赖使用属性注入。
这里的 CompactDisc 可以为强依赖,也可以是可选性的。下面是两种方式的注入:
- 通过构造器注入 CompactDisc
public class CDPlayer implements MediaPlayer {

    private CompactDisc compactDisc;

    public CDPlayer(CompactDisc compactDisc){
        this.compactDisc = compactDisc;
    }
    public void play() {
        compactDisc.play() ;
    }
}
- 通过属性注入 CompactDisc
public class HDPlayer implements MediaPlayer {

    private CompactDisc compactDisc;

    public void setCompactDisc(CompactDisc compactDisc) {
        this.compactDisc = compactDisc;
    }

    public void play() {
        compactDisc.play();
    }
}
- 属性注入
<bean id="hdPlayer" class="codingdojo.parkingboy.spring.xml_bean.HDPlayer">
    <property name="compactDisc" ref="compactDisc"/>
bean>
这里通过 ref 调用setCompactDisc()方法将引用 bean 注入到属性compactDisc
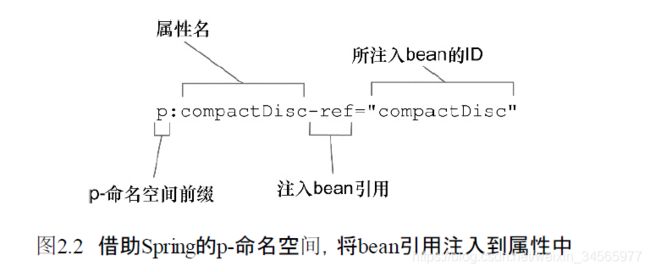
- p 命名空间 属性注入
<beans xmlns="http://www.springframework.org/schema/beans"
xmlns:p="http://www.springframework.org/schema/p"
xmlns:xsi="http://www.w3.org/2001/XMLSchema-instance"
xsi:schemaLocation="http://www.springframework.org/schema/beans
http://www.springframework.org/schema/beans/spring-beans.xsd">
<bean id="compactDisc" class="codingdojo.parkingboy.spring.auto_bean.SgtPeppers"/>
e. 属性注入字面量(变量)
BlankDisc.java
public class BlankDisc implements CompactDisc {
    private String title;
    private String artist;

    public void setTitle(String title){
        this.title = title;
    }

    public void setArtist(String artist){
        this.artist = artist;
    }

    public void play() {
        System.out.println("Playing" + title + "by" + artist);
    }
}
- 注入属性
<bean id="blankDisc" class="codingdojo.parkingboy.spring.xml_bean.BlankDisc">
- p 命名空间 注入属性
<bean id="blankDisc" class="codingdojo.parkingboy.spring.xml_bean.BlankDisc">
<properties>
f. 属性注入集合
BlankDisc.java
public class BlankDisc implements CompactDisc {
    private String title;
    private String artist;
    private List<String> tracks;

    public void setTitle(String title){
        this.title = title;
    }

    public void setArtist(String artist){
        this.artist = artist;
    }

    public void setTracks(List<String> tracks){
        this.tracks = tracks;
    }

    public void play() {
        System.out.println("Playing" + title + "by" + artist);
        for(String track:tracks){
            System.out.println("-Track:"+track);
        }
    }
}
- 注入集合
<bean id="blankDisc" class="codingdojo.parkingboy.spring.xml_bean.BlankDisc">

            <list>
                <value>Avalue>
                <value>Bvalue>
                <value>Cvalue>
            list>
        properties>
bean>
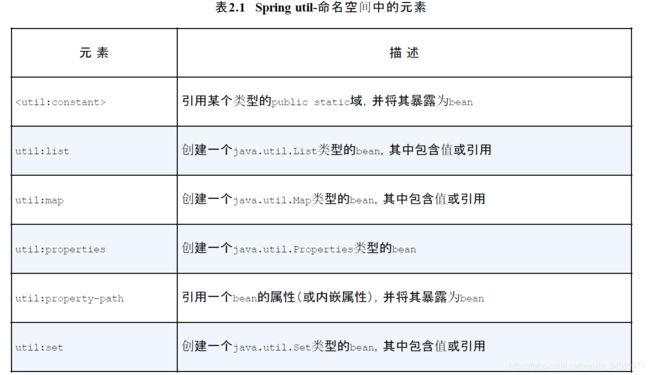
- 这里我们使用 util-命名空间 实现p 命名空间 注入集合
<util:list id="trackList">
  <value>Sgt. Pepper's Lonely Hearts Club Bandvalue>
  <value>With a Little Help from My Friendsvalue>
  <value>Lucy in the Sky with Diamondsvalue>
  <value>Getting Bettervalue>
  <value>Fixing a Holevalue>
  <value>She's Leaving Homevalue>
  <value>Being for the Benefit of Mr. Kite!value>
  <value>Within You Without Youvalue>
  <value>When I'm Sixty-Fourvalue>
  <value>Lovely Ritavalue>
  <value>Good Morning Good Morningvalue>
  <value>Sgt. Pepper's Lonely Hearts Club Band (Reprise)value>
  <value>A Day in the Lifevalue>
util:list>
<bean id="blankDisc" class="codingdojo.parkingboy.spring.xml_bean.BlankDisc">
<properties>
JavaConfig 和 xml 配置 的混合使用
在JavaConfig中引用xml配置
在xml配置中引用 JavaConfig
2. 高级装配
配置profile bean
通常不同的开发环境我们都会使用不同的环境配置,比如配置文件,可以配置多个profile bean,并在不同需要中指定profile进行开发测试。
通过@Profile注解配置profile
@Configuration
public class DataSourceConfig {

  @Bean(destroyMethod = "shutdown")
  @Profile("dev") //创建了dev profile 的bean
  public DataSource embeddedDataSource() {
    return new EmbeddedDatabaseBuilder()
        .setType(EmbeddedDatabaseType.H2)
        .addScript("classpath:schema.sql")
        .addScript("classpath:test-data.sql")
        .build();
  }

  @Bean
  @Profile("prod")//创建 prod profile 的 bean
  public DataSource jndiDataSource() {
    JndiObjectFactoryBean jndiObjectFactoryBean = new JndiObjectFactoryBean();
    jndiObjectFactoryBean.setJndiName("jdbc/myDS");
    jndiObjectFactoryBean.setResourceRef(true);
    jndiObjectFactoryBean.setProxyInterface(javax.sql.DataSource.class);
    return (DataSource) jndiObjectFactoryBean.getObject();
  }

}
这里的装配的bean 是基于激活的profile,即只有处于active 激活状态的profile 相应的bean才会被创建。(PS:没有指定profile的bean,即没有使用@Profile,始终都会被创建,也就没有有没有激活之说)
在XML中配置profile
datasource-config.xml
<beans xmlns="http://www.springframework.org/schema/beans"
       xmlns:xsi="http://www.w3.org/2001/XMLSchema-instance" xmlns:jdbc="http://www.springframework.org/schema/jdbc"
       xmlns:jee="http://www.springframework.org/schema/jee" xmlns:p="http://www.springframework.org/schema/p"
       xsi:schemaLocation="
    http://www.springframework.org/schema/jee
    http://www.springframework.org/schema/jee/spring-jee.xsd
    http://www.springframework.org/schema/jdbc
    http://www.springframework.org/schema/jdbc/spring-jdbc.xsd
    http://www.springframework.org/schema/beans
    http://www.springframework.org/schema/beans/spring-beans.xsd
http://www.springframework.org/schema/beans ">

  <beans profile="dev">
    <jdbc:embedded-database id="dataSource" type="H2">
      <jdbc:script location="classpath:schema.sql"/>
      <jdbc:script location="classpath:test-data.sql"/>
    jdbc:embedded-database>
  beans>

  <beans profile="prod">
    <jee:jndi-lookup id="dataSource"
                     lazy-init="true"
                     jndi-name="jdbc/myDatabase"
                     resource-ref="true"
                     proxy-interface="javax.sql.DataSource"/>
  beans>
beans>
如果以下是项目resources的目录结构
--resources
        |__common
            |__log4j.properties

        |__dev
            |__jdbc.properties

        |__prod
            |__jdbc.properties
可以这样进行配置datasource-config.xml
<beans xmlns="http://www.springframework.org/schema/beans"
       xmlns:xsi="http://www.w3.org/2001/XMLSchema-instance"
       xmlns:context="http://www.springframework.org/schema/context"
       xsi:schemaLocation=" http://www.springframework.org/schema/beans http://www.springframework.org/schema/beans/spring-beans.xsd
       http://www.springframework.org/schema/context
       http://www.springframework.org/schema/context/spring-context-4.2.xsd">

  <description>spring profile配置description>


  <beans profile="development">
    <context:property-placeholder
            location="classpath*:common/*.properties, classpath*:dev/*.properties" />
    <bean id="dataSource"
          class="com.mchange.v2.c3p0.ComboPooledDataSource"
          destroy-method="close">

      <property name="driverClass" value="${jdbc.driver_class}">property>
      <property name="jdbcUrl" value="${jdbc.connection.url}">property>
      <property name="user" value="${jdbc.connection.username}">property>
      <property name="password" value="${jdbc.connection.password}">property>

    bean>
  beans>


  <beans profile="production">
    <context:property-placeholder
            location="classpath*:common/*.properties, classpath*:prod/*.properties" />
    <bean id="dataSource"
          class="com.mchange.v2.c3p0.ComboPooledDataSource"
          destroy-method="close">

      <property name="driverClass" value="${jdbc.driver_class}">property>
      <property name="jdbcUrl" value="${jdbc.connection.url}">property>
      <property name="user" value="${jdbc.connection.username}">property>
      <property name="password" value="${jdbc.connection.password}">property>

    bean>
  beans>
beans>
激活profile
可以通过设置spring.profiles.default和spring.profiles.active这两个属性来激活和使用对应的配置文件。default为默认,如果没有通过active来指定,那么就默认使用default定义的环境。
这两个属性可以通过多种方法来设置:
- 在web.xml中作为web应用的上下文参数context-param;
- 在web.xml中作为DispatcherServlet的初始化参数;
- 作为JNDI条目;
- 作为环境变量;
- 作为JVM的系统属性;
- 在集成测试类上,使用@ActiveProfiles注解配置。
web.xml
<web-app version="3.0" xmlns="http://java.sun.com/xml/ns/javaee"
    xmlns:xsi="http://www.w3.org/2001/XMLSchema-instance"
    xsi:schemaLocation="http://java.sun.com/xml/ns/javaee
    http://java.sun.com/xml/ns/javaee/web-app_3_0.xsd">

    <display-name>Archetype Created Web Applicationdisplay-name>

    <context-param>
        <param-name>contextConfigLocationparam-name>
        <param-value>
            classpath*:/applicationContext*.xml
        param-value>
    context-param>


    <context-param>
        <param-name>spring.profiles.defaultparam-name>
        <param-value>developmentparam-value>
    context-param>


    <context-param>
        <param-name>spring.profiles.activeparam-name>
        <param-value>developmentparam-value>
    context-param>

    <servlet>
        <servlet-name>appServletservlet-name>
        <servlet-class>org.springframework.web.servlet.DispatcherServletservlet-class>

        <init-param>
            <param-name>spring.profiles.defaultparam-name>
            <param-value>developmentparam-value>
        init-param>
        <load-on-startup>1load-on-startup>
    servlet>
    <servlet-mapping>
        <servlet-name>appServletservlet-name>
        <url-pattern>/url-pattern>
    servlet-mapping>

web-app>
指定 profile 进行测试
可以通过@ActiveProfiles来指定激活的profile
  @RunWith(SpringJUnit4ClassRunner.class)
  @ContextConfiguration("classpath:datasource-config.xml")
  @ActiveProfiles("prod")
  public static class ProductionDataSourceTest_XMLConfig {
        @Autowired(required=false)
        private DataSource dataSource;

        @Test
        public void shouldBeEmbeddedDatasource() {
          // should be null, because there isn't a datasource configured in JNDI
          assertNull(dataSource);
    }
  }
有条件地装配bean
概述
在应用的类路径下包含特定的库,或者在另外特定的bean 声明之后,或者只有在特定环境配置之后才创建bean。
@Conditional
public interface Condition {

	/**
	 * Determine if the condition matches.
	 * @param context the condition context
	 * @param metadata metadata of the {@link org.springframework.core.type.AnnotationMetadata class}
	 * or {@link org.springframework.core.type.MethodMetadata method} being checked.
	 * @return {@code true} if the condition matches and the component can be registered
	 * or {@code false} to veto registration.
	 */
	boolean matches(ConditionContext context, AnnotatedTypeMetadata metadata);

}
这个接口就是设置条件必须实现的,实现方法matches 并在里面设置相关条件,该方法返回true即是条件成立,可以创建@Conditional 修饰的bean。
例子说明
- 组件类
public class MagicBean {

}
- 配置类
@Configuration
public class MagicConfig {

  @Bean
  @Conditional(MagicExistsCondition.class)
  public MagicBean magicBean() {
    return new MagicBean();
  }

}
@Conditional(MagicExistsCondition.class)指定Conditional接口的实现类
- Conditional接口的实现类
public class MagicExistsCondition implements Condition {

  @Override
  public boolean matches(ConditionContext context, AnnotatedTypeMetadata metadata) {

      Environment env = context.getEnvironment();
      return env.containsProperty("magic");//判断环境中是否存在magic属性

  }

}
实现matches方法,设置条件
- 测试类
@RunWith(SpringJUnit4ClassRunner.class)
@ContextConfiguration(classes=MagicConfig.class)
public class MagicExistsTest {

  @Autowired
  private ApplicationContext context;

  /*
   * This test will fail until you set a "magic" property.
   * You can set this property as an environment variable, a JVM system property, by adding a @BeforeClass
   * method and calling System.setProperty() or one of several other options.
   */
  @BeforeClass
  public static void setProperty(){
    System.setProperty("magic","value");
  }

  @Test
  public void shouldNotBeNull() {
    assertTrue(context.containsBean("magicBean"));
  }

}
Spring 条件注解(@Conditional)实例
处理自动装配bean 的歧义性
使用@Primary 标识“喜欢”
public interface Animal{

}
@Component
public class Dog implements Animal{}

@Component
public class Cat implements Animal{}
此时就不知道“爱好”哪只动物了,需要进行指定首选的“爱好”动物
public class myHobby{

    @Autowired
    private Animal animal;

    public myHobby(Animal animal){
        this.animal = animal;
    }
}
- 可以加上@Primary 指定首选
@Component
@Primary
public class Cat implements Animal{}
- 如果使用xml创建bean
使用@Qualifier 标识限定词
- 当有多个@Primary首选bean, 或者使用@Qualifier 代替其来指定 bean装配。
public class myHobby{

    @Autowired
    @Qualifier("cat")
    private Animal animal;

    public myHobby(Animal animal){
        this.animal = animal;
    }
}
这里@Qualifier(“cat”)的cat是spring 给定的默认限定符,即与 bean 的ID相同。
当然可以给该限定符重命名,在组件类上进行设置。
@Component
@Qualifier("cute")
public class Cat implements Animal{}
这里的@Qualifier(“cute”)可以描述为该bean的特征,即“可爱的动物”。
还有一个重点,就是这样做更多的是为了解除限定词与类名的紧耦合,避免类名的重构导致限定符的失效。
public class myHobby{

    @Autowired
    @Qualifier("cute")
    private Animal animal;

    public myHobby(Animal animal){
        this.animal = animal;
    }
}
当然我们可以认为 Dog 也具有“cute” 的属性,这时我们不能使用两个@Qualifier,添加更多属性来区分它们。(PS:不允许出现相同类型的多个注解)
- 使用自定义新的注解
如 @Cute 来代替 @Qualifier(“cute”)
@Target({ElementType.TYPE,ElementType.FIELD, ElementType.PARAMETER})
@Retention(RetentionPolicy.RUNTIME)
@Qualifier
public @interface Cute {
}
interface @Red
@Target({ElementType.TYPE,ElementType.FIELD, ElementType.PARAMETER})
@Retention(RetentionPolicy.RUNTIME)
@Qualifier
public @interface Red {
}
interface @Black
@Target({ElementType.TYPE,ElementType.FIELD, ElementType.PARAMETER})
@Retention(RetentionPolicy.RUNTIME)
@Qualifier
public @interface Black {
}
所以cat 的组件类如下
@Component
@Cute
@Red
public class Cat implements Animal {
}
“我的爱好动物”是 cat
public class myHobby{

    @Autowired
    @Cute
    @Red
    private Animal animal;

    public myHobby(Animal animal){
        this.animal = animal;
    }
}
参考文章 Spring 注解实现Bean依赖注入之@Qualifier
bean的作用域
运行时属性注入
注入外部源的值 @PropertySource
student.java
public class Student {

    private String name;
    private String sex ;

    public Student(String name,String sex){
        this.name = name;
        this.sex = sex;
    }

    public String getName() {
        return name;
    }

    public String getSex() {
        return sex;
    }
}
- 传统的属性注入,用的是hard code的方式
    @Bean(name = "Mike")
    public Student student(){
        return new Student("Mike","male");
    }
- 使用@PropertySource,同Environment对象取出属性值(PS:属性文件会加载到Environment对象中)
app.properties
stu.name=jack
stu.sex=male
StudentCofig.java
@Configuration
@PropertySource("classpath:com/zexing/propertySource/app.properties")
public class StudentCofig {

    @Autowired
    Environment environment;

    @Bean(name = "Jack")
    public Student student1(){return new Student(environment.getProperty("stu.name"),environment.getProperty("stu.sex"));}

    @Bean(name = "Mike")
    public Student student(){
        return new Student("Mike","male");
    }

}
Environment 对象的方法
- getProperty(String key, String defaultValue) 检索属性值,null值或者不存在则使用默认值
- getProperty(String key, Class targetType) 将String类型的检索值转成期望的对象类型
- getProperty(String key, Class targetType, T defaultValue) 检索值转化和设置默认值
- containsProperty(String) 判断属性值是否存在
- 使用占位符
xml文件配置加载属性文件
<context:property-placeholder
            location="classpath*:com/zexing/propertySource/app.properties" />
    <bean id="Jack1"
          class="com.zexing.propertySource.Student"
          c:name="${stu.name}"
          c:sex="${stu.sex}"/>
测试
    @Test
    public void setStuWithXml(){
        ApplicationContext applicationContext = new ClassPathXmlApplicationContext("classpath*:/com/zexing/propertySource/app.xml");
        Student jack = (Student) applicationContext.getBean("Jack1");
        assertEquals("jack",jack.getName());
    }

