Machine Learning机器学习(学习记录)
Machine Learning机器学习
目录
- Machine Learning机器学习
- 聚类
-
- K-Means
-
- 基本思路
- k均值算法流程
-
- k均值算法的特点
-
- k-均值算法的优点:
- k-均值算法的缺点:
- sklearn实现KMeans
- K-Means++算法
-
- 基本思路
- 代码实现
-
- K-Means++Python代码实现
- sklearn实现K-Means++
- 参考:
聚类
K-Means
基本思路
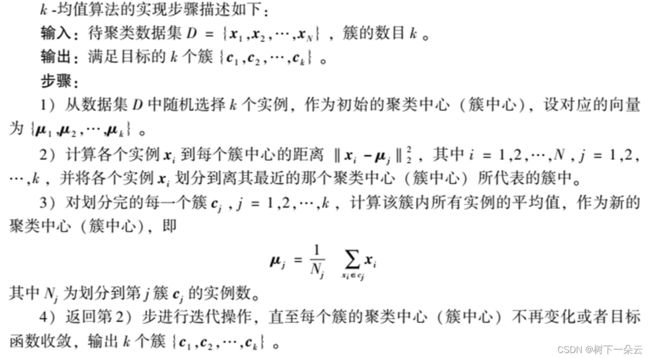
k-均值(k-means )算法是一种划分聚类算法,其目标是将一个没有标签的数据集中的N个数据对象(实例) 划分为k个簇,使得每个簇内的数据对象具有高度的相似性,不同簇间的数据对象具有较大的差异性。
k-均值算法具有一个迭代过程,在这个过程中,数据集被分组成k个预定义的不重叠的簇,使簇的内部点尽可能相似,同时试图保持簇在不同的空间,它将数据点分配给簇,以便簇的质心和数据点之间的平方距离之和最小,在这个位置,簇的质心是簇中数据点的算术平均值。
k均值算法流程
k均值算法的特点
k-均值算法的优点:
- 原理比较简单,容易实现,收敛速度快,可解释性较好。
- 需要调节的参数较少(主要是聚类簇数 k ),且聚类效果较好。
k-均值算法的缺点:
- 聚类簇数 k 值的选取不好把握,一般只能通过暴力搜索法来确定。
- 只适合簇型数据,对其他类型的数据聚类效果一般。
- 如果各隐含类别的数据不平衡,则聚类效果不佳。
- 采用迭代方法,得到的结果只是局部最优。
- 当数据量较大时,计算量也比较大,采用小批量 k-均值的方式虽然可以缓解,但可能会牺牲准确率。
- 对噪音和异常点比较的敏感。
sklearn实现KMeans
# -*- encoding : utf-8 -*-
"""
@project = sklearn_learning_01
@file = KMeans算法
@author = wly
@create_time = 2022/12/6 15:38
"""

from sklearn.datasets import make_blobs
import matplotlib.pyplot as plt
from sklearn.cluster import KMeans
import pandas as pd
from sklearn.metrics import silhouette_score
from sklearn.metrics import silhouette_samples
from sklearn.metrics import calinski_harabasz_score
from time import time

if __name__ == '__main__':
    # 自己创建数据集
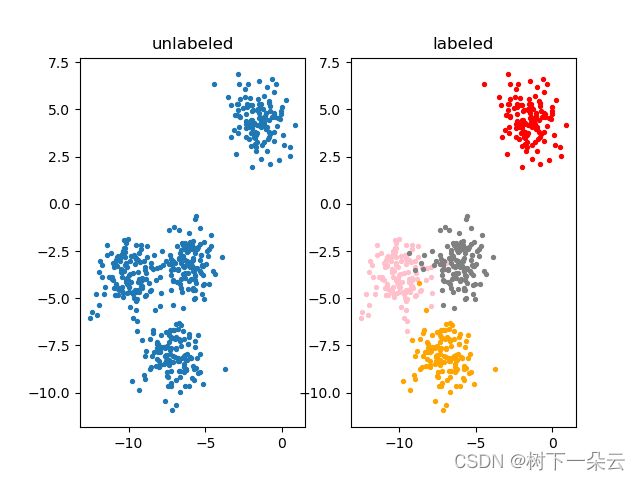
    X, y = make_blobs(n_samples=500, n_features=2, centers=4, random_state=1)

    ax1 = plt.subplot(1, 2, 1)
    plt.title("unlabeled")
    ax1.scatter(X[:, 0], X[:, 1],
                marker='o',  # 点的形状
                s=8)  # 点的大小

    color = ["red", "pink", "orange", "gray"]
    ax2 = plt.subplot(1, 2, 2)
    plt.title("labeled")
    for i in range(4):
        ax2.scatter(X[y == i, 0], X[y == i, 1],
                    marker='o',
                    c=color[i],
                    s=8)
    plt.show()

    # 基于这个分布,使用KMeans进行聚类
    n_clusters = 3

    # KMeans因为并不需要建立模型或者预测结果,因此我们只需要fit就能够得到聚类结果了
    # KMeans也有接口predict和fit_predict,表示学习数据X并对X的类进行预测
    cluster = KMeans(n_clusters=n_clusters, random_state=0).fit(X)
    y_pred = cluster.labels_
    # print(y_pred.shape)
    # pre = cluster.fit_predict(X)
    # print(pre == y_pred)

    # 其实不必使用所有的数据来寻找质心,少量的数据就可以帮助确定质心
    # 当数据量非常大的时候,可以使用部分数据来帮助确认质心
    cluster_smallsub = KMeans(n_clusters=n_clusters, random_state=0).fit(X[:200])
    y_pred_2 = cluster_smallsub.predict(X)
    # 数据量非常大的时候,效果会好
    # 如果数据量还行,不是特别大,直接使用fit之后调用属性.labels_提出来
    print(pd.value_counts(y_pred_2 == y))

    # 重要属性cLuster_centers_,查看质心
    centroids = cluster.cluster_centers_
    print("得到质心如下:")
    print(centroids)
    print("centroids shape = ", centroids.shape)

    # 重要属性inertia_,查看总距离平方和
    inertia = cluster.inertia_
    print("inertia = ", inertia)

    ax1 = plt.subplot(1, 2, 1)
    plt.title("initial unlabeled")
    ax1.scatter(X[:, 0], X[:, 1],
                marker='o',  # 点的形状
                s=8)  # 点的大小

    color = ["red", "pink", "orange", "gray"]
    ax2 = plt.subplot(1, 2, 2)
    plt.title("predict labeled")
    for i in range(n_clusters):
        ax2.scatter(X[y_pred == i, 0], X[y_pred == i, 1],
                    marker='o',
                    s=8,
                    c=color[i])
        ax2.scatter(centroids[:, 0], centroids[:, 1],
                    marker='x',
                    s=15,
                    c="black")
    plt.show()

    # 如果把聚类数换成4
    n_clusters = 4
    cluster_ = KMeans(n_clusters=n_clusters, random_state=0).fit(X)
    inertia_ = cluster_.inertia_
    print("current n_cluster = ", n_clusters)
    print("inertial = ", inertia_)

    # 如果把聚类数换成6
    n_clusters = 6
    cluster_ = KMeans(n_clusters=n_clusters, random_state=0).fit(X)
    inertia_ = cluster_.inertia_
    print("current n_cluster = ", n_clusters)
    print("inertial = ", inertia_)

    # 聚类算法的模型评估指标:当真实标签未知的时候:轮廓系数
    # 计时 轮廓系数
    t0 = time()
    print("silhouette_score(n_cluster = 3) = ", silhouette_score(X, y_pred))
    t1 = time()
    print("silhouette_score 所需时间为:", t1 - t0)

    # 聚类数为6时
    print("silhouette_score = ", silhouette_score(X, cluster_.labels_))

    # silhouette_sample,它的参数与轮廓系数一致,但返回的
    # 是数据集中每个样本自己的轮廓系数。
    print(silhouette_samples(X, y_pred).shape)
    print(silhouette_samples(X, y_pred).mean())

    # 卡林斯基-哈拉巴斯指数
    # 计时 卡林斯基-哈拉巴斯指数
    # ,calinski-harabaz指数比轮廓系数的计算块了一倍不止
    t0 = time()
    print("calinski_harabasz_score = ", calinski_harabasz_score(X, y_pred))
    t1 = time()
    print("calinski_harabasz_score 所需时间为:", t1 - t0)
False 371
True 129
dtype: int64
得到质心如下:
[[-8.0807047 -3.50729701]
[-1.54234022 4.43517599]
[-7.11207261 -8.09458846]]
centroids shape = (3, 2)
inertia = 1903.5607664611764
current n_cluster = 4
inertial = 908.3855684760615
current n_cluster = 6
inertial = 733.1538350083081
silhouette_score(n_cluster = 3) = 0.5882004012129721
silhouette_score 所需时间为: 0.004983186721801758
silhouette_score = 0.5150064498560357
(500,)
0.5882004012129721
calinski_harabasz_score = 1809.991966958033
calinski_harabasz_score 所需时间为: 0.0009975433349609375
K-Means++算法
K-Means++算法是K-Means算法的改进版,主要是为了选择出更优的初始聚类中心。

基本思路
- 在数据集中随机选择一个样本作为第一个初始聚类中心;
- 选择其余的聚类中心:
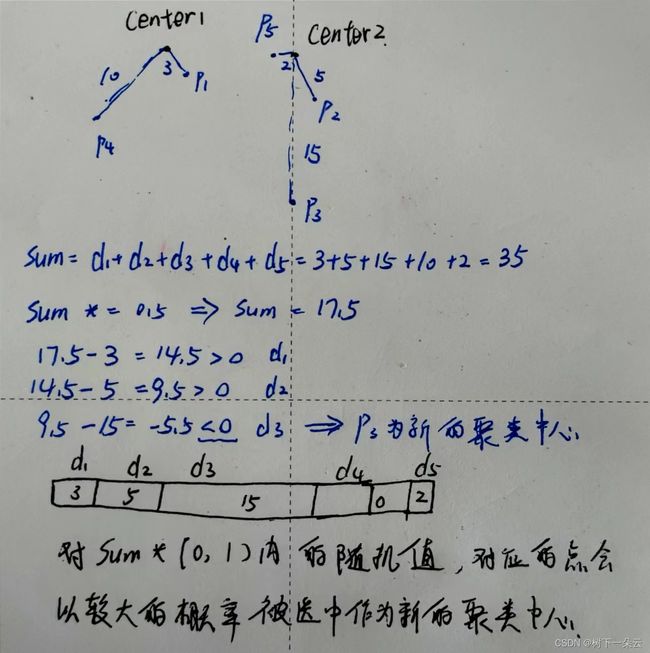
1、计算数据集中每一个样本与已经初始化的聚类中心之间的距离,并选择其中最短的距离,记为di;
2、以概率选择距离最大的样本作为新的聚类中心,重复上述过程,直到k个聚类中心点被确定。 - 对k个初始的聚类中心,利用K-Means算法计算出最终的聚类中心。
对“以概率选择距离最大的样本作为新的聚类中心”的理解:
即初始的聚类中心之间的相互距离应尽可能的远。假如有3 、 5 、 15 、 10 、 2 这五个样本的最小距离d i ,则其和sum为35,然后乘以一个取值在[ 0 , 1 )范围的值,即概率,也可以称其为权重,然后这个结果不断减去样本的距离d i ,直到某一个距离使其小于等于0,这个距离对应的样本就是新的聚类中心。
代码实现
K-Means++Python代码实现
sklearn实现K-Means++
参考:
1、https://blog.csdn.net/qq_42730750/article/details/107119433
2、https://www.cnblogs.com/shelocks/archive/2012/12/20/2826787.html
3、k-means及k-means++原理【python代码实现】


