如何使用Spring Boot,Thymeleaf和Bootstrap上传多个文件
在本教程中,我将向您展示如何使用Spring Boot,Thymeleaf和Bootstrap上传多个文件。我们还使用 Spring Web MultipartFile界面来处理 HTTP 多部分请求并显示上传文件的列表。
春季启动多文件上传与百里香叶概述
我们的 Spring Boot + Thymeleaf 多文件上传示例将具有以下功能:
- 将多个文件上传到服务器中的静态文件夹
- 使用链接从服务器下载文件
- 获取文件信息列表(文件名和URL)
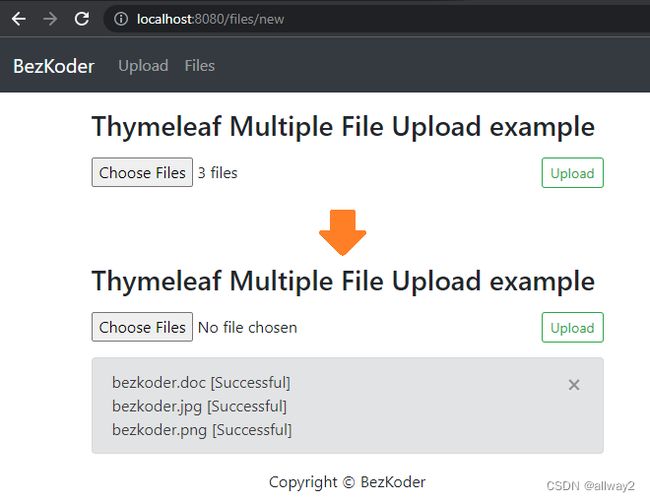
– 这是多文件上传表格:
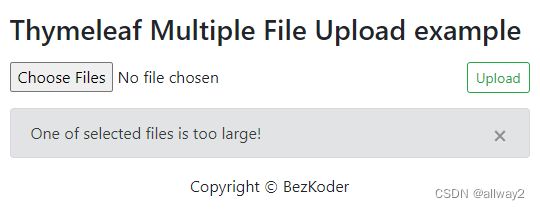
– 如果其中一个文件超过特定的最大大小:
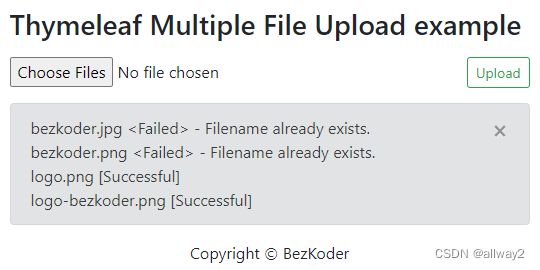
– 如果某些文件与上传的文件同名:
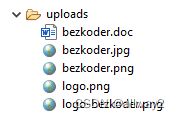
– 这是存储所有上传文件的静态文件夹:
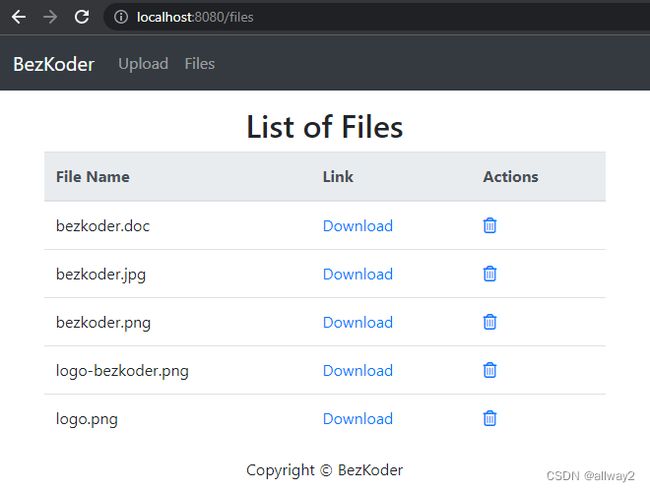
– 您可以查看带有下载链接的上传文件列表:
在本教程中,我不解释删除文件的方法。如果你想知道这一点,只需访问:
弹簧启动删除文件示例与百里香叶
或者使用以下教程添加分页:
春季启动百里香叶分页示例
科技
- Java 8
- Spring Boot 2.7 (with Spring Web MVC, Thymeleaf)
- Maven 3.6.1
- Bootstrap 4
- jQuery 3.6.1
项目结构
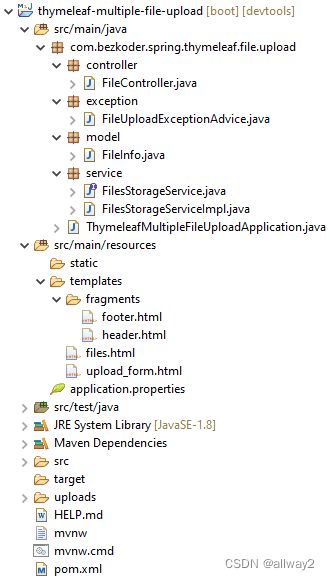
让我简要解释一下。
– FileInfo包含上传文件的信息。
–FilesStorageService帮助我们初始化存储,保存新文件,加载文件,获取文件信息列表,删除文件。
– FileController和FilesStorageService用于处理多个文件上传/下载和模板请求。
– FileUploadExceptionAdvice在控制器处理文件上传时处理异常。
– template存储项目的 HTML 模板文件。
– application.properties 包含 Servlet Multipart 的配置。
– uploads 是用于存储文件的静态文件夹。
– pom.xml 用于 Spring Boot 依赖项。
创建和设置Spring Boot MultiFile Upload项目
使用 Spring Web 工具或开发工具(Spring Tool Suite、Eclipse、Intellij)创建 Spring Boot 项目。
然后打开pom.xml并为Spring Web,Thymeleaf,Bootstrap,Jquery添加依赖项:
	org.springframework.boot
	spring-boot-starter-web


	org.springframework.boot
	spring-boot-starter-thymeleaf


	org.webjars
	bootstrap
	4.6.2


	org.webjars
	jquery
	3.6.1


	org.webjars
	webjars-locator-core
为文件存储创建服务
首先,我们需要一个将在控制器中自动连接的接口。
在服务文件夹中,创建类似于以下代码的FilesStorageService接口:
service/FilesStorageService.java
package com.bezkoder.spring.thymeleaf.file.upload.service;

import java.nio.file.Path;
import java.util.stream.Stream;

import org.springframework.core.io.Resource;
import org.springframework.web.multipart.MultipartFile;

public interface FilesStorageService {
  public void init();

  public void save(MultipartFile file);

  public Resource load(String filename);

  public void deleteAll();

  public Stream loadAll();
}
现在我们创建接口的实现。
service/FilesStorageServiceImpl.java
package com.bezkoder.spring.thymeleaf.file.upload.service;

import java.io.IOException;
import java.net.MalformedURLException;
import java.nio.file.FileAlreadyExistsException;
import java.nio.file.Files;
import java.nio.file.Path;
import java.nio.file.Paths;
import java.util.stream.Stream;

import org.springframework.core.io.Resource;
import org.springframework.core.io.UrlResource;
import org.springframework.stereotype.Service;
import org.springframework.util.FileSystemUtils;
import org.springframework.web.multipart.MultipartFile;

@Service
public class FilesStorageServiceImpl implements FilesStorageService {
  private final Path root = Paths.get("./uploads");

  @Override
  public void init() {
    try {
      Files.createDirectories(root);
    } catch (IOException e) {
      throw new RuntimeException("Could not initialize folder for upload!");
    }
  }

  @Override
  public void save(MultipartFile file) {
    try {
      Files.copy(file.getInputStream(), this.root.resolve(file.getOriginalFilename()));
    } catch (Exception e) {
      if (e instanceof FileAlreadyExistsException) {
        throw new RuntimeException("Filename already exists.");
      }

      throw new RuntimeException(e.getMessage());
    }
  }

  @Override
  public Resource load(String filename) {
    try {
      Path file = root.resolve(filename);
      Resource resource = new UrlResource(file.toUri());

      if (resource.exists() || resource.isReadable()) {
        return resource;
      } else {
        throw new RuntimeException("Could not read the file!");
      }
    } catch (MalformedURLException e) {
      throw new RuntimeException("Error: " + e.getMessage());
    }
  }

  @Override
  public void deleteAll() {
    FileSystemUtils.deleteRecursively(root.toFile());
  }

  @Override
  public Stream loadAll() {
    try {
      return Files.walk(this.root, 1).filter(path -> !path.equals(this.root)).map(this.root::relativize);
    } catch (IOException e) {
      throw new RuntimeException("Could not load the files!");
    }
  }
}
为多个文件上传创建控制器
在控制器包中,我们创建FileController .
controller/FileController.java
package com.bezkoder.spring.thymeleaf.file.upload.controller;
// ...
import com.bezkoder.spring.thymeleaf.file.upload.service.FilesStorageService;

@Controller
public class FileController {

  @Autowired
  FilesStorageService storageService;

  @GetMapping("/")
  public String homepage() {
    return "redirect:/files";
  }

  @GetMapping("/files/new")
  public String newFile(Model model) {
    return "upload_form";
  }

  @PostMapping("/files/upload")
  public String uploadFiles(Model model, @RequestParam("files") MultipartFile[] files) {
    ...

    return "upload_form";
  }

  @GetMapping("/files")
  public String getListFiles(Model model) {
    ...

    return "files";
  }

  @GetMapping("/files/{filename:.+}")
  public ResponseEntity getFile(@PathVariable String filename) {
    ...

    // return File
  }
}
– @Controller注释用于定义控制器。
– @GetMapping@PostMapping注释用于将 HTTP GET & POST 请求映射到特定的处理程序方法并返回适当的模板文件。
– @Autowired我们使用将 FilesStorageService bean 的实现注入到局部变量中。
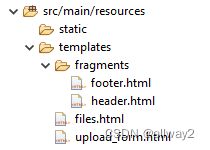
设置模板
在 src/main/resources 文件夹中,按以下结构创建文件夹和文件:
页眉和页脚
我们将使用百里香叶碎片()来重用一些常见的部分,例如页眉和页脚。
让我们为它们编写 HTML 代码。th:fragment
fragments/footer.html
以及包含导航栏的标题:
fragments/header.html
现在我们需要创建HTML文件,然后导入Thymeleaf片段,Bootstrap,jQuery和Font Awesome。
多文件上传表单
upload_form.html
  Thymeleaf Multiple File Upload example


  -- Multiple file upload form --
文件列表
files.html
  Thymeleaf Multiple File Upload example


  -- list of files display --
实现多文件上传功能
我们使用@GetMapping和@PostMapping注释用于将HTTP GET和POST请求映射到特定的处理程序方法:
- 获取/文件/新:
newFile()– 返回upload_form.html模板 - 发布/文件/上传:
ploadFiles()– 上传多个文件u
uploadFiles()是主要方法我们使用MultipartFile[] files参数,Java 8 Stream API 来处理数组中的每个文件。
FileController.java
import com.bezkoder.spring.thymeleaf.file.upload.service.FilesStorageService;

@Controller
public class FileController {

  @Autowired
  FilesStorageService storageService;

  @GetMapping("/files/new")
  public String newFile(Model model) {
    return "upload_form";
  }

  @PostMapping("/files/upload")
  public String uploadFiles(Model model, @RequestParam("files") MultipartFile[] files) {
    List messages = new ArrayList<>();

    Arrays.asList(files).stream().forEach(file -> {
      try {
        storageService.save(file);
        messages.add(file.getOriginalFilename() + " [Successful]");
      } catch (Exception e) {
        messages.add(file.getOriginalFilename() + "  - " + e.getMessage());
      }
    });

    model.addAttribute("messages", messages);

    return "upload_form";
  }
}
upload_form.html
显示文件列表
首先,我们需要创建具有name和url字段的FileInfo模型:&.nameurl
model/FileInfo.java
package com.bezkoder.spring.thymeleaf.file.upload.model;

public class FileInfo {

  private String name;
  private String url;

  public FileInfo(String name, String url) {
    this.name = name;
    this.url = url;
  }

  public String getName() {
    return this.name;
  }

  public void setName(String name) {
    this.name = name;
  }

  public String getUrl() {
    return this.url;
  }

  public void setUrl(String url) {
    this.url = url;
  }
}在控制器中,我们将返回FileInfo对象列表作为模型属性。
@GetMapping@PostMapping注释用于将 HTTP GET & POST 请求映射到特定的处理程序方法:
- 获取/文件:
getListFiles()– 返回文件.html模板 - 获取 /files/[文件名]:
getFile()– 下载filename文件
FileController.java
import com.bezkoder.spring.thymeleaf.file.upload.model.FileInfo;
import com.bezkoder.spring.thymeleaf.file.upload.service.FilesStorageService;

@Controller
public class FileController {

  @Autowired
  FilesStorageService storageService;

  // ...

  @GetMapping("/")
  public String homepage() {
    return "redirect:/files";
  }

  @GetMapping("/files")
  public String getListFiles(Model model) {
    List fileInfos = storageService.loadAll().map(path -> {
      String filename = path.getFileName().toString();
      String url = MvcUriComponentsBuilder
          .fromMethodName(FileController.class, "getFile", path.getFileName().toString()).build().toString();

      return new FileInfo(filename, url);
    }).collect(Collectors.toList());

    model.addAttribute("files", fileInfos);

    return "files";
  }

  @GetMapping("/files/{filename:.+}")
  public ResponseEntity getFile(@PathVariable String filename) {
    Resource file = storageService.load(filename);

    return ResponseEntity.ok()
        .header(HttpHeaders.CONTENT_DISPOSITION, "attachment; filename=\"" + file.getFilename() + "\"").body(file);
  }
}
files.html
要删除文件,请访问以下教程:
弹簧启动删除文件示例与百里香叶
为 Servlet 配置多部分文件
让我们定义可以在 application.properties 中上传的最大文件大小,如下所示:
spring.servlet.multipart.max-file-size=1MB
spring.servlet.multipart.max-request-size=1MB
– spring.servlet.multipart.max-file-size:每个请求的最大文件大小。
– spring.servlet.multipart.max-request-size:多部分/表单数据的最大请求大小。
处理文件上传异常
这是我们处理请求超过最大上传大小的情况的地方。系统将抛出MaxUploadSizeExceededException,我们将使用@ControllerAdvice和@ExceptionHandler注释来处理异常。
exception/FileUploadExceptionAdvice.java
package com.bezkoder.spring.thymeleaf.file.upload.exception;

import org.springframework.web.multipart.MaxUploadSizeExceededException;

import java.util.ArrayList;
import java.util.List;

import org.springframework.ui.Model;
import org.springframework.web.bind.annotation.ControllerAdvice;
import org.springframework.web.bind.annotation.ExceptionHandler;

@ControllerAdvice
public class FileUploadExceptionAdvice {

  @ExceptionHandler(MaxUploadSizeExceededException.class)
  public String handleMaxSizeException(Model model, MaxUploadSizeExceededException e) {
    List messages = new ArrayList<>();
    messages.add("One of selected files is too large!");

    model.addAttribute("messages", messages);

    return "upload_form";
  }
}
初始化存储
我们需要运行FilesStorageService的init()方法(如有必要deleteAll())。所以打开ThymeleafMultipleFileUploadApplication.java并实现CommandLineRunner的run()方法:
package com.bezkoder.spring.thymeleaf.file.upload;

import javax.annotation.Resource;

import org.springframework.boot.CommandLineRunner;
import org.springframework.boot.SpringApplication;
import org.springframework.boot.autoconfigure.SpringBootApplication;

import com.bezkoder.spring.thymeleaf.file.upload.service.FilesStorageService;

@SpringBootApplication
public class ThymeleafMultipleFileUploadApplication implements CommandLineRunner {

  @Resource
  FilesStorageService storageService;

  public static void main(String[] args) {
    SpringApplication.run(ThymeleafMultipleFileUploadApplication.class, args);
  }

  @Override
  public void run(String... arg) throws Exception {
//    storageService.deleteAll();
    storageService.init();
  }
}
使用百里香叶运行春季引导多文件上传示例
使用以下命令运行 Spring 引导应用程序:mvn spring-boot:run。
源代码
您可以在 Github 上找到本教程的完整源代码。
用于删除文件:
弹簧启动删除文件示例与百里香叶
结论
今天我们已经学习了如何使用多部分文件创建 Spring 启动 Thymeleaf 多文件上传应用程序,并使用静态文件夹获取文件信息。
或带前端的全栈: – Angular + Spring Boot:文件上传示例 – React + Spring Boot:
文件上传示例
您还可以了解如何上传Excel / CSV文件并将内容存储在MySQL数据库中,并带有以下帖子: – Spring Boot:将Excel文件数据上传/导入MySQL数据库 – Spring Boot:将CSV文件数据上传/导入MySQL数据库
如果要像这样将文件存储在数据库中:

您可以在以下位置找到说明:
Spring 引导上传/下载文件到/从数据库示例
快乐学习!再见。
延伸阅读
– Spring Boot 上传多个文件 Rest API
– Spring Boot Thymeleaf CRUD 示例 – Spring Boot Thymeleaf 分页和排序示例
异常处理:
– Spring Boot @ControllerAdvice & @ExceptionHandler 示例 – Spring Boot 中的@RestControllerAdvice示例
单元测试:
– JPA 存储库的弹簧引导单元测试
– 其余控制器的弹簧引导单元测试
部署:
– 在 AWS 上部署 Spring Boot 应用程序 – Elastic Beanstalk
关联:
– 带有 JPA 的 Spring Boot 一对一示例,Hibernate – 使用 JPA 的 Spring Boot One To More 示例,Hibernate – 使用 JPA 的 Spring Boot Many to Many 示例,Hibernate