PSMNet代码的一些理解
作为入坑进深度学习的小白,第一篇复现的论文是《Pyramid Stereo Matching Network》,代码已经由作者开源,链接:https://github.com/JiaRenChang/PSMNet
代码大致读懂,将一些代码po出,做简单注释。代码 、注释、下面的备注要结合看哦。代码只针对KITTI2015,其他训练集没有用到。
数据预处理
讲一下KITT2015的预处理部分。
dataloader/KITTIloader2015.py
class myImageFloder(data.Dataset):
    def __init__(self, left, right, left_disparity, training, loader=default_loader, dploader= disparity_loader):
        self.left = left
        self.right = right

        self.disp_L = left_disparity
        self.loader = loader
        self.dploader = dploader
        self.training = training

    def __getitem__(self, index):
        left  = self.left[index]
        right = self.right[index]
        disp_L= self.disp_L[index]

        left_img = self.loader(left)
        right_img = self.loader(right)
        dataL = self.dploader(disp_L)


        if self.training:

           w, h = left_img.size
           th, tw = 256, 512

           x1 = random.randint(0, w - tw)
           y1 = random.randint(0, h - th)

           left_img = left_img.crop((x1, y1, x1 + tw, y1 + th))

           right_img = right_img.crop((x1, y1, x1 + tw, y1 + th))
           left_img = np.array(left_img, dtype=np.uint8)
           right_img = np.array(right_img, dtype=np.uint8)

           dataL = np.ascontiguousarray(dataL,dtype=np.float32)/256
           dataL = dataL[y1:y1 + th, x1:x1 + tw]
           processed = preprocess.get_transform(augment=False)
           left_img   = processed(left_img)
           right_img  = processed(right_img)
           return left_img, right_img, dataL
        else:

           """
           w, h = left_img.size

           left_img = left_img.crop((w - 1232, h - 368, w, h))
           right_img = right_img.crop((w - 1232, h - 368, w, h))
           #w1, h1 = left_img.size

           dataL = dataL.crop((w - 1232, h - 368, w, h))
           dataL = np.ascontiguousarray(dataL, dtype=np.float32)/ 256

           processed = preprocess.get_transform(augment=False)
           left_img = processed(left_img)
           right_img = processed(right_img)
           """
           w, h = left_img.size
           th, tw = 256, 512

           x1 = random.randint(0, w - tw)
           y1 = random.randint(0, h - th)

           left_img = left_img.crop((x1, y1, x1 + tw, y1 + th))

           right_img = right_img.crop((x1, y1, x1 + tw, y1 + th))
           left_img = np.array(left_img, dtype=np.uint8)
           right_img = np.array(right_img, dtype=np.uint8)

           dataL = np.ascontiguousarray(dataL, dtype=np.float32) / 256
           dataL = dataL[y1:y1 + th, x1:x1 + tw]
           processed = preprocess.get_transform(augment=False)
           left_img = processed(left_img)
           right_img = processed(right_img)

           return left_img, right_img, dataL

    def __len__(self):
        return len(self.left)
图片大小为375 * 1242,训练时将图片随机裁剪至256 * 512的大小,再进行均值为[0.485, 0.456, 0.406],标准差为[0.229, 0.224, 0.225]的标准化。对于读入的视差ground truth,将视差缩小256倍,因为原来视差范围很大。
验证或预测时 若全图比较,考虑卷积神经网络对图片矩阵的一些缩放问题,先将原图裁剪至368*1232,输入网络得到视差图,再填充至原图大小。
网络模型
models/basic.py & models/stackhourglass.py
代价卷的生成
 refimg_fea     = self.feature_extraction(left)
    targetimg_fea  = self.feature_extraction(right)
    #matching
    cost = Variable(torch.FloatTensor(refimg_fea.size()[0], refimg_fea.size()[1]*2, self.maxdisp/4,  refimg_fea.size()[2],  refimg_fea.size()[3]).zero_()).cuda()
    #pytorch高版本的话self.maxdisp/4,改成self.maxdisp//4

    for i in range(self.maxdisp/4):
    #pytorch高版本的话改成for i in range(self.maxdisp//4)
        if i > 0 :
         cost[:, :refimg_fea.size()[1], i, :,i:]   = refimg_fea[:,:,:,i:]
           #COST  【B, 0-32 ,i,H,0-(i-W)】都为左图特征【B,0-32,H,i-1024】
         cost[:, refimg_fea.size()[1]:, i, :,i:] = targetimg_fea[:,:,:,:-i]
         #对应的转换的右图特征
        else:
         cost[:, :refimg_fea.size()[1], i, :,:]   = refimg_fea
         cost[:, refimg_fea.size()[1]:, i, :,:]   = targetimg_fea
refimg_fea, targetimg_fea的format为B * C * H * W,C为32。那么cost对应的五个维度为B,2C,192/4,H,W。生成的代价卷为5维的,大小为原图的1/4。
代价卷的调整
 # 1.basic
    cost0 = self.dres0(cost)     #1,32,48,64,128
    cost0 = self.dres1(cost0) + cost0#1,32,48,64,128
    cost0 = self.dres2(cost0) + cost0
    cost0 = self.dres3(cost0) + cost0
    cost0 = self.dres4(cost0) + cost0#1,32,48,64,128

    cost = self.classify(cost0) #1,1,48,64,128
    cost = F.upsample(cost, [self.maxdisp,left.size()[2],left.size()[3]], mode='trilinear')  #1,1,192,256,512
    cost = torch.squeeze(cost,1) #1,192,256,512
    pred = F.softmax(cost) #1,192,256,512
   pred = disparityregression(self.maxdisp)(pred) #1,256,512
  return pred
    #2. stackhourglass
    cost0 = self.dres0(cost)
    cost0 = self.dres1(cost0) + cost0

    out1, pre1, post1 = self.dres2(cost0, None, None)
    out1 = out1+cost0

    out2, pre2, post2 = self.dres3(out1, pre1, post1)
    out2 = out2+cost0

    out3, pre3, post3 = self.dres4(out2, pre1, post2)
    out3 = out3+cost0

    cost1 = self.classif1(out1)
    cost2 = self.classif2(out2) + cost1
    cost3 = self.classif3(out3) + cost2

    if self.training:
	cost1 = F.upsample(cost1, [self.maxdisp,left.size()[2],left.size()[3]], mode='trilinear')
	cost2 = F.upsample(cost2, [self.maxdisp,left.size()[2],left.size()[3]], mode='trilinear')

	cost1 = torch.squeeze(cost1,1)
	pred1 = F.softmax(cost1,dim=1)
	pred1 = disparityregression(self.maxdisp)(pred1)

	cost2 = torch.squeeze(cost2,1)
	pred2 = F.softmax(cost2,dim=1)
	pred2 = disparityregression(self.maxdisp)(pred2)

    cost3 = F.upsample(cost3, [self.maxdisp,left.size()[2],left.size()[3]], mode='trilinear')
    cost3 = torch.squeeze(cost3,1)
    pred3 = F.softmax(cost3,dim=1)
    pred3 = disparityregression(self.maxdisp)(pred3)

    if self.training:
        return pred1, pred2, pred3
该部分细看代码,结合文章两个结构图来看,基本没什么难度。根据pytorch版本,作者的思路是先用3D卷积调整代价卷至代价卷第二个维度 C=1,利用torch.squeeze()将5维代价卷降维,再利用F.upsample将代价卷的深度D、H、W三维度拓展为Dmax,4H,4W,也就是最大视差值和原图高和宽。然后预测相应像素位置上的视差。相应像素位置的视差为视差范围内各视差和对应概率的乘积和,是期望。 (这句话待调试验证)
训练部分
finetune.py
没什么好说的,注意batch size。
parser = argparse.ArgumentParser(description='PSMNet')
parser.add_argument('--maxdisp', type=int ,default=192,
                    help='maxium disparity')
parser.add_argument('--model', default='basic',
                    help='select model')
parser.add_argument('--batch_size', type=int, default=1,
                    help='number of batch to train')   #batch 改小
parser.add_argument('--datatype', default='2015',
                    help='datapath')
parser.add_argument('--datapath', default='/home/xxx/Downloads/dataset/data_scene_flow_2015/training/',
                    help='datapath')#改成自己的
parser.add_argument('--data_path', default='/media/xxx/xxxx/dataset/cityscapes/DATA/1',
                    help='datapath')#改成自己的
parser.add_argument('--epochs', type=int, default=600,
                    help='number of epochs to train')
parser.add_argument('--loadmodel', default='/media/xxx/xxxxFCNandPSM/model_16_stack/disp_PSM/finetune_752.tar',
                    help='load model') #默认为None,后来改成自己训练或下载的预训练模型
parser.add_argument('--savemodel', default='/media/xxx/xxxx/xxxx/model_16_stack/disp_PSM/',
                    help='save model')#自己设一个保存模型的文件
parser.add_argument('--no-cuda', action='store_true', default=False,
                    help='enables CUDA training')
parser.add_argument('--seed', type=int, default=1, metavar='S',
                    help='random seed (default: 1)')
预测部分
选一对立体图,左图如下:
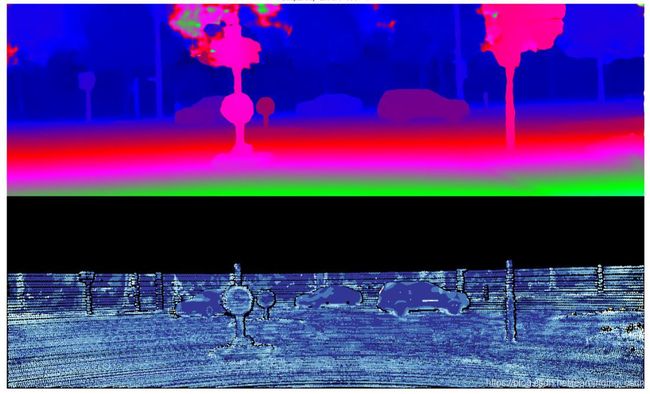
我们预测的视差图是这样的:

黑漆漆一片,不方便看,如果想用MATLAB看误差图之类的,这样的
运行MATLAB代码:代码链接可能需要,也可以去GitHub上找找
贴一下MATLAB的demo.py
clear all; close all; dbstop error;

% error threshold
tau = [3 0.05];

% stereo demo
disp('Load and show disparity map ... ');
D_est = disp_read('data1/disp_est.png');#自己的预测视差
D_gt  = disp_read('data1/disp_gt.png');#视差图的真值
O_map = obj_read('data1/obj_map.png');#obj_map文件夹的图,用于计算有无遮挡,对一些像素做mask的
% d_err = disp_error(D_gt,D_est,tau);
D_err = disp_error_image(D_gt,D_est,tau);
[d_err,d_bg_err,d_fg_err] = disp_error1(D_gt,D_est,O_map,tau)
D_err = disp_error_image(D_gt,D_est,tau);
figure,imshow([disp_to_color([D_est;D_gt]);D_err]);
title(sprintf('Disparity Error: %.2f %%',d_err*100));
#具体不阐述了,关于评价标准的,以后单独写一个博客。
% % flow demo
% disp('Load and show optical flow field ... ');
% F_est = flow_read('data/flow_est.png');
% F_gt  = flow_read('data/flow_gt.png');
% f_err = flow_error(F_gt,F_est,tau);
% F_err = flow_error_image(F_gt,F_est,tau);
% figure,imshow([flow_to_color([F_est;F_gt]);F_err]);
% title(sprintf('Flow Error: %.2f %%',f_err*100));
太复杂的,或许你想要更直接的:

其实so easy!在submission.py的代码中加上两句:
#在前面加个包
from matplotlib import pyplot as plt
#看 主代码:
def main():
   processed = preprocess.get_transform(augment=False)

   for inx in range(len(test_left_img)):

       imgL_o = (skimage.io.imread(test_left_img[inx]).astype('float32'))
       imgR_o = (skimage.io.imread(test_right_img[inx]).astype('float32'))
       imgL = imgL_o.astype(float) / 255.0
       imgR = imgR_o.astype(float) / 255.0
       imgL = imgL.transpose(2, 0, 1)
       imgR = imgR.transpose(2, 0, 1)
       #imgL = processed(imgL_o).numpy()
       #imgR = processed(imgR_o).numpy()
       imgL = np.reshape(imgL,[1,3,imgL.shape[1],imgL.shape[2]])
       imgR = np.reshape(imgR,[1,3,imgR.shape[1],imgR.shape[2]])

       # pad to (384, 1248)
       top_pad = 384-imgL.shape[2]
       left_pad = 1248-imgL.shape[3]
       imgL = np.lib.pad(imgL,((0,0),(0,0),(top_pad,0),(0,left_pad)),mode='constant',constant_values=0)
       imgR = np.lib.pad(imgR,((0,0),(0,0),(top_pad,0),(0,left_pad)),mode='constant',constant_values=0)

       start_time = time.time()
       pred_disp = val(imgL,imgR)
       print('time = %.2f' %(time.time() - start_time))

       top_pad   = 384-imgL_o.shape[0]
       left_pad  = 1248-imgL_o.shape[1]
       img = pred_disp[top_pad:,:-left_pad]
       skimage.io.imsave(args.savedisp+test_left_img[inx].split('/')[-1],(img*256).astype('uint16'))
       #加上几句对得到的视差图进行处理
       img= skimage.io.imread(args.savedisp+(test_left_img[inx].split('/')[-1])).astype('float32') # (375,1242,3)\
       plt.imshow(img)
       plt.savefig(args.savedisp1 + (test_left_img[inx].split('/')[-1]))
总结:这是一篇很简略的总结,帮助理解的。事实上,代码挺清楚的,基本上,上手稍微改下参数和文件路径就能跑,相当清晰。