记录自己 Ubuntu 20.04 安装 CUDA 及 Pytorch
文章目录
- 一. 安装相关驱动
-
- 1. 查看显卡型号
- 2. 查找显卡驱动
- 3. 禁用 nouveau
-
- 3.1 检查是否已经禁用
- 3.2 禁用 nouveau 的具体命令
- 二. 安装 CUDA
-
- 1. 选择 CUDA 版本
- 2. 进行安装
- 3. **遇到了问题**: 最后一步
- 4. 又尝试了 `runfile[local]` 的安装方式
- 5. 安装安装成功的提示, 配置环境变量
- 6. 运行 cuda 的 samples
- 7. 可能遇到的其他问题
- 三. 安装 CUDNN
- 四. 安装 Pytorch
之前没接触过深度学习, 所以对安装 CUDA 以及 Pytorch 没什么概念, 这里主要记录一下.
自己用的是 Dell 的一款塔式服务器 (Precision 7820 Tower), 配置里面正好有 NVIDIA 的显卡, 所以就用这个机器来安装 CUDA 和 Pytorch.
参考了:
-
Ubuntu18.04查看显卡信息并安装NVDIA显卡驱动driver + Cuda + Cudnn
-
通过 conda 虚拟环境进行安装的话, 参考 ubuntu安装cuda,cudnn,pytorch , 但是要注意安装时的版本选择.
-
感觉通过 conda 虚拟环境进行安装, 是个更好的选择, 但是自己安装后 Pytorch 不能调用虚拟环境中的 cuda, 所以又更改了虚拟环境的环境变量, 来调用系统的 cuda, 参见 Conda 虚拟环境中配置环境变量 (具体来说是 Pytorch 虚拟环境调用系统 CUDA)
一. 安装相关驱动
1. 查看显卡型号
利用命令 lshw -c video 进行查看:
dell@dell-Tower:~$ lshw -c video
WARNING: you should run this program as super-user.
  *-display
       description: VGA compatible controller
       product: GP106GL [Quadro P2000]
       vendor: NVIDIA Corporation
       physical id: 0
       bus info: pci@0000:b3:00.0
       version: a1
       width: 64 bits
       clock: 33MHz
       capabilities: vga_controller bus_master cap_list rom
       configuration: driver=nouveau latency=0
       resources: irq:48 memory:fa000000-faffffff memory:e0000000-efffffff memory:f0000000-f1ffffff ioport:f000(size=128) memory:c0000-dffff
WARNING: output may be incomplete or inaccurate, you should run this program as super-user.
其中显卡具体型号为 [Quadro P2000] (关于该显卡当然可以百度更多的信息: NVIDIA Quadro P2000显卡).
2. 查找显卡驱动
利用 ubuntu-drivers devices (输入这个命令后可能需要等几秒才会出结果) 查看可以用的驱动:
dell@dell-Tower:~$ ubuntu-drivers devices
== /sys/devices/pci0000:b2/0000:b2:00.0/0000:b3:00.0 ==
modalias : pci:v000010DEd00001C30sv00001028sd000011B3bc03sc00i00
vendor   : NVIDIA Corporation
model    : GP106GL [Quadro P2000]
driver   : nvidia-driver-470 - distro non-free
driver   : nvidia-driver-418-server - distro non-free
driver   : nvidia-driver-450-server - distro non-free
driver   : nvidia-driver-510-server - distro non-free
driver   : nvidia-driver-390 - distro non-free
driver   : nvidia-driver-470-server - distro non-free
driver   : nvidia-driver-510 - distro non-free recommended
driver   : xserver-xorg-video-nouveau - distro free builtin

== /sys/devices/pci0000:00/0000:00:1f.4 ==
modalias : pci:v00008086d0000A1A3sv00001028sd00000739bc0Csc05i00
vendor   : Intel Corporation
model    : C620 Series Chipset Family SMBus
driver   : oem-somerville-matira-5-7-meta - third-party free

== /sys/devices/virtual/dmi/id ==
modalias : dmi:bvnDellInc.:bvr2.6.3:bd05/04/2020:br2.6:svnDellInc.:pnPrecision7820Tower:pvr:rvnDellInc.:rn05WNJ2:rvrA02:cvnDellInc.:ct3:cvr:sku0739:
driver   : oem-somerville-meta - third-party free
driver   : oem-release - third-party free
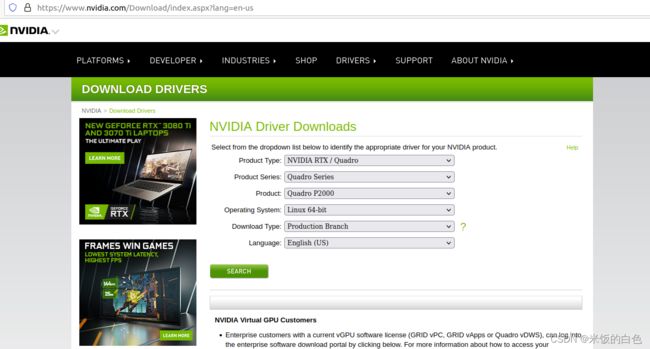
选择这个 driver : nvidia-driver-510 - distro non-free recommended, 然后去 NVDIA driver search page 搜索显卡需要的驱动型号并下载 (注意: 如果后面要安装 CUDA 则并不需要单独安装驱动, 因为 cuda 安装包里是有驱动的).

3. 禁用 nouveau
nouveau 驱动是 Ubuntu 默认的开源显卡驱动,与 Nvidia 显卡驱动一起使用会导致兼容性问题,比如卡在登录界面无法进入图形界面.
如何禁用参考了 解决NVIDIA-SMI has failed because it couldn‘t communicate with the NVIDIA driver.
3.1 检查是否已经禁用
使用 lsmod | grep nouveau 命令查看 nouveau 是否禁用, 若没有任何输出则说明已经禁用, 如果由如下的输出, 则表示没有禁用
dell@dell-Tower:~$ lsmod | grep nouveau
nouveau              2064384  28
mxm_wmi                16384  1 nouveau
drm_ttm_helper         16384  1 nouveau
ttm                    69632  2 drm_ttm_helper,nouveau
drm_kms_helper        258048  1 nouveau
i2c_algo_bit           16384  1 nouveau
video                  53248  2 dell_wmi,nouveau
drm                   557056  15 drm_kms_helper,drm_ttm_helper,ttm,nouveau
wmi                    32768  7 intel_wmi_thunderbolt,dell_wmi,wmi_bmof,dell_smbios,dell_wmi_descriptor,mxm_wmi,nouveau
3.2 禁用 nouveau 的具体命令
(1) 利用下面的命令
sudo bash -c "echo blacklist nouveau > /etc/modprobe.d/blacklist-nvidia-nouveau.conf"
sudo bash -c "echo options nouveau modeset=0 >> /etc/modprobe.d/blacklist-nvidia-nouveau.conf"
(2) 查看是否正确写入文件
dell@dell-Tower:~$ cat /etc/modprobe.d/blacklist-nvidia-nouveau.conf
blacklist nouveau
options nouveau modeset=0
(3) 更新并重启
sudo update-initramfs -u
sudo reboot
(4) 重启后, 检查是否禁用
dell@dell-Tower:~$ lsmod | grep nouveau
dell@dell-Tower:~$
二. 安装 CUDA
因为 CUDA 中带有 N 卡的驱动, 所以直接选择正确的 CUDA 版本进行安装.
(1) CUDA 下载地址: https://developer.nvidia.com/cuda-toolkit
(2) 英伟达官方的cuda和驱动的对应: NVIDIA CUDA Toolkit Release Notes
1. 选择 CUDA 版本
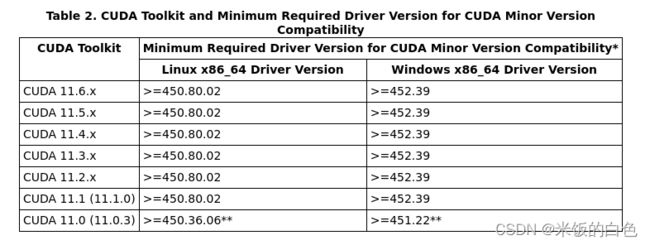
由 NVIDIA CUDA Toolkit Release Notes 中的图表所示

结合本机器可安装的驱动版本 driver : nvidia-driver-510 - distro non-free recommended, 所以可以直接选择 CUDA 11.6.x 的版本进行安装.
2. 进行安装
从 https://developer.nvidia.com/cuda-toolkit 中进行下载并选择自己的系统, 然后官网会给出安装步骤, 如下图

直接采用上面的安装步骤, wget https://developer.download.nvidia.com/compute/cuda/11.6.2/local_installers/cuda-repo-ubuntu2004-11-6-local_11.6.2-510.47.03-1_amd64.deb 命令就是下载 .deb 安装包, 一般就直接下载到当前目录下, 因为我这里是 /home, 所以就直接在 /home/ 目录下了.
3. 遇到了问题: 最后一步
dell@dell-Tower:~$ sudo apt-get -y install cuda
Reading package lists... Done
Building dependency tree
Reading state information... Done
Some packages could not be installed. This may mean that you have
requested an impossible situation or if you are using the unstable
distribution that some required packages have not yet been created
or been moved out of Incoming.
The following information may help to resolve the situation:

The following packages have unmet dependencies:
 cuda : Depends: cuda-11-6 (>= 11.6.2) but it is not going to be installed
E: Unable to correct problems, you have held broken packages.
4. 又尝试了 runfile[local] 的安装方式
Ubuntu20.04下CUDA、cuDNN的详细安装与配置过程(图文) 中提到:
CUDA的run文件虽然比另外两种安装方法的文件大,但是它包含了所有的依赖库文件,所以采用相对来说很容易安装成功。
安装官网给出的方式:
$ wget https://developer.download.nvidia.com/compute/cuda/11.6.2/local_installers/cuda_11.6.2_510.47.03_linux.run
$ sudo sh cuda_11.6.2_510.47.03_linux.run
其中 wget https://developer.download.nvidia.com/compute/cuda/11.6.2/local_installers/cuda_11.6.2_510.47.03_linux.run 命令将 cuda_11.6.2_510.47.03_linux.run 下载到了 /home/ 目录下.
运行 sudo sh cuda_11.6.2_510.47.03_linux.run 时, 会在 Terminal 中显示一个框, 选择 accept (忘记截图了), 接着又会有个框, 直接选择 Install, 如下图

这次安装成功了, 并有如下提示
dell@dell-Tower:~$ sudo sh cuda_11.6.2_510.47.03_linux.run
===========
= Summary =
===========

Driver:   Installed
Toolkit:  Installed in /usr/local/cuda-11.6/

Please make sure that
 -   PATH includes /usr/local/cuda-11.6/bin
 -   LD_LIBRARY_PATH includes /usr/local/cuda-11.6/lib64, or, add /usr/local/cuda-11.6/lib64 to /etc/ld.so.conf and run ldconfig as root

To uninstall the CUDA Toolkit, run cuda-uninstaller in /usr/local/cuda-11.6/bin
To uninstall the NVIDIA Driver, run nvidia-uninstall
Logfile is /var/log/cuda-installer.log
5. 安装安装成功的提示, 配置环境变量
sudo gedit ~/.bashrc
在 ~/.bashrc 的最后添加下面的内容 (注意自己安装的版本号)
# user-add: cuda
export PATH=/usr/local/cuda-11.6/bin:$PATH
export LD_LIBRARY_PATH=/usr/local/cuda-11.6/lib64:$LD_LIBRARY_PATH
export CUDA_HOME=/usr/local/cuda
其中 /usr/local/cuda 其实是一个软链接 (链接到了 /usr/local/cuda-11.6), 可以通过 ll 命令查看
dell@dell-Tower:~$ ll /usr/local/cuda
lrwxrwxrwx 1 root root 21 4月  25 16:37 /usr/local/cuda -> /usr/local/cuda-11.6//
配置完环境变量之后, 需要更新一下 (或者通过重启)
source ~/.bashrc
然后通过 nvcc --version 查看是否安装成功
dell@dell-Tower:~$ nvcc --version
nvcc: NVIDIA (R) Cuda compiler driver
Copyright (c) 2005-2022 NVIDIA Corporation
Built on Tue_Mar__8_18:18:20_PST_2022
Cuda compilation tools, release 11.6, V11.6.124
Build cuda_11.6.r11.6/compiler.31057947_0
有如上提示的表示安装成功.
同时查看一下所设置的路径
dell@dell-Tower:~$ echo "$CUDA_HOME"
/usr/local/cuda
6. 运行 cuda 的 samples
在 /usr/local/cuda-11.6/samples 中有个 README_CUDA_Samples.txt 文件:
CUDA samples have moved! Please find up-to-date CUDA samples on our GitHub repository:

https://github.com/nvidia/cuda-samples
利用 git clone (我这里 git clone 速度远比网页上直接下载快得多)
git clone https://github.com/NVIDIA/cuda-samples.git
$ cd
$ make
make 中提示如下错误
...
make[1]: Leaving directory '/home/dell/Documents/cuda-samples/Samples/0_Introduction/vectorAddMMAP'
make[1]: Entering directory '/home/dell/Documents/cuda-samples/Samples/0_Introduction/simpleMPI'
/opt/anaconda3/bin/mpicxx -I../../../Common    -o simpleMPI_mpi.o -c simpleMPI.cpp
/opt/anaconda3/bin/mpicxx: line 299: x86_64-conda_cos6-linux-gnu-c++: command not found
make[1]: *** [Makefile:389: simpleMPI_mpi.o] Error 127
make[1]: Leaving directory '/home/dell/Documents/cuda-samples/Samples/0_Introduction/simpleMPI'
make: *** [Makefile:45: Samples/0_Introduction/simpleMPI/Makefile.ph_build] Error 2
按照提示, 直接百度 x86_64-conda_cos6-linux-gnu-c++, 经过搜索可能是没安装 gxx_linux-64, 首先 sudo -i
dell@dell-Tower:~$ sudo -i
(base) root@dell-Tower:~# conda install gxx_linux-64
(以防万一) 同时再安装
apt install g++-aarch64-linux-gnu
最后再
make clean
make
最终 make 成功, 尝试一个例子, 如下
dell@dell-Tower:~/Documents/cuda-samples$ cd Samples/1_Utilities/deviceQuery
dell@dell-Tower:~/Documents/cuda-samples/Samples/1_Utilities/deviceQuery$ ./deviceQuery
./deviceQuery Starting...

 CUDA Device Query (Runtime API) version (CUDART static linking)

Detected 1 CUDA Capable device(s)

Device 0: "Quadro P2000"
  CUDA Driver Version / Runtime Version          11.6 / 11.6
  CUDA Capability Major/Minor version number:    6.1
  Total amount of global memory:                 5051 MBytes (5296357376 bytes)
  (008) Multiprocessors, (128) CUDA Cores/MP:    1024 CUDA Cores
  GPU Max Clock rate:                            1481 MHz (1.48 GHz)
  Memory Clock rate:                             3504 Mhz
  Memory Bus Width:                              160-bit
  L2 Cache Size:                                 1310720 bytes
  Maximum Texture Dimension Size (x,y,z)         1D=(131072), 2D=(131072, 65536), 3D=(16384, 16384, 16384)
  Maximum Layered 1D Texture Size, (num) layers  1D=(32768), 2048 layers
  Maximum Layered 2D Texture Size, (num) layers  2D=(32768, 32768), 2048 layers
  Total amount of constant memory:               65536 bytes
  Total amount of shared memory per block:       49152 bytes
  Total shared memory per multiprocessor:        98304 bytes
  Total number of registers available per block: 65536
  Warp size:                                     32
  Maximum number of threads per multiprocessor:  2048
  Maximum number of threads per block:           1024
  Max dimension size of a thread block (x,y,z): (1024, 1024, 64)
  Max dimension size of a grid size    (x,y,z): (2147483647, 65535, 65535)
  Maximum memory pitch:                          2147483647 bytes
  Texture alignment:                             512 bytes
  Concurrent copy and kernel execution:          Yes with 2 copy engine(s)
  Run time limit on kernels:                     No
  Integrated GPU sharing Host Memory:            No
  Support host page-locked memory mapping:       Yes
  Alignment requirement for Surfaces:            Yes
  Device has ECC support:                        Disabled
  Device supports Unified Addressing (UVA):      Yes
  Device supports Managed Memory:                Yes
  Device supports Compute Preemption:            Yes
  Supports Cooperative Kernel Launch:            Yes
  Supports MultiDevice Co-op Kernel Launch:      Yes
  Device PCI Domain ID / Bus ID / location ID:   0 / 179 / 0
  Compute Mode:
     < Default (multiple host threads can use ::cudaSetDevice() with device simultaneously) >

deviceQuery, CUDA Driver = CUDART, CUDA Driver Version = 11.6, CUDA Runtime Version = 11.6, NumDevs = 1
Result = PASS
成功.
7. 可能遇到的其他问题
Ubuntu18.04查看显卡信息并安装NVDIA显卡驱动driver + Cuda + Cudnn
中列出了几个可能的问题, 可以作为参考.
三. 安装 CUDNN
CUDNN 是一个SDK,是一个专门用于神经网络的加速包,注意,它跟我们的CUDA没有一一对应的关系,即每一个版本的CUDA可能有好几个版本的cuDNN与之对应,但一般有一个最新版本的cuDNN版本与CUDA对应更好。
cuda与cudnn需要满足关系:
https://developer.nvidia.com/rdp/cudnn-archive
我搜了下 cudnn 的安装, 发现网上的方法很多都是下载一个压缩包, 解压后将文件夹复制到 cuda 目录下, 但是官网又提供了 deb 的安装包, 就没弄懂有什么区别, 参考这篇博客, 大概写了下两者的区别: 安装cudnn时, library和deb模式的区别
① download the tgz format:
为Linux选择CUDNN库
此安装相对简单,只需下载,解压缩,将相应的文件复制到指定的目录,并授予权限。
② download deb format:
Runtime and Developer version区别:Developer library 包含在Ubuntu系统上开发深度学习所需的cudnn头文件。 如果您不需要开发和编译任何深度学习程序,只需使用它们来运行某些深度。 要了解应用程序,只需下载Runtime library 就足够了。
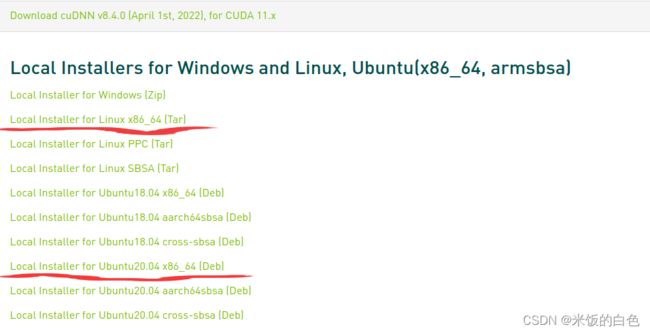
但是, 这个描述已经不再适用当前的情况了, 目前 cudnn 已经没有 Runtime 和 Developer 的 deb 包了, 只有一个, 如下图
 那么就只能同时安装这两个包了, 具体可以参考 Ubuntu20.04下CUDA、cuDNN的详细安装与配置过程(图文)
下面是自己的安装过程:
(1). 下载并解压 Local Installer for Linux x86_64(Tar), 得到下面的目录

(2). 将解压得到的目录中 cudnn/include 和 cudnn/lib 目录下的内容复制到 /usr/local/cuda-11.6/include 和 /usr/local/cuda-11.6/lib64 中, 但是需要注意, cudnn/lib 中有很多软链接:
dell@dell-Tower:~/Downloads/cudnn-linux-x86_64-8.3.3.40_cuda11.5-archive/lib$ ll
total 2777120
drwxrwxr-x 2 dell dell       4096 4月  26 15:45 ./
drwxr-xr-x 5 dell dell       4096 4月  26 15:44 ../
lrwxrwxrwx 1 dell dell         23 4月  26 15:45 libcudnn_adv_infer.so -> libcudnn_adv_infer.so.8*
lrwxrwxrwx 1 dell dell         27 4月  26 15:45 libcudnn_adv_infer.so.8 -> libcudnn_adv_infer.so.8.3.3*
-rwxr-xr-x 1 dell dell  129239056 4月  26 15:45 libcudnn_adv_infer.so.8.3.3*
-rw-r--r-- 1 dell dell  132855804 4月  26 15:45 libcudnn_adv_infer_static.a
lrwxrwxrwx 1 dell dell         27 4月  26 15:45 libcudnn_adv_infer_static_v8.a -> libcudnn_adv_infer_static.a
lrwxrwxrwx 1 dell dell         23 4月  26 15:45 libcudnn_adv_train.so -> libcudnn_adv_train.so.8*
lrwxrwxrwx 1 dell dell         27 4月  26 15:45 libcudnn_adv_train.so.8 -> libcudnn_adv_train.so.8.3.3*
-rwxr-xr-x 1 dell dell   96469904 4月  26 15:45 libcudnn_adv_train.so.8.3.3*
-rw-r--r-- 1 dell dell   98696466 4月  26 15:45 libcudnn_adv_train_static.a
lrwxrwxrwx 1 dell dell         27 4月  26 15:45 libcudnn_adv_train_static_v8.a -> libcudnn_adv_train_static.a
...
...
所以在复制 cudnn/lib 中的内容时需要用 cp -d 命令:
dell@dell-Tower:~$ cd Downloads/cudnn-linux-x86_64-8.3.3.40_cuda11.5-archive/lib/
dell@dell-Tower:~/Downloads/cudnn-linux-x86_64-8.3.3.40_cuda11.5-archive/lib$ sudo cp -d ./* /usr/local/cuda-11.6/lib64/
[sudo] password for dell:
dell@dell-Tower:~/Downloads/cudnn-linux-x86_64-8.3.3.40_cuda11.5-archive/lib$ cd ../include/
dell@dell-Tower:~/Downloads/cudnn-linux-x86_64-8.3.3.40_cuda11.5-archive/include$ sudo cp ./* /usr/local/cuda-11.6/include/
然后赋予权限:
dell@dell-Tower:~$ sudo chmod a+r /usr/local/cuda-11.6/include/cudnn.h /usr/local/cuda-11.6/lib64/libcudnn*
[sudo] password for dell:
查看 CUDNN 的信息:
dell@dell-Tower:~$ cat /usr/local/cuda-11.6/include/cudnn_version.h | grep CUDNN_MAJOR -A 2
#define CUDNN_MAJOR 8
#define CUDNN_MINOR 3
#define CUDNN_PATCHLEVEL 3
--
#define CUDNN_VERSION (CUDNN_MAJOR * 1000 + CUDNN_MINOR * 100 + CUDNN_PATCHLEVEL)

#endif /* CUDNN_VERSION_H */
(3). 下载 Local Installer for Ubuntu20.04 x86_64(Deb) 包, 直接双击后利用 Ubuntu 自带的 Ubuntu Software 进行安装的.
四. 安装 Pytorch
这一部分可以参考 macOS conda 安装指定版本的 Pytorch (虽然给出的是在 macOS 下安装, 但这里同样适用) 进行 Pytorch 的安装.