使用 OpenCV 对图像中的区域进行透视变换
原文链接:
4 Point OpenCV getPerspective Transform Example - PyImageSearchwww.pyimagesearch.com
本篇文章介绍使用OpenCV的 cv2.getPerspectiveTransform 函数实现四点透视变换。
在文章中我提到可以使用透视变换来得到自上而下的“鸟瞰”图,前提是要能找到参考点。
这篇文章继续讨论自上而下的“鸟瞰”图,但是这次我将要我分享在我每次需要做四点透视变换时都要用到的代码。
# transform.py
import numpy as np
import cv2

def order_points(pts):
    # initialzie a list of coordinates that will be ordered
    # such that the first entry in the list is the top-left,
    # the second entry is the top-right, the third is the
    # bottom-right, and the fourth is the bottom-left
    rect = np.zeros((4, 2), dtype = "float32")

    # the top-left point will have the smallest sum, whereas
    # the bottom-right point will have the largest sum
    s = pts.sum(axis = 1)
    rect[0] = pts[np.argmin(s)]
    rect[2] = pts[np.argmax(s)]

    # now, compute the difference between the points, the
    # top-right point will have the smallest difference,
    # whereas the bottom-left will have the largest difference
    diff = np.diff(pts, axis = 1)
    rect[1] = pts[np.argmin(diff)]
    rect[3] = pts[np.argmax(diff)]

    # return the ordered coordinates
    return rect
定义一个 order_points 函数,需要传入参数 pts,是一个包含矩形四个点的(x, y)坐标的列表。
对矩形中的四个点进行 一致的排序 是非常重要的,实际的排序可以是任意的,只要它在整个实现过程中是一致的。
对于我来说,我习惯将点按照 “左上,右上,右下,左下” 进行排序。
代码里使用 np.zeros 为四个点分配内存。根据 x 与 y 之和最小找到左上角的点,x 与 y 之和最大找到右下角的点。
然后使用 np.diff 函数,根据 x 与 y 之差(y-x)最小找到右上角的点,x 与 y 之差最大找到左下角的点。
最后将排好序的点返回给调用函数。
def four_point_transform(image, pts):
    # obtain a consistent order of the points and unpack them
    # individually
    rect = order_points(pts)
    (tl, tr, br, bl) = rect

    # compute the width of the new image, which will be the
    # maximum distance between bottom-right and bottom-left
    # x-coordiates or the top-right and top-left x-coordinates
    widthA = np.sqrt(((br[0] - bl[0]) ** 2) + ((br[1] - bl[1]) ** 2))
    widthB = np.sqrt(((tr[0] - tl[0]) ** 2) + ((tr[1] - tl[1]) ** 2))
    maxWidth = max(int(widthA), int(widthB))

    # compute the height of the new image, which will be the
    # maximum distance between the top-right and bottom-right
    # y-coordinates or the top-left and bottom-left y-coordinates
    heightA = np.sqrt(((tr[0] - br[0]) ** 2) + ((tr[1] - br[1]) ** 2))
    heightB = np.sqrt(((tl[0] - bl[0]) ** 2) + ((tl[1] - bl[1]) ** 2))
    maxHeight = max(int(heightA), int(heightB))

    # now that we have the dimensions of the new image, construct
    # the set of destination points to obtain a "birds eye view",
    # (i.e. top-down view) of the image, again specifying points
    # in the top-left, top-right, bottom-right, and bottom-left
    # order
    dst = np.array([
        [0, 0],
        [maxWidth - 1, 0],
        [maxWidth - 1, maxHeight - 1],
        [0, maxHeight - 1]], dtype = "float32")

    # compute the perspective transform matrix and then apply it
    M = cv2.getPerspectiveTransform(rect, dst)
    warped = cv2.warpPerspective(image, M, (maxWidth, maxHeight))

    # return the warped image
    return warped
接下来定义 four_point_transform 函数,需要传入两个参数 image 和 pts。
image 是我们想应用透视变换的图片,pts 表示图片中要做变换的区域(ROI)的四个点坐标的列表。
先调用 order_points 函数,按顺序获得点的坐标。然后我们需要确定新图片的维度。
新图片的宽度就是右下角和左下角的点的x坐标之差。同理新图片的高度就是右上角和右下角的点的y坐标之差。
接下来就是重点:
dst = np.array([
    [0, 0],
    [maxWidth - 1, 0],
    [maxWidth - 1, maxHeight - 1],
    [0, maxHeight - 1]], dtype = "float32")
这里定义了代表图像 “鸟瞰” 视图的四个点,列表第一个元素 (0, 0) 表示左上角的点,第二个元素 (maxWidth - 1, 0) 表示右上角的点,第三个元素 (maxWidth - 1, maxHeight - 1) 表示右下角的点,最后第四个元素 (0, maxHeight - 1) 表示左下角的点。如上面所说,这里还是按照这个顺序对点进行排列。
先使用 cv2.getPerspectiveTransform 函数。要传入两个参数,rect 是原始图像中代表感兴趣区域的点组成的列表,dst 是我们转换后的点组成的列表。返回值 M 是实际的变换矩阵(transformation matrix)。
最后使用 cv2.warpPerspective 来得到自上而下的“鸟瞰”图,传入的三个参数分别是原始图片,转换矩阵,输出图像的长和宽。其返回值就是透视变换后的图像。
four_point_transform 函数已经实现好了,现在来调用它并应用到图片中,
# transform_example.py
from pyimagesearch.transform import four_point_transform
import numpy as np
import argparse
import cv2

# construct the argument parse and parse the arguments
ap = argparse.ArgumentParser()
ap.add_argument("-i", "--image", help = "path to the image file")
ap.add_argument("-c", "--coords",
    help = "comma seperated list of source points")
args = vars(ap.parse_args())

# load the image and grab the source coordinates (i.e. the list of
# of (x, y) points)
# NOTE: using the 'eval' function is bad form, but for this example
# let's just roll with it -- in future posts I'll show you how to
# automatically determine the coordinates without pre-supplying them
image = cv2.imread(args["image"])
pts = np.array(eval(args["coords"]), dtype = "float32")

# apply the four point tranform to obtain a "birds eye view" of
# the image
warped = four_point_transform(image, pts)

# show the original and warped images
cv2.imshow("Original", image)
cv2.imshow("Warped", warped)
cv2.waitKey(0)先进行参数解析,可以传入两个参数,--image 是想应用变换的图片,--coords 是一个由4个点组成的列表,代表图片中要进行透视变换的区域。
然后加载图片,并将点坐标转换为 NumPy 数组格式。最后应用 four_point_transform就可以得到我们想要的结果了。
这里是需要手动输入需要进行透视变换的区域的点坐标,这个很麻烦,下篇将介绍如何自动确定透视变换所需的四个点。
执行这个函数:
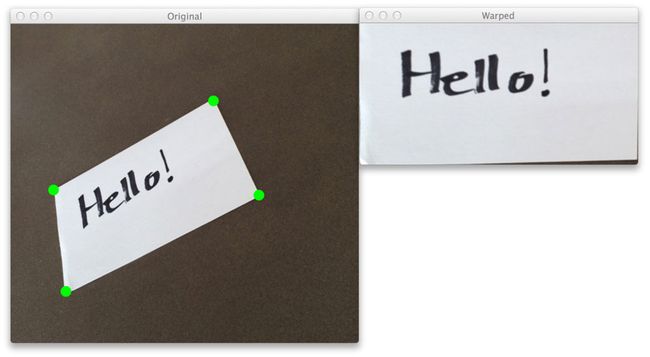
python transform_example.py --image images/example_01.png --coords "[(73, 239), (356, 117), (475, 265), (187, 443)]"
得到如下结果:
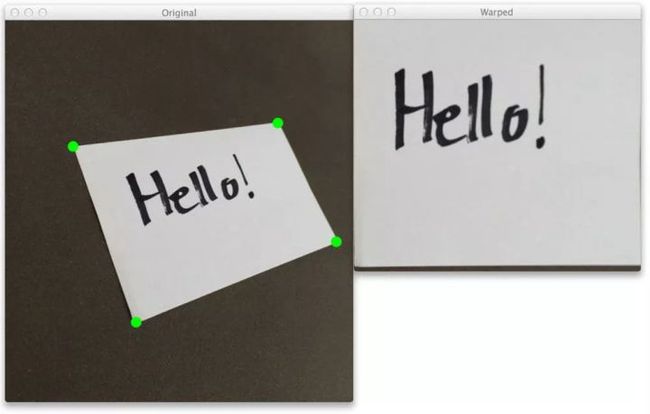
换一张图片试试,
python transform_example.py --image images/example_03.png --coords "[(63, 242), (291, 110), (361, 252), (78, 386)]
到此我们就成功地获取了图片中的一个区域的“鸟瞰”图。
在这里可以查看源码:
zxdefying/OpenCV_projectgithub.com
参考资料:https://blog.csdn.net/rrrfff/article/details/77340641?locationNum=1&fps=1
https://blog.csdn.net/u013063099/article/details/81937848?utm_medium=distribute.pc_relevant.none-task-blog-searchFromBaidu-1.not_use_machine_learn_pai&depth_1-utm_source=distribute.pc_relevant.none-task-blog-searchFromBaidu-1.not_use_machine_learn_pai


