基于PCA的人脸识别
前言:PCA的说明
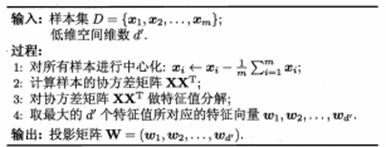
1.主成分分析算法(PCA)是最常用的线性降维方法,它的目标是通过某种线性投影,将高维的数据映射到低维的空间中,并期望在所投影的维度上数据的信息量最大(方差最大),以此使用较少的数据维度,同时保留住较多的原数据点的特性。
PCA降维的目的,就是为了在尽量保证“信息量不丢失”的情况下,对原始特征进行降维,也就是尽可能将原始特征往具有最大投影信息量的维度上进行投影。将原特征投影到这些维度上,使降维后信息量损失最小。
2.矩阵的主成分就是其协方差矩阵对应的特征向量,按照对应的特征值大小进行排序,最大的特征值就是第一主成分,其次是第二主成分,以此类推。
3.算法的流程:
一、实验一:将matlab转译成python语言
a.生成数据集
function T = CreateDatabase(TrainDatabase)
% Align a set of face images (the training set T1, T2, ... , TM )
%
% Description: This function reshapes all 2D images of the training database
% into 1D column vectors. Then, it puts these 1D column vectors in a row to
% construct 2D matrix 'T'.
%
%
% Argument:     TrainDatabasePath      - Path of the training database
%
% Returns:      T                      - A 2D matrix, containing all 1D image vectors.
%                                        Suppose all P images in the training database
%                                        have the same size of MxN. So the length of 1D
%                                        column vectors is MN and 'T' will be a MNxP 2D matrix.
%
% See also: STRCMP, STRCAT, RESHAPE

%%%%%%%%%%%%%%%%%%%%%%%% File management
TrainFiles = dir('TrainDatabase\');
Train_Number = 0;

for i = 1:size(TrainFiles,1)
    if not(strcmp(TrainFiles(i).name,'.')|strcmp(TrainFiles(i).name,'..')|strcmp(TrainFiles(i).name,'Thumbs.db'))
        Train_Number = Train_Number + 1; % Number of all images in the training database
    end
end

%%%%%%%%%%%%%%%%%%%%%%%% Construction of 2D matrix from 1D image vectors
T = [];
for i = 1 : Train_Number

    % I have chosen the name of each image in databases as a corresponding
    % number. However, it is not mandatory!
    str = int2str(i);
    str = strcat('\',str,'.jpg');
    str = strcat('TrainDatabase\',str);

    img = imread(str);


    [irow icol] = size(img);

    temp = reshape(img',irow*icol,1);   % Reshaping 2D images into 1D image vectors
    T = [T temp]; % 'T' grows after each turn
end
转python语言
import tensorflow as tf
import os
from PIL import Image
import numpy as np

# 生成图片与对应标签的列表
def load_sample(sample_dir):
    # 图片名列表
    lfilenames = []
    # 标签名列表
    labelnames = []
    # 遍历文件夹
    for (dirpath, dirnames, filenames) in os.walk(sample_dir):
        # 遍历图片
        for filename in filenames:
            # 每张图片的路径名
            filename_path = os.sep.join([dirpath, filename])
            # 添加文件名
            lfilenames.append(filename_path)
            # 添加文件名对应的标签
            labelnames.append(dirpath.split('/')[-1])

    # 生成标签名列表
    lab = list(sorted(set(labelnames)))
    # 生成标签字典
    labdict = dict(zip(lab, list(range(len(lab)))))
    # 生成与图片对应的标签列表
    labels = [labdict[i] for i in labelnames]
    # 图片与标签字典
    image_label_dict = dict(zip(lfilenames, labels))
    # 将文件名与标签列表打乱
    lfilenames = []
    labels = []
    for key in image_label_dict:
        lfilenames.append(key)
        labels.append(image_label_dict[key])
    # 返回文件名与标签列表
    return lfilenames, labels


# train数据集路径
train_directory = 'E:\Facial Recgnition\TrainDatabase\\'
# test数据集路径
test_directory = 'E:\Facial Recgnition\TestDatabase\\'
train_filenames, train_labels = load_sample(train_directory)
test_filenames, test_labels = load_sample(test_directory)
print(train_filenames, train_labels)


#将图片制成Dataset方法
def make_Dataset(filenames,labels,size,batch_size):
    #生成dataset对象
    dataset = tf.data.Dataset.from_tensor_slices((filenames,labels))
    #转化为图片数据集
    dataset = dataset.map(_parseone)
    #按批次组合数据
    dataset = dataset.batch(batch_size)
    return dataset

#解析图片文件的方法
def _parseone(filename,label):
    #读取所有图片
    image_string = tf.read_file(filename)
    #将图片解码并返回空的shape
    image_decoded = tf.image.decode_image(image_string)
    #因为是空的shape,所以需要设置shape
    image_decoded.set_shape([None,None,None])
    image_decoded = tf.image.resize_images(image_decoded,size)
    #归一化
    image_decoded = image_decoded/255.
    #将归一化后的像素矩阵转化为image张量
    image_decoded = tf.cast(image_decoded,dtype=tf.float32)
    #将label转为张量
    label = tf.cast(tf.reshape(label,[]),dtype=tf.int32)
    #将标签制成one_hot
    label = tf.one_hot(label,depth=classes_num,on_value=1)
    return image_decoded,label
b.PCA过程-返回参数[m, A, Eigenfaces]
function [m, A, Eigenfaces] = EigenfaceCore(T)
% Use Principle Component Analysis (PCA) to determine the most
% discriminating features between images of faces.
%
% Description: This function gets a 2D matrix, containing all training image vectors
% and returns 3 outputs which are extracted from training database.
%
% Argument:      T                      - A 2D matrix, containing all 1D image vectors.
%                                         Suppose all P images in the training database
%                                         have the same size of MxN. So the length of 1D
%                                         column vectors is M*N and 'T' will be a MNxP 2D matrix.
%
% Returns:       m                      - (M*Nx1) Mean of the training database
%                Eigenfaces             - (M*Nx(P-1)) Eigen vectors of the covariance matrix of the training database
%                A                      - (M*NxP) Matrix of centered image vectors
%
% See also: EIG

%%%%%%%%%%%%%%%%%%%%%%%% Calculating the mean image
m = mean(T,2); % Computing the average face image m = (1/P)*sum(Tj's)    (j = 1 : P)
Train_Number = size(T,2);

%%%%%%%%%%%%%%%%%%%%%%%% Calculating the deviation of each image from mean image
A = [];
for i = 1 : Train_Number
    temp = double(T(:,i)) - m; % Computing the difference image for each image in the training set Ai = Ti - m
    A = [A temp]; % Merging all centered images
end

%%%%%%%%%%%%%%%%%%%%%%%% Snapshot method of Eigenface methos
% We know from linear algebra theory that for a PxQ matrix, the maximum
% number of non-zero eigenvalues that the matrix can have is min(P-1,Q-1).
% Since the number of training images (P) is usually less than the number
% of pixels (M*N), the most non-zero eigenvalues that can be found are equal
% to P-1. So we can calculate eigenvalues of A'*A (a PxP matrix) instead of
% A*A' (a M*NxM*N matrix). It is clear that the dimensions of A*A' is much
% larger that A'*A. So the dimensionality will decrease.

L = A'*A; % L is the surrogate of covariance matrix C=A*A'.
[V D] = eig(L); % Diagonal elements of D are the eigenvalues for both L=A'*A and C=A*A'.

%%%%%%%%%%%%%%%%%%%%%%%% Sorting and eliminating eigenvalues
% All eigenvalues of matrix L are sorted and those who are less than a
% specified threshold, are eliminated. So the number of non-zero
% eigenvectors may be less than (P-1).

L_eig_vec = [];
for i = 1 : size(V,2)
    if( D(i,i)>1 )
        L_eig_vec = [L_eig_vec V(:,i)];
    end
end

%%%%%%%%%%%%%%%%%%%%%%%% Calculating the eigenvectors of covariance matrix 'C'
% Eigenvectors of covariance matrix C (or so-called "Eigenfaces")
% can be recovered from L's eiegnvectors.
Eigenfaces = A * L_eig_vec; % A: centered image vectors
转python语言
mport numpy as np
def EigenfaceCore(T):
    m = np.mean(T,1)  #matlab里面的mean(A,2)就是求包含每一行的平均值的列向量。
                      #python中np.mean(a, axis=1) # 计算每一行的均值,返回m*1的矩阵

    Train_Number = np.size(T,1)   #matlab里面c=size(A,2) 该语句返回的时矩阵A的列数。
                                  #np里面size函数axis = 1,返回该二维矩阵的列数
    A = []
    A = np.mat(A)  # 列表转换成矩阵的形势
    for i in range(Train_Number):
        temp = np.double(T[:,i])  - m
        np.append(A,temp,axis=1)  #按列拼接

    L = A.T * A

    V, D = np.linalg.eig(L)  #eig函数有两个返回值,D为特征向量,V为特征值  存疑

    L_eig_vec = []
    for i in range(np.size(V,1)):
        if D[i,i]>1 :
            np.append(L_eig_vec,V[:,i],axis=1)

    Eigenfaces = A * L_eig_vec

    return Eigenfaces
c.欧式距离比较面部特征-返回参数OutputName
#欧式距离比较面部特征-OutputName
# 此函数通过将图像投影到面部空间中来比较两个面部,然后测量它们之间的欧几里得距离
import numpy as np
import cv2
def Recognition(TestImage, m, A, Eigenfaces):

    ProjectedImages = [];

    # 将ProjectedImages转成矩阵
    ProjectedImages=np.mat(ProjectedImages)

    # matlab里面c=size(A,2) 该语句返回的时矩阵A的列数。
    # np里面size函数axis = 1,返回该二维矩阵的列数
    Train_Number = np.size(Eigenfaces, 1);

    for i in range(Train_Number ):
       temp = Eigenfaces.T*A[:i]
       np.append(Eigenfaces, temp, axis=1)  # 按列拼接

    # imread根据文件名读取图像
    InputImage = cv2.imread(TestImage)

    # T = (:,:, 1)
    # 代表第一维、第二维的所有数据,第三维的第一个。T是个三维矩阵\
    temp = InputImage[:,:, 1]
    irow,icol = np.size(temp)
    InImage = np.reshape(temp.T,irow*icol,1)
    # 居中测试图像百分比
    Difference = np.double(InImage) - m
    # 测试图像特征向量
    ProjectedTestImage = Eigenfaces.T*Difference
    Euc_dist = [];
    for i in range(Train_Number):
      q = ProjectedImages[:, i]
      temp = (np.linalg.norm(ProjectedTestImage - q)) ^ 2
      np.append(Euc_dist,temp,axis=1)
    [Euc_dist_min, Recognized_index] = min(Euc_dist)


    # chr = int2str(N)将N视为整数矩阵,并将其转换为表示整数的字符数组
    # numpy中使用array转为为数组
    # 使用template实现拼接
    from string import Template
    t = Template('${s1} ${s2}!')
    OutputName= t.safe_substitute(s1=np.array(Recognized_index), s2='.jpg')
    return OutputName
二、直接实现基于PCA的人脸识别
a.执行代码
import numpy as np
import tkinter as tk
from PIL import Image, ImageTk
from tkinter.filedialog import askopenfilename

Image_size = (40, 30)

# 将图片库中的图片按顺序命名,并将其像数值存到一个数组中
def Database(path, n):
    ImageMatrix = []
    for i in range(1, n + 1):
        ImageXn = Image.open(path + '\\' + str(i) + '.jpg')
        ImageXn = ImageXn.resize(Image_size)
        grayImage = ImageXn.convert('L')
        ImageArray = list(grayImage.getdata())
        ImageMatrix.append(ImageArray)
    ImageMatrix = np.array(ImageMatrix)
    return ImageMatrix


def TrainDatabase(matrix):
    # 对样本进行中心化
    picNumber, picSize = np.shape(matrix)
    meanArray = matrix.mean(axis=0)
    diffMatrix = matrix - meanArray
    diffMatrix = np.mat(diffMatrix).T
    # 计算样本的协方差矩阵
    covariance = diffMatrix * diffMatrix.T
    eigenvalues, eigenvectors = np.linalg.eig(covariance)
    eigenvectors = list(eigenvectors)
    # 取特征向量,选择特征值大于一的,特征向量和特征值不用排序
    for i in range(0, picNumber):
        if eigenvalues[i] < 1:
            eigenvectors.pop(i)
    eigenvectors = np.array(eigenvectors)
    # 调用mat()函数可以将数组转换为矩阵,然后可以对矩阵进行一些线性代数的操作
    w = np.mat(eigenvectors)
    p = w * diffMatrix
    return p, w, meanArray


def TestDatabase(testfile, w, p, meanArray):
    ImageXn = Image.open(testfile)
    ImageXn = ImageXn.resize(Image_size)
    grayImage = ImageXn.convert('L')
    ImageArray = list(grayImage.getdata())
    ImageArray = np.array(ImageArray)
    ImageData = ImageArray - meanArray
    ImageData = np.mat(ImageData).T
    testPic = w * ImageData
    # 计算距离
    distance = p - testPic
    distance = np.array(distance)
    distance = distance ** 2
    sumDistance = np.sum(distance, axis=0)
    minDistance = np.min(sumDistance)
    index = np.where(sumDistance == minDistance)
    return (index[0][0] + 1)


def resetpic(leftfilename, rightfilename=None):
    img = Image.open(leftfilename)
    # 把图片放在label里后在窗口显示
    photo = ImageTk.PhotoImage(img)
    label.config(image=photo)
    label.image = photo
    testImage = rightfilename;
    if rightfilename == None:
        name = TestDatabase(leftfilename, w, p, meanArray)
        testImage = 'E:\\Facial Recgnition\\TestDatabase\\' + str(name) + '.jpg'
    img_1 = Image.open(testImage)
    photo_1 = ImageTk.PhotoImage(img_1)
    label_1.config(image=photo_1)
    label_1.image = photo_1


def go():
    path = askopenfilename()
    # print(path)
    resetpic(path)


if __name__ == "__main__":
    trainNumber = 20
    path = 'E:\\Facial Recgnition\\TrainDatabase\\'
    Matrix = Database(path, trainNumber)
    global w, p, meanArray
    p, w, meanArray = TrainDatabase(Matrix)
    Windows = tk.Tk()
    Windows.title('Face Recognition')
    Windows.geometry('600x450')
    button = tk.Button(Windows, text='请选择图片', width=15, height=1, command=go)
    label = tk.Label(Windows)
    label_1 = tk.Label(Windows)
    label_2 = tk.Label(Windows, text="成功识别后的图片")
    label.pack()
    label.place(relx=0, rely=0)
    label_1.pack()
    label_1.place(relx=0.55, rely=0)
    label_2.pack()
    label_2.place(relx=0.7, rely=0.9)
    button.pack()
    Windows.mainloop()
    button.place(relx=0.1, rely=0.9)
    resetpic("A.jpg", "B.jpg")
    Windows.mainloop()
b.执行结果

注: 此博客是本博主在做学校模式识别大作业的时候而做,想把自己的思路以及实现过程记录一下。数据集这就不提供了,可以网上自行扒数据集,拆分训练集,测试集(这里不需要分验证集,不是一个回归问题进行预测连续值的)。同时代码里的文件路径改成你自己的。