Apollo planning模块pipeline详细分析
1.apollo整体结构
最近利用工作业余时间,抽空学习一下apollo项目的源码。整体来说,apollo的代码量还是挺大,对于入门时间不长的新手来说,逻辑也不是太容易一眼看懂。因此,结合源码以及其他相关理解分析材料,先重点了解了一下apollo中的planning模块也就是规控模块的,把整个planning模块的pipeline大致理清。
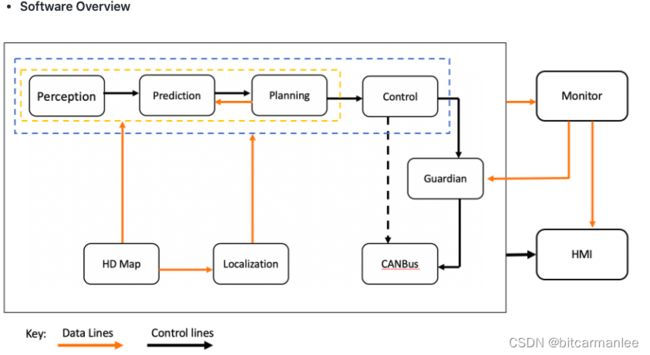
本文参考的代码均为apollo 7.0版本,apollo项目github地址上有一张图,反应了整个系统的结构
2.Planning模块框架
planning模块,包含有决策与规划两部分功能。
模块的输入包括:
定位、感知、预测、高精地图、路由、任务管理模块。
输出为:
控制模块可执行的顺滑无碰撞轨迹。
整体说来,可以分为三层(参考参考文献4的提法,个人感觉比较合理)
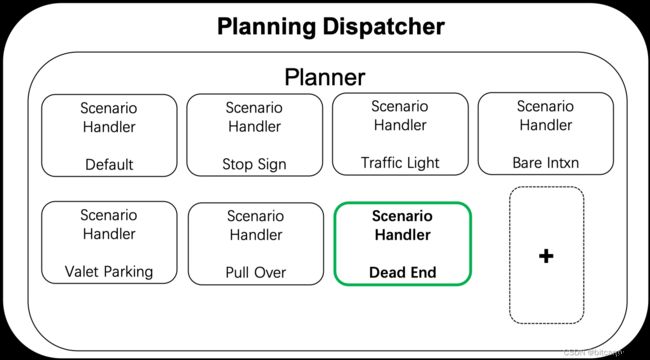
1.可执行代码层。planning模块的入口类为planning_component,·planning_component中会调用合适的planner类,确定相应的车辆意图,执行该意图所需的规划任务并生成规划轨迹。它还将更新未来作业的上下文。
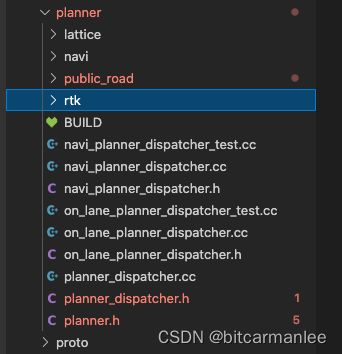
可以看出,planner中包含有lattice/navi/public_road/rtk这几种方式,目前默认的是public_road。
2.app层 每种planner又可以分为多个Scenario。特意查了一下相关资料,Scenario翻译为场景可能比较合适。而每个Scenario又可以分成不同的stage。
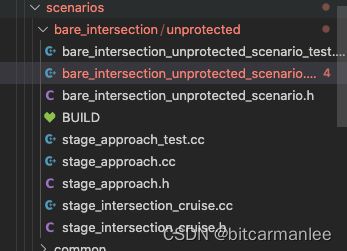
我们以bare_intersection_unprotected_scenario为例,该scenario包含有两个stage,一个为approach,一个为cruise。
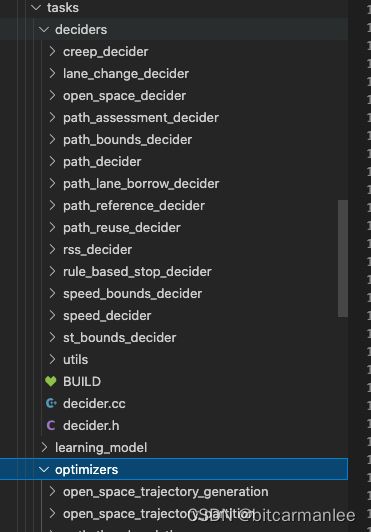
3.lib层。每个stage,包含有可执行的tasks。Task是Deciders & Optimizers :一组实现决策任务和各种优化的无状态库。优化器负责优化车辆的轨迹和速度。决策者是基于规则的分类决策者,他们建议何时换车道、何时停车、何时爬行(慢速行进)或爬行何时完成。
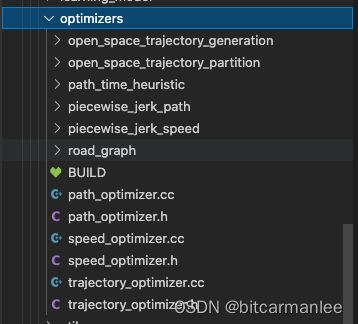
上面就是task包中的deciders与optimizers。
3.上下游数据pipeline分析
要了解一个模块的逻辑,最好的方式是结合数据流的方向来进行梳理分析。结合代码以及全局的架构图,我们总结了planning模块的输入输出
在planning.component.h文件中,作为入口程序,可以观察到的输入有
 public:
  bool Init() override;

  bool Proc(const std::shared_ptr<prediction::PredictionObstacles>&
                prediction_obstacles,
            const std::shared_ptr<canbus::Chassis>& chassis,
            const std::shared_ptr<localization::LocalizationEstimate>&
                localization_estimate) override;
...

private:
  std::shared_ptr<cyber::Reader<perception::TrafficLightDetection>>
      traffic_light_reader_;
  std::shared_ptr<cyber::Reader<routing::RoutingResponse>> routing_reader_;
  ...
  std::shared_ptr<cyber::Reader<relative_map::MapMsg>> relative_map_reader_;
private部分成员变量,包含有如下输入:
1.traffic_light_reader_ 交通信号灯
2.routing_reader_ 全局导航信息
3.relative_map_reader_ 高清地图
proc方法,包含的输入:
4.prediction_obstacles 预测障碍物大小,轨迹等相关信息
5.chassis 底盘信息
6.localization_estimate 预测的位置信息
而整个模块的输出,在proc方法最后可以看到
  ADCTrajectory adc_trajectory_pb;
  ....
  planning_writer_->Write(adc_trajectory_pb);
最后输出的是ADCTrajectory类型,并通过planning_writer_写入。ADCTrajectory是经过所有逻辑处理的最终结果,包含有车辆行驶所需要的所有信息,这个数据将直接影响到车的自动驾驶行为。
4.代码pipeline之Init方法
前面提到,整个planning模块的入口为planning.component.cc(.h为头文件),主要包含了两个方法:Init()与Proc()。
首先我们分析Init方法的逻辑。
4.1 选择规划器
bool PlanningComponent::Init() {
  injector_ = std::make_shared<DependencyInjector>();

  if (FLAGS_use_navigation_mode) {
    planning_base_ = std::make_unique<NaviPlanning>(injector_);
  } else {
    planning_base_ = std::make_unique<OnLanePlanning>(injector_);
  }
  ....
首先根据配置,选择planning类型
1.NaviPlanning,基于地图规划
2.OnLanePlanning,默认规划器,用于public_road。
这两个规划器都有共同基类PlanningBase。
4.2 选择planner
planning_base_->Init(config_);
规划器选择完毕,然后有planning_base_进行Init()操作。
前面我们提到默认的planning是OnLanePlanning,进入到OnLanePlanning中看一下 Init的操作。
Status OnLanePlanning::Init(const PlanningConfig& config) {
  config_ = config;
  if (!CheckPlanningConfig(config_)) {
    return Status(ErrorCode::PLANNING_ERROR,
                  "planning config error: " + config_.DebugString());
  }

  PlanningBase::Init(config_);

  planner_dispatcher_->Init();
  ...
  // clear planning history
  injector_->history()->Clear();
  // clear planning status
  injector_->planning_context()->mutable_planning_status()->Clear();

  // load map
  hdmap_ = HDMapUtil::BaseMapPtr();
  ACHECK(hdmap_) << "Failed to load map";

  // instantiate reference line provider
  reference_line_provider_ = std::make_unique<ReferenceLineProvider>(
      injector_->vehicle_state(), hdmap_);
  reference_line_provider_->Start();
  // dispatch planner
  planner_ = planner_dispatcher_->DispatchPlanner(config_, injector_);
  ...
  return planner_->Init(config_);
  ...
1.首先通过injector_,将planning的一些历史信息以及状态进行clear。
2.进行load map操作。
3.reference_line_provider_启动,根据导航信息生成的一条或多条道路中心线,即 reference_line
4.planner_dispatcher_进行planner选择。
前面我们提到了四种planner,分别为lattice/navi/public_road/rtk,默认使用的是public_road。
5.代码最后一行是planner_->Init(config_); 比如我们在PublicRoadPlanner中查看,Init代码如下:
Status PublicRoadPlanner::Init(const PlanningConfig& config) {
  config_ = config;
  scenario_manager_.Init(config);
  return Status::OK();
}
上面的代码,就是对scenario_manager_进行了注册。
4.3 创建reader/writer
  routing_reader_ = node_->CreateReader<RoutingResponse>(
      config_.topic_config().routing_response_topic(),
      [this](const std::shared_ptr<RoutingResponse>& routing) {
        AINFO << "Received routing data: run routing callback."
              << routing->header().DebugString();
        std::lock_guard<std::mutex> lock(mutex_);
        routing_.CopyFrom(*routing);
      });

  traffic_light_reader_ = node_->CreateReader<TrafficLightDetection>(
      config_.topic_config().traffic_light_detection_topic(),
      [this](const std::shared_ptr<TrafficLightDetection>& traffic_light) {
        ADEBUG << "Received traffic light data: run traffic light callback.";
        std::lock_guard<std::mutex> lock(mutex_);
        traffic_light_.CopyFrom(*traffic_light);
      });

  pad_msg_reader_ = node_->CreateReader<PadMessage>(
      config_.topic_config().planning_pad_topic(),
      [this](const std::shared_ptr<PadMessage>& pad_msg) {
        ADEBUG << "Received pad data: run pad callback.";
        std::lock_guard<std::mutex> lock(mutex_);
        pad_msg_.CopyFrom(*pad_msg);
      });
...
  planning_learning_data_writer_ = node_->CreateWriter<PlanningLearningData>(
      config_.topic_config().planning_learning_data_topic());

  return true;
执行完 planning_base_->Init(config_);以后,开始注册各种reader/writer,为cyber RT框架用于通信的部分,先不做过多关注,至此Init方法结束。
5.Proc方法
5.1 注册local_view
bool PlanningComponent::Proc(
    const std::shared_ptr<prediction::PredictionObstacles>&
        prediction_obstacles,
    const std::shared_ptr<canbus::Chassis>& chassis,
    const std::shared_ptr<localization::LocalizationEstimate>&
        localization_estimate) {
  ACHECK(prediction_obstacles != nullptr);

  // check and process possible rerouting request
  CheckRerouting();

  // process fused input data
  local_view_.prediction_obstacles = prediction_obstacles;
  local_view_.chassis = chassis;
  local_view_.localization_estimate = localization_estimate;
  {
    std::lock_guard<std::mutex> lock(mutex_);
    if (!local_view_.routing ||
        hdmap::PncMap::IsNewRouting(*local_view_.routing, routing_)) {
      local_view_.routing =
          std::make_shared<routing::RoutingResponse>(routing_);
    }
  }
  {
    std::lock_guard<std::mutex> lock(mutex_);
    local_view_.traffic_light =
        std::make_shared<TrafficLightDetection>(traffic_light_);
    local_view_.relative_map = std::make_shared<MapMsg>(relative_map_);
  }
  {
    std::lock_guard<std::mutex> lock(mutex_);
    local_view_.pad_msg = std::make_shared<PadMessage>(pad_msg_);
  }
  {
    std::lock_guard<std::mutex> lock(mutex_);
    local_view_.stories = std::make_shared<Stories>(stories_);
  }
  ...
proc方法,先是对local_view_各种数据进行设置。
查看一下LocalView的源码
/**
 * @struct local_view
 * @brief LocalView contains all necessary data as planning input
 */

struct LocalView {
  std::shared_ptr<prediction::PredictionObstacles> prediction_obstacles;
  std::shared_ptr<canbus::Chassis> chassis;
  std::shared_ptr<localization::LocalizationEstimate> localization_estimate;
  std::shared_ptr<perception::TrafficLightDetection> traffic_light;
  std::shared_ptr<routing::RoutingResponse> routing;
  std::shared_ptr<relative_map::MapMsg> relative_map;
  std::shared_ptr<PadMessage> pad_msg;
  std::shared_ptr<storytelling::Stories> stories;
};

}  // namespace planning
}  // namespace apollo
根据上面的注释,不难看出,planning模块所需的所有input都在该结构体中。
5.2 Planning_base_->RunOnce()
  ADCTrajectory adc_trajectory_pb;
  planning_base_->RunOnce(local_view_, &adc_trajectory_pb);
  ...
  planning_writer_->Write(adc_trajectory_pb);
注册完毕localview以后,重点就是planning_base_->RunOnce,这是planning真正的计算逻辑所在,输入为local_view_与adc_trajectory_pb, 输出为planning_writer_->Write(adc_trajectory_pb)。
6.RunOnce
我们看下on_lane_planning中的RunOnce方法。
void OnLanePlanning::RunOnce(const LocalView& local_view,
                             ADCTrajectory* const ptr_trajectory_pb) {
  // when rerouting, reference line might not be updated. In this case, planning
  // module maintains not-ready until be restarted.
  static bool failed_to_update_reference_line = false;
  local_view_ = local_view;
  const double start_timestamp = Clock::NowInSeconds();
  const double start_system_timestamp =
      std::chrono::duration<double>(
          std::chrono::system_clock::now().time_since_epoch())
          .count();
  ...
   // Update reference line provider and reset pull over if necessary
  reference_line_provider_->UpdateVehicleState(vehicle_state);
  ...
  status = InitFrame(frame_num, stitching_trajectory.back(), vehicle_state);
  ...
    for (auto& ref_line_info : *frame_->mutable_reference_line_info()) {
    TrafficDecider traffic_decider;
    traffic_decider.Init(traffic_rule_configs_);
    auto traffic_status =
        traffic_decider.Execute(frame_.get(), &ref_line_info, injector_);
    if (!traffic_status.ok() || !ref_line_info.IsDrivable()) {
      ref_line_info.SetDrivable(false);
      AWARN << "Reference line " << ref_line_info.Lanes().Id()
            << " traffic decider failed";
    }
  }
  status = Plan(start_timestamp, stitching_trajectory, ptr_trajectory_pb);
  for (const auto& p : ptr_trajectory_pb->trajectory_point()) {
    ADEBUG << p.DebugString();
  }
  ...
    if (!status.ok()) {
    status.Save(ptr_trajectory_pb->mutable_header()->mutable_status());
    AERROR << "Planning failed:" << status.ToString();
    if (FLAGS_publish_estop) {
      AERROR << "Planning failed and set estop";
      // "estop" signal check in function "Control::ProduceControlCommand()"
      // estop_ = estop_ || local_view_.trajectory.estop().is_estop();
      // we should add more information to ensure the estop being triggered.
      EStop* estop = ptr_trajectory_pb->mutable_estop();
      estop->set_is_estop(true);
      estop->set_reason(status.error_message());
    }
  }
  ...
    if (FLAGS_enable_planning_smoother) {
      planning_smoother_.Smooth(injector_->frame_history(), frame_.get(),
                                ptr_trajectory_pb);
    }
因为方法代码较长,有比较多的debug相关的msg,因此把代码中核心部分逻辑选出来进行解读。
1.根据注释不难看出,reference_line_provider_会更新reference_line。如果失败,会生成一个停车轨迹。
2.InitFrame方法,主要是生成reference_lines。
3.for循环中有traffic_decider,主要是与交规相关的决策内容。
4.status = Plan(start_timestamp, stitching_trajectory, ptr_trajectory_pb);,plan的主要逻辑,后面我们再讲。
5.规划失败,执行estop()。
6.最后一步,对轨迹进行平滑处理。
7.PublicRoadPlanner::Plan()
Status PublicRoadPlanner::Plan(const TrajectoryPoint& planning_start_point,
                               Frame* frame,
                               ADCTrajectory* ptr_computed_trajectory) {
  scenario_manager_.Update(planning_start_point, *frame);
  scenario_ = scenario_manager_.mutable_scenario();
  auto result = scenario_->Process(planning_start_point, frame);

  if (FLAGS_enable_record_debug) {
    auto scenario_debug = ptr_computed_trajectory->mutable_debug()
                              ->mutable_planning_data()
                              ->mutable_scenario();
    scenario_debug->set_scenario_type(scenario_->scenario_type());
    scenario_debug->set_stage_type(scenario_->GetStage());
    scenario_debug->set_msg(scenario_->GetMsg());
  }

  if (result == scenario::Scenario::STATUS_DONE) {
    // only updates scenario manager when previous scenario's status is
    // STATUS_DONE
    scenario_manager_.Update(planning_start_point, *frame);
  } else if (result == scenario::Scenario::STATUS_UNKNOWN) {
    return Status(common::PLANNING_ERROR, "scenario returned unknown");
  }
  return Status::OK();
}
上面是PublicRoadPlanner中的Plan方法源码。
主要是包含有两个步骤:
1.scenario_manager_.Update(planning_start_point, *frame);,这一句用来更新当前的场景。
2.auto result = scenario_->Process(planning_start_point, frame)
前面我们已经提到,apollo中,scenario->stage->task是层层递进关系,即驾驶中有许多scenario(场景),每个场景分为一个或者多个stage(阶段),每个阶段又是由多个task(任务)组成。
进入到Process方法
Scenario::ScenarioStatus Scenario::Process(
    const common::TrajectoryPoint& planning_init_point, Frame* frame) {
  if (current_stage_ == nullptr) {
    AWARN << "Current stage is a null pointer.";
    return STATUS_UNKNOWN;
  }
  if (current_stage_->stage_type() == ScenarioConfig::NO_STAGE) {
    scenario_status_ = STATUS_DONE;
    return scenario_status_;
  }
  auto ret = current_stage_->Process(planning_init_point, frame);
以LaneFollowStage中的 Process方法为例
Stage::StageStatus LaneFollowStage::Process(
    const TrajectoryPoint& planning_start_point, Frame* frame) {
  bool has_drivable_reference_line = false;

  ADEBUG << "Number of reference lines:\t"
         << frame->mutable_reference_line_info()->size();

  unsigned int count = 0;

  for (auto& reference_line_info : *frame->mutable_reference_line_info()) {
    // TODO(SHU): need refactor
    if (count++ == frame->mutable_reference_line_info()->size()) {
      break;
    }
  ...
  auto cur_status =
        PlanOnReferenceLine(planning_start_point, frame, &reference_line_info);
  ...
for循环中,遍历reference_line_info,当前road的每条lane对应一条reference_line。
然后,调用PlanOnReferenceLine方法。
Status LaneFollowStage::PlanOnReferenceLine(
    const TrajectoryPoint& planning_start_point, Frame* frame,
    ReferenceLineInfo* reference_line_info) {
  if (!reference_line_info->IsChangeLanePath()) {
    reference_line_info->AddCost(kStraightForwardLineCost);
  }
  ADEBUG << "planning start point:" << planning_start_point.DebugString();
  ADEBUG << "Current reference_line_info is IsChangeLanePath: "
         << reference_line_info->IsChangeLanePath();

  auto ret = Status::OK();
  for (auto* task : task_list_) {
    const double start_timestamp = Clock::NowInSeconds();

    ret = task->Execute(frame, reference_line_info);
    ...
      if (!ret.ok()) {
      AERROR << "Failed to run tasks[" << task->Name()
             << "], Error message: " << ret.error_message();
      break;
    }
    ...
    reference_line_info->set_trajectory_type(ADCTrajectory::NORMAL);
  if (!ret.ok()) {
    PlanFallbackTrajectory(planning_start_point, frame, reference_line_info);
  }
  ...
   // determine if there is a destination on reference line.
  double dest_stop_s = -1.0;
  for (const auto* obstacle :
       reference_line_info->path_decision()->obstacles().Items()) {
    if (obstacle->LongitudinalDecision().has_stop() &&
        obstacle->LongitudinalDecision().stop().reason_code() ==
            STOP_REASON_DESTINATION) {
      SLPoint dest_sl = GetStopSL(obstacle->LongitudinalDecision().stop(),
                                  reference_line_info->reference_line());
      dest_stop_s = dest_sl.s();
    }
  }
  ...
通过PlanOnReferenceLine代码不难看出,里面核心的逻辑,就是位于ret = task->Execute(frame, reference_line_info);。如果ret失败了,再进行fallback操作。
8.总结
以上,就是planning模块运行的整个pipeline,包含了读取配置文件选择合适的planner类型,更新scenario类型,再遍历stage执行task的全过程。当然我们上面只是梳理清楚代码运行逻辑,对于具体的算法实践并未做分析,关于具体的算法实现,后面再来进行解读。
参考文献
1.https://github.com/ApolloAuto/apollo
2.https://github.com/ApolloAuto/apollo/blob/master/modules/planning/README_cn.md
3.https://zhuanlan.zhihu.com/p/266116528
4.https://blog.csdn.net/Cxiazaiyu/article/details/109766770
