Flutter 使用FFI+CustomPainter实现全平台渲染视频
Flutter视频渲染系列
第一章 Android使用Texture渲染视频
第二章 Windows使用Texture渲染视频
第三章 Linux使用Texture渲染视频
第四章 全平台FFI+CustomPainter渲染视频(本章)
文章目录
- Flutter视频渲染系列
- 前言
- 一、如何实现
-
- 1、C/C++采集视频帧
-
- (1)、编写C++代码
- (2)编写CMakeList
- 2、FFI导入C/C++方法
-
- (1)、依赖包
- (2)、加载动态库
- (3)、定义方法
- 3、Isolate开启采集线程
- (1)、定义入口方法
- (2)、创建Isolate
- 4、CustomPainter绘制
-
- (1)、自定义绘制
- (2)、布局界面
- (3)、绘制视频帧
- 二、效果预览
- 三、性能对比
- 四、完整代码
- 总结
前言
前面几章介绍了flutter使用texture渲染视频的方法,但是有个问题就是在每个平台都需要写一套原生代码去创建texture,这样对于代码的维护是比较不利的。最好的方法应该是一套代码每个平台都能运行,于是有了一个设想,使用c++实现跨平台的视频采集,通过ffi将数据传到dart界面,通过画布控件将图像绘制出来。最终通过测试发现能用的方案就是ffi结合CustomPainter实现视频渲染,这种方式实现的视频渲染可以做到一套代码所有平台(除web外)都可运行。
一、如何实现
1、C/C++采集视频帧
(1)、编写C++代码
播放器就是一种视频采集,比如下列代码是一个简单的播放器的定义。

ffplay.h示例如下
//播放回调方法原型
typedef void(*DisplayEventHandler)(void*play,unsigned char* data[8], int linesize[8], int width, int height, AVPixelFormat format);
//创建播放器
void*play_create();
//销毁播放器
void play_destory(void*);
//设置渲染回调
void play_setDisplayCallback(void*, DisplayEventHandler callback);
//开始播放(异步)
void play_start(void*,const char*);
//开始播放(同步)
void play_exec(void*, const char*);
//停止播放
void play_stop(void*);
(2)编写CMakeList
每个平台的cmake。
- Windows、Linux的CMakeList(部分)
# Project-level configuration.
set(PROJECT_NAME "ffplay_plugin")
project(${PROJECT_NAME} LANGUAGES CXX)

# This value is used when generating builds using this plugin, so it must
# not be changed.
set(PLUGIN_NAME "ffplay_plugin_plugin")

# Define the plugin library target. Its name must not be changed (see comment
# on PLUGIN_NAME above).
#
# Any new source files that you add to the plugin should be added here.
add_library(${PLUGIN_NAME} SHARED
  "ffplay_plugin.cc"
"../ffi/ffplay.cpp"
"../ffi/DllImportUtils.cpp"
)
target_link_libraries(${PLUGIN_NAME} PRIVATE flutter  )
- Android的jni CMakeList(部分)
add_library( # Sets the name of the library.
        ffplay_plugin_plugin
        # Sets the library as a shared library.
        SHARED
        # Provides a relative path to your source file(s).
        ../../../../ffi/ffplay.cpp
        ../../../../ffi/DllImportUtils.cpp
        )
target_link_libraries( # Specifies the target library.
                       ffplay_plugin_plugin
                       # Links the target library to the log library
                       # included in the NDK.
                       ${log-lib}
                       android
                       )
2、FFI导入C/C++方法
(1)、依赖包
import 'dart:ffi'; // For FFI
import 'package:ffi/ffi.dart';
import 'dart:io'; // For Platform.isX
(2)、加载动态库
根据不同的平台加载动态库,通常windows为dll其他平台为so。动态库的名称由上面的CMakeList确定。
final DynamicLibrary nativeLib = Platform.isWindows
    ? DynamicLibrary.open("ffplay_plugin_plugin.dll")
    : DynamicLibrary.open("libffplay_plugin_plugin.so");
(3)、定义方法
比如ffplay.h中的方法对应dart定义如下:
main.dart
//播放回调方法原型
typedef display_callback = Void Function(Pointer<Void>, Pointer<Pointer<Uint8>>,
    Pointer<Int32>, Int32, Int32, Int32);
//创建播放器
final Pointer<Void> Function() play_create = nativeLib
    .lookup<NativeFunction<Pointer<Void> Function()>>('play_create')
    .asFunction();
//销毁播放器
final void Function(Pointer<Void>) play_destory = nativeLib
    .lookup<NativeFunction<Void Function(Pointer<Void>)>>('play_destory')
    .asFunction();
//设置渲染回调
final void Function(Pointer<Void>, Pointer<NativeFunction<display_callback>>)
    play_setDisplayCallback = nativeLib
        .lookup<
                NativeFunction<
                    Void Function(Pointer<Void>,
                        Pointer<NativeFunction<display_callback>>)>>(
            'play_setDisplayCallback')
        .asFunction();
//开始播放(异步)
final void Function(Pointer<Void>, Pointer<Int8>) play_start = nativeLib
    .lookup<NativeFunction<Void Function(Pointer<Void>, Pointer<Int8>)>>(
        'play_start')
    .asFunction();
//开始播放(同步)
final void Function(Pointer<Void>, Pointer<Int8>) play_exec = nativeLib
    .lookup<NativeFunction<Void Function(Pointer<Void>, Pointer<Int8>)>>(
        'play_exec')
    .asFunction();
//停止播放
final void Function(Pointer<Void>) play_stop = nativeLib
    .lookup<NativeFunction<Void Function(Pointer<Void>)>>('play_stop')
    .asFunction();
3、Isolate开启采集线程
由于flutter的界面机制是不允许线程间数据共享,而且全局变量都是TLS,在C/C++中创建的线程无法将播放数据直接传给主线程渲染,所以需要使用dart创建一个Isolate让C/C++的播放器跑在上面,数据通过sendPort发送给主线程。
(1)、定义入口方法
入口方法相当于子线程方法。
main.dart
//Isolate通信端口
SendPort? m_sendPort;
//Isolate入口方法
  static isolateEntry(SendPort sendPort) async {
    //记录sendPort
    m_sendPort = sendPort;
    //播放逻辑,此处需要堵塞,简单点可以在播放逻辑中堵塞,也可以放一个C/C++消息队列给多路流线程通信做调度。
    //比如采用播放逻辑阻塞实现,阻塞后在渲染回调方法中使用sendPort将视频数据发送到主线程,回调必须在此线程中。

    //发送消息通知结束播放
    sendPort?.send([1]);
  }
(2)、创建Isolate
有了入口方法就可以创建一个Isolate了,示例如下:
main.dart
  startPlay() async {
    ReceivePort receivePort = ReceivePort();
    //创建一个Isolate相当于创建一个子线程
    await Isolate.spawn(isolateEntry, receivePort.sendPort);
    // 监听Isolate子线程消息port
    await for (var msg in receivePort) {
      //处理Isolate子线程发过来的视频数据

      int type=msg[0];
      if(type==1)
      //结束播放
        break;
  }
}
4、CustomPainter绘制
(1)、自定义绘制
自定义绘制需要继承CustomPainter并实现paint方法,在paint方法中绘制ui.image。这个ui.image可以由argb数据转码得到。
main.dart
import 'dart:ui' as ui;
//渲染的image
ui.Image? image;
//通知控件绘制
ChangeNotifier notifier = ChangeNotifier();
//自定义panter
class MyCustomPainter extends CustomPainter {
//触发绘制的标识
ChangeNotifier flag;
MyCustomPainter(this.flag) : super(repaint: flag);
void paint(Canvas canvas, ui.Size size) {
//绘制image
if (image != null) canvas.drawImage(image!, Offset(0, 0), Paint());
}
bool shouldRepaint(MyCustomPainter oldDelegate) => true;
}
(2)、布局界面
在界面中使用自定义的CustomPainter,并传入ChangeNotifier对象用于触发绘制。
main.dart
Widget build(BuildContext context) {
return Scaffold(
appBar: AppBar(
title: Text(widget.title),
),
//控件布局
body: Center(
child: Row(
mainAxisAlignment: MainAxisAlignment.center,
children: <Widget>[
Container(
width: 640,
height: 360,
child: Center(
child: CustomPaint(
foregroundPainter: MyCustomPainter(notifier),
child: Container(
width: 640,
height: 360,
color: Color(0x5a00C800),
),
),
),
)
],
),
),
floatingActionButton: FloatingActionButton(
onPressed: onClick,
tooltip: 'play or stop',
child: Icon(Icons.add),
),
);
}
(3)、绘制视频帧
当播放数据发送到主线程后,需要将argb数据转换成ui.image对象,我们直接使用 ui.decodeImageFromPixels方法即可。
main.dart
 ui.decodeImageFromPixels(pixels, width, height, PixelFormat.rgba8888,
            (result) {
          image = result;
          //通知绘制
          notifier.notifyListeners();
        }, rowBytes: linesize, targetWidth: 640, targetHeight: 360);
二、效果预览
基本的一个运行效果
三、性能对比
其实在摸索过程中采用过RawImage的方式渲染视频,成功显示画面但是cpu占用率非常高,不能用于实际开发。最后找到本文的这种方法其实性能也不是很好,相对于Texture渲染还是有一些差距,但是也算是能够使用了。
测试平台:Windows 11
测试设备:i7 8750h gpu使用核显
数据记录:30秒内取5次值计算均值
本文渲染
| 视频 | 控件显示大小 | cpu使用率(%) | gpu使用率(%) |
|---|---|---|---|
| h264 320p 30fps | 320p | 1.82 | 4.56 |
| h264 1080p 30fps | 360p | 13.4 | 4.84 |
| h264 1080p 30fps | 1080p | 13.04 | 15.14 |
Texture渲染
| 视频 | 控件显示大小 | cpu使用率(%) | gpu使用率(%) |
|---|---|---|---|
| h264 320p 30fps | 320p | 1.28 | 5.06 |
| h264 1080p 30fps | 360p | 4.26 | 12.66 |
| h264 1080p 30fps | 1080p | 4.78 | 14.72 |
可以看出本文的渲染方法在渲染小分辨率时性能还是可以接受,分辨率比较高时cpu使用率会上升很多,gpu使用率会受控件显示大小影响。 texture的方式则性能好一些且波动较小。
四、完整代码
https://download.csdn.net/download/u013113678/87121930
注:本文的实现性能不算特别好,请根据需求下载。
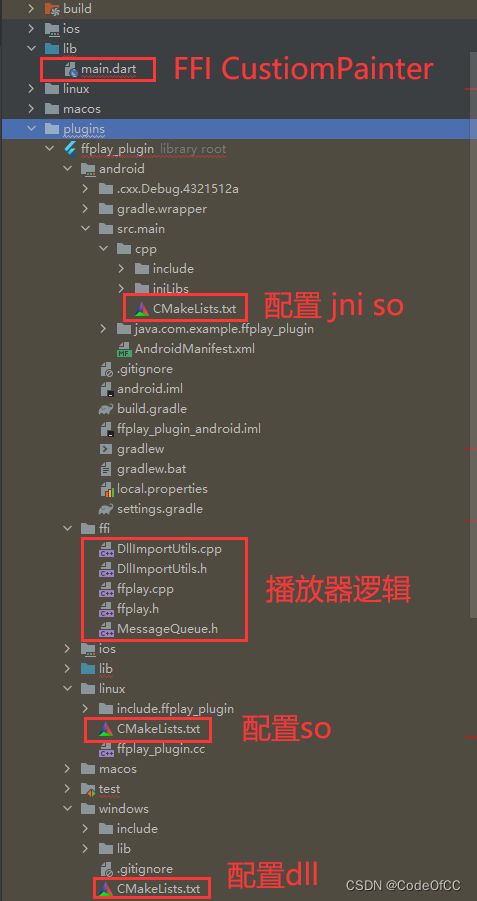
包含完整代码的flutter项目,版本3.0.4、3.3.8都成功运行,目前不包含ios、macos实现。目录说明如下。

总结
以上就是今天要讲述的内容,使用FFI+CustomPainter实现视频渲染是一种笔者探索出来的方法,原理并不复杂,而且性能也只能说勉强能用,适合渲染小画面。编写成文章发出来,也是为了作为一个节点,在这基础上能够继续优化。总的来说,这是一个不错的示例也是一个值得继续探索的方案。