【Transformer】16、SegFormer:Simple and Efficient Design for Semantic Segmentation with Transformers
文章目录
-
- 一、背景和动机
- 二、方法
-
- 2.1 Hierarchical Transformer Encoder
- 2.2 Lightweight ALL-MLP Decoder
- 2.3 和 SETR 的区别
- 三、效果
- 四、代码

出处:NeurIPS 2021
论文链接:https://arxiv.org/pdf/2105.15203.pdf
代码链接:https://github.com/NVlabs/SegFormer
一、背景和动机
语义分割是计算机视觉任务的基础,又因为分割和分类有强关系,所以产生了从分类网络变体而来的分割网络,如 FCN 是一个典型的网络结构,并且在其后也产生了很多基于 FCN 的变体。
ViT 在图像分类上的成功,催生了 SETR 网络,该网络说明了 Transformer 也能在分割任务上生效。SETR 使用 ViT 作为主干网络,然后使用 CNN 来进行特征图增大。但是 ViT 有一些不足:
- ViT 只能输出单一迟到的低分辨率特征
- 在图像上计算量很大
基于此,有作者提出了 PVT,是 ViT 的变体,金字塔结构,能进行密集预测。PVT 的提出,超越了基于 CNN 的目标检测和语义分割。还有后续的 Swin 和 Twins,这些方法主要考虑设计 encoder,但忽略了 decoder 能带来的更多提升。
本文提出了一种 SegFormer,同时考虑了效果、效率、鲁棒性,同时使用了 encoder 和 decoder。
创新性:
- positional-encoding-free && 多层级的 encoder
- all MLP
- 同时兼顾效果、效率、鲁棒性
本文提出的 encoder,在对分辨率不同的输入进行 inference 的时候, 没使用插值的位置编码,所以,本文提出的 encoder 能够很简单的应用于不同分辨率的测试,也不会影响性能。并且分层级的部分能够产生高分辨率和低分辨率的特征。
轻量级的 MLP decoder,能够很好的利用 Transformer 的特征,其中低层能保留局部信息,高层能保留非局部信息。将这些不同层的 MLP decoder 结合后,能够结合 local 和 global 特征,能够得到一个简单且直接的 decoder 来得到有效的特征表达。
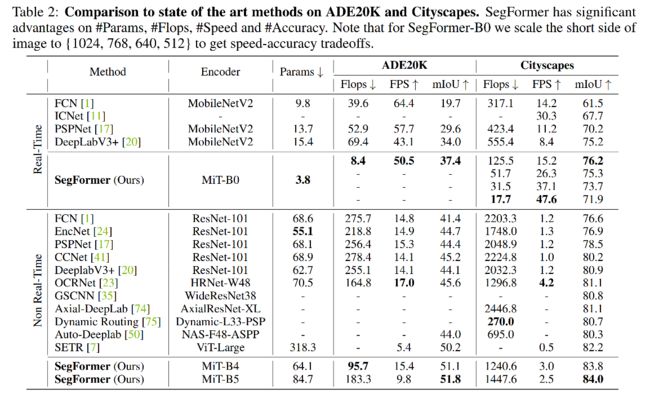
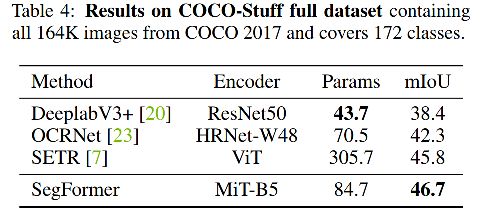
作者在 ADE20K,cityscapes,COCO-Stuff 进行了实验。
二、方法
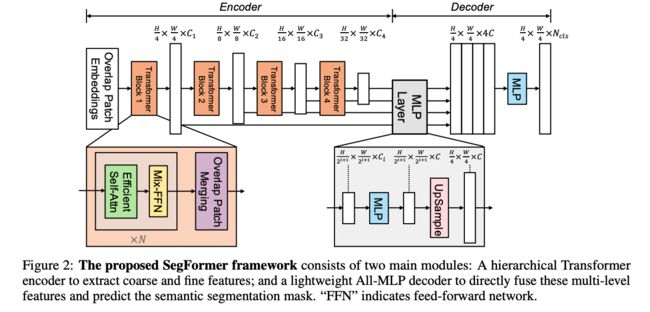
SegFormer 的结构如图 2 所示,主要有两个模块:
- hierarchical Transformer encoder:为了产生不同分辨率的特征
- lightweight ALL-MLP decoder:聚合多层特征来产生最终的语义分割 mask
- 输入图像大小为 H × W × 3 H\times W \times 3 H×W×3
- 首先,将图像分为大小为 4 × 4 4\times 4 4×4 大小的 patches,patch 越小越有利于密集预测任务
- 接着,将 patches 输入层级 transformer encoder 中,得到多尺度特征,包括原图像大小的 { 1 / 4 , 1 / 8 , 1 / 16 , 1 / 32 } \{1/4, 1/8, 1/16, 1/32\} {1/4,1/8,1/16,1/32}。
- 之后,将这些多尺度特征输入 ALL-MLP decoder 中,预测分割 mask H 4 × W 4 × N c l s \frac{H}{4} \times \frac{W}{4} \times N_{cls} 4H×4W×Ncls
2.1 Hierarchical Transformer Encoder
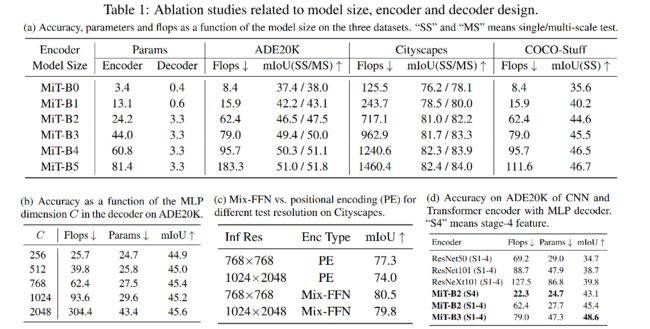
作者设计了一系列的 Mix Transformer encoders (MiT),MiT-B0 到 MiT-B5,结构相同,大小不同,MiT-B0 是最轻量级的,可以用来快速推理,MiT-B5 是最重量级的,可以取得最好的效果。
MiT 灵感来源于 ViT,但为适应分割做了一些优化。
1、Hierarchical Feature Representation:
给定输入图像 H × W × 3 H\times W \times 3 H×W×3,作者使用 patch merging 的方法来得到层级特征图 F i F_i Fi,其分辨率为 H 2 i + 1 × W 2 i + 1 × C i \frac{H}{2^{i+1}} \times \frac{W}{2^{i+1}} \times C_{i} 2i+1H×2i+1W×Ci,其中 i = { 1 , 2 , 3 , 4 } i=\{1, 2, 3, 4\} i={1,2,3,4},且 C i + 1 > C i C_{i+1}>C_{i} Ci+1>Ci
2、Overlapped Patch Merging:
ViT 中,将 N × N × 3 N\times N \times 3 N×N×3 的 patch,merge 成了 1 × 1 × C 1 \times 1 \times C 1×1×C 的特征,所以,作者可以吧特征从 H 4 × W 4 × C 1 \frac{H}{4} \times \frac{W}{4} \times C_{1} 4H×4W×C1 变换到 H 8 × W 8 × C 2 \frac{H}{8} \times \frac{W}{8} \times C_{2} 8H×8W×C2。并且不重叠的 patch 会失去局部连续性,所以作者使用有重叠的 patch merging 方法。
作者的 patch size K=7,相邻 patch 的 stride 为 S=4,padding size P=1,基于此来实现有重叠的 patch merging,得到和无重叠 patch merging 相同大小的结果。
3、Efficient Self-Attention
encoder 中计算量最大的就是 self-attention 层,所以作者使用了文献 [8] 中提出的方法,使用了一个 reduction ratio R R R 来降低序列的长度:
![]()
4、Mix-FFN
ViT 使用 position encoding(PE) 来引入局部位置信息,但是 PE 的分辨率大小是固定的,所以当测试不同于训练图像大小的图像时,需要插值,这样会导致准确率下降。
作者认为 PE 在语义分割中是不需要的,引入了一个 Mix-FFN,考虑了零填充对位置泄露的影响,直接在 FFN 中使用 3x3 的卷积,格式如下:
![]()
Mix-FFN 在 FNN 中使用了 3x3 的卷积和 MLP,并且也证明了 3x3 的卷积能够保留位置信息。
2.2 Lightweight ALL-MLP Decoder
SegFormer 使用 MLP 构建了一个 Decoder,能够使用 MLP 来实现 decoder 的一个重要原因是,Transformer 有比 CNN 高的感受野。
Decoder 的过程:
- step 1:将多层级特征输入 MLP 层,来规范通道维度
- step 2:将特征图上采样为原图大小的 1/4 大小,concat 起来
- step 3:使用一层 MLP 对特征通道聚合
- step 4:输出预测 segmentation mask H 4 × W 4 × N c l s \frac{H}{4} \times \frac{W}{4} \times N_{cls} 4H×4W×Ncls
![]()
Effective Receptive Field Analysis:
语义分割任务中,保持大的感受野非常重要,所以作者使用 Effective Receptive Field Analysis(ERF)作为工具来可视化并解释为什么 MLP decoder 在 Transformer 上如此有效。
如图 3 所示,作者分别可视化了SegFormer 和 Deeplabv3+ 的 4个 stage 和 decoder head 的 ERF。
- Deeplabv3+ 的 ERF 在每个 stage 都小
- SegFormer 的 encoder 在较低 stage 产生类似于卷积的局部注意,同时也能够在 stage 4 输出非局部的注意,能够有效捕获上下文
- MLP head 的 ERF (蓝框)不同于 stage 4 的红框,蓝框除了 non-local 的attention外,还有更强的局部attention。
所以,MLP 形式的 decoder 能在 Transformer 网络中发挥比 CNN 中更好的作用的原因在于感受野。
![]()
![]()
2.3 和 SETR 的区别
1、SegFormer 只使用了 ImageNet-1k 预训练,SETR 中的 ViT 在 ImageNet-22k 上预训练
2、SegFormer 的 encoder 是多层级的结构,能够同时捕捉不同分辨率的特征,SETR 的 ViT encoder 只能生成单个分辨率的特征图
3、SegFormer 没有使用位置编码,SETR 使用了固定大小的位置编码,会降低准确率
4、MLP 的 decoder 比 SETR 的更小更轻量,SETR 需要多个 3x3 的卷积堆叠来实现 decoder。
三、效果
![]()
![]()
四、代码
这里以训练 cityscapes 为例,来展示其中的要点。
代码运行:
python tools/train.py local_configs/segformer/B1/segformer.b1.1024x1024.city.160k.py
1、Encoder 主要过程
- 1、输入 [1,3,1024,1024],进行 OverlapPatchEmbed,使用核大小为 7,步长为 4 的卷积,生成 [1, 64, 256, 256] 的 patches
- 2、经过 transformer block 1(attention+mlp),特征图大小还是 [1, 64, 256, 256]
- 3、将 block 1 输出的特征图,进行 OverlapPatchEmbed,使用核大小为 3,步长为 2 的卷积,生成 [1, 128, 128, 128] 的 patches
- 4、经过 transformer block 2 (attention+mlp),特征图大小还是 [1, 128, 128, 128]
- 5、将 block 2 输出的特征图,进行 OverlapPatchEmbed,使用核大小为 3,步长为 2 的卷积,生成 [1, 320, 64, 64] 的 patches
- 6、经过 transformer block 3 (attention+mlp),特征图大小还是 [1, 320, 64, 64]
- 7、将 block 3 输出的特征图,进行 OverlapPatchEmbed,使用核大小为 3,步长为 2 的卷积,生成 [1, 512, 32, 32] 的 patches
- 8、经过 transformer block 4 (attention+mlp),特征图大小还是 [1, 512, 32, 32]
四个 stage 的输出被 concat 成为一个 list,也就是四种不同分辨率大小的多层级特征图。
transformer block 1 如下:
ModuleList(
  (0): Block(
    (norm1): LayerNorm((64,), eps=1e-06, elementwise_affine=True)
    (attn): Attention(
      (q): Linear(in_features=64, out_features=64, bias=True)
      (kv): Linear(in_features=64, out_features=128, bias=True)
      (attn_drop): Dropout(p=0.0, inplace=False)
      (proj): Linear(in_features=64, out_features=64, bias=True)
      (proj_drop): Dropout(p=0.0, inplace=False)
      (sr): Conv2d(64, 64, kernel_size=(8, 8), stride=(8, 8))
      (norm): LayerNorm((64,), eps=1e-05, elementwise_affine=True)
    )
    (drop_path): Identity()
    (norm2): LayerNorm((64,), eps=1e-06, elementwise_affine=True)
    (mlp): Mlp(
      (fc1): Linear(in_features=64, out_features=256, bias=True)
      (dwconv): DWConv(
        (dwconv): Conv2d(256, 256, kernel_size=(3, 3), stride=(1, 1), padding=(1, 1), groups=256)
      )
      (act): GELU()
      (fc2): Linear(in_features=256, out_features=64, bias=True)
      (drop): Dropout(p=0.0, inplace=False)
    )
  )
  (1): Block(
    (norm1): LayerNorm((64,), eps=1e-06, elementwise_affine=True)
    (attn): Attention(
      (q): Linear(in_features=64, out_features=64, bias=True)
      (kv): Linear(in_features=64, out_features=128, bias=True)
      (attn_drop): Dropout(p=0.0, inplace=False)
      (proj): Linear(in_features=64, out_features=64, bias=True)
      (proj_drop): Dropout(p=0.0, inplace=False)
      (sr): Conv2d(64, 64, kernel_size=(8, 8), stride=(8, 8))
      (norm): LayerNorm((64,), eps=1e-05, elementwise_affine=True)
    )
    (drop_path): DropPath()
    (norm2): LayerNorm((64,), eps=1e-06, elementwise_affine=True)
    (mlp): Mlp(
      (fc1): Linear(in_features=64, out_features=256, bias=True)
      (dwconv): DWConv(
        (dwconv): Conv2d(256, 256, kernel_size=(3, 3), stride=(1, 1), padding=(1, 1), groups=256)
      )
      (act): GELU()
      (fc2): Linear(in_features=256, out_features=64, bias=True)
      (drop): Dropout(p=0.0, inplace=False)
    )
  )
)
2、SegFormer Head
- 1、输入为上面的 4 种不同分辨率的输出
- 2、经过4层 MLP 和 上采样(每个 stage 的特征分别经过一个 MLP,参数不共享,上采样到最大特征图的大小)
- 3、4 层特征concat,得到 [1, 1024, 256, 256] 维特征,然后经过 Conv+BN+ReLU,得到 [1, 256, 256, 256]
- 4、线性映射为 [1, 19, 256, 256],作为预测 segmentation mask
# MLP 1 (for the feature from stage 4)
MLP(
  (proj): Linear(in_features=512, out_features=256, bias=True)
)
resize

# MLP 2
MLP(
  (proj): Linear(in_features=320, out_features=256, bias=True)
)
resize

# MLP 3
MLP(
  (proj): Linear(in_features=128, out_features=256, bias=True)
)
resize

# MLP 4
MLP(
  (proj): Linear(in_features=64, out_features=256, bias=True)
)
resize
# 特征融合
ConvModule(
  (conv): Conv2d(1024, 256, kernel_size=(1, 1), stride=(1, 1), bias=False)
  (bn): BatchNorm2d(256, eps=1e-05, momentum=0.1, affine=True, track_running_stats=True)
  (activate): ReLU(inplace=True)
)


