pointnet代码理解
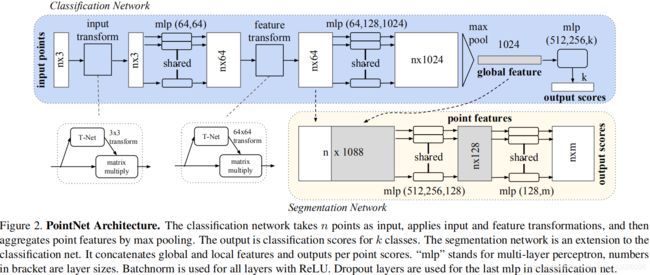
PointNet:Deep Learning on Point Sets for 3D Classification and Segmentation
分类
点云(nx3-nx64)
def get_model(point_cloud, is_training, bn_decay=None):

    """ Classification PointNet, input is BxNx3, output Bx40 """

    batch_size = point_cloud.get_shape()[0].value
    num_point = point_cloud.get_shape()[1].value
    end_points = {}

        #得到点云的规范化选择矩阵,将原始点云输入进行规范化处理。
        with tf.variable_scope('transform_net1') as sc:   #创建一个命名空间,名为:transform_net1,然后在作用域下定义一个变量transform。
        transform = input_transform_net(point_cloud, is_training, bn_decay, K=3)   # 预测出旋转矩阵T(个人理解因为输入点云维度为3,所以这里定义K=3,即确定了旋转矩阵的大小)。

         point_cloud_transformed = tf.matmul(point_cloud, transform)   #原始点云乘以旋转矩阵(此处的乘法可理解为最前面的维度是batch所以对最后两维进行普通的矩阵乘法),得到矫正后点云,作为MLP的输入抽取特征。
         input_image = tf.expand_dims(point_cloud_transformed, -1)   #扩展成 4D 张量,在最后增加一维变成:BxNx3x1。

    # 构建两层的MLP(64—64)得到64维的特征。
    net = tf_util.conv2d(input_image, 64, [1,3],    #卷积核大小为1*3,输出为BxNx1x64。
                         padding='VALID', stride=[1,1],
                         bn=True, is_training=is_training,
                         scope='conv1', bn_decay=bn_decay)
    net = tf_util.conv2d(net, 64, [1,1],
                         padding='VALID', stride=[1,1],
                         bn=True, is_training=is_training,
                         scope='conv2', bn_decay=bn_decay)  #卷积核大小为1*1,通过该层再次提取特征。
点云(nx64-nx1024)
#利用特征旋转矩阵transform对特征进行规范化处理,得到校正后的特征。此时的新特征net_transformed将输入到下一个MPL中进行处理
    with tf.variable_scope('transform_net2') as sc:
        transform = feature_transform_net(net, is_training, bn_decay, K=64)  #在此处定义了旋转矩阵的大小为64*64
    end_points['transform'] = transform   #end_points 用于存储张量 transform 的信息。


    net_transformed = tf.matmul(tf.squeeze(net, axis=[2]), transform)     # tf.squeeze( ): 默认从tensor中删除所有大小是1的维度。tf.squeeze(net, axis=[2]) 移除第三维,因为维度的开始索引为0,即由BxNx1x64移除1变成BxNx64,再用后两维与旋转矩阵相乘即Nx64 x 64x64.

    net_transformed = tf.expand_dims(net_transformed, [2])#第三个索引(因为是从0开始的)增加一个维度变成BxNx1x64

    #构建一个三层感知机(64-128-1024)对处理后的点云特征进行提取,1024维的输出。
    net = tf_util.conv2d(net_transformed, 64, [1,1],
                         padding='VALID', stride=[1,1],
                         bn=True, is_training=is_training,
                         scope='conv3', bn_decay=bn_decay)
    net = tf_util.conv2d(net, 128, [1,1],
                         padding='VALID', stride=[1,1],
                         bn=True, is_training=is_training,
                         scope='conv4', bn_decay=bn_decay)
    net = tf_util.conv2d(net, 1024, [1,1],
                         padding='VALID', stride=[1,1],
                         bn=True, is_training=is_training,
                         scope='conv5', bn_decay=bn_decay)      # 输出n * 1024维度的特征矩阵.
输出
 # 此时每个输入点从三维变成了1024维的表示,此时需要对n个点所描述的点云进行融合处理以得到全局特征,源码中使用了最大池化层来实现这一功能:
    # 最大池化,二维的池化函数对点云中点的数目这个维度进行池化,n-->1
    net = tf_util.max_pool2d(net, [num_point,1],
                             padding='VALID', scope='maxpool')
#输出为全局特征[num_point,1]表示将每一个点云的n个点最大池化为1个特征,这个特征的长度为1024。此时通过了两次mpl的处理将一个点云的特征逐点进行描述,并合并到了1024维的全局特征上来。变成BxNx1x1024.

#利用上面的1024维特征,就可以基于这一特征对点云的特性进行学习实现分类任务,PointNet利用了一个三层感知机MPL(512--256--40)来对特征进行学习,最终实现了对于40类的分类.

    net = tf.reshape(net, [batch_size, -1])  #更改数组形状,由Bx1x1x1024 reshape为 Bx1024

    # 定义分类的mpl512-256-k, k为分类类别数目
    net = tf_util.fully_connected(net, 512, bn=True, is_training=is_training,
                                  scope='fc1', bn_decay=bn_decay)
    net = tf_util.dropout(net, keep_prob=0.7, is_training=is_training,
                          scope='dp1')
    net = tf_util.fully_connected(net, 256, bn=True, is_training=is_training,
                                  scope='fc2', bn_decay=bn_decay)
    net = tf_util.dropout(net, keep_prob=0.7, is_training=is_training,
                          scope='dp2')
    net = tf_util.fully_connected(net, 40, activation_fn=None, scope='fc3')
    #这一感知机由全连接层组成,其中包含了两个dropout = 0.7防止过拟合。其中K是最后一层的输出数量,代表分类的类别,每个类别会对应于点云的分类得分。最终就可以根据输出K个分类值分数的大小来确定输入点云的分类了。
    return net, end_points
分割
前半部分和分类是一样的。
def get_model(point_cloud, is_training, bn_decay=None):
    """ Classification PointNet, input is BxNx3, output BxNx50 """
    batch_size = point_cloud.get_shape()[0].value
    num_point = point_cloud.get_shape()[1].value
    end_points = {}

    with tf.variable_scope('transform_net1') as sc:
        transform = input_transform_net(point_cloud, is_training, bn_decay, K=3)
    point_cloud_transformed = tf.matmul(point_cloud, transform)
    input_image = tf.expand_dims(point_cloud_transformed, -1)

    net = tf_util.conv2d(input_image, 64, [1,3],
                         padding='VALID', stride=[1,1],
                         bn=True, is_training=is_training,
                         scope='conv1', bn_decay=bn_decay)
    net = tf_util.conv2d(net, 64, [1,1],
                         padding='VALID', stride=[1,1],
                         bn=True, is_training=is_training,
                         scope='conv2', bn_decay=bn_decay)

    with tf.variable_scope('transform_net2') as sc:
        transform = feature_transform_net(net, is_training, bn_decay, K=64)
    end_points['transform'] = transform
    net_transformed = tf.matmul(tf.squeeze(net, axis=[2]), transform)
    point_feat = tf.expand_dims(net_transformed, [2])
    print(point_feat)

    net = tf_util.conv2d(point_feat, 64, [1,1],
                         padding='VALID', stride=[1,1],
                         bn=True, is_training=is_training,
                         scope='conv3', bn_decay=bn_decay)
    net = tf_util.conv2d(net, 128, [1,1],
                         padding='VALID', stride=[1,1],
                         bn=True, is_training=is_training,
                         scope='conv4', bn_decay=bn_decay)
    net = tf_util.conv2d(net, 1024, [1,1],
                         padding='VALID', stride=[1,1],
                         bn=True, is_training=is_training,
                         scope='conv5', bn_decay=bn_decay)
    global_feat = tf_util.max_pool2d(net, [num_point,1],
                                     padding='VALID', scope='maxpool')     #Bx1x1x64
    print(global_feat)
最大池化后,对于分割任务,需要加入局域信息来进行学习,所以分类任务的输入包括了1024维的全局信息还包括从点云直接学习出的64维的局部信息。PointNet的做法是将全局信息附在每一个局部点描述的后面,形成了1024 + 64 = 1088维的向量,而后通过两个感知机来进行分割。
global_feat_expand = tf.tile(global_feat, [1, num_point, 1, 1])  #tf.tile(input, multiple, name=None)其中input为待扩展的张量,multiples为扩展方法,假如input是一个3维的张量,那么mutiples就必须是一个1x3的一维张量,这个张量的三个值依次是表示input的第一、第二、第三维数的数据的扩展倍数,为1表示不变。 所以global_feat_expand为BxNx1x1024.

 concat_feat = tf.concat(3, [point_feat, global_feat_expand])  #n*1088
 print(concat_feat)
 # 定义分割的MLP(512-256-128  128-m), m为点所属的类别数目
 net = tf_util.conv2d(concat_feat, 512, [1,1],
                      padding='VALID', stride=[1,1],
                      bn=True, is_training=is_training,
                      scope='conv6', bn_decay=bn_decay)
 net = tf_util.conv2d(net, 256, [1,1],
                      padding='VALID', stride=[1,1],
                      bn=True, is_training=is_training,
                      scope='conv7', bn_decay=bn_decay)
 net = tf_util.conv2d(net, 128, [1,1],
                      padding='VALID', stride=[1,1],
                      bn=True, is_training=is_training,
                      scope='conv8', bn_decay=bn_decay)


 net = tf_util.conv2d(net, 128, [1,1],
                      padding='VALID', stride=[1,1],
                      bn=True, is_training=is_training,
                      scope='conv9', bn_decay=bn_decay)

 net = tf_util.conv2d(net, 50, [1,1],
                      padding='VALID', stride=[1,1], activation_fn=None,
                      scope='conv10')
 net = tf.squeeze(net, [2])  # BxNxC
# 由于点云的分割问题可以看做是对于每一个点的分类问题,需要对每一个点的分类进行预测。在通过对全局 + 局部特征学习后,最后将每一个点分类到50类中,并输出n * 50.

 return net, end_points
预测矩阵T-net

T-net是一个微型的pointnet,用于生成一个仿射变换矩阵来对点云的旋转、平移等变化进行规范化处理。
def input_transform_net(point_cloud, is_training, bn_decay=None, K=3):  #3 代表输入的是原始点云,是每个点的维度(x,y,z)

    """ Input (XYZ) Transform Net, input is BxNx3 gray image
        Return:
            Transformation matrix of size 3xK """
    batch_size = point_cloud.get_shape()[0].value #点云的个数(一个batch包含的点云数目,pointnet为32)
    num_point = point_cloud.get_shape()[1].value #每个点云内点的个数 (pointNet 为 1024)

    input_image = tf.expand_dims(point_cloud, -1)    #在point_cloud最后追加一个维度,BxNx3 变成 BxNx3x1 3d张量-->4d张量

    # 输入点云point_cloud有3个axis,即B×N×3,tf.expand_dims(point_cloud, -1) 将点云最后加上一个size为1 的axis
    # 作为 input_image(B×N×3×1),则input_image的channel数为1。
    # net=Tensor("transform_net1/tfc1/Relu:0", shape=(x,x,x,x), dtype=float32, device=/device:GPU:0)
    # 64 代表要输出的 channels (单通道变成64通道)
    # [1,3]代表1行3列的矩阵,作为卷积核。将B×N×3×1转换成 B×N×1×64
    # 步长:stride=[1,1] 代表滑动一个距离。决定滑动多少可以到边缘。
    # padding='VALID',在原始图像上加边界(这里默认不加)
    # bn: 批归一化
    # is_training=is_training 设置训练模式
    # bn_decay=bn_decay

    # 构建T-Net模型,MLP(64--128--1024)。
    net = tf_util.conv2d(input_image, 64, [1,3],
                         padding='VALID', stride=[1,1],
                         bn=True, is_training=is_training,
                         scope='tconv1', bn_decay=bn_decay)

    # 128 代表要输出的 channels
    # [1,1]代表1行1列的矩阵,作为卷积核。将B×N×1×64转换成 B×N×1×128
    net = tf_util.conv2d(net, 128, [1,1],
                         padding='VALID', stride=[1,1],
                         bn=True, is_training=is_training,
                         scope='tconv2', bn_decay=bn_decay)

    # 1024 代表要输出的 channels
    # [1,1]代表1行1列的矩阵,作为卷积核。将B×N×1×128转换成 B×N×1 X 1024
    net = tf_util.conv2d(net, 1024, [1,1],
                         padding='VALID', stride=[1,1],
                         bn=True, is_training=is_training,
                         scope='tconv3', bn_decay=bn_decay)

    # 对上一步做 max_pooling 操作,将B×N×1×1024 转换成 B×1×1 X 1024
    net = tf_util.max_pool2d(net, [num_point,1],
                             padding='VALID', scope='tmaxpool')

    # 利用1024维特征生成256维度的特征向量
    # 将 Bx1x1x1024变成 Bx1024
    net = tf.reshape(net, [batch_size, -1])

    # 将 Bx1024变成 Bx512
    net = tf_util.fully_connected(net, 512, bn=True, is_training=is_training,
                                  scope='tfc1', bn_decay=bn_decay)
    # 将 Bx512变成 Bx256
    net = tf_util.fully_connected(net, 256, bn=True, is_training=is_training,
                                  scope='tfc2', bn_decay=bn_decay)

#生成点云旋转矩阵T=3*3:接下来需要将MLP得到的256维度特征进行处理,以输出3*3的旋转矩阵:
    with tf.variable_scope('transform_XYZ') as sc:
        assert(K==3)

        weights = tf.get_variable('weights', [256, 3*K],           #为了q权值共享,创建变量weight形状大小为[256,9],进行常量初始化。
                                  initializer=tf.constant_initializer(0.0),
                                  dtype=tf.float32)

        biases = tf.get_variable('biases', [3*K],           #创建常量偏置,用constant[1,0,0,0,1,0,0,0,1]对biases进行相加,即9+矩阵[1,0,0,0,1,0,0,0,1]。
                                 initializer=tf.constant_initializer(0.0),
                                 dtype=tf.float32)

        biases += tf.constant([1,0,0,0,1,0,0,0,1], dtype=tf.float32)

        # net = shape(32,256) weight = shape(256,9)  ===> net*weight = transform(32,9)
        transform = tf.matmul(net, weights)

        transform = tf.nn.bias_add(transform, biases)

    #(32, 3, 3)
    transform = tf.reshape(transform, [batch_size, 3, K])
    return transform

#通过定义权重[W(256,3*K), bais(3*K)],将上面的256维特征转变为3*3的旋转矩阵输出。

# 输入是一个张量:shape=(32, 1024, 1, 64)
def feature_transform_net(inputs, is_training, bn_decay=None, K=64):
    """ Feature Transform Net, input is BxNx1xK
        Return:
            Transformation matrix of size KxK """
    batch_size = inputs.get_shape()[0].value
    num_point = inputs.get_shape()[1].value

    net = tf_util.conv2d(inputs, 64, [1,1],
                         padding='VALID', stride=[1,1],
                         bn=True, is_training=is_training,
                         scope='tconv1', bn_decay=bn_decay)
    net = tf_util.conv2d(net, 128, [1,1],
                         padding='VALID', stride=[1,1],
                         bn=True, is_training=is_training,
                         scope='tconv2', bn_decay=bn_decay)
    net = tf_util.conv2d(net, 1024, [1,1],
                         padding='VALID', stride=[1,1],
                         bn=True, is_training=is_training,
                         scope='tconv3', bn_decay=bn_decay)
    net = tf_util.max_pool2d(net, [num_point,1],
                             padding='VALID', scope='tmaxpool')

    net = tf.reshape(net, [batch_size, -1])
    net = tf_util.fully_connected(net, 512, bn=True, is_training=is_training,
                                  scope='tfc1', bn_decay=bn_decay)
    net = tf_util.fully_connected(net, 256, bn=True, is_training=is_training,
                                  scope='tfc2', bn_decay=bn_decay)

    with tf.variable_scope('transform_feat') as sc:
        weights = tf.get_variable('weights', [256, K*K],
                                  initializer=tf.constant_initializer(0.0),
                                  dtype=tf.float32)
        biases = tf.get_variable('biases', [K*K],
                                 initializer=tf.constant_initializer(0.0),
                                 dtype=tf.float32)
        biases += tf.constant(np.eye(K).flatten(), dtype=tf.float32)
        transform = tf.matmul(net, weights)
        transform = tf.nn.bias_add(transform, biases)

    transform = tf.reshape(transform, [batch_size, K, K])
    return transform
#mpl网络定义每一层的神经元数量为64--128--512--256。同样在得到256维的特征后利用weight(256*K*K), bais(K*K)来计算出K*K的特征旋转矩阵,其中K为64,为默认输出特征数量。
多层感知机(MLP)
多层感知器(MLP,Multilayer Perceptron)是一种前馈人工神经网络模型,多层感知机在单层神经网络的基础上引入了一到多个隐藏层(hidden layer)。隐藏层位于输入层和输出层之间。多层感知机中的隐藏层和输出层都是全连接层。其中每一个隐藏层的输出都会通过激活函数进行变换,ReLU(rectified linear unit)函数提供了一个很简单的非线性变换,ReLU函数只保留正数元素,并将负数元素清零。
最简单的MLP只含一个隐藏层,即三层的结构,如下图:

从上图可以看到,多层感知机层与层之间是全连接的。多层感知机最底层是输入层,中间是隐藏层,最后是输出层。隐藏层的神经元怎么得来?首先它与输入层是全连接的,假设输入层用向量X表示,则隐藏层的输出就是 f (W1X+b1),W1是权重(也叫连接系数),b1是偏置,函数f 可以是常用的sigmoid函数或者tanh函数。
1×1卷积层
1、优点
(1)降维。
Eg1.一张500*500且depth为100的图片在20个filter上做1×1的卷积,那么结果的大小为500×500×20。Eg2.GoogleNet中的3a模块输入的feature map是28×28×192,1×1卷积通道为64,3×3卷积通道为128,5×5卷积通道为32,左图卷积核参数:192 × (1×1×64) +192 × (3×3×128) + 192 × (5×5×32) = 387072,右图对3×3和5×5卷积层前分别加入了通道数为96和16的1×1卷积层,这样卷积核参数就变成了: 192 × (1×1×64) +(192×1×1×96+ 96 × 3×3×128)+(192×1×1×16+16×5×5×32)= 157184同时在并行pooling层后面加入1×1卷积层后也可以降低输出的feature map数量(feature map尺寸指W、H是共享权值的sliding window,feature map 的数量就是channels)
左图feature map数量:64 + 128 + 32 + 192(pooling后feature map不变) = 416 (如果每个模块都这样,网络的输出会越来越大)
右图feature map数量:64 + 128 + 32 + 32(pooling后面加了通道为32的1×1卷积) = 256
GoogLeNet利用1×1的卷积降维后,得到了更为紧凑的网络结构,虽然总共有22层,但是参数数量却只是8层的AlexNet的十二分之一(当然也有很大一部分原因是去掉了全连接层)

Eg3:ResNet中的残差模块
假设上一层的feature map是w×h×256,并且最后要输出的是256个feature map,左侧操作数:w×h×256×3×3×256 =589824×w×h,右侧操作数:w×h×256×1×1×64 + w×h×64×3×3×64 +w×h×64×1×1×256 = 69632×w×h,,左侧参数大概是右侧的8.5倍。(实现降维,减少参数)

(2)加入非线性特性。
1×1卷积核,可以在保持feature map尺度不变的(即不损失分辨率)的前提下大幅增加非线性特性(利用后接的非线性激活函数),把网络做的很deep。卷积层之后经过激励层,1×1的卷积在前一层的学习表示上添加了非线性激励(non-linear activation),提升网络的表达能力。
(3)升维(用最少的参数拓宽网络channal)
例子:上一个例子中,不仅在输入处有一个1×1卷积核,在输出处也有一个卷积核,3×3,64的卷积核的channel是64,只需添加一个1×1,256的卷积核,只用64*256个参数就能把网络channel从64拓宽四倍到256。
(4)跨通道信息交互(channal 的变换)
例子:使用1×1卷积核,实现降维和升维的操作其实就是channel间信息的线性组合变化,3×3,64channels的卷积核后面添加一个1×1,28channels的卷积核,就变成了3×3,28channels的卷积核,原来的64个channels就可以理解为跨通道线性组合变成了28channels,这就是通道间的信息交互。注意:只是在channel维度上做线性组合,W和H上是共享权值的sliding window
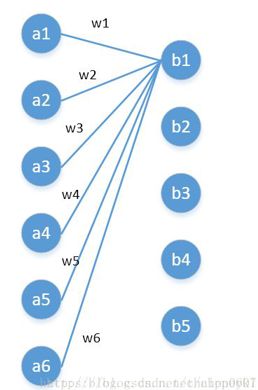
(5)从全连接层的角度来理解1*1卷积核

左边6个神经元,分别是a1—a6,通过全连接之后变成5个,分别是b1—b5
左边6个神经元相当于输入特征里面的channels:6
右边5个神经元相当于1*1卷积之后的新的特征channels:5
左边 W×H×6 经过 1×1×5 的卷积核能实现全连接变成W×H×5
2、1×1卷积层代替全连接层的好处:
(1)不改变空间结构:全连接层会破坏图像的空间结构,而1×1卷积层不会破坏图像的空间结构。
(2)输入可以是任意尺寸:全连接层的输入尺寸是固定的,因为全连接层的参数个数取决于图像大小。而卷积层的输入尺寸是任意的,因为卷积核的参数个数与图像大小无关。


