pytorch nn.LSTM及nn.LSTMCell的用法和理解
RNN和LSTM的原理及公式
传统RNN的隐藏侧状态更新: h t = f ( U h t − 1 + W x t + b ) h_t=f(Uh_{t-1}+Wx_t+b) ht=f(Uht−1+Wxt+b),其中 x t x_t xt 是 t t t 时刻的输入。
LSTM新增了内部状态 c t c_t ct, 用来进行线性的循环信息传递,并非线性地输出信息给外部状态 h t h_t ht。
输 入 门 i t = σ ( W i x t + U i h t − 1 + b i ) 遗 忘 门 f t = σ ( W f x t + U f h t − 1 + b f ) 输 出 门 o t = σ ( W o x t + U o h t − 1 + b o ) 候 选 状 态 c t ~ = t a n h ( W c x t + U c h t − 1 + b c ) 内 部 状 态 c t = f t ⊙ c t − 1 + i t ⊙ c t ~ 外 部 状 态 h t = o t ⊙ t a n h ( c t ) 输入门 i_t=\sigma(W_{i} x_{t}+U_{i}h_{t-1}+b_i) \\ 遗忘门 f_t=\sigma(W_{f} x_{t}+U_{f}h_{t-1}+b_f) \\ 输出门 o_t=\sigma(W_{o} x_{t}+U_{o}h_{t-1}+b_o) \\ 候选状态 \tilde{c_t}=tanh(W_{c} x_{t}+U_{c} h_{t-1}+b_{c}) \\ 内部状态 c_t=f_t \odot c_{t-1}+i_t \odot \tilde{c_t} \\ 外部状态 h_t=o_t \odot tanh(c_t) \\ 输入门it=σ(Wixt+Uiht−1+bi)遗忘门ft=σ(Wfxt+Ufht−1+bf)输出门ot=σ(Woxt+Uoht−1+bo)候选状态ct~=tanh(Wcxt+Ucht−1+bc)内部状态ct=ft⊙ct−1+it⊙ct~外部状态ht=ot⊙tanh(ct)
nn.LSTM
照例先贴官方文档~
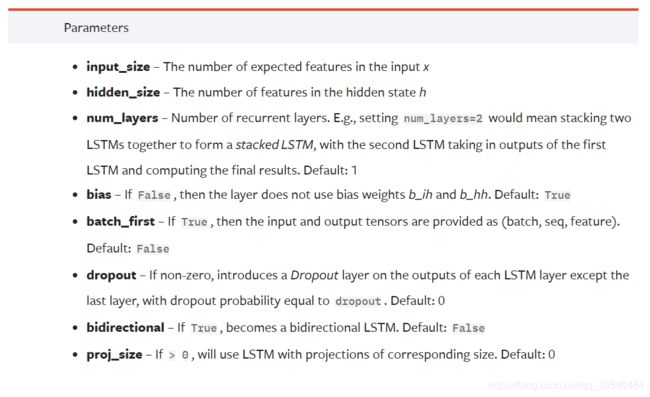
以下是实例化一个nn.LSTM单元时会用到的参数,例如lstm = nn.LSTM(10, 20, 2)就实例化了一个input_size=10, hidden_size=20,num_layer=2的LSTM网络,也就是输入的维度为10,隐层的神经元数目为20,总共有2个隐层。
实例化好的LSTM如何使用呢?以下是输入,h0和c0都是可选的(不指定则默认为0),重点是input,是一个表示输入序列特征的tensor,维度是(seq_len, batch, input_size),比如接上例,x = torch.randn(5, 3, 10),每个句子5个词,每个词用10维向量表示(正好对应LSTM单元里的input_size),一次把3个句子作为一个batch一起输入。

至于h0和c0,分别是hidden和cell的初始状态,维度是(num_layers * num_directions, batch, hidden_size),比如h0 = torch.randn(2, 3, 20), c0 = torch.randn(2, 3, 20),这是因为实例化好的LSTM单元有2层,非双向,每批3个句子,每个句子到隐层的时候转化为20维向量。
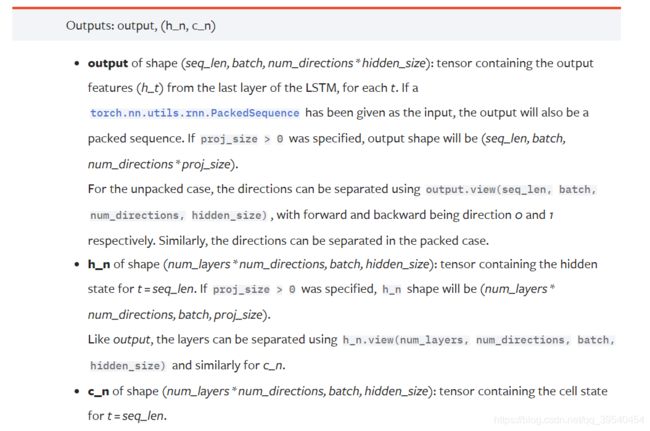
然后,使用output, (hn, cn) = lstm(x, (h0, c0))得到输出。
输出的size是(seq_len, batch, num_directions × hidden_size) (正好和输入的size(seq_len, batch, input_size)对应,相当于把输入做了一个从input_size到num_directionshidden_size维度的变换!)*
这时候查看output.size(), 是torch.Size([5, 3, 20]),正好对应。
完整的例子见这里:
>>> rnn = nn.LSTM(10, 20, 2)
>>> input = torch.randn(5, 3, 10)
>>> h0 = torch.randn(2, 3, 20)
>>> c0 = torch.randn(2, 3, 20)
>>> output, (hn, cn) = rnn(input, (h0, c0))
以上是默认batch_first = False的情况。如果明确规定了batch_first = True, 那么input和output的size是(batch_size, seq_len,对应的featue_size)
对batch_first的设计,有人是这样解释原因的(待研究):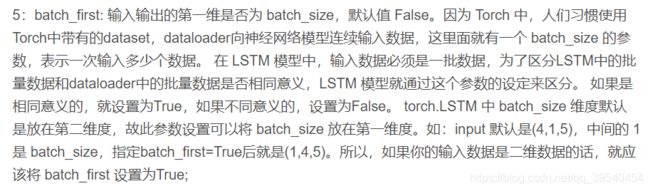
nn.LSTMCell
和nn.LSTM直接得到编码完整个序列后的h和output不同,nn.LSTMCell完成的是序列中单个单词的计算。官方文档的链接。
参数:input_size, hidden_size, bias=True or False.例如,rnn = nn.LSTMCell(10, 20)是创建一个input_size=10, hidden_size=20的LSTM单元。
输入和输出:
例如,input=torch.randn(6, 3, 10)表示输入是time_steps=6(可以形象化为输入的句子每句6个单词,seq_len=6), 词向量长度为10(embed_dim=10),batch_size=3(3句话并行,每次读3句话的下一个单词)。
初始的h和c为:hx=torch.randn(3, 20), cx=torch.randn(3, 20),存储着h和c值for each element in the batch(也就是每输入这3句话的下一个单词,就会存一个hx和cx)
rnn = nn.LSTMCell(10, 20) # embed_size=10, hidden_size=20
input = torch.randn(6, 3, 10) # seq_len=6, batch_size=3, embed_size=10
hx = torch.randn(3, 20) # batch_size=3, hidden_size=20
cx = torch.randn(3, 20)
output = []
for i in range(input.size()[0]): # 逐个单词进行计算
	hx, cx = rnn(input[i], (hx, cx)) # input[i]是序列中的第i个单词
	output.append(hx) # 记录中间层的h
output = torch.stack(output, dim=0) # 沿着dim=0进行concat,matrix的列表变3d tensor

差不多弄懂了,爽~