Scala开发环境搭建
Scala开发环境搭建
- 1. 实验室名称:
- 2. 实验项目名称:
- 3. 实验学时:
- 4. 实验原理:
- 5. 实验目的:
- 6. 实验内容:
- 7. 实验器材(设备、虚拟机名称):
- 8. 实验步骤:
-
- 8.1 验证Scala安装与环境变量配置
- 8.2 使用Shell进行交互式编程
- 8.3 安装集成开发环境 Scala IDE
- 9. 实验结果及分析:
- 10. 实验结论:
- 11. 总结及心得体会:
原创申明: 未经许可,禁止以任何形式转载,若要引用,请标注链接地址
全文共计5192字,阅读大概需要3分钟
欢迎关注我的个人公众号:不懂开发的程序猿
1. 实验室名称:
大数据实验教学系统
2. 实验项目名称:
Scala开发环境搭建
3. 实验学时:
4. 实验原理:
Scala语言是开发Spark应用程序的主要编程语言,它可以运行在Window、Linux、Unix、 Mac OS X等系统上。
Scala是一种JVM语言,使用 Scala 之前必须先安装 JDK。
编写Scala程序有两种方式:
1)使用shell进行交互式编程;
2)使用集成开发环境(IDE)开发应用程序。
5. 实验目的:
掌握Scala安装和环境变量配置。
掌握通过Shell方法交互式编程。
掌握通过Scala IDE文件式程序开发。
6. 实验内容:
1、安装并配置Scala环境
2、通过Shell方法交互式编程
3、学习通过Scala IDE文件式程序开发
7. 实验器材(设备、虚拟机名称):
硬件:x86_64 ubuntu 16.04服务器
软件:JDK 1.8,Scala-2.11.x
8. 实验步骤:
8.1 验证Scala安装与环境变量配置
1、验证Scala安装。
在本实验环境中,scala安装包位于:/data/software/scala-2.11.11.tgz
在本实验中,我们指定scala的安装路径位于:/opt/
在终端窗口下,执行以下命令(注:$提示符后面的命令),查看Scala的安装路径:
1.	$ ls -l /opt/scala-2.11.11
2.	$ ls -l /opt/scala-2.11.11/bin
可以看到,Scala已经被安装到了/opt/目录下。在Scala的bin目录下,是Scala的编辑器和执行程序。
2、查看Scala环境变量配置。
使用编辑器打开/etc/profile文件:
1. $ vim /etc/profile
在打开的文件中找到如下内容。
1.	export SCALA_HOME=/opt/scala
2.	export PATH=$PATH:$SCALA_HOME/bin
3.	  这是对Scala的环境变量配置。
4.	  接下来执行以下命令,使环境变量生效。
5.	$ source /etc/profile
3、验证Scala安装是否正确。
新打开一个终端窗口,执行以下命令:
1. $ scala -version
查看输出内容。如果正确输出了Scala的版本号,如下所示,则说明Scala安装成功。
Scala code runner version 2.11.11 -- Copyright 2002-2017, LAMP/EPFL
8.2 使用Shell进行交互式编程
1、Scala提供了一个Shell工具,以支持交互式编程。
在终端窗口下,执行以下命令,启动Shell。
1.	$ scala
2.	  执行此命令,出现scala>提示符,进入shell命令行。
3.	  在shell中查看帮助。
  在”scala>”命令提示符下,输入如下命令:
4.	scala> :help
可以看以,在shell中会输出所有命令的帮助信息,如下所示:
1.	All commands can be abbreviated, e.g., :he instead of :help.
2.	:edit <id>|<line> edit history
3.	:help [command] print this summary or command-specific help
4.	:history [num] show the history (optional num is commands to show)
5.	:h? <string> search the history
6.	:imports [name name ...] show import history, identifying sources of names
7.	:implicits [-v] show the implicits in scope
8.	:javap <path|class> disassemble a file or class name
9.	:line <id>|<line> place line(s) at the end of history
10.	:load <path> interpret lines in a file
11.	:paste [-raw] [path] enter paste mode or paste a file
12.	:power enable power user mode
13.	:quit exit the interpreter
14.	:replay [options] reset the repl and replay all previous commands
15.	:require <path> add a jar to the classpath
16.	:reset [options] reset the repl to its initial state, forgetting all session entries
17.	:save <path> save replayable session to a file
18.	:sh <command line> run a shell command (result is implicitly => List[String])
19.	:settings <options> update compiler options, if possible; see reset
20.	:silent disable/enable automatic printing of results
21.	:type [-v] <expr> display the type of an expression without evaluating it
22.	:kind [-v] <expr> display the kind of expression's type
23.	:warnings show the suppressed warnings from the most recent line
3、在shell中执行代码。
在scala命令提示符下,执行一些简单的scala代码。例如,输入如下代码,并按回车键执行:
1. scala> 1 + 1
上面代码的执行结果如下:
1. res0: Int = 2
执行结果说明:在我们输入每个Scala语句后,它的执行结果会输出一行信息,由三部分组成。其中:
• res0 代表 result0 变量:一个由 Scala 解释器自动生成的变量名或者由你指定的变量名用来指向计算出来的结果。
• 变量类型:Int
• 计算结果:本例为 1+1 的结果 2
继续在scala命令提示符下输入以下语句,并按回车键执行:
scala> println("Hello World!")
输出结果如下:
Hello World!
大家可以尝试执行以下其他类似命令。
4、paste模式
默认情况下,每行scala语句都单独执行。如果我们想一次执行多行代码,则可以进入paste(粘贴)模式。在这种模式下,我们可以将代码片段粘贴进去,然后同时执行这些代码。
在scala命令提示符下,执行以下命令,进入粘贴模式:
scala> :paste
然后输入或粘贴以下代码。
1.	if (true)
2.	    print("that was true")
3.	else
4.	    print("that was false")
输入或粘贴结束后,按下回车键换行,然后同时按下”Ctrl + D”,则执行这些代码。输出结果如下所示:
1. that was true
退出命令行模式:
1. scala> :q
8.3 安装集成开发环境 Scala IDE
如果想要开发Scala应用程序,则可以使用集成开发环境Scala IDE。请按下面的步骤先安装该IDE。
1、安装 Scala IDE。
在本实验环境中,Scala IDE的安装包位于以下路径:/data/software/scala-SDK-4.7.0-vfinal-2.12-linux.gtk.x86_64.tar.gz
在本实验环境中,我们将把Scala IDE安装到以下位置:/data/bigdata/
打开一个终端窗口,输入以下命令,将scala ide包解压到/data/bigdata/路径下:
1. $ tar -zxvf /data/software/scala-SDK-4.7.0-vfinal-2.12-linux.gtk.x86_64.tar.gz -C /data/bigdata/
2、启动 Scala IDE。
在终端窗口中,执行如下命令,以启动Scala IDE:
1. $ /data/bigdata/eclipse/eclipse
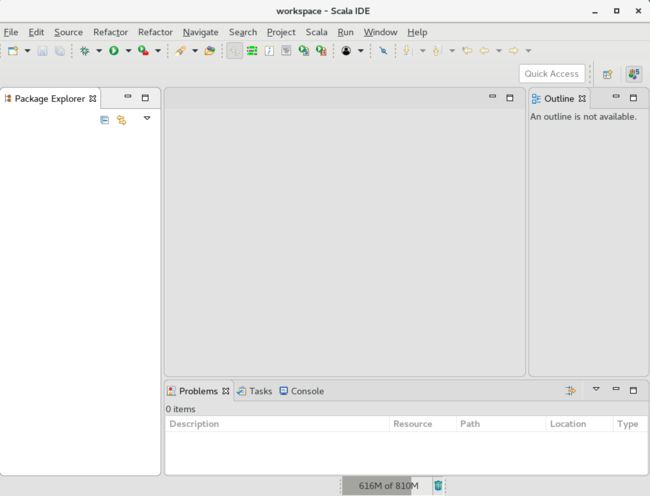
打开IDE,界面如下图所示:
图1 eclipse界面
5.4 Scala应用程序开发
请按以下步骤在Scala IDE中开发Scala应用程序。
1、创建Scala Project。
选择菜单”【File】|【New】|【Scala Project】”,创建项目ScalaDemo。如下图所示:
图2 创建项目
2、配置Scala Project。
在左侧的项目中,找到”Scala Library container”,在其上单击右键,在弹出的环境菜单中,选择【properties】菜单项,修改Scala版本。如下图所示:
图3 选择Scala编译版本
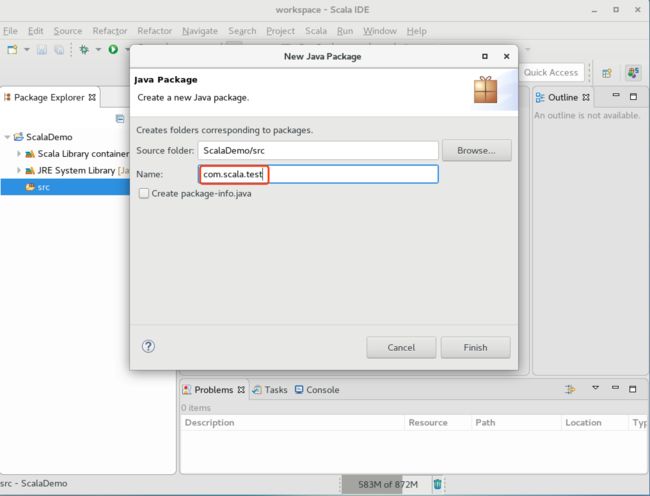
在左侧项目的”src”上单击右键,在弹出的环境菜单中,选择”【new】|【Package】”菜单项,新创建一个包”com.scala.test”。如下图所示:
图4 创建包
在”com.scala.test”上单击右键,在弹出的环境菜单中,选择”【new】|【Scala Object】”,新建一个Scala Object。如下图所示:
图5 创建Scala Object
3、编辑源代码。
打开源文件com.scala.text.HelloWord.scala,编辑内容。如下图所示:
图6 编辑Scala代码
按下”Ctrl + S”键保存代码。
4、执行程序。
在源文件的任何空白处,单击右键。在弹出的环境菜单中,选择”【Run As】|【Scala Application】”,运行该scala应用程序。如下图所示:
图7 运行
注意观察编辑器下方的”Console”窗口,可以看到程序执行的输出结果。如下图所示:
图8 输出Hello World
9. 实验结果及分析:
本次Scala开发环境搭建很顺利,基本达到本次实验目的
10. 实验结论:
实验进展顺利
11. 总结及心得体会:
经过本节实验的学习,通过安装scala环境,熟悉了Linux系统的操作以及安装步骤,通过使用scala Shell方法交互式编程,学习到了shel行下的语法操作以及反馈,通过IDE的方式来编辑scala语法,我们能很明显的感觉到工具的作用,我们可以更加快捷的编辑scala方法,增加开发效率。


