Python+OpenCV:Meanshift and Camshift
Python+OpenCV:Meanshift and Camshift
Meanshift
Consider you have a set of points. (It can be a pixel distribution like histogram backprojection).
You are given a small window (may be a circle) and you have to move that window to the area of maximum pixel density (or maximum number of points).
It is illustrated in the simple image given below:

The initial window is shown in blue circle with the name "C1". Its original center is marked in blue rectangle, named "C1_o".
But if you find the centroid of the points inside that window, you will get the point "C1_r" (marked in small blue circle) which is the real centroid of the window.
Surely they don't match. So move your window such that the circle of the new window matches with the previous centroid. Again find the new centroid.
Most probably, it won't match. So move it again, and continue the iterations such that the center of window and its centroid falls on the same location (or within a small desired error).
So finally what you obtain is a window with maximum pixel distribution. It is marked with a green circle, named "C2". As you can see in the image, it has maximum number of points.
The whole process is demonstrated on a static image below:
So we normally pass the histogram backprojected image and initial target location.
When the object moves, obviously the movement is reflected in the histogram backprojected image.
As a result, the meanshift algorithm moves our window to the new location with maximum density.
Meanshift in OpenCV
####################################################################################################
# 视频目标跟踪Meanshift法(Meanshift)
def lmc_cv_meanshift():
    """
        函数功能: 视频目标跟踪Meanshift法(Meanshift)。
    """

    # 读取视频
    parser = argparse.ArgumentParser(description='This sample demonstrates the meanshift algorithm.')
    parser.add_argument('--input', type=str, help='Path to a video or a sequence of image.',
                        default='D:/99-Research/Python/Image/slow_traffic_small.mp4')
    args = parser.parse_args()
    cap = lmc_cv.VideoCapture(lmc_cv.samples.findFileOrKeep(args.input))
    # take first frame of the video
    ret, frame = cap.read()
    # setup initial location of window
    x, y, w, h = 300, 200, 100, 50  # simply hardcoded the values
    track_window = (x, y, w, h)
    # set up the ROI for tracking
    roi = frame[y:y + h, x:x + w]
    hsv_roi = lmc_cv.cvtColor(roi, lmc_cv.COLOR_BGR2HSV)
    mask = lmc_cv.inRange(hsv_roi, np.array((0., 60., 32.)), np.array((180., 255., 255.)))
    roi_hist = lmc_cv.calcHist([hsv_roi], [0], mask, [180], [0, 180])
    lmc_cv.normalize(roi_hist, roi_hist, 0, 255, lmc_cv.NORM_MINMAX)
    # Setup the termination criteria, either 10 iteration or move by atleast 1 pt
    term_crit = (lmc_cv.TERM_CRITERIA_EPS | lmc_cv.TERM_CRITERIA_COUNT, 10, 1)
    while True:
        ret, frame = cap.read()
        if ret:
            hsv = lmc_cv.cvtColor(frame, lmc_cv.COLOR_BGR2HSV)
            dst = lmc_cv.calcBackProject([hsv], [0], roi_hist, [0, 180], 1)
            # apply meanshift to get the new location
            ret, track_window = lmc_cv.meanShift(dst, track_window, term_crit)
            # Draw it on image
            x, y, w, h = track_window
            result_image = lmc_cv.rectangle(frame, (x, y), (x + w, y + h), 255, 2)
            lmc_cv.imshow('Meanshift', result_image)
            keyboard = lmc_cv.waitKey(30) & 0xff
            if keyboard == 'q' or keyboard == 27:
                break
        else:
            break
    return

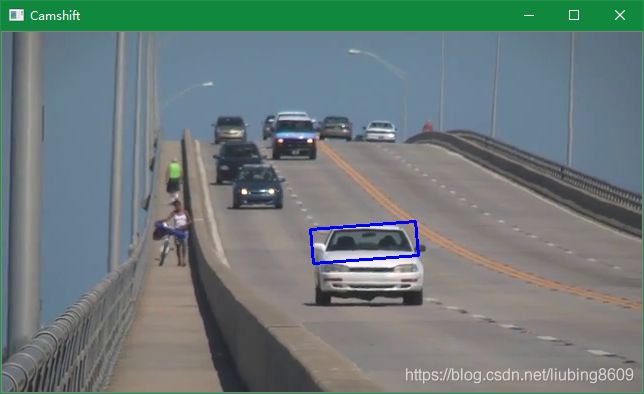
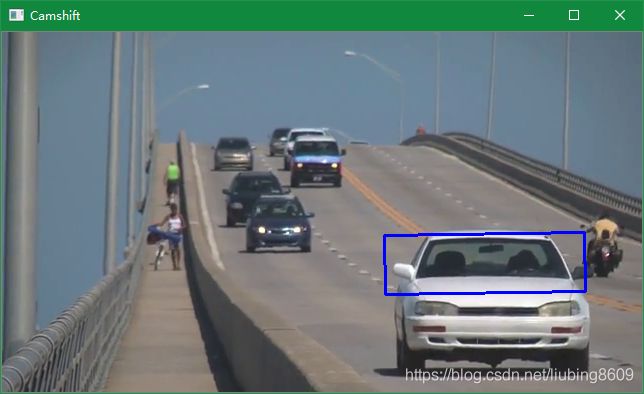
Camshift
Did you closely watch the last result? There is a problem. Our window always has the same size whether the car is very far or very close to the camera. That is not good.
We need to adapt the window size with size and rotation of the target.
Once again, the solution came from "OpenCV Labs" and it is called CAMshift (Continuously Adaptive Meanshift) published by Gary Bradsky in his paper "Computer Vision Face Tracking for Use in a Perceptual User Interface" in 1998.
(Gary R Bradski. Computer vision face tracking for use in a perceptual user interface. 1998.) .
It applies meanshift first. Once meanshift converges, it updates the size of the window as, ![]() .
.
It also calculates the orientation of the best fitting ellipse to it. Again it applies the meanshift with new scaled search window and previous window location.
The process continues until the required accuracy is met.

Camshift in OpenCV
####################################################################################################
# 视频目标跟踪Camshift法(Camshift)
def lmc_cv_camshift():
    """
        函数功能: 视频目标跟踪Camshift法(Camshift)。
    """

    # 读取视频
    parser = argparse.ArgumentParser(description='This sample demonstrates the camshift algorithm.')
    parser.add_argument('--input', type=str, help='Path to a video or a sequence of image.',
                        default='D:/99-Research/Python/Image/slow_traffic_small.mp4')
    args = parser.parse_args()
    cap = lmc_cv.VideoCapture(lmc_cv.samples.findFileOrKeep(args.input))
    # take first frame of the video
    ret, frame = cap.read()
    # setup initial location of window
    x, y, w, h = 300, 200, 100, 50  # simply hardcoded the values
    track_window = (x, y, w, h)
    # set up the ROI for tracking
    roi = frame[y:y + h, x:x + w]
    hsv_roi = lmc_cv.cvtColor(roi, lmc_cv.COLOR_BGR2HSV)
    mask = lmc_cv.inRange(hsv_roi, np.array((0., 60., 32.)), np.array((180., 255., 255.)))
    roi_hist = lmc_cv.calcHist([hsv_roi], [0], mask, [180], [0, 180])
    lmc_cv.normalize(roi_hist, roi_hist, 0, 255, lmc_cv.NORM_MINMAX)
    # Setup the termination criteria, either 10 iteration or move by atleast 1 pt
    term_crit = (lmc_cv.TERM_CRITERIA_EPS | lmc_cv.TERM_CRITERIA_COUNT, 10, 1)
    while True:
        ret, frame = cap.read()
        if ret:
            hsv = lmc_cv.cvtColor(frame, lmc_cv.COLOR_BGR2HSV)
            dst = lmc_cv.calcBackProject([hsv], [0], roi_hist, [0, 180], 1)
            # apply camshift to get the new location
            ret, track_window = lmc_cv.CamShift(dst, track_window, term_crit)
            # Draw it on image
            pts = lmc_cv.boxPoints(ret)
            pts = np.int0(pts)
            result_image = lmc_cv.polylines(frame, [pts], True, 255, 2)
            lmc_cv.imshow('Camshift', result_image)
            keyboard = lmc_cv.waitKey(30) & 0xff
            if keyboard == 'q' or keyboard == 27:
                break
        else:
            break
    return