clickhouse集群搭建
一、clickhouse单机部署
clickhouse镜像下载地址
https://mirrors.tuna.tsinghua.edu.cn/clickhouse/
1、关闭防火墙
 #查看防火墙状态
 systemctl status firewalld
 #关闭防火墙
 systemctl stop firewalld
 #设置防火墙服务开机不自启
 systemctl disable firewalld
 #再次查看防火墙检查防火墙是否关闭
 systemctl status firewalld
2、取消文件数限制
vim /etc/security/limits.conf * soft nofile 65536 * hard nofile 65536 * soft nproc 131072 * hard nproc 131072 vim /etc/security/limits.d/20-nproc.conf * soft nofile 65536 * hard nofile 65536 * soft nproc 131072 * hard nproc 131072
3、安装依赖
 yum install -y libtool
 yum install -y *unixODBC*
4、取消selinux
 vim /etc/selinux/config
 SELINUX=disabled
5、创建clickhouse文件夹及安装
将clickhouse依赖包上传到该目录下,然后一键安装
rpm -ivh *.rpm #clickhouse安装包 clickhouse-client-20.4.5.36-2.noarch.rpm clickhouse-common-static-20.4.5.36-2.x86_64.rpm clickhouse-common-static-dbg-20.4.5.36-2.x86_64.rpm 10:34 clickhouse-server-20.4.5.36-2.noarch.rpm
6、修改clickhouse-server的配置文件
vim /etc/clickhouse-server/config.xml #让本机的clickhouse可以被其他服务器访问 打开:: #数据文件路径/var/lib/clickhouse/ #日志文件路径/var/log/clickhouse-server/clickhouse-server.log
7、关闭开机自启
systemctl disable clickhouse-server
8、启动clickhouse
systemctl start clickhouse-server
9、连接clickhouse
clickhouse-client -m
10、重启clickhouse
 service clickhouse-server restart
 #日志
 [root@hdp4 clickhouse-server]# service clickhouse-server restart
 Stop clickhouse-server service: DONE
 Start clickhouse-server service: Path to data directory in /etc/clickhouse-server/config.xml: /var/lib/clickhouse/
 DONE
二、clickhouse集群及副本安装——2分片1副本
前面的配置和单机一样,下面的配置每个节点均执行
1、clickhouse-server的配置文件
110和111是同一分片的两副本,110和112是同一集群的两分片
vim /etc/clickhouse-server/config.d/metrika-shard.xml
true 192.168.8.110 9000 192.168.8.111 9000 true 192.168.8.112 9000 192.168.8.110 2181 192.168.8.111 2181 192.168.8.112 2181 01 rep_1_1
2、宏修改——macros
macros是宏的意思,各节点说明及宏修改。marros用于标识当前节点的在集群中的角色。
mpp-1(192.168.8.110)——分片1
         01
         rep_1_1
mpp-2(192.168.8.111)——分片1的副本
     01
     rep_1_1
mpp-3(192.168.8.112)——分片2
     01
     rep_2_1
3、将metrika-shard.xml添加到config.xml中
/etc/clickhouse-server/config.d/metrika-shard.xml
4、使用clickhouse-client
clickhouse-client -m
5、使用分布式表测试集群
#副本表
create table student on cluster luopc_mpp_cluster (
id UInt8,
name String,
age UInt8,
create_time Datetime
) engine =ReplicatedMergeTree('/clickhouse/tables/{shard}/student','{replica}')
primary key (id)
order by (id,age);
#分布式表
create table student_all on cluster luopc_mpp_cluster(
id UInt8,
name String,
age UInt8,
create_time Datetime
)engine=Distributed(luopc_mpp_cluster,default,student,rand());
6、插入数据测试
 insert into student_all values
 (1,'a',17,'2021-05-08 12:00:00'),
 (2,'b',25,'2021-05-08 12:00:00'),
 (3,'c',20,'2021-05-08 12:00:00'),
 (4,'d',22,'2021-05-08 12:00:00'),
 (5,'e',30,'2021-05-08 12:00:00');
7、本地表、分布式表查询情况
本地表数据分布情况(原始数据如上)
| 节点名称 | 表类型 | 数据分布 |
|---|---|---|
| mpp-1 | 本地表 | ┌─id─┬─name─┬─age─┬─────────create_time─┐ │ 4 │ d │ 22 │ 2021-05-08 12:00:00 │ └────┴──────┴─────┴─────────────────────┘ |
| mpp-2 | 本地表 | 无 |
| mpp-3 | 本地表 | ┌─id─┬─name─┬─age─┬─────────create_time─┐ │ 1 │ a │ 17 │ 2021-05-08 12:00:00 │ │ 2 │ b │ 25 │ 2021-05-08 12:00:00 │ │ 3 │ c │ 20 │ 2021-05-08 12:00:00 │ │ 5 │ e │ 30 │ 2021-05-08 12:00:00 │ └────┴──────┴─────┴─────────────────────┘ |
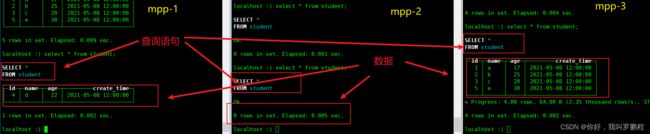
分布式表数据分布情况:集群中任意节点和分片的分布式表查询结果一致

说明 1、建表时使用on cluster表示是表模型同步到各个节点中。 2、使用engine=ReplicatedMergeTree,数据将分散到各个分片,相同的分片的副本数据相同。 3、使用engine=Distributed,则可以在任意分片和副本中查看数据结果相同。 4、使用engine=Distributed的表是分布式表,分布式表类似于视图,不存数据,分布式表引擎会将我们的查询请求路由本地表进行查询, 然后进行汇总最终返回给用户。
三、遇到的问题
1、clickhouse连接不上——clickhouse未启动
clickhouse-client -m
日志
 [root@localhost ~]# clickhouse-client -m
 ClickHouse client version 20.4.5.36 (official build).
 Connecting to localhost:9000 as user default.
 Code: 210. DB::NetException: Connection refused (localhost:9000)
2、clickhouse启动失败——zookeeper未启动
systemctl start clickhouse-server
日志
[root@localhost ~]# systemctl status clickhouse-server ● clickhouse-server.service - ClickHouse Server (analytic DBMS for big data) Loaded: loaded (/etc/systemd/system/clickhouse-server.service; enabled; vendor preset: disabled) Active: activating (auto-restart) (Result: exit-code) since 五 2021-05-14 18:18:53 CST; 1s ago Process: 1838 ExecStart=/usr/bin/clickhouse-server --config=/etc/clickhouse-server/config.xml --pid-file=/run/clickhouse-server/clickhouse-server.pid (code=exited, status=70) Main PID: 1838 (code=exited, status=70) 5月 14 18:18:53 localhost.localdomain systemd[1]: clickhouse-server.service: main process exited, code=exited, status=70/n/a 5月 14 18:18:53 localhost.localdomain systemd[1]: Unit clickhouse-server.service entered failed state. 5月 14 18:18:53 localhost.localdomain systemd[1]: clickhouse-server.service failed.
3、clickhouse启动后又关闭——端口占用
systemctl start clickhouse-server ps -aux | grep clickhouse-server #启动后立刻查看进程可以看到进程信息,大约2~3后再次查看进程消失 #查看日志后发现端口占用 #本次问题是组件smartsense,端口是9000 #本次解决办法是卸载smartsense,因为它没有被用到 #另外一种做法修改clickhouse的端口号