ONNX转TensorRT加速模型推理
前言
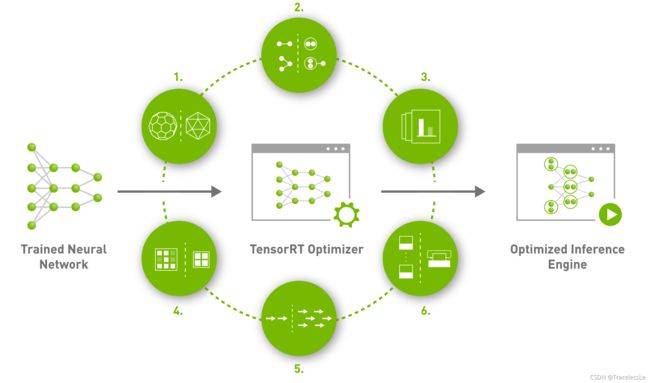
TensorRT是NVIDIA推出的一款高效深度学习模型推理框架,其包括了深度学习推理优化器和运行时,能够让深度学习推理应用拥有低时延和高吞吐的优点。

本质上来讲,就是通过采用对模型中的部分算子进行融合、对特定尺寸的算子选用更好的实现方法,以及使用混合精度等方式,最终加速整个网络的推理速度。

在使用PyTorch训练得到网络模型后,我们希望在模型部署时通过TensorRT加速模型推理,那么可以先将PyTorch模型转为ONNX,然后再讲ONNX转为TensorRT的engine。
实现步骤
PyTorch模型转为ONNX
具体过程可参考 PyTorch模型转ONNX格式_TracelessLe的专栏-CSDN博客
ONNX转TensorRT的engine
方法一:trtexec
直接使用trtexec命令行将ONNX模型转为TensorRT的engine:
trtexec --onnx=net_bs8_v1_simple.onnx --tacticSources=-cublasLt,+cublas --workspace=2048 --fp16 --saveEngine=net_bs8_v1.engine --verbose
注:(参考:TensorRT-trtexec-README)
①--onnx 指定ONNX文件路径
②--tacticSources指定使用的方法库
③--workspace指定工作空间大小,单位是MB
④--fp16 开启FP16模式
⑤--saveEngine指定生成的engine的保存路径
⑥--verbose打开verbose模式,更多打印信息。
正常情况下,经过漫长的等待时间,能够正常生成engine文件。如遇到问题,需根据具体问题具体分析。
方法二:基于Python API的engine生成
TensorRT提供了C++、Python等API,可以基于该API进行生成engine的过程。
__author__ = 'TracelessLe'

import os
import tensorrt as trt

ONNX_SIM_MODEL_PATH = 'net_bs8_v1_simple.onnx'
TENSORRT_ENGINE_PATH_PY = 'net_bs8_v1_fp16_py.engine'

def build_engine(onnx_file_path, engine_file_path, flop=16):
    trt_logger = trt.Logger(trt.Logger.VERBOSE)  # trt.Logger.ERROR
    builder = trt.Builder(trt_logger)
    network = builder.create_network(
        1 << (int)(trt.NetworkDefinitionCreationFlag.EXPLICIT_BATCH)
    )

    parser = trt.OnnxParser(network, trt_logger)
    # parse ONNX
    with open(onnx_file_path, 'rb') as model:
        if not parser.parse(model.read()):
            print('ERROR: Failed to parse the ONNX file.')
            for error in range(parser.num_errors):
                print(parser.get_error(error))
            return None
    print("Completed parsing ONNX file")
    builder.max_workspace_size = 2 << 30
    # default = 1 for fixed batch size
    builder.max_batch_size = 1
    # set mixed flop computation for the best performance
    if builder.platform_has_fast_fp16 and flop == 16:
        builder.fp16_mode = True

    if os.path.isfile(engine_file_path):
        try:
            os.remove(engine_file_path)
        except Exception:
            print("Cannot remove existing file: ",
                engine_file_path)

    print("Creating Tensorrt Engine")

    config = builder.create_builder_config()
    config.set_tactic_sources(1 << int(trt.TacticSource.CUBLAS))
    config.max_workspace_size = 2 << 30
    config.set_flag(trt.BuilderFlag.FP16)

    engine = builder.build_engine(network, config)
    with open(engine_file_path, "wb") as f:
        f.write(engine.serialize())
    print("Serialized Engine Saved at: ", engine_file_path)
    return engine

if __name__ == "__main__":
    build_engine(ONNX_SIM_MODEL_PATH, TENSORRT_ENGINE_PATH_PY)
该方法正常情况下能生成和trtexec执行后一样的engine文件,拥有同等文件大小和推理速度。
结果比对
将engine推理得到的结果与ONNX得到结果进行比对:
__author__ = 'TracelessLe'

import os
import time
import onnxruntime
import pycuda.driver as cuda
import tensorrt as trt
import numpy as np

ONNX_SIM_MODEL_PATH = 'net_bs8_v1_simple.onnx'
TENSORRT_ENGINE_PATH_PY = 'net_bs8_v1_fp16_py.engine'

def get_numpy_data():
    batch_size = 8
    img_input = np.ones((batch_size, 3, 128, 128), dtype=np.float32)
    return img_input

def test_onnx(inputs, loop=100):
    inputs = inputs.astype(np.float32)
    print(onnxruntime.get_device())
    sess = onnxruntime.InferenceSession(ONNX_SIM_MODEL_PATH)
    batch_size = 8
    time1 = time.time()
    for i in range(loop):
        time_bs1 = time.time()
        out_ort_img = sess.run(None, {sess.get_inputs()[0].name: inputs,})
        time_bs2 = time.time()
        time_use_onnx_bs = time_bs2 - time_bs1
        print(f'ONNX use time {time_use_onnx_bs} for bs8')
    time2 = time.time()
    time_use_onnx = time2-time1
    print(f'ONNX use time {time_use_onnx} for loop {loop}, FPS={loop*batch_size//time_use_onnx}')
    return out_ort_img

class HostDeviceMem(object):
    def __init__(self, host_mem, device_mem):
        self.host = host_mem
        self.device = device_mem

    def __str__(self):
        return "Host:\n" + str(self.host) + "\nDevice:\n" + str(self.device)

    def __repr__(self):
        return self.__str__()


def _load_engine(engine_file_path):
    trt_logger = trt.Logger(trt.Logger.ERROR)
    with open(engine_file_path, 'rb') as f:
        with trt.Runtime(trt_logger) as runtime:
            engine = runtime.deserialize_cuda_engine(f.read())
            print('_load_engine ok.')
    return engine


def _allocate_buffer(engine):
    binding_names = []
    for idx in range(100):
        bn = engine.get_binding_name(idx)
        if bn:
            binding_names.append(bn)
        else:
            break

    inputs = []
    outputs = []
    bindings = [None] * len(binding_names)
    stream = cuda.Stream()

    for binding in binding_names:
        binding_idx = engine[binding]
        if binding_idx == -1:
            print("Error Binding Names!")
            continue

        size = trt.volume(engine.get_binding_shape(binding)) * engine.max_batch_size
        dtype = trt.nptype(engine.get_binding_dtype(binding))
        host_mem = cuda.pagelocked_empty(size, dtype)
        device_mem = cuda.mem_alloc(host_mem.nbytes)
        bindings[binding_idx] = int(device_mem)

        if engine.binding_is_input(binding):
            inputs.append(HostDeviceMem(host_mem, device_mem))
        else:
            outputs.append(HostDeviceMem(host_mem, device_mem))
    return inputs, outputs, bindings, stream

def _test_engine(engine_file_path, data_input, num_times=100):
    # Code from blog.csdn.net/TracelessLe
    engine = _load_engine(engine_file_path)
    # print(engine)
    input_bufs, output_bufs, bindings, stream = _allocate_buffer(engine)
    batch_size = 8
    context = engine.create_execution_context()
    ###heat###
    input_bufs[0].host = data_input
    cuda.memcpy_htod_async(
        input_bufs[0].device,
        input_bufs[0].host,
        stream
    )
    context.execute_async_v2(
        bindings=bindings,
        stream_handle=stream.handle
    )
    cuda.memcpy_dtoh_async(
        output_bufs[0].host,
        output_bufs[0].device,
        stream
    )
    stream.synchronize()
    trt_outputs = [output_bufs[0].host.copy()]
    ##########
    start = time.time()
    for _ in range(num_times):
        time_bs1 = time.time()
        input_bufs[0].host = data_input
        cuda.memcpy_htod_async(
            input_bufs[0].device,
            input_bufs[0].host,
            stream
        )
        context.execute_async_v2(
            bindings=bindings,
            stream_handle=stream.handle
        )
        cuda.memcpy_dtoh_async(
            output_bufs[0].host,
            output_bufs[0].device,
            stream
        )
        stream.synchronize()
        trt_outputs = [output_bufs[0].host.copy()]
        time_bs2 = time.time()
        time_use_bs = time_bs2 - time_bs1
        print(f'TRT use time {time_use_bs} for bs8')

    end = time.time()
    time_use_trt = end - start
    print(f"TRT use time {(time_use_trt)}for loop {num_times}, FPS={num_times*batch_size//time_use_trt}")
    return trt_outputs

def test_engine(data_input, loop=100):
    engine_file_path = TENSORRT_ENGINE_PATH_PY
    cuda.init()
    cuda_ctx = cuda.Device(0).make_context()
    trt_outputs = None
    try:
        trt_outputs = _test_engine(engine_file_path, data_input, loop)
    finally:
        cuda_ctx.pop()
    return trt_outputs

if __name__ == "__main__":
    img_input = get_numpy_data()

    trt_outputs = test_engine(img_input, 100)
    trt_outputs = trt_outputs[0].reshape((8,3,128,128))
    trt_image_numpy = (np.transpose(trt_outputs[0], (1, 2, 0)) + 1) / 2.0 * 255.0
    trt_image_numpy = np.clip(trt_image_numpy, 0, 255)

    out_ort_img = test_onnx(img_input, loop=1)[0]
    onnx_image_numpy = (np.transpose(out_ort_img[0], (1, 2, 0)) + 1) / 2.0 * 255.0
    onnx_image_numpy = np.clip(onnx_image_numpy, 0, 255)

    mse = np.square(np.subtract(onnx_image_numpy, trt_image_numpy)).mean()
    print('mse between onnx and trt result: ', mse)
其他说明
(1)PyTorch转TensorRT的engine
方法除了常规的PyTorch—>ONNX—>TensorRT外,还有一些其他方法。例如NVIDIA-AI-IOT推出的torch2trt以及NVIDIA推出的TRTorch,也可以尝试一下。
(2)ONNX算子支持
TensorRT并非对ONNX的所有算子都支持,具体支持列表可以查看相关文档。
(3)engine debug
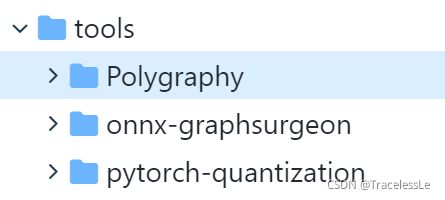
TensorRT提供了一套可用于engine生成过程中debug的工具,包括Polygraphy、ONNX GraphSurgeon和PyTorch-Quantization。这些小工具用处很大,值得花时间进一步研究。

版权说明
本文为原创文章,独家发布在blog.csdn.net/TracelessLe。未经个人允许不得转载。如需帮助请email至[email protected]。
![]()
参考资料
[1] NVIDIA TensorRT | NVIDIA Developer
[2] TensorRT-trtexec-README
[3] PyTorch模型转ONNX格式_TracelessLe的专栏-CSDN博客
[4] 如何使用TensorRT对训练好的PyTorch模型进行加速? - 云+社区 - 腾讯云
[5] How to Convert a Model from PyTorch to TensorRT and Speed Up Inference | LearnOpenCV #
[6] 如何使用TensorRT对训练好的PyTorch模型进行加速? - 知乎
[7] TensorRT教程3:使用trtexec工具转engine
[8] onnx-tensorrt/operators.md at master · onnx/onnx-tensorrt
[9] mmediting/onnx2tensorrt.py at master · open-mmlab/mmediting
[10] TensorRT详细入门指北,如果你还不了解TensorRT,过来看看吧! - SegmentFault 思否
[11] 分享一些值的深入学习的关于AI部署的NVIDIA新技术 - 知乎