CenterFusion/src/tools/convert_nuScenes.py 文件代码详解
目录
- 一、import 引用
- 二、全局变量及函数定义
- 三、main 函数
- 五、参考资料
文件路径:CenterFusion/src/tools/convert_nuScenes.py
文件作用:将 nuScenes 数据转化为 COCO 格式
注意:阅读本篇文章时,可以参照 nuScenes 数据集格式
一、import 引用
- 打开文件后,会看到开头引用了很多包,这个可以不用管
# Copyright (c) Xingyi Zhou. All Rights Reserved
'''
nuScenes pre-processing script.
This file convert the nuScenes annotation into COCO format.
'''
import os
import json
import numpy as np
import cv2
import copy
import matplotlib.pyplot as plt
from nuscenes.nuscenes import NuScenes
from nuscenes.utils.geometry_utils import BoxVisibility, transform_matrix
from nuScenes_lib.utils_kitti import KittiDB
from nuscenes.eval.detection.utils import category_to_detection_name
from pyquaternion import Quaternion

import _init_paths
from utils.ddd_utils import compute_box_3d, project_to_image, alpha2rot_y
from utils.ddd_utils import draw_box_3d, unproject_2d_to_3d
from utils.pointcloud import RadarPointCloudWithVelocity as RadarPointCloud
from nuScenes_lib.utils_radar import map_pointcloud_to_image
import time
二、全局变量及函数定义
DATA_PATH = '../../data/nuscenes/'
'''
这个路径,也就是 nuscenes 数据集的路径
它其实就是在 CenterFusion-master/data/nuscenes 这个路径下。
'''

OUT_PATH = DATA_PATH + 'annotations'
'''
这个路径,也就是最后 COCO 格式的文件输出的路径
得到的值为 '../../data/nuscenes/annotations'
'''

SPLITS = {
          'mini_val': 'v1.0-mini',
          'mini_train': 'v1.0-mini',
          'train': 'v1.0-trainval',
          'val': 'v1.0-trainval',
          'test': 'v1.0-test',
          }
'''
划分数据集
从 v1.0-mini 划分出训练集 mini_train 和测试集 min_val
从 v1.0-trainval 划分出训练集 train 和测试集 val
从 test 划分出验证集 test(换个名称而已)
'''

DEBUG = False
'''
额,赋个 False 值
'''

CATS = ['car', 'truck', 'bus', 'trailer', 'construction_vehicle',
        'pedestrian', 'motorcycle', 'bicycle', 'traffic_cone', 'barrier']
'''
定义一些目标物体类别,有车、树、公交车等等
'''

SENSOR_ID = {'RADAR_FRONT': 7, 'RADAR_FRONT_LEFT': 9,
  'RADAR_FRONT_RIGHT': 10, 'RADAR_BACK_LEFT': 11,
  'RADAR_BACK_RIGHT': 12,  'LIDAR_TOP': 8,
  'CAM_FRONT': 1, 'CAM_FRONT_RIGHT': 2,
  'CAM_BACK_RIGHT': 3, 'CAM_BACK': 4, 'CAM_BACK_LEFT': 5,
  'CAM_FRONT_LEFT': 6}
'''
自定义 12 种传感器的 id
'''

USED_SENSOR = ['CAM_FRONT', 'CAM_FRONT_RIGHT',
  'CAM_BACK_RIGHT', 'CAM_BACK', 'CAM_BACK_LEFT',
  'CAM_FRONT_LEFT']
'''
定义 CenterFusion 项目需要使用的相机传感器
'''

RADARS_FOR_CAMERA = {
  'CAM_FRONT_LEFT':  ["RADAR_FRONT_LEFT", "RADAR_FRONT"],
  'CAM_FRONT_RIGHT': ["RADAR_FRONT_RIGHT", "RADAR_FRONT"],
  'CAM_FRONT':       ["RADAR_FRONT_RIGHT", "RADAR_FRONT_LEFT", "RADAR_FRONT"],
  'CAM_BACK_LEFT':   ["RADAR_BACK_LEFT", "RADAR_FRONT_LEFT"],
  'CAM_BACK_RIGHT':  ["RADAR_BACK_RIGHT", "RADAR_FRONT_RIGHT"],
  'CAM_BACK':        ["RADAR_BACK_RIGHT","RADAR_BACK_LEFT"]}
'''
关联相机与毫米波雷达,什么意思呢?看下图
'''
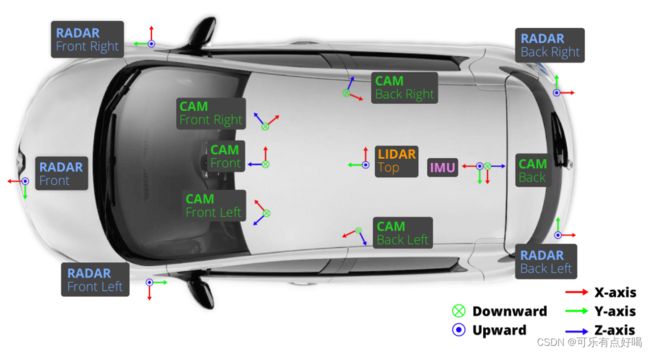
- 前左相机的数据,是对应前雷达、前左雷达的数据
前右相机的数据,是对应前雷达、前右雷达的数据
······
就不一 一列举了,肯定懂了吧,继续
NUM_SWEEPS = 3
suffix1 = '_{}sweeps'.format(NUM_SWEEPS) if NUM_SWEEPS > 1 else ''
OUT_PATH = OUT_PATH + suffix1 + '/'
'''
其实就是改变 OUT_PATH 的值,在前面赋值的基础上,多加了个尾巴
现在值为 '../../data/nuscenes/annotations_3sweeps'
'''

CAT_IDS = {v: i + 1 for i, v in enumerate(CATS)}
'''
循环自定义目标物体类别的 id
结果就是 CAT_IDS = {'car':1, 'truck':2, 'bus':3, ...}
enumerate() 函数就是枚举
'''

def _rot_y2alpha(rot_y, x, cx, fx):
    """
    Get rotation_y by alpha + theta - 180
    alpha : 目标观测角度,范围 [-pi..pi]
    x : 物体中心 x 到相机中心 (x- w /2),单位为像素
    rotation_y : 在摄像机坐标中绕 y 轴旋转 ry [-pi..pi]
    """
    alpha = rot_y - np.arctan2(x - cx, fx)
    '''
    np.arctan2(x,y):根据坐标点x,y得出角度,范围[-pi..pi]
    '''
    if alpha > np.pi:
      alpha -= 2 * np.pi
    if alpha < -np.pi:
      alpha += 2 * np.pi
    return alpha
    '''
    这个函数根据 box 的数据,计算得出 box 的观测角度
    '''
- 这个_rot_y2alpha()函数不太理解的话,可以点击参考资料中的第6个链接,解释十分清楚
def _bbox_inside(box1, box2):
  return box1[0] > box2[0] and box1[0] + box1[2] < box2[0] + box2[2] and \
         box1[1] > box2[1] and box1[1] + box1[3] < box2[1] + box2[3]

ATTRIBUTE_TO_ID = {
  '': 0, 'cycle.with_rider' : 1, 'cycle.without_rider' : 2,
  'pedestrian.moving': 3, 'pedestrian.standing': 4,
  'pedestrian.sitting_lying_down': 5,
  'vehicle.moving': 6, 'vehicle.parked': 7,
  'vehicle.stopped': 8}
'''
自定义目标物体状态 id
'''

SCENE_SPLITS = {
'train':
    ['scene-0001', 'scene-0002', 'scene-0004', 'scene-0005', 'scene-0006', 'scene-0007', 'scene-0008', 'scene-0009',
     'scene-0010', 'scene-0011', 'scene-0019', 'scene-0020', 'scene-0021', 'scene-0022', 'scene-0023', 'scene-0024',
     'scene-0025', 'scene-0026', 'scene-0027', 'scene-0028', 'scene-0029', 'scene-0030', 'scene-0031', 'scene-0032',
'''
还有文件中后面的一大坨的部分,定义了每个数据集中划分了哪些场景
'''
三、main 函数
- 整个程序的 main 函数就是重点部分(该有的缩进还是有的)
def main():
  if not os.path.exists(OUT_PATH):
    os.mkdir(OUT_PATH)
  '''
  如果没有路径 OUT_PATH ,则创建
  '''

  for split in SPLITS:
  '''
  第一个 for 循环,代码从91-313行(这个数字的前提下是你的代码没有添加注释改变行数)
  共需要循环 5 次,因为划分了 5 个数据集
  即 mini_train、mini_val、train、val、test
  '''

    data_path = DATA_PATH
    nusc = NuScenes(
      version=SPLITS[split], dataroot=data_path, verbose=True)
    '''
    为划分的 split 数据集创建 NuScenes 对象
    NuScenes 类来自于 CenterFusion-master/src/tools/nuscenes-devkit/python-sdk/nuscenes/nuscenes.py
    其中 verbose=True ,表示加载时打印状态消息
    '''

    out_path = OUT_PATH + '{}.json'.format(split)
    '''
    输出为 .json 文件
    也就是:
    mini_trian.json
    mini_val.json
    ......
    '''

    categories_info = [{'name': CATS[i], 'id': i + 1} for i in range(len(CATS))]
    '''
    这是 coco 格式其中一个字段,记录目标物体的种类及 id ,最后的结果如下:
    categories_info = [
      {'name':'car','id':1},
      {'name':'truck','id':2},
      {'name':'bus','id':3},
      ......
    ]
    '''

    ret = {'images': [], 'annotations': [], 'categories': categories_info,
           'videos': [], 'attributes': ATTRIBUTE_TO_ID, 'pointclouds': []}
    '''
    创建coco格式数据,从这里可以看出 coco 格式如下:
    {
      "images": [],
      "annotations": [],
      "categories": [categories_info],		#记录所有目标物体的类别
      "videos": [],							#记录所有的场景
      "attributes": [ATTRIBUTE_TO_ID],
      "pointclouds": []
    }
    到现在为止,已经赋值了 categories 的值和 attributes 的值
    '''

    num_images = 0
    num_anns = 0
    num_videos = 0
    '''
    第一个:所有相机拍摄的全部图片数量计数
    第二个:一张图片中有效的 box 个数
    第三个:可以理解为场景的数量计数
    '''

    for sample in nusc.sample:
    '''
    内嵌的第二层 for 循环,代码从 105-294 行,前面一层是划分成 5 个数据集
    了解过 nuscenes 数据集格式的应该知道吧,这里再来梳理下关系
    sample 其实就是时间戳,一个 scene 中有多个 sample
    这里的意思就是遍历 nuscenes 中所有的时间戳 sample
    '''

      scene_name = nusc.get('scene', sample['scene_token'])['name']
      '''
      根据 sample 的属性 scene_token 获取当前时间戳所属的 scene 的名称,比如 scene-0001
      get() 函数在 CenterFusion/src/tools/nuscenes-devkit/python-sdk/nuscenes/nuscenes.py 208 行
      '''

      if not (split in ['test']) and \
        not (scene_name in SCENE_SPLITS[split]):
        continue
      '''
      如果当前划分的数据集,也就是变量 split 的值不是 'test' 且获取到的场景名 scene_name 不在全局变量 SCENE_SPLITS[split] 中
      则直接跳过后面代码,开始下一次的循环
      '''

      if sample['prev'] == '':
      '''
      首先看判断条件 sample 字段中 prev 是它其中一个属性
      sample 的 prev 属性指向同一个场景它前面一个时间戳
      sample 的 next 属性指向同一个场景它后面一个时间戳
      如果 prev 为空,那么说明当前这个时间戳是它所属 scene 中的第一个时间戳
      '''

        print('scene_name', scene_name)
        num_videos += 1
        '''
        每检测到一个场景中的首个时间戳,它就 +1,所以可以理解为场景的数量
        '''

        ret['videos'].append({'id': num_videos, 'file_name': scene_name})
        '''
        往 coco 格式中的 videos 字段循环添加字典,每有一个场景,就有一个字典,这里把场景数量当成了场景 id
        最后第二层 for 循环结束后 videos 中的数据如下:
        videos = [
          {'id':1,'file_name':'scene-0001'},
	      {'id':2,'file_name':'scene-0002'},
	      ......]
        '''

        frame_ids = {k: 0 for k in sample['data']}
        '''
        sample 的 data 属性中每个传感器的值为 sample_data 的 token 外键,也就是指向一个传感器数据 sample_data
        这里将它初始化,它的结果为:
        frame_ids = {
          'RADAR_FRONT':0,
          'RADAR_FRONT_LEFT':0,
          'CAM_FRONT_RIGHT':0,
          'CAM_BACK_LEFT':0,
          ......
        }
        用来记录一个 scene 中每个相机传感器拍摄的图片数量,初始化为 0
        '''

        track_ids = {}
        '''
        用来记录一个 scene 中持续追踪的 box
        记住,frame_ids 和 track_ids 是当前时间戳为首位时初始化的变量
        当前时间戳不是首位时,没有初始化这个两个变量
        '''

      for sensor_name in sample['data']:
      '''
      内嵌的第三层 for 循环,代码从 117-294 行,前面一层是遍历所有的时间戳
      这里是遍历当前时间戳中的所有传感器(相机、激光雷达、毫米波雷达)
      '''

        if sensor_name in USED_SENSOR:
        '''
        如果当前传感器是相机传感器,则执行
        '''

          image_token = sample['data'][sensor_name]
          '''
          获取 sample_data 的 token 外键,前面也说过
          '''

          image_data = nusc.get('sample_data', image_token)
          '''
          根据 sample_data 的 token 外键获取当前时间戳下的当前传感器所对应的数据,即 sample_data
          '''

          num_images += 1
          '''
          所有相机拍摄的全部图片数量 +1
          '''
- 到现在为止,就是获取到了一个时间戳下的其中一个相机传感器采集的数据,也就是字段 sample_data ,结构如下:
sample_data {
   "token":                   // -- Unique record identifier.
   "sample_token":            // -- 外键,指向该sample_data关联的sample.
   "ego_pose_token":          // -- Foreign key.
   "calibrated_sensor_token": // -- Foreign key.
   "filename":                // -- 文件存放的相对路径.
   "fileformat":              // -- data文件的格式.
   "width":                   // -- 如果sample data是图片,则表示宽度(像素).
   "height":                  // -- 如果sample data是图片,则表示高度(像素).
   "timestamp":               // -- Unix 时间戳.
   "is_key_frame":            // -- 标识是否为keyframes的部分
   "next":                    // -- 外键,时间上,相同传感器下该sample data的下一个sample data. Empty if end of scene.
   "prev":                    // -- 外键,时间上,相同传感器下该sample data的前一个sample data. Empty if start of scene.
}
- 接下来就是将 sample_data 当中的数据进行处理,比较复杂慢慢理解。
          sd_record = nusc.get('sample_data', image_token)
          '''
          根据 sample_data 的 token 外键获取当前的 sample_data 字段
          和 image_data 的内容一样
          '''

          cs_record = nusc.get(
            'calibrated_sensor', sd_record['calibrated_sensor_token'])
          '''
          根据当前 sample_data 中的 calibrated_sensor_token 外键
          获取当前数据所对应时刻的传感器姿态数据 calibrated_sensor ,由于官网没有说清楚这个字段的意义,这里多啰嗦一下
          calibrated_sensor {
            'token':             // -- Unique record identifier.
            'sensor_token':      // -- Foreign key pointing to the sensor type.
            'translation':       // [3] -- 坐标系原点以米为单位:x, y, z
            'rotation':          // [4] -- 坐标系定位为四元数:w, x, y, z
            'camera_intrinsic':  // [3, 3] -- 内在的相机校正,空出来的传感器不是摄像头
          }
          属性 translation 表示在汽车车身坐标系中传感器位置;
          属性 rotation 是一个四元素,表示在汽车车身坐标系中传感器的姿态数据(姿态数据:刚体在空间中的姿态)
          '''
- 这部分涉及到四元素和旋转矩阵的概念,可以参考资料:https://zhuanlan.zhihu.com/p/79894982
          pose_record = nusc.get('ego_pose', sd_record['ego_pose_token'])
          '''
          根据当前 sample_data 中的 ego_pose_token 外键
          获取当前数据所对应时刻的车辆姿态数据 ego_pose
          ego_pose {
            'token':             // -- Unique record identifier.
            'translation':       // [3] -- 坐标系原点以米为单位:x, y, z(注意 z 总是 0)
            'rotation':          // [4] -- 坐标系定位为四元数:w, x, y, z
            'timestamp':         // -- Unix时间戳
          }
          属性 translation 表示在全局坐标系中车辆位置;
          属性 rotation 是一个四元素,表示在全局坐标系中车辆的姿态数据
          不要跟上面的混淆,两个坐标系不同
          '''

          global_from_car = transform_matrix(pose_record['translation'],
            Quaternion(pose_record['rotation']), inverse=False)
          '''
          根据车辆姿态数据(全局坐标系中)计算并返回一个变换矩阵,inverse=False 表示不计算逆旋转矩阵(这里矩阵的名称没写错,往下看就知道了)
          这里传递参数为 ego_pose 中的 translation 值和 rotation 值
          transform_matrix() 函数在 CenterFusion/src/tools/nuscenes-devkit/python-sdk/nuscenes/utils/geometry_utils.py 87 行
          '''
- transform_matrix() 函数原型如下:
def transform_matrix(translation: np.ndarray = np.array([0, 0, 0]),
                     rotation: Quaternion = Quaternion([1, 0, 0, 0]),
                     inverse: bool = False) -> np.ndarray:
    tm = np.eye(4)
    '''
    np.eye(4) 是生成一个 4×4 的对角矩阵,结果如下:
    [[1. 0. 0. 0.]
     [0. 1. 0. 0.]
     [0. 0. 1. 0.]
     [0. 0. 0. 1.]]
    '''
    #逆旋转矩阵计算
    if inverse:
        rot_inv = rotation.rotation_matrix.T
        trans = np.transpose(-np.array(translation))
        tm[:3, :3] = rot_inv
        tm[:3, 3] = rot_inv.dot(trans)
    #四元素转旋转矩阵
    else:
        tm[:3, :3] = rotation.rotation_matrix
        '''
        rotation.rotation_matrix 表示将四元素 rotation 转换为旋转矩阵
        并将旋转矩阵赋值给对角矩阵 tm 的前三行前三列
        '''
        tm[:3, 3] = np.transpose(np.array(translation))
        '''
        将矩阵 tm 的前三行第四列赋值为 translation
        '''
    return tm
    '''
    最后返回一个 4×4 的变换矩阵
    '''
- 这里科普一点小知识
旋转矩阵:
- 四元素、旋转矩阵都是用来描述刚体的姿态信息,只不过表达形式不同,它们之间可以通过数学公式进行换算,而这里就需要把四元素转换成旋转矩阵,因为后面需要使用旋转矩阵进行相应的计算
- 数学公式:已知四元素: ( w , x , y , z ) (w,x,y,z) (w,x,y,z)
则旋转矩阵为:
[ w 2 + x 2 − y 2 − z 2 2 ( x y − w z ) 2 ( x z + w y ) 2 ( x y + w z ) w 2 − x 2 + y 2 − z 2 2 ( y z − w x ) 2 ( x z − w y ) 2 ( y z + w x ) w 2 − x 2 − y 2 + z 2 ] (1) \left[ \begin{array}{ccc} w^2+x^2-y^2-z^2&2(xy-wz)&2(xz+wy)\\ 2(xy+wz)&w^2-x^2+y^2-z^2&2(yz-wx)\\ 2(xz-wy)&2(yz+wx)&w^2-x^2-y^2+z^2 \end{array} \tag{1} \right] ⎣⎡w2+x2−y2−z22(xy+wz)2(xz−wy)2(xy−wz)w2−x2+y2−z22(yz+wx)2(xz+wy)2(yz−wx)w2−x2−y2+z2⎦⎤(1) - 旋转矩阵有什么作用呢?例如,已知空间中一个点 P 0 ( x 0 , y 0 , z 0 ) P_0(x_0,y_0,z_0) P0(x0,y0,z0),通过绕 X X X 轴、 Y Y Y 轴、 Z Z Z 轴分别旋转不同角度后,得到点 P 1 ( x 1 , y 1 , z 1 ) P_1(x_1,y_1,z_1) P1(x1,y1,z1),那么 P 1 P_1 P1 是多少呢?
[ x 1 y 1 z 1 1 ] = [ w 2 + x 2 − y 2 − z 2 2 ( x y − w z ) 2 ( x z + w y ) 0 2 ( x y + w z ) w 2 − x 2 + y 2 − z 2 2 ( y z − w x ) 0 2 ( x z − w y ) 2 ( y z + w x ) w 2 − x 2 − y 2 + z 2 0 0 0 0 1 ] [ x 0 y 0 z 0 1 ] \left[ \begin{array}{c} x_1 \\ y_1 \\ z_1 \\ 1 \end{array} \right] = \left[ \begin{array}{cccc} w^2+x^2-y^2-z^2&2(xy-wz)&2(xz+wy)&0\\ 2(xy+wz)&w^2-x^2+y^2-z^2&2(yz-wx)&0\\ 2(xz-wy)&2(yz+wx)&w^2-x^2-y^2+z^2&0\\ 0&0&0&1 \end{array} \right] \left[ \begin{array}{c} x_0 \\ y_0 \\ z_0 \\ 1 \end{array} \right] ⎣⎢⎢⎡x1y1z11⎦⎥⎥⎤=⎣⎢⎢⎡w2+x2−y2−z22(xy+wz)2(xz−wy)02(xy−wz)w2−x2+y2−z22(yz+wx)02(xz+wy)2(yz−wx)w2−x2−y2+z200001⎦⎥⎥⎤⎣⎢⎢⎡x0y0z01⎦⎥⎥⎤ - 很显然, P 0 P_0 P0 左乘一个旋转矩阵,就可以得到旋转后的坐标 P 1 P_1 P1 了
- 关于旋转矩阵更深入的了解,参考博客:旋转矩阵及左右乘的意义,看这一篇就够了
平移矩阵:
- 已知空间中一个点 P 0 ( x 0 , y 0 , z 0 ) P_0(x_0,y_0,z_0) P0(x0,y0,z0),然后将 x 0 , y 0 , z 0 x_0,y_0,z_0 x0,y0,z0 分别沿着 X X X 轴、 Y Y Y 轴、 Z Z Z 轴平移 t x , t y , t z t_x,t_y,t_z tx,ty,tz 的距离,得到点 P 1 ( x 1 , y 1 , z 1 ) P_1(x_1,y_1,z_1) P1(x1,y1,z1),那么平移矩阵是怎样的呢?
[ x 1 y 1 z 1 1 ] = [ x 0 + t x y 0 + t y z 0 + t z 1 ] = [ 1 0 0 t x 0 1 0 t y 0 0 1 t z 0 0 0 1 ] [ x 0 y 0 z 0 1 ] \left[ \begin{array}{c} x_1 \\ y_1 \\ z_1 \\ 1 \end{array} \right] = \left[ \begin{array}{c} x_0+t_x\\ y_0+t_y \\ z_0+t_z \\ 1 \end{array} \right] = \left[ \begin{array}{cccc} 1&0&0&t_x\\ 0&1&0&t_y\\ 0&0&1&t_z\\ 0&0&0&1 \end{array} \right] \left[ \begin{array}{c} x_0 \\ y_0 \\ z_0 \\ 1 \end{array} \right] ⎣⎢⎢⎡x1y1z11⎦⎥⎥⎤=⎣⎢⎢⎡x0+txy0+tyz0+tz1⎦⎥⎥⎤=⎣⎢⎢⎡100001000010txtytz1⎦⎥⎥⎤⎣⎢⎢⎡x0y0z01⎦⎥⎥⎤
复合矩阵
- 例如,已知空间中一个点 P 0 ( x 0 , y 0 , z 0 ) P_0(x_0,y_0,z_0) P0(x0,y0,z0),通过绕 X X X 轴、 Y Y Y 轴、 Z Z Z 轴分别旋转不同角度后,得到点 P 1 P_1 P1,再将点 P 1 P_1 P1 分别沿着 X X X 轴、 Y Y Y 轴、 Z Z Z 轴平移 t x , t y , t z t_x,t_y,t_z tx,ty,tz 的距离,得到点 P 2 ( x 2 , y 2 , z 2 ) P_2(x_2,y_2,z_2) P2(x2,y2,z2),应该很容易想到过程吧!
[ x 2 y 2 z 2 1 ] = [ 1 0 0 t x 0 1 0 t y 0 0 1 t z 0 0 0 1 ] [ w 2 + x 2 − y 2 − z 2 2 ( x y − w z ) 2 ( x z + w y ) 0 2 ( x y + w z ) w 2 − x 2 + y 2 − z 2 2 ( y z − w x ) 0 2 ( x z − w y ) 2 ( y z + w x ) w 2 − x 2 − y 2 + z 2 0 0 0 0 1 ] [ x 0 y 0 z 0 1 ] \left[ \begin{array}{c} x_2 \\ y_2 \\ z_2 \\ 1 \end{array} \right] = \left[ \begin{array}{cccc} 1&0&0&t_x\\ 0&1&0&t_y\\ 0&0&1&t_z\\ 0&0&0&1 \end{array} \right] \left[ \begin{array}{cccc} w^2+x^2-y^2-z^2&2(xy-wz)&2(xz+wy)&0\\ 2(xy+wz)&w^2-x^2+y^2-z^2&2(yz-wx)&0\\ 2(xz-wy)&2(yz+wx)&w^2-x^2-y^2+z^2&0\\ 0&0&0&1 \end{array} \right] \left[ \begin{array}{c} x_0 \\ y_0 \\ z_0 \\ 1 \end{array} \right] ⎣⎢⎢⎡x2y2z21⎦⎥⎥⎤=⎣⎢⎢⎡100001000010txtytz1⎦⎥⎥⎤⎣⎢⎢⎡w2+x2−y2−z22(xy+wz)2(xz−wy)02(xy−wz)w2−x2+y2−z22(yz+wx)02(xz+wy)2(yz−wx)w2−x2−y2+z200001⎦⎥⎥⎤⎣⎢⎢⎡x0y0z01⎦⎥⎥⎤ - 没错,就是 P 0 P_0 P0 先左乘一个旋转矩阵,然后再左乘一个平移矩阵,最后就得到了 P 2 P_2 P2
- 中间这个两个变换矩阵相乘后,就得到如下的复合变换矩阵:
[ w 2 + x 2 − y 2 − z 2 2 ( x y − w z ) 2 ( x z + w y ) t x 2 ( x y + w z ) w 2 − x 2 + y 2 − z 2 2 ( y z − w x ) t y 2 ( x z − w y ) 2 ( y z + w x ) w 2 − x 2 − y 2 + z 2 t z 0 0 0 1 ] \left[ \begin{array}{cccc} w^2+x^2-y^2-z^2&2(xy-wz)&2(xz+wy)&t_x\\ 2(xy+wz)&w^2-x^2+y^2-z^2&2(yz-wx)&t_y\\ 2(xz-wy)&2(yz+wx)&w^2-x^2-y^2+z^2&t_z\\ 0&0&0&1 \end{array} \right] ⎣⎢⎢⎡w2+x2−y2−z22(xy+wz)2(xz−wy)02(xy−wz)w2−x2+y2−z22(yz+wx)02(xz+wy)2(yz−wx)w2−x2−y2+z20txtytz1⎦⎥⎥⎤ - 这个复合变换矩阵,就表示先旋转,再平移
回到 transform_matrix() 函数中:
- 上面代码中的 rotation.rotaion_matrix 就是将四元素转化为旋转矩阵的一个函数,然后再赋值给对角矩阵的前三行、前三列,如下面所示:
[ w 2 + x 2 − y 2 − z 2 2 ( x y − w z ) 2 ( x z + w y ) 0 2 ( x y + w z ) w 2 − x 2 + y 2 − z 2 2 ( y z − w x ) 0 2 ( x z − w y ) 2 ( y z + w x ) w 2 − x 2 − y 2 + z 2 0 0 0 0 1 ] (2) \left[ \begin{array}{cccc} w^2+x^2-y^2-z^2&2(xy-wz)&2(xz+wy)&0\\ 2(xy+wz)&w^2-x^2+y^2-z^2&2(yz-wx)&0\\ 2(xz-wy)&2(yz+wx)&w^2-x^2-y^2+z^2&0\\ 0&0&0&1 \end{array} \tag{2} \right] ⎣⎢⎢⎡w2+x2−y2−z22(xy+wz)2(xz−wy)02(xy−wz)w2−x2+y2−z22(yz+wx)02(xz+wy)2(yz−wx)w2−x2−y2+z200001⎦⎥⎥⎤(2) - 上面代码中 np.array(translation) 是将 translation 的三个参数 x , y , z x,y,z x,y,z 转化为一个数组,代码中 np.transpose() 是将该数组变成转置矩阵,再赋值给 tm 的前三行、第四列,最后 tm 的值为(为避免混淆,将 translation 的三个参数大写):
[ w 2 + x 2 − y 2 − z 2 2 ( x y − w z ) 2 ( x z + w y ) X 2 ( x y + w z ) w 2 − x 2 + y 2 − z 2 2 ( y z − w x ) Y 2 ( x z − w y ) 2 ( y z + w x ) w 2 − x 2 − y 2 + z 2 Z 0 0 0 1 ] (3) \left[ \begin{array}{cccc} w^2+x^2-y^2-z^2&2(xy-wz)&2(xz+wy)&X\\ 2(xy+wz)&w^2-x^2+y^2-z^2&2(yz-wx)&Y\\ 2(xz-wy)&2(yz+wx)&w^2-x^2-y^2+z^2&Z\\ 0&0&0&1 \end{array} \tag{3} \right] ⎣⎢⎢⎡w2+x2−y2−z22(xy+wz)2(xz−wy)02(xy−wz)w2−x2+y2−z22(yz+wx)02(xz+wy)2(yz−wx)w2−x2−y2+z20XYZ1⎦⎥⎥⎤(3) - 有没有很眼熟,就是上面提到的复合变换矩阵,表示先旋转、再平移
回到 convert_nuScenes.py 文件中:
- 下面回到 convert_nuScenes.py 中,继续接下来的代码解读
          car_from_sensor = transform_matrix(
            cs_record['translation'], Quaternion(cs_record['rotation']),
            inverse=False)
          '''
          这里就是将传感器的姿态数据(车身坐标系中),转化为变化矩阵,格式如上,公式也如上
          '''

          trans_matrix = np.dot(global_from_car, car_from_sensor)
          '''
          np.dot()是将两个变换矩阵进行相乘
          其中的参数一个是车辆相对于全局坐标系的变换矩阵、一个是传感器相对于车身坐标系的变换矩阵
          乘积的结果含义:传感器相对于全局坐标系的变换矩阵
          '''
到这里为止,是不是对这些旋转矩阵有点懵逼,下面我来解释一下:
-
首先看幅图,其中 A 坐标系为全局坐标系、B 坐标系为车身坐标系,C 坐标系为传感器坐标系
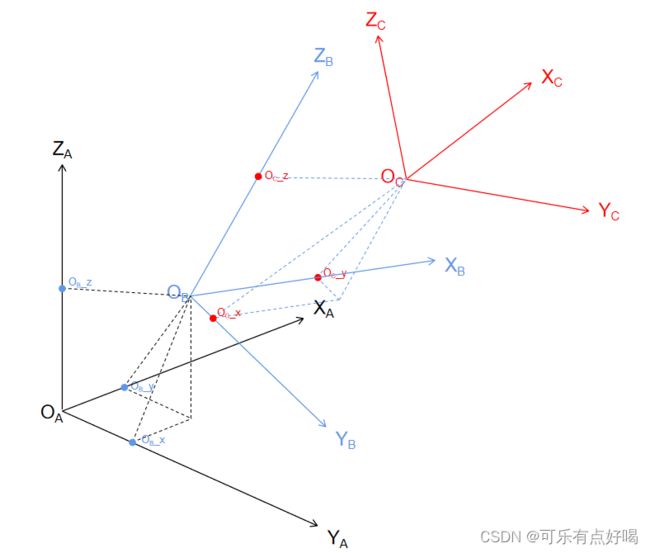
-
从最开始,获取到的 cs_record,也就是传感器姿态数据
其中 translation 的值就是传感器坐标系 C 的原点 O C O_C OC(也就是传感器的中心点)在车身坐标系 B 中坐标( O C O_C OC _ x , O C x,O_C x,OC _ y , O C y,O_C y,OC _ z z z)
其中 rotation 的值就是传感器坐标系 C (也就是传感器本身)在车身坐标系 B 中的姿态数据 -
获取到的 pose_record,也就是车身姿态数据
其中 translation 的值就是车身坐标系 B 的原点 O B O_B OB(也就是车辆的中心点)在全局坐标系 A 中坐标( O B O_B OB _ x , O B x,O_B x,OB _ y , O B y,O_B y,OB _ z z z)
其中 rotation 的值就是车身坐标系 C (也就是车子本身)在全局坐标系 A 中的姿态数据 -
在代码中,由 global_from_car × car_from_sensor 得到一个新的复合变换矩阵,要注意矩阵的乘积顺序,car_from_sensor 左乘 global_from_car 就可以得到传感器坐标系(传感器本身)在全局坐标系中的姿态数据,也就是一个 4×4 的复合变换矩阵,矩阵的前三行前三列表示传感器坐标系在全局坐标系中的旋转矩阵,矩阵的前三行第四列表示传感器坐标系原点 O C O_C OC 在全局坐标系中的位置
-
最后得到的这个矩阵有什么用呢?nuScenes 数据集中的 Box 是基于全局坐标系的,如果想让 Box 框显示在图片上,那么就需要对 Box 进行坐标变换,转换到相机坐标系中,才能在图像上框出来,所以就需要 Box 姿态数据左乘这里的变换矩阵
          vel_global_from_car = transform_matrix(np.array([0,0,0]),
            Quaternion(pose_record['rotation']), inverse=False)
          '''
          需要注意的是,第一个参数是数组([0,0,0]),第二个参数是车辆在全局坐标系中的姿态
          带入到 transform_matrix 中可以发现,vel_global_form_car 的值为上面公式(2)
          这样的一个 4×4 矩阵表示只旋转,不平移
          '''

          vel_car_from_sensor = transform_matrix(np.array([0,0,0]),
            Quaternion(cs_record['rotation']), inverse=False)
          '''
          这里第二个参数是相对于车身坐标系中传感器的姿态
          '''

          velocity_trans_matrix = np.dot(vel_global_from_car, vel_car_from_sensor)
          '''
          两个 4×4 的变换矩阵相乘,结果含义:传感器相对于全局坐标系的旋转变换
          '''

          _, boxes, camera_intrinsic = nusc.get_sample_data(
            image_token, box_vis_level=BoxVisibility.ANY)
          '''
          根据外键 image_token 获取当前传感器的数据信息字段 sample_data,其中 box_vis_level 设置框的可见性,返回以下值:
          data_path:文件存放的绝对路径(这里没有获取这个值)
          boxes:box 列表
          cam_intrinsic:当前相机传感器的标定内参(3×3 的矩阵)
          get_sample_data() 函数在 CenterFusion/src/tools/nuscenes-devkit/python-sdk/nuscenes/nuscenes.py 249 行
          '''
- 其中 box 就是图中一个一个的框,一张图片中有多个 box
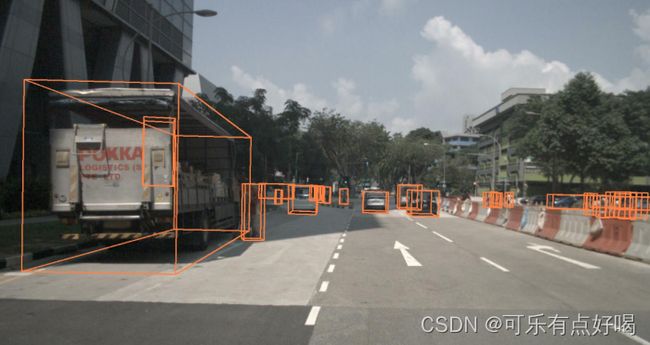
- 既然这里已经提到 box 了,这里先了解下 box 的相关内容,参考博客:nuScenes数据集3Dbonding box
- 在
CenterFusion/src/tools/nuscenes-devkit/python-sdk/nuscenes/utils/data_classes.py521 行就是 Box 类的定义,需要说明一点的是 box 的 orientation 属性,表示框的方向,也就是姿态数据 - 首先在
CenterFusion/src/tools/nuscenes-devkit/python-sdk/nuscenes/nuscenes.py249 行 get_sample_data() 函数中,找到制作 box 对象列表的代码
        #制作包含坐标系统变换的Box对象列表
        box_list = []
        for box in boxes:
            if use_flat_vehicle_coordinates:
                yaw = Quaternion(pose_record['rotation']).yaw_pitch_roll[0]
                box.translate(-np.array(pose_record['translation']))
                box.rotate(Quaternion(scalar=np.cos(yaw / 2), vector=[0, 0, np.sin(yaw / 2)]).inverse)
            else:
                # box 从全局坐标系转换到车身坐标系
                box.translate(-np.array(pose_record['translation']))
                box.rotate(Quaternion(pose_record['rotation']).inverse)

                # box 从车身坐标系转换到相机坐标系
                box.translate(-np.array(cs_record['translation']))
                box.rotate(Quaternion(cs_record['rotation']).inverse)

            if sensor_record['modality'] == 'camera' and not \
                    box_in_image(box, cam_intrinsic, imsize, vis_level=box_vis_level):
                continue

            box_list.append(box)
- 由于 nuscenes 中的 box 数据是在全局坐标系下,所以这里就需要两次的坐标系转换,先从全局坐标系转换到车身坐标系,再由车身坐标系转换到相机坐标系,最后才能再图像上呈现 box 的效果,如上图
- 代码继续
          calib = np.eye(4, dtype=np.float32)
          calib[:3, :3] = camera_intrinsic
          calib = calib[:3]
          '''
          生成 float32 型的 4×4 的对角矩阵 calib
          然后将 calib 的前三行、前三列赋值 camera_intrinsic(相机内参)
          最后再将前三行赋值给 calib,得到一个 3×4 的矩阵,在后面 box 会用到
          '''

          frame_ids[sensor_name] += 1
          '''
          当前相机 sensor_name 拍摄的图片数量 +1
          '''

          all_radar_pcs = RadarPointCloud(np.zeros((18, 0)))
          '''
          初始化雷达点云图,np.zeros((18,0))=[] 是生成一个空数组
          RadarPointCloud 类在 CenterFusion/src/lib/utils/pointcloud.py 54 行
          '''

          for radar_channel in RADARS_FOR_CAMERA[sensor_name]:
          '''
          遍历当前相机传感器 sensor_name 所关联的雷达传感器
          '''

            radar_pcs, _ = RadarPointCloud.from_file_multisweep(nusc,
              sample, radar_channel, sensor_name, NUM_SWEEPS)
            '''
            根据 sample、雷达传感器名、相机传感器名获取相对应的聚合的点云图
            from_file_multisweep() 函数在 CenterFusion/src/lib/utils/pointcloud.py 70 行
            '''

            all_radar_pcs.points = np.hstack((all_radar_pcs.points, radar_pcs.points))
            '''
            循环水平拼接雷达点云图(就是将一个场景中分块的雷达点云图拼接成一个场景中完整的点云图)
            np.hstack() 按水平方向(列顺序)拼接 2 个或多个图像,图像的高度(数组的行)必须相同
            np.vstack() 按垂直方向(行顺序)拼接 2 个或多个图像,图像的宽度(数组的列)必须相同
            '''

          image_info = {'id': num_images,
                        'file_name': image_data['filename'],
                        'calib': calib.tolist(),
                        'video_id': num_videos,
                        'frame_id': frame_ids[sensor_name],
                        'sensor_id': SENSOR_ID[sensor_name],
                        'sample_token': sample['token'],
                        'trans_matrix': trans_matrix.tolist(),
                        'velocity_trans_matrix': velocity_trans_matrix.tolist(),
                        'width': sd_record['width'],
                        'height': sd_record['height'],
                        'pose_record_trans': pose_record['translation'],
                        'pose_record_rot': pose_record['rotation'],
                        'cs_record_trans': cs_record['translation'],
                        'cs_record_rot': cs_record['rotation'],
                        'radar_pc': all_radar_pcs.points.tolist(),
                        'camera_intrinsic': camera_intrinsic.tolist()}
          '''
          创建 COCO 格式的 image_info 的字段,将上面所产生的结果储存在了 image_info 字段中了,下面解释下每个属性的意义:
          'id':图片的id(基于全部的相机图片)
          'file_name':图片的文件名
          'calib':当前传感器的内参 3×4 矩阵
          'video_id':自定义的图片所属场景 scene 的 id (外键)
          'frame_id':将当前相机传感器所拍摄的图片数量作为自定义 id
          'sensor_id':自定义的传感器外键
          'sample_token':sample 外键
          'trans_matrix':传感器相对于全局坐标系姿态复合变化矩阵列表化
          'velocity_trans_matrix':传感器相对于全局坐标系旋转矩阵列表化
          'width':图片的宽度
          'height':图片的高度
          'pose_record_trans':车辆的原始 translation 数据
          'pose_record_rot':车辆的原始四元素 rotation 数据
          'cs_record_trans':传感器的原始 translation 数据
          'cs_record_rot':传感器的原始 rotation 数据
          'radar_pc':当前相机传感器所对应的完整雷达点云图列表化
          'camera_intrinsic':box 在当前相机传感器的坐标框架列表化
          '''

          ret['images'].append(image_info)
          '''
          将 images 字段添加进 COCO 格式中
          '''

          anns = []
          for box in boxes:
          '''
          循环读取当前相机传感器拍摄的一张图片中的 box 列表
          '''

            det_name = category_to_detection_name(box.name)
            '''
            获取 box 所属的目标类,比如移动的人、站着的人都属于人这一类
            category_to_detection_name() 函数在 CenterFusion/src/tools/nuscenes-devkit/python-sdk/nuscenes/eval/detection/utils.py 7 行
            '''

            if det_name is None:
              continue
            '''
            如果 box 没有所属的类,则直接检测下一个 box
            '''

            num_anns += 1
            '''
            有所属的类,是有效 box ,个数 +1
            '''

            v = np.dot(box.rotation_matrix, np.array([1, 0, 0]))
            '''
            由于 box 列表中的姿态数据 orientation 是一个四元素
            这里使用函数 rotation_matrix() 将四元素转换为旋转矩阵
            旋转矩阵再和 [1,0,0] 点乘,得到旋转矩阵的第一列
            rotation_matrix() 在 CenterFusion-master/src/tools/nuscenes-devkit/python-sdk/nuscenes/utils/data_classes.py 580 行
            '''
- 建议先把这篇博客的内容完全理解清楚,就能明白这里的原理了:旋转矩阵及左右乘的意义,看这一篇就够了
- 在这里,其中 Box 旋转矩阵表示在相机坐标系中的姿态数据,而旋转矩阵的第一行,表示 Box 绕相机坐标系(可以看上面那辆车,图片中标记了每个传感器的坐标系)的 X 轴旋转
- 什么意思呢?可以把 box 看作是一个坐标系,它的长宽高分别就表示坐标系的 X X X 轴 Y Y Y 轴 Z Z Z 轴,其中 Box 旋转矩阵的第一列就表示 Box 坐标系的 X X X 轴在相机坐标系中的位置,这个结论是根据向量的余弦定理得出的
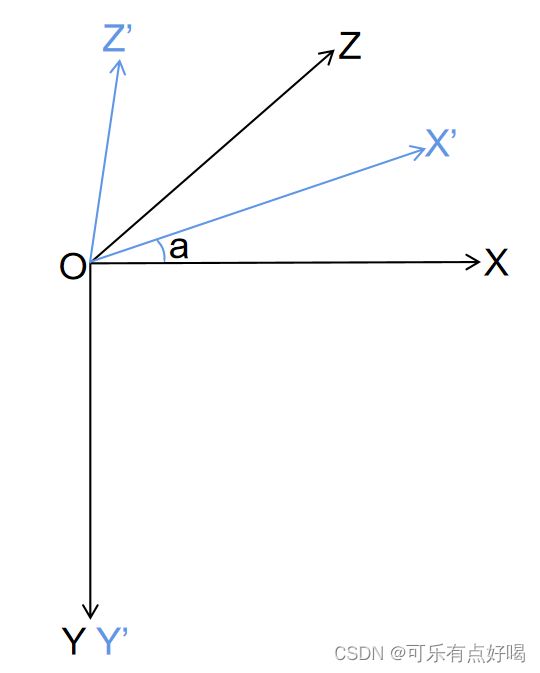
            yaw = -np.arctan2(v[2], v[0])
            '''
            arctan2() 函数是反正切函数第二种形式,可以参考博客:https://blog.csdn.net/qq_37083038/article/details/121264809
            这里将 Box 旋转矩阵第一列的第一个元素和第三个元素进行反正切计算
            得到的结果是 Box 绕相机坐标系的 Y 轴旋转的角度(这个角度也被叫做观测角)
            '''
- 绕 Y Y Y 轴旋转,意思 Y Y Y 轴不动, X O Z XOZ XOZ 面旋转
            box.translate(np.array([0, box.wlh[2] / 2, 0]))
            '''
            通过查看 Box 类的定义,可知 wlh 是一个包含 box 长宽高的数组 array[长、宽、高]
            再查看 translate() 函数在 CenterFusion/src/tools/nuscenes-devkit/python-sdk/nuscenes/utils/data_classes.py 587 行
            可以知道这里是将 box 的中心点沿着 y 轴平移了 box 长度的一半
            '''

            category_id = CAT_IDS[det_name]
            '''
            根据 det_name 获取目标物体类别自定义的 id (全局变量中定义了)
            '''

            amodel_center = project_to_image(
              np.array([box.center[0], box.center[1] - box.wlh[2] / 2, box.center[2]],
                np.float32).reshape(1, 3), calib)[0].tolist()
            '''
            这句有点长,首先不管参数,它的代码为 project_to_image(参数1,参数2)[0].tolish
            参数1:np.array([box.center[0], box.center[1] - box.wlh[2] / 2, box.center[2]], np.float32).reshape(1, 3)
              reshape() 函数用于在不更改数据的情况下为数组赋予新形状
              这个参数的值其实就是 box 原始中心点(前面有平移过) 1×3 矩阵
            参数2:calib
              前面生成的一个 3×4 的矩阵(相机的内参)
            返回一个 1×2 的矩阵,并取矩阵的第一行,也就是 1×2 的矩阵,将其 tolist() 列表化
            其实这个矩阵就是 box 中心点在图像上显示的位置
            project_to_image() 函数在 CenterFusion-master/src/lib/utils/ddd_utils.py 36 行
            '''
- 进行一个小插曲,project_to_image() 函数原型如下:
def project_to_image(pts_3d, P):
  # pts_3d: n x 3
  # P: 3 x 4
  # return: n x 2
  pts_3d_homo = np.concatenate(
    [pts_3d, np.ones((pts_3d.shape[0], 1), dtype=np.float32)], axis=1)
  '''
  np.concatenate() :能够一次完成多个数组的拼接,其中参数 axis=1 表示对应行的拼接
  np.ones():函数返回给定形状和数据类型的新数组,其中元素的值设置为 1
  pts_3d.shape[0]:读取 pts_3d 的第一个元素长度,说白了就是 1,所以得到一个 1×1 的矩阵
  最后再和进行拼接 pts_3d_homo 是一个 1×4 的矩阵:前 3 列为 pts_3d,最后 1 列为 1
  '''
  pts_2d = np.dot(P, pts_3d_homo.transpose(1, 0)).transpose(1, 0)
  '''
  pts_3d_homo.transpose(1, 0) 是将 pts_3d_homo 进行转置,变成 4×1 的矩阵
  最后点乘得到一个 1×3 的矩阵 pts_2d
  '''
  pts_2d = pts_2d[:, :2] / pts_2d[:, 2:]
  '''
  pts_2d 的前两列构成一个 1×2 的矩阵,pts_2d 的前两列构成一个 1×2 的矩阵
  两个矩阵再相除,再返回一个 1×2 的矩阵
  '''
  return pts_2d
            sample_ann = nusc.get(
              'sample_annotation', box.token)
            '''
            根据 box.token 外键,获取 sample_annotation 数据
            这里就不贴出 sample_annotation 字段的详细结构了
            '''

            instance_token = sample_ann['instance_token']
            '''
            获取 sample_annotation 中的 instance_token 外键
            '''

            if not (instance_token in track_ids):
              track_ids[instance_token] = len(track_ids) + 1
            '''
            需要检测的目标物体不在记录中,则记录需要检测的目标物体,并自定义 id
            '''

            attribute_tokens = sample_ann['attribute_tokens']
            '''
            获取 attribute_tokens 外键
            '''

            attributes = [nusc.get('attribute', att_token)['name'] \
              for att_token in attribute_tokens]
            '''
            获取 attribute 字段中的 name 属性
            它的值是目标物体的状态,比如人移动、人站立等
            它的长度是 1
            '''

            att = '' if len(attributes) == 0 else attributes[0]
            '''
            如果 attributes 长度为 0,则 att = '',否则 att = attributes[0]
            '''

            if len(attributes) > 1:
              print(attributes)
              import pdb; pdb.set_trace()
            '''
            这里,我懵了,attributes 的长度是 1 ,但又为啥写这句
            在整个代码的执行过程中,都没有执行这个 if 语句
            '''

            track_id = track_ids[instance_token]
            '''
            根据 instance_token 外键获取记录中被检测目标物体自定义的 id
            '''

            vel = nusc.box_velocity(box.token).tolist()
            '''
            根据 box.token 外键获取 box 的速度
            其中 vel 的值为列表,里面由三个值,分别表示 X/Y/Z 轴方向上的速度
            box_velocity() 函数在 CenterFusion/src/tools/nuscenes-devkit/python-sdk/nuscenes/nuscenes.py 第 380 行
            '''

            vel_cam = np.dot(np.linalg.inv(velocity_trans_matrix),
              np.array([vel[0], vel[1], vel[2], 0], np.float32)).tolist()
            '''
            np.linalg.inv() 函数:求 velocity_trans_matrix 传感器相对于全局坐标系的旋转矩阵的逆矩阵
            再与 box 的速度矩阵点乘并列表化
            得到 box 在摄像机坐标中的速度
            '''

            ann = {
              'id': num_anns,
              'image_id': num_images,
              'category_id': category_id,
              'dim': [box.wlh[2], box.wlh[0], box.wlh[1]],
              'location': [box.center[0], box.center[1], box.center[2]],
              'depth': box.center[2],
              'occluded': 0,
              'truncated': 0,
              'rotation_y': yaw,
              'amodel_center': amodel_center,
              'iscrowd': 0,
              'track_id': track_id,
              'attributes': ATTRIBUTE_TO_ID[att],
              'velocity': vel,
              'velocity_cam': vel_cam
            }
            '''
            coco 格式的 ann 字段,一张图片中一个 box 对应一个 ann 字段,属性含义如下:
            'id': 有效 box 的 id
            'image_id': 当前 box 所属的图片 id
            'category_id': box 所属类别的 id
            'dim': box 的长宽高
            'location': box 的中心点
            'depth': box 的深度
            'occluded': 暂时不知道
            'truncated': 暂时不知道
            'rotation_y': 绕相机坐标系 y 轴旋转(观测角)
            'amodel_center': box 在图像中的中心点位置
            'iscrowd': 道路是否拥挤,0 为不拥挤 1 为拥挤
            'track_id': 被检测目标物体 box 的 id
            'attributes': 目标物体状态的 id
            'velocity': 目标物体在全局坐标系的速度
            'velocity_cam': box 在相机坐标系中的速度
            '''

            bbox = KittiDB.project_kitti_box_to_image(
              copy.deepcopy(box), camera_intrinsic, imsize=(1600, 900))
            '''
            这个函数在 CenterFusion/src/tools/nuScenes_lib/utils_kitti.py 154 行
            copy.deepcopy() 函数:深拷贝,拷贝对象及其子对象
            camera_intrinsic:相加传感器内参(是一个投影矩阵)
            imsize:图片像素
            这个函数的作用是在图像上面作出 bbox 框,所以 bbox 的值为图像中的位置
            '''

            alpha = _rot_y2alpha(yaw, (bbox[0] + bbox[2]) / 2,
                                 camera_intrinsic[0, 2], camera_intrinsic[0, 0])
            '''
            调用函数,获取 box 在相机坐标系中的局部旋转角度 alpha
            '''

            ann['bbox'] = [bbox[0], bbox[1], bbox[2] - bbox[0], bbox[3] - bbox[1]]
            ann['area'] = (bbox[2] - bbox[0]) * (bbox[3] - bbox[1])
            ann['alpha'] = alpha
            anns.append(ann)
            '''
            给 ann 添加三个属性:bbox(box 数据)、area(box 覆盖的区域)、alpha(局部旋转角)
            最后为 anns 字段添加 ann
            '''

          visable_anns = []
          '''
          初始化 visable_anns 列表
          '''

          for i in range(len(anns)):
            vis = True
            for j in range(len(anns)):
              if anns[i]['depth'] - min(anns[i]['dim']) / 2 > \
                 anns[j]['depth'] + max(anns[j]['dim']) / 2 and \
                _bbox_inside(anns[i]['bbox'], anns[j]['bbox']):
                vis = False
                break
            if vis:
              visable_anns.append(anns[i])
            else:
              pass
          '''
          遍历所有的 box 对应的 ann 字段,并根据两个 box 的 depth 和 dim 属性判断有效 box
          '''

          for ann in visable_anns:
            ret['annotations'].append(ann)
          '''
          给 annotations 字段添加 ann 属性
          '''

    print('reordering images')
    images = ret['images']
    '''
    获取当前 COCO 格式的数据集中的 images 字段
    '''

    video_sensor_to_images = {}
    for image_info in images:
      tmp_seq_id = image_info['video_id'] * 20 + image_info['sensor_id']
      '''
      遍历数据集中的所有相机图片信息 image_info
      tmp_seq_id = 图片对应的场景id × 20 + 图片对应的传感器id
      '''

      if tmp_seq_id in video_sensor_to_images:
        video_sensor_to_images[tmp_seq_id].append(image_info)
      else:
        video_sensor_to_images[tmp_seq_id] = [image_info]
      '''
      对 image_info 进行重新排序
      '''

    ret['images'] = []
    for tmp_seq_id in sorted(video_sensor_to_images):
      ret['images'] = ret['images'] + video_sensor_to_images[tmp_seq_id]
    '''
    sorted() 函数:可以对所有可迭代的对象进行排序操作
    将排序后的 video_sensor_to_images 重新赋给 images 字段
    '''

    print('{} {} images {} boxes'.format(
      split, len(ret['images']), len(ret['annotations'])))
    print('out_path', out_path)
    json.dump(ret, open(out_path, 'w'))
    '''
    json.dump() 函数:将 Python 对象转换为适当的 json 对象
    '''
五、参考资料
[1] nuScenes数据集3Dbonding box
[2] Nuscenes 数据集
[3] 旋转矩阵及左右乘的意义,看这一篇就够了
[4] Unity为什么是4X4矩阵 矩阵平移、矩阵旋转、矩阵缩放、矩阵复合变换
[5] nuScenes数据集标注格式
[6] KITTI 数据集 参数—— tracking devkit中的rotation_y和alpha角