【Python】【期末复习题】【2022秋】
文章目录
- 一、单选题(20分)
- 二、判断题(10分)
- 三、填空题(10分)
- 四、问答题(共30分,6题,每题5分)
- 五、程序题(3题,每题10分,共30分)
一、单选题(20分)
二、判断题(10分)
三、填空题(10分)
以上三题主要复习范围和要点。
- Python语言的特点
- Python的应用场景
- Python的下载与安装
- Python的基本语法要素
- Python常用的集成开发工具
- Python基本数据类型和运算符
- Python基本程序结构
- Python使用Turtle进行绘图
- 列表的定义
- 列表的切片
- 列表的遍历
- 列表的主要方法
- 字典、元组和集合的特点、定义和基本操作
- 函数的概念及定义
- 函数的参数传递
- 文件的基本读、写操作
- 程序错误及异常捕获
- 类的定义和使用
- 字符串处理的主要方法
四、问答题(共30分,6题,每题5分)
1、Python的特点 p4
1.简单
2.易学
3.易用
4.易扩展
2、Python的应用场景及使用的第三方库 p5
1.科学计算
2.Web应用开发
3.桌面软件
4.游戏
5.网络爬虫
6.服务器运维的自动化脚本
7.人工智能
略
3、字典和列表的主要区别p66
①字典的键可以是整数、实数、字符串等类型(严格地说要求是“不可变”类型,这个概念后面会讲到),而列表的下标只能是整数。
②字典中元素的顺序是没有意义的(例如,显示出的顺序与书写的顺序并不一样),而列表中的元素的顺序是很重要的。
③字典中各个键是互不相等的,如果放入多个相等的键,则实际上只能存在一个。例如:
a={1:1,2:2,1:99}
a
{1:99,2:2}
虽然各个键互不相等,但多个值之间是可以相等的。
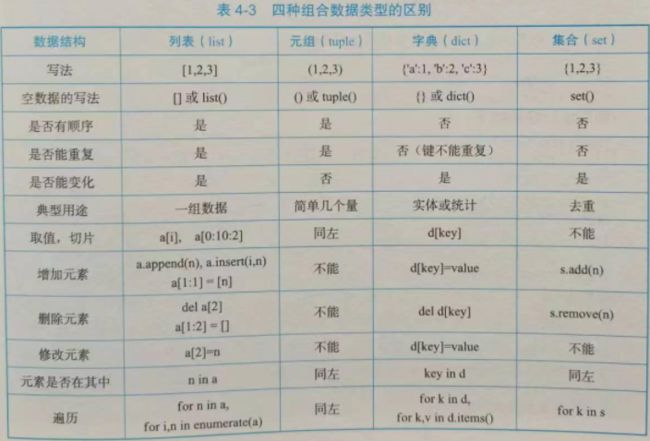
4、列表、字典、元组和集合的各自特点和区别p73(含表4-3)
列表:数据的序列(元素有顺序关系)。
字典:键值对的集合,元素没有顺序,键不能重复。
元组:数据的序列,具有不可变性。
集合:元素没有顺序,元素不能重复。
7、文件操作的基本步骤 p121-123
①打开文件
②读写操作
③关闭文件
8、程序错误的主要类型 p135
①语法错误
②逻辑错误
③运行错误
9、安装Python第三方包的步骤及用到的主要方法 p162
略
①pip安装
②指定国内的安装源
10、正则表达式的概念和要素 p173-175
正则表达式是用来匹配某种格式的字符串的模式。
正则表达式主要由三要素构成:字符、量词(字符个数)、位置。
11、BS4对HTML解析的主要步骤 p203
①根据HTML文本,得到一个BeautifulSoup对象。
②在BeautifulSoup对象中查找,得到Tag对象(标记对象)或者Tag对象的列表。
③对于得到的tag对象,可以得到其属性。
④由于网页的嵌套对象的特点,可以用tag对象进一步查找或遍历。
12、网络的爬虫的工作原理 p206
通用的网络爬虫程序是指沿着网页中的链接得到新的网页,而新的网页中又有新的链接,沿着这些链接将相关的网页或其他资源进行下载或分析。
13、Echarts绘制图表的方法 p229-230
①pyecharts的安装
②图表对象及数据
③显示结果文件
④文件链式调用
⑤对图表进行格式设定
五、程序题(3题,每题10分,共30分)
【例3-18】turtle_draw_fun.py绘制函数图
# coding: utf-8
from turtle import *
import math
# 先画x轴
goto(-200, 0)
goto(200, 0)
penup()
# 画函数图
k = 30  # 放大系数
start = -2 * math.pi
end = 2 * math.pi
goto(start * k, math.sin(start) * k)
pendown()
for x in range(int(start * k), int(end * k), 1):
    y = math.sin(x / k) * k
    goto(x, y)
done()
【例4-18】random_pi.py用画点模拟法估算π的值
#coding: utf-8
import random
import turtle

# 画圆
r = 200 # 圆的半径
turtle.Screen().delay(0)  # 让画图更快
turtle.penup()
turtle.goto(0, -r) # 画圆是从南面的点开始的
turtle.pendown()
turtle.pencolor("red")
turtle.circle(r)
# 画正方形
turtle.penup()
turtle.goto(-r, -r) # 从西南角开始
turtle.pendown()
turtle.pencolor("black")
for i in range(4): # 画4条边
    turtle.forward(2 * r)
    turtle.left(90)

# 模拟打点并统计在圆中的点数
points = 0 # 总点数
incircle = 0  # 在圆形中的点数
for i in range(1000):
    x = random.random() * 2 * r - r  # 点的坐标位于-r到r
    y = random.random() * 2 * r - r
    turtle.penup()
    turtle.goto(x, y)
    turtle.pendown()
    if x**2 + y**2 < r**2:  # 如果位于圆中
        turtle.dot(3, "red")  # 画点,两个参数分别为大小和颜色
        incircle += 1  # 计数
    else:
        turtle.dot(3, "green")
    points += 1
    print("当前π的估算值:", incircle / points * 4)
turtle.done()
【例8-5】pinyin_idiom.py成语接龙
#coding: utf-8
import pinyin
import random

# 先读取文件,得到成语字典
dictBegin = {} # 以首拼音为key的字典,value是成语的列表
dictEnd = {} # 以尾拼音为key的字典,value是成语的列表
with open("idiom.txt", "r", encoding="utf-8") as f:
	for line in f:
		line = line.strip().replace("\t\t","\t") #格式规范一下
		if line == "":
			continue
		parts = line.strip().split("\t")
		idiom = parts[0]  # 成语
		charpinyins = parts[1].split("'") # 每个字的拼音
		pinyinBegin = charpinyins[0]  # 首字拼音
		pinyinEnd = charpinyins[-1]  # 尾字拼音
		if pinyinBegin in dictBegin: # 如果在字典中
			dictBegin[pinyinBegin].append(idiom) # 则加上一条
		else:
			dictBegin[pinyinBegin] = [idiom] # 否则,用一个新的列表
		if pinyinEnd in dictEnd:
			dictEnd[pinyinEnd].append(idiom)
		else:
			dictEnd[pinyinEnd] = [idiom]


def getIdiomByBegin(c):
	'''得到以字c的音为首音的成语'''
	p = pinyin.get(c, format="strip")
	idioms = dictBegin[p] # 得到以这个音为首音的成语列表
	idiom = idioms[random.randrange(len(idioms))] # 从中取一个成语
	return idiom

def getIdiomByEnd(c):
	'''得到以字c的音为尾音的成语'''
	p = pinyin.get(c, format="strip")
	idioms = dictEnd[p] # 得到以这个音为尾音的成语列表
	idiom = idioms[random.randrange(len(idioms))] # 从中取一个成语
	return idiom

def checkIdiomBeginWidth(word, c):
	'''检查词语word是不是以c的拼音开头的成语'''
	p = pinyin.get(c, format="strip")
	idioms = dictBegin[p] # 得到以这个音为首音的成语列表
	return word in idioms

# 成语接龙
s = input("请输入一个字:")
idiom = getIdiomByBegin(s[0]) # 用这个字找个成语
print(idiom)
while True:
	s = input().strip()  # 获取用户输入
	if s == "0": # 用0表示结束接龙
		break
	elif s == "": # 用上个成语的尾字得到新的成语
		idiom = getIdiomByBegin(idiom[-1])
		print(idiom)
	else: # 检查是否可以接龙
		if checkIdiomBeginWidth(s, idiom[-1]):
			print("ok, 请继续!")
			idiom = s  #当前的成语
		else:
			print("不对啊,请重新输入。输入回车自动接龙,输入0结束")
【例9-4】letter_count.py读取英文文章,统计其字母出现的频率
#coding: utf-8

# 先读入语料的所有内容
fileName = "speech.txt"
with open(fileName, "r", encoding="utf-8") as f:
    content = f.read()
# 统计字母出现的次数
letter_cnt = {}  # 用字典来表示
total = 0  # 总字母数
for c in content:
    c = c.lower()  # 都以小写为准
    if 'a' <= c <= 'z':  # 只统计字母
        total += 1
        if c in letter_cnt:  # 如果已在字典中
            letter_cnt[c] += 1  # 计数加1
        else:
            letter_cnt[c] = 1  # 初始化为1

print(letter_cnt)
# 个数转成频率值
for c in letter_cnt:
    letter_cnt[c] = round(letter_cnt[c] / total, 2)
# 排序后显示
print(sorted(letter_cnt.items(), key=lambda kv: kv[1]), reverse=True)
【例9-6】jieba_cut.py使用结巴分词进行分词、词性标注及关键词提取
# encoding: utf-8

import jieba
import jieba.posseg
import jieba.analyse

str1 = "我来到北京清华大学"

print("\n精准模式:")
for seg in jieba.cut(str1):  # 默认是精准模式
    print(seg, end=",")

print("\n全模式:")
for seg in jieba.cut(str1, cut_all=True):  # 全模式
    print(seg, end=",")

print("\n词性标注:")
for w in jieba.posseg.cut(str1):  # 词性标注
    print(w.word, "/", w.flag, ", ", end=",")

print("\n关键词提取:")
result3 = jieba.analyse.extract_tags(str1, 2)  # 第二个参数表示关键词个数
print(result3)
【例10-6】get_all_images_2.py用requests及bs4来实现下载网页中的多张图像
# coding:utf-8
import requests
from bs4 import BeautifulSoup

def get_html(url):
    '''获取网页'''
    return requests.get(url).text

def get_image(imgurl, file):
    '''获取并保存图片'''
    content = requests.get(imgurl).content
    with open(file, "wb") as f:
        f.write(content)

def get_imgags_in_page(html):
    '''找到网页中的多个图片'''
    soup = BeautifulSoup(html, "html.parser")
    images = soup.find_all("img",
        {"pic_type": "0", "class": "BDE_Image"})
    cnt = 0
    for img in images:
        imgurl = img["src"]
        print(imgurl)
        get_image(imgurl,'./images/'+str(cnt)+'.jpg')
        cnt += 1

url = "https://tieba.baidu.com/p/2460150866"
html = get_html(url)
get_imgags_in_page(html)
【例11-1】plot_linechat.py折线图及散点图
#coding:utf-8

import matplotlib.pyplot as plt
import os
import random

# 设置字体以支持汉字显示
import os
if os.name == "nt": # Windows系统
    plt.rcParams['font.sans-serif'] = ['SimHei']  # 设置字体
else: # MacOS系统
    plt.rcParams["font.family"] = 'Arial Unicode MS'
plt.rcParams['axes.unicode_minus'] = False  # 支持负号的正常显示

# 绘制图表
xdata = [10,12,13,16,18]
ydata = [1.107,1.213,1.405,1.654,1.701]
xdata2 = [random.uniform(10, 18) for _ in range(20)]
ydata2 = [random.uniform(1.1, 1.7) for _ in range(20)]
plt.plot(xdata, ydata, linestyle="--",
	marker="o", color="red", label="实验值")  # 绘折线图
plt.scatter(xdata2, ydata2,
	marker="+", color="blue", label="随机值") # 绘散点图

# 设置一些基本元素
plt.title('电信号测量') # 图标标题
plt.grid() # 显示网格线
plt.xlabel('电压') # x轴标签
plt.ylabel('电流') # y轴标签
plt.xlim(8, 20) # x轴范围
plt.ylim(1.0, 1.8) # y轴范围
plt.legend(loc='upper left')  #显示图例,位置在左上角
plt.text(1.1, 7, r'特殊值')  #指定位置显示文字

plt.savefig("test.png") # 保存图片
plt.show() # 显示图表
要求:补充程序中不完整的部分


