PyTorch实战:使用GRU实现名字分类问题
目录
- 一、GRU介绍
- 二、分类问题介绍
- 三、PyTorch实现
-
-
- 1、模型理解
- 2、代码
-
一、GRU介绍
GRU(Gate Recurrent Unit)是循环神经网络(Recurrent Neural Network, RNN)的一种,和LSTM(Long-Short Term Memory)一样,也是为了解决长期记忆和反向传播中的梯度等问题而提出来的。我们在实验中选择GRU是因为它的实验效果与LSTM相似,但是更易于计算。
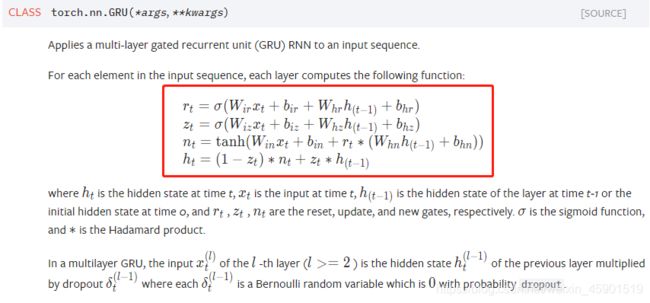
网上很多都使用画图来说明,我感觉不是很好,被一大堆的 “门” 给搞乱了,实际上看着公式更好理解。至于什么门,先不用管,只需要知道公式这么操作能实现一些不重要的信息的丢弃、重要信息的保留等等。等学的熟悉了,再回过头看论文中描述的“门”就很清晰。下面直接看图:

下面是PyTorch中实现的GRU类, 链接.
二、分类问题介绍
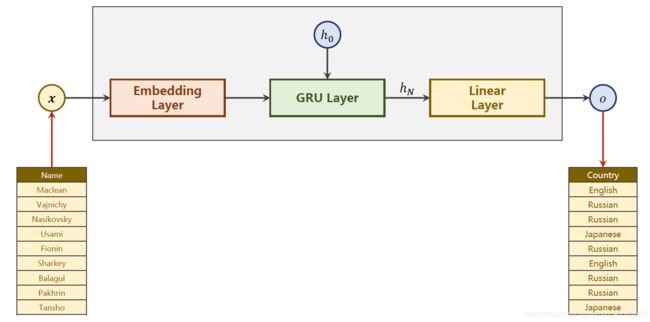
如下图,对来自18种语言的几千个姓氏进行训练,并根据拼写来预测一个名字来自哪种语言。
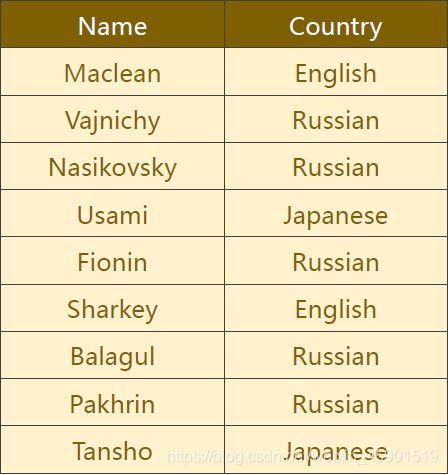
训练和测试数据:
链接:https://pan.baidu.com/s/1K9Eju4sNsrde8th56QPlVA
提取码:cvof
三、PyTorch实现
为了方便复现,我将所有的类和函数全放在一个.py文件中,所以下面的代码段最后全拷贝到一起运行就可以了。
1、模型理解
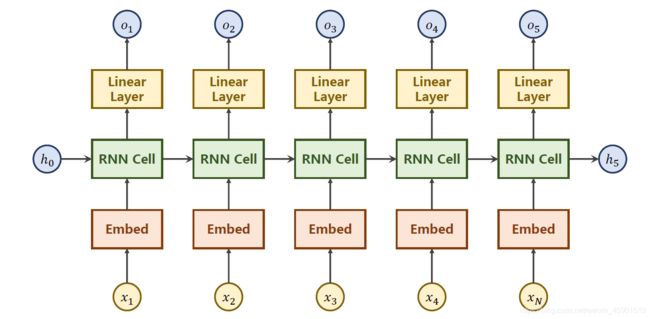
对上面解释一下:
自然语言处理中一般是将 字/词 转换成一个one-hot向量,但是one-hot向量维度太高了,所以使用 嵌入层(Embed) 转换成低维的稠密的向量,然后经过RNN层,由于隐层的输出不一定和要求的输出一致,所以最后再加一个线性层。
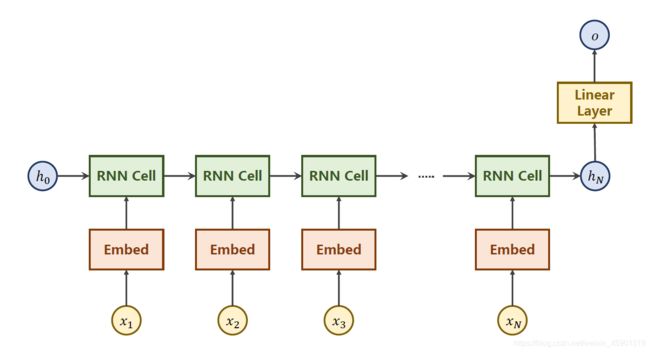
但是本文是一个分类问题,只需要得到最后的一个隐层 h N h_N hN,所以简化成下面这样:
2、代码
整体分四步:
(1)数据准备
(2)定义模型
(3)定义优化器和损失函数
(4)训练+测试
import torch
import torch.nn as nn
import torch.optim as optim
import csv
from torch.utils.data import Dataset
from torch.utils.data import DataLoader
import numpy as np
import matplotlib.pyplot as plt
import time
from torch.nn.utils.rnn import pack_padded_sequence # https://pytorch.org/docs/master/generated/torch.nn.utils.rnn.pack_padded_sequence.html
import math

# 1:数据集

# 超参数
HIDDEN_SIZE = 100 # 隐藏层
BATCH_SIZE = 256
N_LAYER = 2 # RNN的层数
N_EPOCHS = 100 # train的轮数
N_CHARS = 128 # 这个就是要构造的字典的长度
USE_GPU = False

class NameDataset(Dataset):  # 这个是自己写的数据集的类,就那3个函数
    def __init__(self, is_train_set=True):
        filename = "E:\\PyTorch\\PyTorch深度学习实践\\names_train.csv" if is_train_set else "E:\\PyTorch\\PyTorch深度学习实践\\names_test.csv"
        with open(filename, "rt") as f:  # 因为这个文件不是很大,所以在初始化的时候就全读进来了
            reader = csv.reader(f)
            rows = list(reader)
        self.names = [row[0] for row in rows]
        self.len = len(self.names)
        self.countries = [row[1] for row in rows]
        self.country_list = list(sorted(set(self.countries)))  # 去重+排序
        self.country_dict = self.getCountryDict()  # 做一个国家词典,这个就是标签 y
        self.country_num = len(self.country_list)

    def __getitem__(self, index):
        return self.names[index], self.country_dict[self.countries[index]] # 前者是名字字符串,后者是国家的索引

    def __len__(self):
        return self.len

    def getCountryDict(self):
        country_dict = dict()
        for idx, country_name in enumerate(self.country_list, 0):
            country_dict[country_name] = idx
        return country_dict

    def idx2country(self, index): # 这个就是为了得到分类之后,返回下标对应的字符串,也就是显示使用的
        return self.country_list[index]

    def getCountriesNum(self):  # 分类的国家数量
        return self.country_num

def make_tensors(names, countries): # 这个就是将名字的字符串转换成数字表示
    sequences_and_lengths = [name2list(name)for name in names]  # [(),(),,...]
    name_sequences = [sl[0] for sl in sequences_and_lengths] # 取转换成ACCIIS的序列,长度是BatchSize
    seq_lengths = torch.LongTensor([sl[1]for sl in sequences_and_lengths]) # 取序列的长度,转换成longtensor
    countries = countries.long() #这个cluntries之前转换成了数字,这里只转换成longtensor

    # make tensor of name, BatchSize x SeqLen
    seq_tensor = torch.zeros(len(name_sequences), seq_lengths.max()).long() #先做全0的张量,然后填充,长度是BatchSize
    for idx, (seq, seq_len) in enumerate(zip(name_sequences, seq_lengths), 0):
        seq_tensor[idx, :seq_len] = torch.LongTensor(seq)

    # sort by length to use pack_padded_sequence
    seq_lengths, perm_idx = seq_lengths.sort(dim=0, descending=True)
    seq_tensor = seq_tensor[perm_idx]
    countries = countries[perm_idx]

    return create_tensor(seq_tensor), \
           create_tensor(seq_lengths), \
           create_tensor(countries)

def name2list(name): # 将name字符串的字母转换成ASCII
    arr = [ord(c) for c in name]
    return arr, len(arr)  # 返回的是元组

def create_tensor(tensor):  # 是否使用GPU
    if USE_GPU:
        device = torch.device("cuda:0")
        tensor = tensor.to(device)
    return tensor

trainset = NameDataset(is_train_set=True) # train数据
trainloader = DataLoader(trainset, batch_size=BATCH_SIZE, shuffle=True)

testset = NameDataset(is_train_set=False) # test数据
testloader = DataLoader(testset, batch_size=BATCH_SIZE, shuffle=False)

N_COUNTRY = trainset.getCountriesNum() # 这个就是总的类别的数量
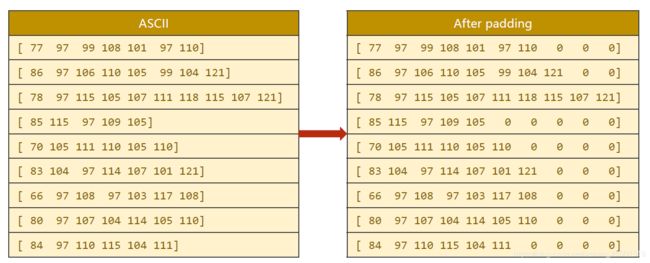
对上面的数据处理说明一下:
如下图,就是根据字母的ASCLL将名字做一个向量。

补齐:
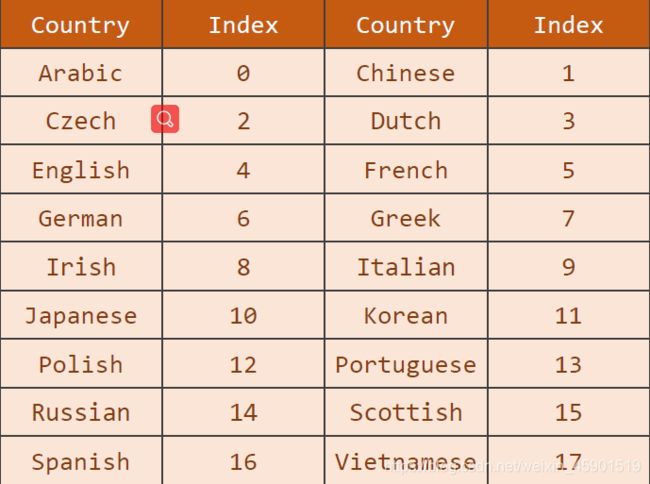
对标签国家就很好处理了,先排序,然后用下标来代替:
# 2:构造模型
class RNNClassifier(nn.Module):
    """
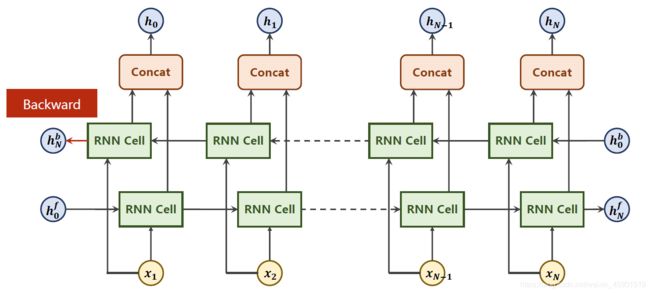
    这里的bidirectional就是GRU是不是双向的,双向的意思就是既考虑过去的影响,也考虑未来的影响(如一个句子)
    具体而言:正向hf_n=w[hf_{n-1}, x_n]^T,反向hb_0,最后的h_n=[hb_0, hf_n],方括号里的逗号表示concat。
    """
    def __init__(self, input_size, hidden_size, output_size, n_layers=1, bidirectional=True):
        super(RNNClassifier, self).__init__()
        self.hidden_size = hidden_size
        self.n_layers = n_layers
        self.n_directions = 2 if bidirectional else 1 # 双向2、单向1

        self.embedding = nn.Embedding(input_size, hidden_size)
        self.gru = nn.GRU(hidden_size, hidden_size, n_layers,  # 输入维度、输出维度、层数、bidirectional用来说明是单向还是双向
                         bidirectional=bidirectional)
        self.fc = nn.Linear(hidden_size * self.n_directions, output_size)

    def __init__hidden(self, batch_size):  # 工具函数,作用是创建初始的隐藏层h0
        hidden = torch.zeros(self.n_layers * self.n_directions,
                            batch_size, self.hidden_size)
        return create_tensor(hidden) # 加载GPU

    def forward(self, input, seq_lengths):
        # input shape:B * S -> S * B
        input = input.t()
        batch_size = input.size(1)

        hidden = self.__init__hidden(batch_size) # 隐藏层h0
        embedding = self.embedding(input)

        # pack them up
        gru_input = pack_padded_sequence(embedding, seq_lengths)  # 填充了可能有很多的0,所以为了提速,将每个序列以及序列的长度给出

        output, hidden = self.gru(gru_input, hidden) # 只需要hidden
        if self.n_directions == 2: #双向的,则需要拼接起来
            hidden_cat = torch.cat([hidden[-1], hidden[-2]], dim=1)
        else:
            hidden_cat = hidden[-1] # 单向的,则不用处理
        fc_output = self.fc(hidden_cat) # 最后来个全连接层,确保层想要的维度(类别数)
        return fc_output
对双向GRU的说明:
对pack_padded_sequence()的说明: 链接.
总的来说,由于可能填充了很多的0,为了提速而这么折腾的。
# 4:训练和测试模型
def trainModel():
    total_loss = 0
    for i, (names, countries) in enumerate(trainloader, 1): # 记载的下标从1开始
        inputs, seq_lengths, target = make_tensors(names, countries)
        output = classifier(inputs, seq_lengths) # 预测输出
        loss = criterion(output, target) # 求出损失
        optimizer.zero_grad() # 清除之前的梯度
        loss.backward() # 梯度反传
        optimizer.step() # 更新参数

        total_loss += loss.item()
        if i % 10 ==0:
            print(f'[{time_since(start)}] Epoch {epoch}', end='')
            print(f'[{i * len(inputs)}/{len(trainset)}]', end='')
            print(f'loss={total_loss / (i * len(inputs))}')

    return total_loss

def testModel():
    correct = 0
    total = len(testset)
    print("evaluating trained model...")
    with torch.no_grad():
        for i, (names, countries) in enumerate(testloader, 1):
            inputs, seq_lengths, target = make_tensors(names, countries) # 将名字的字符串转换成数字表示
            output = classifier(inputs, seq_lengths) # 预测输出
            pred = output.max(dim=1, keepdim=True)[1] # 预测出来是个向量,里面的值相当于概率,取最大的
            correct += pred.eq(target.view_as(pred)).sum().item() # 预测和实际标签相同则正确率加1

        percent = '%.2f' % (100 * correct / total)
        print(f'Test set:Accuracy{correct} / {total} {percent}%')

    return correct / total

def time_since(since):
    s = time.time() - since
    m = math.floor(s / 60)
    s -= m * 60
    return "%dm %ds" % (m, s)

if __name__ == "__main__":
    classifier = RNNClassifier(N_CHARS, HIDDEN_SIZE, N_COUNTRY, N_LAYER) # 定义模型
    if USE_GPU:
        device = torch.device("cuda:0")
        classifier.to(device)

    # 第三步:定义损失函数和优化器
    criterion = torch.nn.CrossEntropyLoss() # 分类问题使用交叉熵损失函数
    optimizer = torch.optim.Adam(classifier.parameters(), lr=0.001) # 使用了随机梯度下降法

    start = time.time()
    print("Training for %d epochs..." % N_EPOCHS)
    acc_list = []
    for epoch in range(1, N_EPOCHS + 1):
        # Train cycle
        trainModel()
        acc = testModel()
        acc_list.append(acc) # 存入列表,后面画图使用

    # 画图
    epoch = np.arange(1, len(acc_list) + 1, 1) # 步长为1
    acc_list = np.array(acc_list)
    plt.plot(epoch, acc_list)
    plt.xlabel("Epoch")
    plt.ylabel("Accuracy")
    plt.grid() # 显示网格线 1=True=默认显示;0=False=不显示
    plt.show()
