Tensorflow——图像的语义分割
文章目录
- 图像的语义分割
- 图像语义分割的应用
- 图像语义分割实质
-
- 语义分割的目标
- 图像语义分割的实现
-
- FCN
-
- 语义分割的跳级(skips)结构
- FCN缺点
- FCN实例
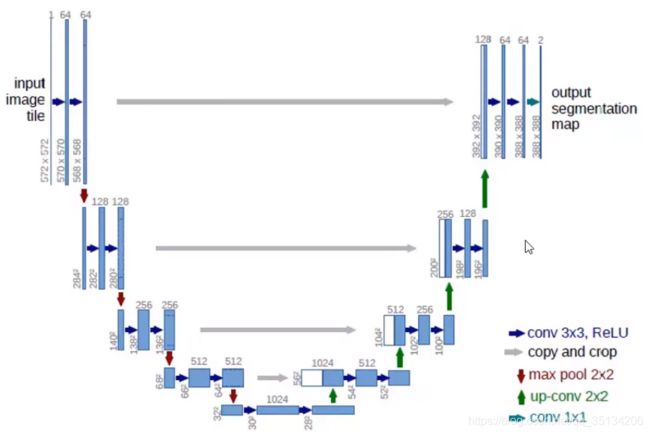
- UNET
- 图像语义分割结构的特点
-
- 输入和输出
- 上采样Upsampling
图像的语义分割
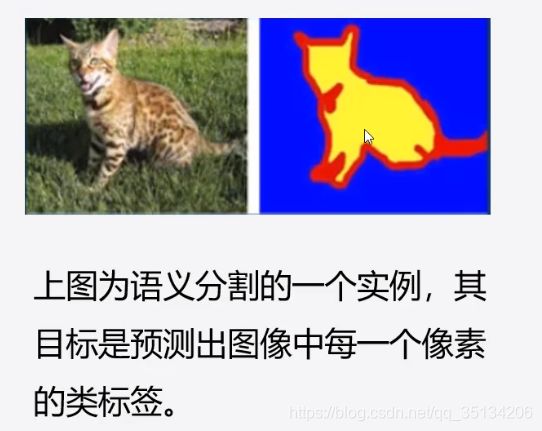
图像的语义分割是计算机视觉中十分重要的领域。它是指像素级地识别图像,即标注出图像中每个像素所属的对象类别(如属于背景、边缘或身体等)。
图像语义分割的应用
- 自动驾驶汽车:我们需要为汽车增加必要的感知,以了解他们所处的环境,以便自动驾驶的汽车可以安全行驶;
- 医学图像诊断:机器可以增强放射医生进行的分析,大大减少了运行诊断测试所需的时间;
- 无人机着陆点判断等。
图像语义分割实质
语义分割的目标
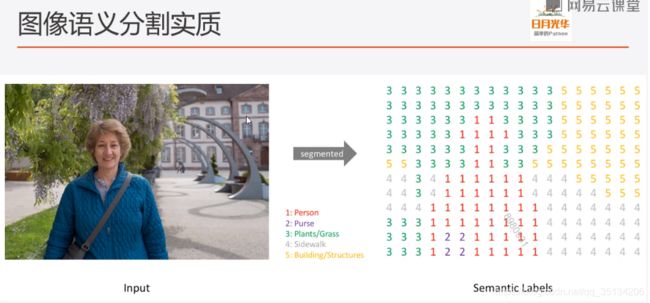
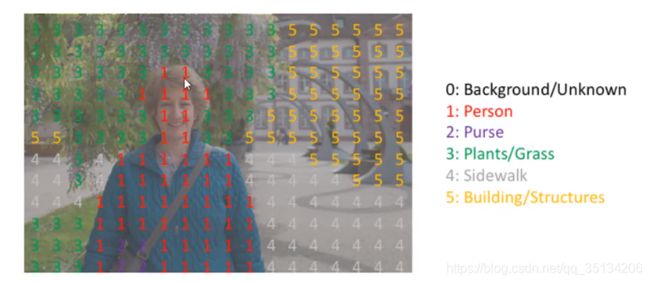
一般是将一张RGB图像或是灰度图作为输入,输出的是分割图,其中每一个像素包含了其类别的标签(heightwidth1)。
图像语义分割的实现
FCN
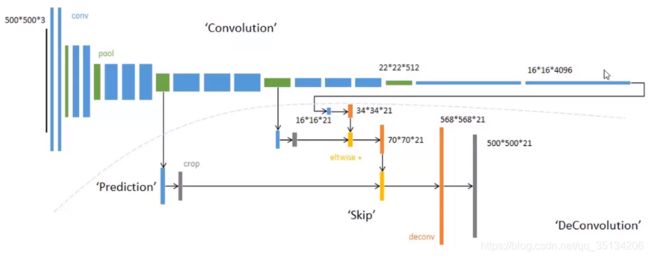
目前在图像分割领域比较成功的算法,有很大一部分都来自于同一个先驱:Long等人提出的Fully Convolutional Network(FCN),或者叫全卷积网络。
FCN将分类网络转换成用于分割任务的网络结构,并证明了在分割问题上,可以实现端到端的网络训练。
FCN成为了深度学习解决分割问题的奠基石。
分类网络结构尽管表面上来看可以接受任意尺寸的图片作为输入,但是由于网络结构最后全连接层的存在,使其丢失了输入的空间信息,因此,这些网络并没有办法直接用于解决诸如分割等稠密估计问题。
考虑到这一点,FCN用卷积层和池化层替代了分类网络中的全连接层,从而使得网络结构可以适应像素级的稠密估计任务。
FCN网络结构图

语义分割的跳级(skips)结构
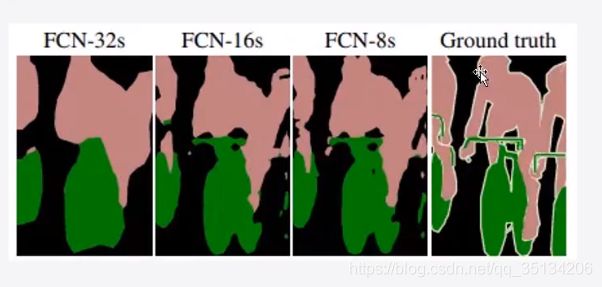
增加Skips结构将最后一层的预测(有更丰富的全局信息)和更浅层(有更多的局部细节)的预测结合起来,这样可以在遵守全局预测的同时进行局部预测。

FCN缺点
- 得到的结果不够精细,对细节不够敏感
- 没有考虑像素与像素之间的关系,缺乏空间一致性
FCN实例
对数据集的处理
def data_process():
    """
    处理数据,创建训练数据集和测试数据集
    :return: 训练数据集、测试数据集、STEPS_PER_EPOCH、VALIDATION_STEPS
    """
    # 获取所有图片的存储地址
    images = glob.glob("F:\\dataset\\图片定位与分割\\images\\*.jpg")
    # 对图片地址按照图片名称进行排序
    images.sort(key=lambda x: x.split('/')[-1])
    # 获取所有图像分割后的图片
    annotations = glob.glob("F:\\dataset\\图片定位与分割\\annotations\\trimaps\\*.png")
    # 对分割图像按照名称排序
    annotations.sort(key=lambda x: x.split('/')[-1])
    # 生成长度与图片个数相同的随机序列
    np.random.seed(2020)
    index = np.random.permutation(len(images))
    # 将图片和分割图像地址一起随机
    images = np.array(images)[index]
    annotations = np.array(annotations)[index]
    # 创建dataset数据集
    dataset = tf.data.Dataset.from_tensor_slices((images, annotations))
    # 划分train数据集和test数据集(20%作为测试数据)
    test_count = int(len(images) * 0.2)
    train_count = len(images) - test_count
    train_ds = dataset.skip(test_count)
    test_ds = dataset.take(train_count)
    # 对训练数据和测试数据进行处理
    train_ds = train_ds.map(load_image, num_parallel_calls=tf.data.experimental.AUTOTUNE)
    test_ds = test_ds.map(load_image)
    BATCH_SIZE = 8
    BUFFER_SIZE = 100
    STEPS_PER_EPOCH = train_count // BATCH_SIZE
    VALIDATION_STEPS = test_count // BATCH_SIZE
    # 对训练数据和测试数据做随机、重复、分批次
    train_ds = train_ds.cache().shuffle(BUFFER_SIZE).batch(BATCH_SIZE).repeat()
    train_ds = train_ds.prefetch(buffer_size=tf.data.experimental.AUTOTUNE)
    test_ds = test_ds.batch(BATCH_SIZE)
    return train_ds, test_ds, STEPS_PER_EPOCH, VALIDATION_STEPS
def read_jpg(path):
    """
    将图片解码成JPG格式
    :param path: 图片的存储地址
    :return: JPG格式的图片
    """
    img = tf.io.read_file(path)
    img = tf.image.decode_jpeg(img, channels=3)
    return img


def read_png(path):
    """
    将图片解码成PNG格式
    :param path: 图片的存储地址
    :return: PNG格式的图片
    """
    img = tf.io.read_file(path)
    img = tf.image.decode_png(img, channels=1)
    return img


def normalize(input_image, input_mask):
    """
    对图片进行归一化处理,分割信息编号从0开始,将[1,2,3]变为[0,1,2]
    :param input_image: 输入图片
    :param input_mask: 输入的分割图片信息
    :return: 归一化的图片和改变编码的分割图片信息
    """
    input_image = tf.cast(input_image, tf.float32) / 127.5 - 1
    # 让定位信息中的分类从0开始编号
    input_mask -= 1
    return input_image, input_mask


def load_image(input_image_path, input_mask_path):
    """
    加载图片和分割图像,以及进行预处理
    :param input_image_path: 图片的存储路径
    :param input_mask_path: 分割图像的存储路径
    :return: 处理之后的图片和分割图像
    """
    input_image = read_jpg(input_image_path)
    input_image = tf.image.resize(input_image, (224, 224))
    input_mask = read_png(input_mask_path)
    input_mask = tf.image.resize(input_mask, (224, 224))
    input_image, input_mask = normalize(input_image, input_mask)
    return input_image, input_mask
跳级结构模型
def create_model():
    """
    创建训练模型
    :return:创建好的模型
    """
    # 使用预训练网络VGG16
    conv_base = tf.keras.applications.VGG16(weights='imagenet', input_shape=(224, 224, 3), include_top=False)
    # print(conv_base.summary())
    # 创建一个元组记录要提取的网络层名
    layer_names = ['block5_conv3',  # 14*14
                   'block4_conv3',  # 28*28
                   'block3_conv3',  # 56*56
                   'block5_pool']
    # 根据网络层名获取对应网络层的输出
    layers_output = [conv_base.get_layer(name).output for name in layer_names]
    # 创建特征提取模型
    down_stack = tf.keras.Model(inputs=conv_base.inputs, outputs=layers_output)
    # 将网络设为不可训练状态
    down_stack.trainable = False
    # 设置输入格式
    inputs = tf.keras.layers.Input(shape=(224, 224, 3))
    # 获取特征提取模型的输出
    out_block5, out_block4, out_block3, out_pool = down_stack(inputs)
    # 将VGG16的最后一个pool层进行反卷积
    x1 = tf.keras.layers.Conv2DTranspose(512, 3, padding='same', strides=2, activation='relu')(out_pool)  # 14*14
    # 使用一层卷积进行特征提取
    x1 = tf.keras.layers.Conv2D(512, 3, padding='same', activation='relu')(x1)  # 14*14
    # 将进行特征提取后的卷积层与block5_conv3相加
    c1 = tf.add(x1, out_block5)
    # 将相加所得的结果进行反卷积
    x2 = tf.keras.layers.Conv2DTranspose(512, 3, padding='same', strides=2, activation='relu')(c1)  # 28*28
    # 特征提取
    x2 = tf.keras.layers.Conv2D(512, 3, padding='same', activation='relu')(x2)  # 28*28
    # 将进行特征提取后的卷积层与block4_conv3相加
    c2 = tf.add(x2, out_block4)
    # 将相加所得的结果进行反卷积
    x3 = tf.keras.layers.Conv2DTranspose(256, 3, padding='same', strides=2, activation='relu')(c2)  # 56*56
    # 特征提取
    x3 = tf.keras.layers.Conv2D(256, 3, padding='same', activation='relu')(x3)  # 56*56
    # 将进行特征提取后的卷积层与block3_conv3相加
    c3 = tf.add(x3, out_block3)
    x4 = tf.keras.layers.Conv2DTranspose(128, 3, padding='same', strides=2, activation='relu')(c3)  # 112*112
    x4 = tf.keras.layers.Conv2D(128, 3, padding='same', activation='relu')(x4)  # 112*112
    # 预测输出层
    predictions = tf.keras.layers.Conv2DTranspose(3, 3, padding='same', strides=2, activation='softmax')(x4)  # 224*224
    # 建立模型
    model = tf.keras.models.Model(inputs=inputs, outputs=predictions)
    print(model.summary())
    return model
完整项目和数据集在GitHub
UNET
UNET是2015年诞生的模型,它几乎是当前segmentation项目中应用最广的模型。
UNET能从更少的训练图像中进行学习。当它在少于40张图的生物医学数据集上训练时,IOU值能达到92%。
图像语义分割结构的特点
输入和输出
输入可以为任意尺寸的彩色图像,输出尺寸与输入尺寸相同。
上采样Upsampling
由于在卷积过程中,我们的特征图像变得很小,为了得到原图像大小的稠密像素预测,我们需要进行上采样。
