bmi计算 python_看一眼就知道你的BMI:基于Keras与迁移学习的人脸预测系统

大数据文摘出品
编译:橡树_Hiangsug
让机器学习基于面部照片预测BMI不仅是一个有趣的项目,这种预测方法也有望成为未来医疗诊断的实用工具。
本文介绍了一个通过面部图像预测BMI(身体质量指数)的神经网络项目。该项目由另一个基于人脸输入对人的年龄和性别进行分类的项目修改而来,借用了原项目训练模型的权重与通过网络摄像头探测用户面部的脚本。
训练数据集
本项目所采用的训练数据集为用户正面拍摄的4000张人脸图像及通过用户身高体重计算的BMI指数(BMI=体重/身高的平方,单位:kg/㎡)。尽管在此我们无法共享项目的训练数据集,但诸如此类的数据可以在许多地方在线获取。
图形预处理
在训练模型前,我们需要将数据集中的每一图像裁剪至用户的面部,而这一操作可以通过基于Python的dlib库的程序脚本实现。Dlib可用于检测图像中的人脸并为其添加边框线,另外还可以根据要求为截取的面部训练数据拓展为包含原图背景的区域。经实验表明,当边框距离(margin)设为20%并拓展图片大小40%(高度和宽度各20%)时模型的验证效果最佳。
以下便是以Bill Murray的裁剪图像(并不属于训练数据集)举例展示的拓展边框效果,以及在不同添加边框参数下模型在验证集上的最小平均绝对误差值(MAE)表。

原始图像
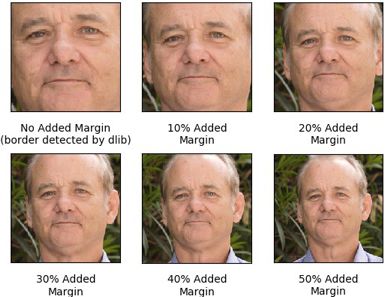
不同拓展边框下的图像

不同拓展边框下的验证集最小MAE数值表
实验结果表明,尽管无法借拓展边框在20%-50%范围的MAE微小差异判定经其训练的模型优劣,但在其拓展至最少20%下的模型性能显著优于dilb原始剪切图像,这可能是由于拓展边框内包含了较原始剪切图像更多的如额头上部、耳朵和脖子等有助于模型预测BMI值的特征信息。
import osimport cv2import dlibfrom matplotlib import pyplot as pltimport numpy as npimport configdetector = dlib.get_frontal_face_detector()def crop_faces(): bad_crop_count = 0 if not os.path.exists(config.CROPPED_IMGS_DIR): os.makedirs(config.CROPPED_IMGS_DIR) print 'Cropping faces and saving to %s' % config.CROPPED_IMGS_DIR good_cropped_images = [] good_cropped_img_file_names = [] detected_cropped_images = [] original_images_detected = [] for file_name in sorted(os.listdir(config.ORIGINAL_IMGS_DIR)): np_img = cv2.imread(os.path.join(config.ORIGINAL_IMGS_DIR,file_name)) detected = detector(np_img, 1) img_h, img_w, _ = np.shape(np_img) original_images_detected.append(np_img) if len(detected) != 1: bad_crop_count += 1 continue d = detected[0] x1, y1, x2, y2, w, h = d.left(), d.top(), d.right() + 1, d.bottom() + 1, d.width(), d.height() xw1 = int(x1 - config.MARGIN * w) yw1 = int(y1 - config.MARGIN * h) xw2 = int(x2 + config.MARGIN * w) yw2 = int(y2 + config.MARGIN * h) cropped_img = crop_image_to_dimensions(np_img, xw1, yw1, xw2, yw2) norm_file_path = '%s/%s' % (config.CROPPED_IMGS_DIR, file_name) cv2.imwrite(norm_file_path, cropped_img) good_cropped_img_file_names.append(file_name) # save info of good cropped images with open(config.ORIGINAL_IMGS_INFO_FILE, 'r') as f: column_headers = f.read().splitlines()[0] all_imgs_info = f.read().splitlines()[1:] cropped_imgs_info = [l for l in all_imgs_info if l.split(',')[-1] in good_cropped_img_file_names] with open(config.CROPPED_IMGS_INFO_FILE, 'w') as f: f.write('%s\n' % column_headers) for l in cropped_imgs_info: f.write('%s\n' % l) print 'Cropped %d images and saved in %s - info in %s' % (len(original_images_detected), config.CROPPED_IMGS_DIR, config.CROPPED_IMGS_INFO_FILE) print 'Error detecting face in %d images - info in Data/unnormalized.txt' % bad_crop_count return good_cropped_images# image cropping function taken from:# https://stackoverflow.com/questions/15589517/how-to-crop-an-image-in-opencv-using-pythondef crop_image_to_dimensions(img, x1, y1, x2, y2): if x1 < 0 or y1 < 0 or x2 > img.shape[1] or y2 > img.shape[0]: img, x1, x2, y1, y2 = pad_img_to_fit_bbox(img, x1, x2, y1, y2) return img[y1:y2, x1:x2, :]def pad_img_to_fit_bbox(img, x1, x2, y1, y2): img = cv2.copyMakeBorder(img, - min(0, y1), max(y2 - img.shape[0], 0), -min(0, x1), max(x2 - img.shape[1], 0), cv2.BORDER_REPLICATE) y2 += -min(0, y1) y1 += -min(0, y1) x2 += -min(0, x1) x1 += -min(0, x1) return img, x1, x2, y1, y2if __name__ == '__main__': crop_faces()图像增强
为了对训练数据集合理利用,图像训练集在每一个epoch中都经过了增强处理,增加了每张原始训练图像在训练网络时的次数。这一步骤通过调取图像增强库Augmentor实现,对图像进行了动态的旋转、翻转及扭曲不同部分的分辨率的操作,也对图像的对比度和亮度进行了修改。

未经增强的原始图像

随机增强的图像
from keras.preprocessing.image import ImageDataGeneratorimport pandas as pdimport Augmentorfrom PIL import Imageimport randomimport numpy as npimport matplotlib.pyplot as pltimport mathimport configdef plot_imgs_from_generator(generator, number_imgs_to_show=9): print ('Plotting images...') n_rows_cols = int(math.ceil(math.sqrt(number_imgs_to_show))) plot_index = 1 x_batch, _ = next(generator) while plot_index <= number_imgs_to_show: plt.subplot(n_rows_cols, n_rows_cols, plot_index) plt.imshow(x_batch[plot_index-1]) plot_index += 1 plt.show()def augment_image(np_img): p = Augmentor.Pipeline() p.rotate(probability=1, max_left_rotation=5, max_right_rotation=5) p.flip_left_right(probability=0.5) p.random_distortion(probability=0.25, grid_width=2, grid_height=2, magnitude=8) p.random_color(probability=1, min_factor=0.8, max_factor=1.2) p.random_contrast(probability=.5, min_factor=0.8, max_factor=1.2) p.random_brightness(probability=1, min_factor=0.5, max_factor=1.5) image = [Image.fromarray(np_img.astype('uint8'))] for operation in p.operations: r = round(random.uniform(0, 1), 1) if r <= operation.probability: image = operation.perform_operation(image) image = [np.array(i).astype('float64') for i in image] return image[0]image_processor = ImageDataGenerator( rescale=1./255, preprocessing_function=augment_image)# subtract validation size from training datawith open(config.CROPPED_IMGS_INFO_FILE) as f: for i, _ in enumerate(f): pass training_n = i - config.VALIDATION_SIZEtrain_df=pd.read_csv(config.CROPPED_IMGS_INFO_FILE, nrows=training_n)train_generator=image_processor.flow_from_dataframe( dataframe=train_df, directory=config.CROPPED_IMGS_DIR, x_col='name', y_col='bmi', class_mode='other', color_mode='rgb', target_size=(config.RESNET50_DEFAULT_IMG_WIDTH,config.RESNET50_DEFAULT_IMG_WIDTH), batch_size=config.TRAIN_BATCH_SIZE)模型建立
模型基于Keras ResNet50建立。ResNet50是目前常用于面部图像识别的优秀模型,其中从年龄和性别识别项目中经过广泛训练的年龄分类器生成的权重可用于迁移学习。
其他的一些网络架构也在面部识别任务中大放异彩,未来也可以尝试探索以上架构建立的BMI预测模型。
from tensorflow.python.keras.models import Modelfrom tensorflow.python.keras.applications import ResNet50from tensorflow.python.keras.layers import Denseimport configdef get_age_model(): # adapted from https://github.com/yu4u/age-gender-estimation/blob/master/age_estimation/model.py age_model = ResNet50( include_top=False, weights='imagenet', input_shape=(config.RESNET50_DEFAULT_IMG_WIDTH, config.RESNET50_DEFAULT_IMG_WIDTH, 3), pooling='avg') prediction = Dense(units=101, kernel_initializer='he_normal', use_bias=False, activation='softmax', name='pred_age')(age_model.output) age_model = Model(inputs=age_model.input, outputs=prediction) age_model.load_weights(config.AGE_TRAINED_WEIGHTS_FILE) print 'Loaded weights from age classifier' return age_modeldef get_model(): base_model = get_age_model() last_hidden_layer = base_model.get_layer(index=-2) base_model = Model( inputs=base_model.input, outputs=last_hidden_layer.output) prediction = Dense(1, kernel_initializer='normal')(base_model.output) model = Model(inputs=base_model.input, outputs=prediction) return model迁移学习
为了使用年龄分类器网络的权重(这些权重可帮助提取面部较低级别的特征),我们使用迁移学习的方法。我们为年龄网络赋予了一个新的线性回归输出层(输出的数字即代表BMI值),并使用MAE作为损失函数和Adam(基于一阶梯度优化随机目标函数的算法)作为训练优化器进行训练。
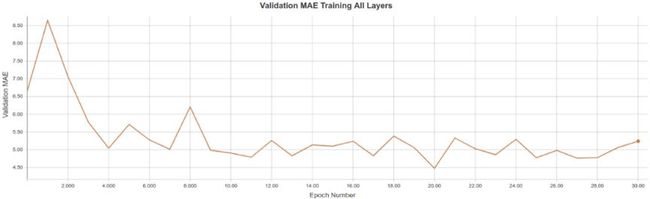
对模型进行初次训练时,我们固定了每一层原始年龄分类器,以便更新新的输出层的随机权重。如图所示,由于在第十个epoch之后没有观察到MAE的明显下降,初训便在完成10个epoch后经由early stopping停止。

在此之后,模型又经过 30 个epoch的训练,而且我们取消了层的固定,以用来微调网络中的所有权重。Early stopping也决定了这一阶段的epoch数:在观察到MAE在10个epoch后没有显著减少(即patience设置为10)时模型停止训练。由于模型在 20 个epoch之后达到了验证集上的最小MAE值,因此对模型的训练在 30个epoch之后停止。最后,模型采用了epoch = 20时的权重,接下来的展示也基于此权重进行。
import cv2import numpy as npfrom tensorflow.python.keras.callbacks import EarlyStopping, ModelCheckpoint, TensorBoardfrom train_generator import train_generator, plot_imgs_from_generatorfrom mae_callback import MAECallbackimport configbatches_per_epoch=train_generator.n //train_generator.batch_sizedef train_top_layer(model): print 'Training top layer...' for l in model.layers[:-1]: l.trainable = False model.compile( loss='mean_absolute_error', optimizer='adam') mae_callback = MAECallback() early_stopping_callback = EarlyStopping( monitor='val_mae', mode='min', verbose=1, patience=1) model_checkpoint_callback = ModelCheckpoint( 'saved_models/top_layer_trained_weights.{epoch:02d}-{val_mae:.2f}.h5', monitor='val_mae', mode='min', verbose=1, save_best_only=True) tensorboard_callback = TensorBoard( log_dir=config.TOP_LAYER_LOG_DIR, batch_size=train_generator.batch_size) model.fit_generator( generator=train_generator, steps_per_epoch=batches_per_epoch, epochs=20, callbacks=[ mae_callback, early_stopping_callback, model_checkpoint_callback, tensorboard_callback])def train_all_layers(model): print 'Training all layers...' for l in model.layers: l.trainable = True mae_callback = MAECallback() early_stopping_callback = EarlyStopping( monitor='val_mae', mode='min', verbose=1, patience=10) model_checkpoint_callback = ModelCheckpoint( 'saved_models/all_layers_trained_weights.{epoch:02d}-{val_mae:.2f}.h5', monitor='val_mae', mode='min', verbose=1, save_best_only=True) tensorboard_callback = TensorBoard( log_dir=config.ALL_LAYERS_LOG_DIR, batch_size=train_generator.batch_size) model.compile( loss='mean_absolute_error', optimizer='adam') model.fit_generator( generator=train_generator, steps_per_epoch=batches_per_epoch, epochs=100, callbacks=[ mae_callback, early_stopping_callback, model_checkpoint_callback, tensorboard_callback])演示示例
Christian Bale会因为不同角色而大改他的体重,在此便是是模型对Christian Bale的几幅人像预测的BMI值。Christian Bale的身高是6'0"(约1.83m),他的体重便可以通过模型预测的BMI推算而出。

左边的图像来自《机械师》,Bale当时曾表示他大概有135磅(约61.23kg)。如果他的体重是135磅,那么他的BMI是18.3 kg/m²(BMI的单位),而模型的预测值约有4 kg/m²的偏差(模型预测值为22.56 kg/m²)。
中间的图片是一个可以代表他真实体重的形象,这是他并没有为任何一个角色做出体重上的改变。右边的图像是他在拍摄《副总统》时的形象,我没有找到他体重的准确数值,但据几个消息来源说他此时的体重增加了45磅(约20.41kg)。
如果我们假设他的平均体重是200磅(约90.72kg),那么他此时的体重为245磅(约111.13kg),即拍摄《副总统》时的BMI为33.2 kg/m²,模型对这张图像的BMI预测仅有约1 kg/m²的偏差(模型预测值为34.60 kg/m²)。
讨论
该模型验证集MAE为4.48,如果给定高5"9重195磅(约1.75m高88.45kg重,美国男性的平均身高和体重),即体重指数为27.35 kg/m²,那么这个4.48的误差将导致模型预测范围为22.87 kg/m²至31.83 kg/m²,分别相当于163磅(约73.93kg)和227磅(约102.97kg)的重量。显然模型还有改进的余地,今后可以尝试减少这一误差。
模型有一个明显的缺点是在评估从用户正面以外的角度拍摄的图像时性能较差。另一个缺点是当用户处于黑暗环境中并由集中光源照射时的性能不佳,这可能可以解释模型对Christian Bale的第一张图像的不准确预测。当用户的面部受强烈的光线集中照射时可能会改变某些特征对模型的显著影响——阴影被扩大、脸的一侧可能比另一侧亮、皮肤外观或骨骼的曲率和细微之处的结构可能被破坏,从而影响模型的BMI预测。
另外,从模型对Christian Bale第一张图片的预测中可以看出,模型似乎也会对BMI较低的用户有所高估。
模型的这些缺点可能来源于训练数据中角度、集中照明和低 BMI 数据的缺失:大多数训练图像是在良好的照明条件下拍摄的用户正脸,而且样本的BMI都超过了25kg/m²。因此,模型可能无法充分了解面部特征与BMI在这些不同情况下的相关性。
由于无法公开发布训练数据集,因此可能无法自行训练模型,但如果有读者想亲自试验这一模型,可以clone这一代码库并按照 README 中的说明进行演示。Demo将通过计算机的摄像头获取视频并预测其检测到的人脸的 BMI,就如上面本文作者所录制的那样。
GitHub:
https://github.com/lsimmons2/bmi-project
原文链接:
https://medium.com/@leosimmons/estimating-body-mass-index-from-face-images-using-keras-and-transfer-learning-de25e1bc0212
实习/全职编辑记者招聘ing
加入我们,亲身体验一家专业科技媒体采写的每个细节,在最有前景的行业,和一群遍布全球最优秀的人一起成长。坐标北京·清华东门,在大数据文摘主页对话页回复“招聘”了解详情。简历请直接发送至[email protected]
志愿者介绍
后台回复“志愿者”加入我们

![]()