Python实现Canny边缘检测
文章目录
- 一、Canny边缘检测
- 二、具体步骤
-
- 1. 高斯平滑滤波 Noise Reduction
- 2. Sobel Kernel
- 3. NMS (Non-Maximum Suppression)
- 4.Hysteresis Thresholding
- 5.主函数
- 6.实验结果
- 三. 解决报错
-
- cv.imshow报错
- 解决方案
- 四 .完整代码
一、Canny边缘检测
基于Canny算子的边缘检测主要有5个步骤,依次是:
- 1.高斯滤波
- 2.像素梯度计算
- 3.非极大值抑制
- 4.滞后阈值处理
- 5.孤立弱边缘抑制(待完成),可参考:link.
二、具体步骤
1. 高斯平滑滤波 Noise Reduction
- ( 2 k + 1 ) ∗ ( 2 k + 1 ) (2 k+1) * (2 k+1) (2k+1)∗(2k+1) Gaussain filter:
G [ i , j ] = 1 2 π σ 2 e − ( i − k − 1 ) 2 + ( j − k − 1 ) 2 2 σ 2 G[i, j]=\frac{1}{2 \pi \sigma^{2}} e^{-\frac{(i-k-1)^{2}+(j-k-1)^{2}}{2 \sigma^{2}}} G[i,j]=2πσ21e−2σ2(i−k−1)2+(j−k−1)2
def smooth(image, sigma, length ):

    # define and compute kernel
    k = length // 2
    gaussian = np.zeros([length, length])  # init kernel
    coef = 2 * np.pi * sigma ** 2

    for i in range(length):
        for j in range(length):
            gaussian[i, j] = np.exp(-((i-k) ** 2 + (j-k) ** 2) / (2 * sigma ** 2)) / coef

    gaussian = gaussian / np.sum(gaussian) # normalize kernel


    # convolution     # !!!attention to the subscript !!!
    W, H = image.shape
    new_image = np.zeros([W - k * 2, H - k * 2]) # no padding (add padding ,to be continued...)

    for i in range(W - 2 * k):
        for j in range(H - 2 * k):
            new_image[i, j] = np.sum(image[i:i+length, j:j+length] * gaussian)

    new_image = np.uint8(new_image) # greyscale image
    return new_image
2. Sobel Kernel
- Smoothened image is then filtered with a Sobel kernel to get first derivative in horizontal direction ( (G_x)) and vertical direction ( (G_y)).
- Sobel Kernel
S x = [ − 1 0 + 1 − 2 0 + 2 − 1 0 + 1 ] S y = [ − 1 − 2 − 1 0 0 0 + 1 + 2 + 1 ] \begin{aligned} S_{x} &=\left[\begin{array}{ccc} -1 & 0 & +1 \\ -2 & 0 & +2 \\ -1 & 0 & +1 \end{array}\right] \\ S_{y} &=\left[\begin{array}{ccc} -1 & -2 & -1 \\ 0 & 0 & 0 \\ +1 & +2 & +1 \end{array}\right] \end{aligned} SxSy=⎣⎡−1−2−1000+1+2+1⎦⎤=⎣⎡−10+1−20+2−10+1⎦⎤
G = ( d x 2 + d y 2 ) θ = arctan d y d x θ ∈ ( − π / 2 , π / 2 ) \begin{gathered} G=\sqrt{\left(d_{x}^{2}+d_{y}^{2}\right)} \\ \theta=\arctan \frac{d_{y}}{d_{x}} \\ \theta \in (-\pi/2,\pi/2) \end{gathered} G=(dx2+dy2)θ=arctandxdyθ∈(−π/2,π/2)
代码):
def get_G_Theta(image):
    Sx = np.array([[-1, 0, 1], [-2, 0, 2], [-1, 0, 1]]) # can detect lines in vertical(along axis y) direction
    Sy = np.array([[-1, -2, -1], [0, 0, 0], [1, 2, 1]]) # can detect lines in horizontal(along axis x) direction

    W, H = image.shape
    gradients = np.zeros([W - 2, H - 2])  # -2 ?    -> no padding, so there is 2 pixels cannot be calculated gradients
    theta = np.zeros([W - 2, H - 2])

    for i in range(W - 2):
        for j in range(H - 2):
            dx = np.sum(image[i:i+3, j:j+3] * Sx)
            dy = np.sum(image[i:i+3, j:j+3] * Sy)
            gradients[i, j] = np.sqrt(dx ** 2 + dy ** 2)
            if dx == 0:   # attention !!when denominator is 0
                theta[i, j] = np.pi / 2
            else:
                theta[i, j] = np.arctan(dy / dx)

    gradients = np.uint8(gradients)
    return gradients, theta
3. NMS (Non-Maximum Suppression)
- 非极大值抑制 (不是最大值!

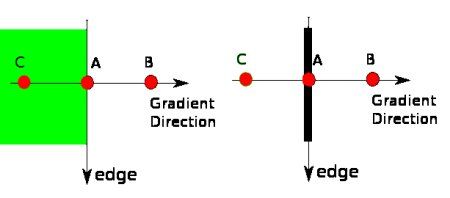
- Point A is on the edge ( in vertical direction). Gradient direction is normal to the edge. Point B and C are in gradient directions. So point A is checked with point B and C to see if it forms a local maximum. If so, it is considered for next stage, otherwise, it is suppressed ( put to zero).
- In short, the result is a binary image with “thin edges”.
- 下图是为了解释是如何进行插值计算上图像素点B,C上的梯度值(因为B,C可能不在某个确切的像素点上,比如见下图的d1与d2,因此需要进行插值计算。

- reference1:https://docs.opencv.org/3.4/da/d22/tutorial_py_canny.html
- image reference2:https://blog.csdn.net/qq_33668060/article/details/97194481
def NMS(gradients,direction):
    W, H = gradients.shape
    nms = np.copy(gradients[1:-1, 1:-1]) # without first/last columns/rows (gradients on four edges)  (W-2)X(H-2)

    for i in range(1, W - 1):            # original img's [1,W-2]  without margin
        for j in range(1, H - 1):
            theta = direction[i, j]
            k = np.tan(theta) # k = dy/dx

            # 图例2 dx*dy >= 0 and |dy|>|dx|
            if theta > np.pi / 4:
                k = 1/ k      # = dx/dy
                d1 = gradients[i-1,j] * (1-k)  + gradients[i-1,j+1]*k
                d2 = gradients[i+1,j] * (1-k)  + gradients[i+1,j-1]*k

            # 图例3 dx*dy >= 0 and |dy|<|dx|
            elif theta >= 0:
                d1 = gradients[i,j-1] * (1-k)  + gradients[i+1,j-1]*k
                d2 = gradients[i,j+1] * (1-k)  + gradients[i-1,j+1]*k

            # 图例4 dx*dy <= 0 and |dy|<|dx|
            elif theta >= - np.pi / 4:
                k *= -1
                d1 = gradients[i,j-1] * (1-k)  + gradients[i-1,j-1]*k
                d2 = gradients[i,j+1] * (1-k)  + gradients[i+1,j+1]*k

            # 图例1 dx*dy <= 0 and |dy|>|dx|
            else:
                k = -1/ k
                d1 = gradients[i-1,j] * (1-k)  + gradients[i-1,j-1]*k
                d2 = gradients[i+1,j] * (1-k)  + gradients[i+1,j+1]*k

            if d1 > gradients[i, j] or d2 > gradients[i, j]:
                nms[i - 1, j - 1] = 0
    return nms
4.Hysteresis Thresholding
- Above maxVal : A is considered as “sure-edge”.
- In (minVal,maxVal): C is considered valid edge(cause it is connected to edge A)
- In (minVal,maxVal): B is discarded(it is not connected to any “sure-edge”)
- Below minval ; discard
This stage also removes small pixels noises on the assumption that edges are long lines.
def thresholding(nms, minVal, maxVal):
    #return an binary img
    vis = np.zeros_like(nms)  # record the pixels visited
    edge = np.zeros_like(nms)
    W, H = edge.shape

    def check_N8(i,j):
        if (i >= W or i < 0 or j >= H or j < 0 or vis[i, j] == 1):
            return
        vis[i,j] = 1
        if nms[i,j] >= minVal :
            edge[i,j] = 255

    for w in range(W):
        for h in range(H):
            if vis[w, h] == 1:
                continue
            elif nms[w, h] <= minVal:
                vis[w, h] = 1
            elif nms[w, h] >= maxVal:
                vis[w,h] = 1
                edge[w,h] = 255 # sure-edge
                check_N8(w-1, h-1)
                check_N8(w-1, h  )
                check_N8(w-1, h+1)
                check_N8(w  , h-1)
                check_N8(w  , h+1)
                check_N8(w+1, h-1)
                check_N8(w+1, h  )
                check_N8(w+1, h+1)
    return edge
5.主函数
image = cv.imread("CUC.jpg", 0)  # 0指的是读为灰度图
smoothed_image = smooth(image,sigma=3,length=5)
gradients, direction = get_G_Theta(smoothed_image)
nms = NMS(gradients, direction)
edge = thresholding(nms,20, 80)
cv.imshow("edge",edge)
cv.imwrite('MyCannyEdge.jpg', edge, [cv.IMWRITE_PNG_COMPRESSION, 0])
cv.waitKey(0)
cv.destroyAllWindows()
6.实验结果
三. 解决报错
cv.imshow报错
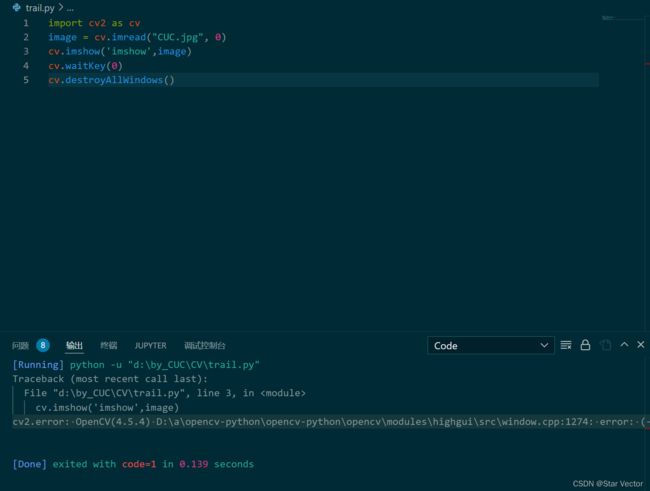
- cv2.error: OpenCV(4.5.4) D:\a\opencv-python\opencv-python\opencv\modules\highgui\src\window.cpp:1274: error: (-2:Unspecified error) The function is not implemented. Rebuild the library with Windows, GTK+ 2.x or Cocoa support. If you are on Ubuntu or Debian, install libgtk2.0-dev and pkg-config, then re-run cmake or configure script in function ‘cvShowImage’

解决方案
- imshow 需要下载含有contrib的opencv,如果不需要的话,普通的就可以了
- 命令1
pip uninstall opencv-contrib-python
直接通过命令可能无法卸载干净,如果它提示某些需要manually,则自己按照提示删除干净。确保卸载干净后,再重新安装
- 命令 2
pip install opencv-contrib-python
四 .完整代码
import cv2 as cv
import numpy as np

# 1. Noise Reduction
def smooth(image, sigma, length ):

    # define and compute kernel
    k = length // 2
    gaussian = np.zeros([length, length])  # init kernel
    coef = 2 * np.pi * sigma ** 2
    for i in range(length):
        for j in range(length):
            gaussian[i, j] = np.exp(-((i-k) ** 2 + (j-k) ** 2) / (2 * sigma ** 2)) / coef
    gaussian = gaussian / np.sum(gaussian) # normalize kernel


    # convolution     # !!!attention to the subscript !!!
    W, H = image.shape
    new_image = np.zeros([W - k * 2, H - k * 2]) # no padding (add padding ,to be continued...)

    for i in range(W - 2 * k):
        for j in range(H - 2 * k):
            new_image[i, j] = np.sum(image[i:i+length, j:j+length] * gaussian)

    new_image = np.uint8(new_image) # greyscale image
    return new_image

# 2. Sobel Kernel
def get_G_Theta(image):
    Sx = np.array([[-1, 0, 1], [-2, 0, 2], [-1, 0, 1]]) # can detect lines in vertical(along axis y) direction
    Sy = np.array([[-1, -2, -1], [0, 0, 0], [1, 2, 1]]) # can detect lines in horizontal(along axis x) direction

    W, H = image.shape
    gradients = np.zeros([W - 2, H - 2])  # -2 ?    -> no padding, so there is 2 pixels cannot be calculated gradients
    theta = np.zeros([W - 2, H - 2])

    for i in range(W - 2):
        for j in range(H - 2):
            dx = np.sum(image[i:i+3, j:j+3] * Sx)
            dy = np.sum(image[i:i+3, j:j+3] * Sy)
            gradients[i, j] = np.sqrt(dx ** 2 + dy ** 2)
            if dx == 0:   # attention !!when denominator is 0
                theta[i, j] = np.pi / 2
            else:
                theta[i, j] = np.arctan(dy / dx)

    gradients = np.uint8(gradients)
    return gradients, theta

#  3. Non-Maximum Suppression(NMS)
def NMS(gradients,direction):
    W, H = gradients.shape
    nms = np.copy(gradients[1:-1, 1:-1]) # without first/last columns/rows (gradients on four edges)  (W-2)X(H-2)

    for i in range(1, W - 1):            # original img's [1,W-2]  without margin
        for j in range(1, H - 1):
            theta = direction[i, j]
            k = np.tan(theta) # k = dy/dx

            # 图例2 dx*dy >= 0 and |dy|>|dx|
            if theta > np.pi / 4:
                k = 1/ k      # = dx/dy
                d1 = gradients[i-1,j] * (1-k)  + gradients[i-1,j+1]*k
                d2 = gradients[i+1,j] * (1-k)  + gradients[i+1,j-1]*k

            # 图例3 dx*dy >= 0 and |dy|<|dx|
            elif theta >= 0:
                d1 = gradients[i,j-1] * (1-k)  + gradients[i+1,j-1]*k
                d2 = gradients[i,j+1] * (1-k)  + gradients[i-1,j+1]*k

            # 图例4 dx*dy <= 0 and |dy|<|dx|
            elif theta >= - np.pi / 4:
                k *= -1
                d1 = gradients[i,j-1] * (1-k)  + gradients[i-1,j-1]*k
                d2 = gradients[i,j+1] * (1-k)  + gradients[i+1,j+1]*k

            # 图例1 dx*dy <= 0 and |dy|>|dx|
            else:
                k = -1/ k
                d1 = gradients[i-1,j] * (1-k)  + gradients[i-1,j-1]*k
                d2 = gradients[i+1,j] * (1-k)  + gradients[i+1,j+1]*k

            if d1 > gradients[i, j] or d2 > gradients[i, j]:
                nms[i - 1, j - 1] = 0
    return nms

# 4.Hysteresis Thresholding
def thresholding(nms, minVal, maxVal):
    #return an binary img
    vis = np.zeros_like(nms)  # record the pixels visited
    edge = np.zeros_like(nms)
    W, H = edge.shape

    def check_N8(i,j):
        if (i >= W or i < 0 or j >= H or j < 0 or vis[i, j] == 1):
            return
        vis[i,j] = 1
        if nms[i,j] >= minVal :
            edge[i,j] = 255

    for w in range(W):
        for h in range(H):
            if vis[w, h] == 1:
                continue
            elif nms[w, h] <= minVal:
                vis[w, h] = 1
            elif nms[w, h] >= maxVal:
                vis[w,h] = 1
                edge[w,h] = 255 # sure-edge
                check_N8(w-1, h-1)
                check_N8(w-1, h  )
                check_N8(w-1, h+1)
                check_N8(w  , h-1)
                check_N8(w  , h+1)
                check_N8(w+1, h-1)
                check_N8(w+1, h  )
                check_N8(w+1, h+1)
    return edge

# main
image = cv.imread("CUC.jpg", 0)
smoothed_image = smooth(image,sigma=3,length=5)
gradients, direction = get_G_Theta(smoothed_image)
nms = NMS(gradients, direction)
edge = thresholding(nms,20, 80)
cv.imshow("edge",edge)
cv.imwrite('MyCannyEdge.jpg', edge, [cv.IMWRITE_PNG_COMPRESSION, 0])
cv.waitKey(0)
cv.destroyAllWindows()

