CUDA学习(八)图像处理--不用texture
前面也学习了如何使用CUDA,今天就来试试它的图像处理,今天实现的一个功能是彩色图转换为灰度图。使用的开发环境是
VS2015+CUDA 9.1+Opencv340
安装好了之后新建一个工程,选择NVIDIA->CUDA9.1
新建了工程之后,需要自己配置Opencv340
可以选择使用它自己的kerner.cu,也可以选择自己新建一个.cu
这里添加,只能选择在工程上右键添加。
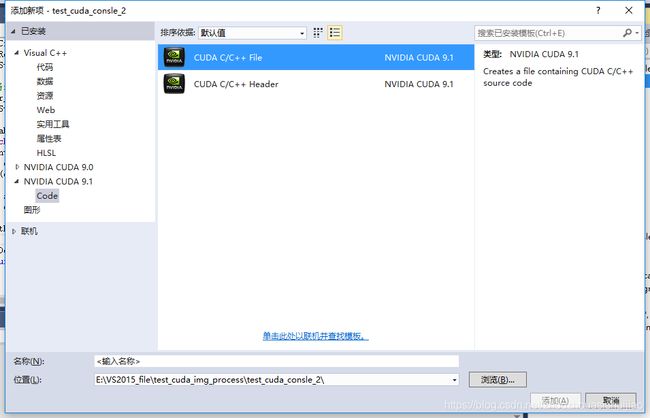
选择CUDA C/C++ File添加一个.cu文件
.cu文件的代码如下
//grayscale.cu
#include "math.h"
#include "stdio.h"
#include "algorithm"
#include "cuda_runtime.h"
#include "device_launch_parameters.h"
#include "helper_cuda.h"
#include "vector"
#include "vector_functions.hpp"

__global__ void rgba_to_greyscale(const uchar4* const rgbaImage,unsigned char* const greyImage,
	int numRows,int numCols)
{
	int index_x = blockIdx.x*blockDim.x + threadIdx.x;
	int index_y = blockIdx.y*blockDim.y + threadIdx.y;
	int grid_width = gridDim.x*blockDim.x;
	int index = index_y*grid_width + index_x;//index表示图像的指针index
	greyImage[index] = .299f*rgbaImage[index].x + .587f*rgbaImage[index].y + .114f*rgbaImage[index].z;

}

extern "C"
void your_rgba_to_greyscale( uchar4* const d_rgbaImage,
	unsigned char* const d_greyImage, size_t numRows, size_t numCols)
{
	const int thread = 16;
	const dim3 blockSize(thread,thread,1);
	const dim3 gridSize(ceil(numRows/(float)thread),ceil(numCols/(float)thread),1);
	rgba_to_greyscale<<>> (d_rgbaImage,d_greyImage,numRows,numCols);

	cudaDeviceSynchronize();
	checkCudaErrors(cudaGetLastError());
}
里面包含了__global__函数
再新建一个.h文件
#pragma once
#include "stdafx.h"
#include "opencv2/core/core.hpp"
#include "opencv2/highgui/highgui.hpp"
#include "opencv2/opencv.hpp"
#include "cuda.h"
#include "cuda_runtime.h"
#include "device_launch_parameters.h"
#include "helper_cuda.h"
#include "string"
#include "iostream"


cv::Mat imageRGBA;//四通道图像,有一个透明度通道
cv::Mat imageGrey;//灰度图像

uchar4 *d_rgbaImage_;//device端的rgba图像
unsigned char *d_greyImage_;//device端的灰度图像

size_t numRows() { return imageRGBA.rows; }//无符号64位整型
size_t numCols() { return imageRGBA.cols; }


//初始化device端的显存
void preProcess(uchar4** inputImage, unsigned char** greyImage, uchar4** d_rgbaImage, unsigned char** d_greyImage,
	const std::string &filename)
{
	checkCudaErrors(cudaFree(0));
	cv::Mat image;
	image = cv::imread(filename.c_str(), CV_LOAD_IMAGE_COLOR);
	if (image.empty())
	{
		std::cerr << "couldn't open file:" << filename << std::endl;
		exit(1);
	}
	cv::cvtColor(image, imageRGBA, CV_BGR2RGBA);//分成四个通道,是因为没有uchar3
	imageGrey.create(image.rows, image.cols, CV_8UC1);//创建灰度图

	if (!imageRGBA.isContinuous() || !imageGrey.isContinuous())
	{
		std::cerr << "Images aren't continuous!!Exitiong." << std::endl;
		exit(1);
	}

	*inputImage = (uchar4*)imageRGBA.ptr(0);//给host端的*inputImage指针赋值
	*greyImage = imageGrey.ptr(0);//给host端的*greyImage指针赋值
	const size_t numPixels = numRows()*numCols();//计算像素值
	checkCudaErrors(cudaMalloc(d_rgbaImage, sizeof(uchar4)*numPixels));//给device端的rgbaImage分配显存
	checkCudaErrors(cudaMalloc(d_greyImage, sizeof(unsigned char)*numPixels));//给device的greyImage分配显存
	checkCudaErrors(cudaMemset(*d_greyImage, 0, numPixels * sizeof(unsigned char)));//给d_greyImage初始化
	//把host端的inputImage复制到d_rgbaImage
	checkCudaErrors(cudaMemcpy(*d_rgbaImage, *inputImage, sizeof(uchar4)*numPixels, cudaMemcpyHostToDevice));
	d_rgbaImage_ = *d_rgbaImage;//是为了free用
	d_greyImage_ = *d_greyImage;//是为了free用
}

//把计算的结果复制回host端
//释放device端显存
void postProcess(const std::string& output_file)
{
	const int numPixels = numRows()*numCols();
	checkCudaErrors(cudaMemcpy(imageGrey.ptr(0), d_greyImage_, sizeof(unsigned char)*numPixels,
		cudaMemcpyDeviceToHost));
	cv::imwrite(output_file.c_str(), imageGrey);

	cudaFree(d_rgbaImage_);
	cudaFree(d_greyImage_);
}
从NVIDIA SDK里面找到helper_string.h helpr_timer.h exception.h文件添加到工程中
再添加一个.cpp文件
// test_cuda_consle_2.cpp : 定义控制台应用程序的入口点。
//

#include "stdafx.h"
#include "hw.h"
#include "helper_timer.h"
//#include "grayscale.cu"这一句不能有

extern "C" void your_rgba_to_greyscale(uchar4* const d_rgbaImage,
	unsigned char* const d_greyImage, size_t numRows, size_t numCols);


int main()
{
	uchar4 *h_rgbaImage, *d_rgbaImage;
	unsigned char *h_greyImage, *d_greyImage;
	std::string input_file = "test.bmp";
	std::string output_file = "save.bmp";
	preProcess(&h_rgbaImage, &h_greyImage, &d_rgbaImage, &d_greyImage, input_file);
	StopWatchInterface *timer = NULL;
	sdkCreateTimer(&timer);
	sdkResetTimer(&timer);
	sdkStartTimer(&timer);

	//将rgba转换为grey
	your_rgba_to_greyscale( d_rgbaImage, d_greyImage, numRows(), numCols());
	sdkStopTimer(&timer);

	cudaDeviceSynchronize();
	checkCudaErrors(cudaGetLastError());
	printf("\n");
	int err = printf("%f msecs.\n", sdkGetTimerValue(&timer));
	if (err < 0)
	{
		std::cerr << "Couldn't print timing information! STDOUT Closed" << std::endl;
		exit(1);
	}
	postProcess(output_file);//保存输出

	sdkDeleteTimer(&timer);
	return 0;
}
该文件里面包含了main()函数
整个工程的组合是,一个是host需要处理的.h文件,里面做了一些图像的预处理(读入图片,分配内存),device端处理(分配device端显存,初始化,复制内存(host to device/device to host)),图片保存(释放内存,释放显存);一个.cu文件,主要功能是设计计算指令;一个.cpp文件,提供main函数
有些细节需要注意
1.cu文件不能包含到cpp文件中,这样会用c++的编译器编译cu文件,会报错,需要采用extern "C"
2.一些头文件因为没有集成到CUDA toolkit中,需要到SDK中寻找
工程文件放到了github上https://github.com/Yanhongzhou1994/test_cuda_img
欢迎大家一起学习


