Springboot+Pytorch+React实现基于神经网络的图像识别系统
文章目录
- 前言
- 一、概览
-
- 1.系统的整体框架图
- 2.关键技术
- 二、代码详解
-
- 1.Python算法模块
- 2.Java模块
- 3.前端模块
- 三 代码地址
- 总结
前言
由于最近团队项目需要,前段时间我一直在研究卷积神经网络,终于在网络结构上有所突破,终于知道怎么改进一些神经网络了。我的毕设题目就是无人机的识别,用无人机的射频特征转换为图片。然后根据图片来进行识别。导师说光做理论可能工作量不够,让我给自己的算法套个软件的壳子。我心想也不是什么难事,就答应了。所以就有了这篇博客的由来。这个系统是我毕设的最初带版本,很简单就实现了前端调用后端,后端调用Python的神经网络算法模块。因为这个是我的毕设,我还没毕业,所以具体的网络结构我并不会提供,但是整体的框架是非常通用的,你们只要换成你们自己训练的神经网络就可以了。本篇博客提供的代码和思路我相信,只要有点基础的人就能游刃有余的用到自己的项目中。
一、概览
1.系统的整体框架图

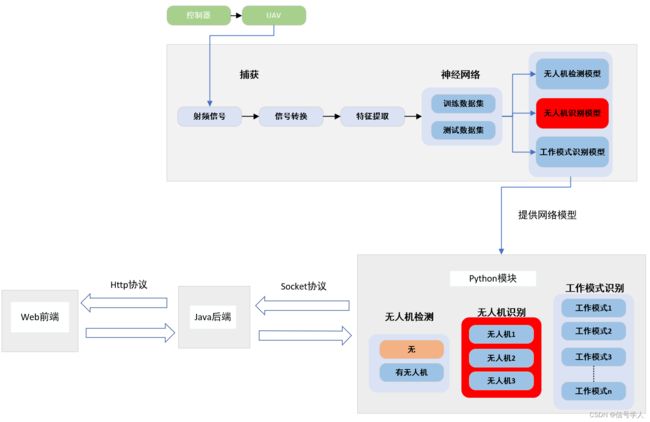
系统的大致流程是 Web前端把用户输入的图片发送http请求给Java后端,Java后端调用Python的算法模块,算法模块调用神经网络得到预测的结果,并把结果返回给Java后端,Java后端再把预测结果进行格式转换,转换给前端来做一个显示。web前端的效果图如下:

由于此版本为最初版本,所以只实现了系统框图中红色部分也就是只对无人机型号的识别,一共有五种不同的无人机加上干扰信号,所以本次训练出来的神经网络是一个六分类的神经网络。
2.关键技术
前端采用React框架并使用antd组件进行开发
后端采用Springboot进行开发
算法模块使用Python 神经网络结构是基于Pytorch
后端和算法模块之间的调用是基于Socket
ps:Java调用Python的方式有很多种,之所以采用Socket这种方式是因为我觉得两个独立的进程会比较好,而且算法模块和Springboot都是多线程的,可以同时处理多个并发请求。对于Socket不熟悉的可以自行百度。
二、代码详解
1.Python算法模块
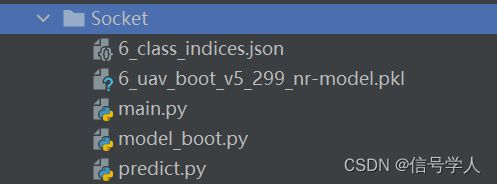
模块整体结构:

该模块一共有五个文件,main.py主要是搭建Socket服务端的也就是主程序模块,model_boot.py是卷积神经网络的结构模块(该模块不会开源,需要换成你们自己的网络结构)。predict.py是主程序调用神经网络进行图片识别的模块。6_class_indices.json是一个无人机类型的索引文件(等下会展示)。6_uav_boot_v5_299_nr-model.pkl是已经训练好的神经网络文件。
main.py代码如下:
import socket
import threading
import json
import numpy as np
import matplotlib.pyplot as plt
import base64
import cv2
from predict import nn_predict
from PIL import Image


def main():
    # 创建服务器套接字
    serversocket = socket.socket(socket.AF_INET, socket.SOCK_STREAM)
    # 获取本地主机名称
    # host = socket.gethostname()  # LAPTOP-00KFAMOU
    host = '127.0.0.1'
    # 设置一个端口号
    port = 9999
    # 将套接字与本地主机和端口绑定
    serversocket.bind((host, port))
    # 设置监听最大连接数
    serversocket.listen(5)
    # 获取本地服务器信息
    myaddr = serversocket.getsockname()
    print("服务器地址:%s" % str(myaddr))

    # 循环等待接受客户端信息
    while True:
        # 获取一个客户端连接
        clientsocket, addr = serversocket.accept()
        # print("连接地址:%s" % str(addr))
        try:
            t = ImgServerThreading(clientsocket)  # 为每一个请求开启一个线程处理请求
            t.start()
            pass
        except Exception as identifier:
            print(identifier)
            pass
        pass

    serversocket.close()
    pass


class ImgServerThreading(threading.Thread):
    def __init__(self, clientsocket, recvsize=1024 * 20, encoding="utf-8"):
        threading.Thread.__init__(self)
        self._socket = clientsocket
        self._recvsize = recvsize
        self._encoding = encoding
        pass

    def run(self):
        # print("开启线程......")

        try:
            # 接受数据
            rec_d = bytes([])
            while True:
                # 读取recvsize个字节
                data = self._socket.recv(self._recvsize)
                if not data or len(data) == 0:
                    break
                else:
                    rec_d = rec_d + data
            rec_d = base64.b64decode(rec_d)

            # cv2方法
            np_arr = np.frombuffer(rec_d, np.uint8)
            image = cv2.imdecode(np_arr, cv2.IMREAD_COLOR)  # 函数从指定的内存缓存中读取数据,并把数据转换(解码)成图像格式;主要用于从网络传输数据中恢复出图像。
            image = cv2.cvtColor(image, cv2.COLOR_BGR2RGB)  # cv2解码以后的格式是BGR格式 而matplotlib requires RGB 格式
            # 展示图片
            # plt.imshow(image)
            # plt.show()
            image = Image.fromarray(image)
            # 神经网络处理
            result, probability, all_predicts = nn_predict(image)

            sendmsg = {
                'code': 200,
                'msg': 'success',
                'data': {'result': result, 'probability': probability, 'all_predicts': all_predicts}
            }

            # 转换为json格式字符串
            sendmsg = json.dumps(sendmsg)
            # 发送数据
            self._socket.send(("%s" % sendmsg).encode(self._encoding))
            pass
        except Exception as identifier:
            sendmsg = {
                'code': 500,
                'msg': 'error'
            }
            # 转化为json格式字符串
            sendmsg = json.dumps(sendmsg)
            self._socket.send(("%s" % sendmsg).encode(self._encoding))
            print(identifier)
            pass
        finally:
            self._socket.close()
        # print("线程任务结束......")

        pass

    def __del__(self):

        pass


if __name__ == '__main__':
    main()
prdict.py的代码如下:
import torch
from torchvision import transforms
import json


def nn_predict(img):
    # 定义送入神经网络图片的预处理方式
    data_transform = transforms.Compose([
        # transforms.Resize(256),
        # transforms.CenterCrop(224),
        transforms.Resize([299, 299]),
        transforms.ToTensor(),
        transforms.Normalize([0.485, 0.456, 0.406], [0.229, 0.224, 0.225])])

    # [N,C,H,W]
    img = data_transform(img)
    # expand batch dimension
    img = torch.unsqueeze(img, dim=0)

    # 判断当前环境是否支持cuda
    device = torch.device("cuda" if torch.cuda.is_available() else "cpu")
    img = img.to(device)

    # read class_indict
    try:
        json_file = open('6_class_indices.json', 'r')
        class_indict = json.load(json_file)
    except Exception as e:
        print(e)
        exit(-1)

    # create model
    net = torch.load("./6_uav_boot_v5_299_nr-model.pkl")
    net.to(device)
    net.eval()
    with torch.no_grad():
        # predict class
        output = torch.squeeze(net(img))
        predict = torch.softmax(output, dim=0)
        predict_cla = torch.argmax(predict).cpu().numpy()  # 如果报错使用这个  torch.argmax(predict).numpy()

        result = class_indict[str(predict_cla)]
        probability = predict[predict_cla].cpu().numpy()  # 如果报错使用这个 predict[predict_cla].numpy()

        # 根据 6_class_indices.json文件内容 来进行编写
        all_predicts = {'beebeerun': predict[0].cpu().numpy().tolist(), 'dji_inspire': predict[1].cpu().numpy().tolist(),
                  'dji_m600': predict[2].cpu().numpy().tolist(), 'dji_mavicpro': predict[3].cpu().numpy().tolist(),
                  'dji_phantom': predict[4].cpu().numpy().tolist(), 'none_uav': predict[5].cpu().numpy().tolist()
                  }

        return result, probability.tolist(), all_predicts
从上面两个文件中可以看到,算法模块的输入是图片,算法模块的返回结果是JSON格式的字符串。格式具体如下:
{'code': 200, 'msg': 'success', 'data': {'result': 'DJI_MAVICPRO', 'probability': 0.9999903440475464, 'all_predicts': {'beebeerun': 2.1368125047160902e-08, 'dji_inspire': 1.574390751102328e-08, 'dji_m600': 2.1859609660168644e-06, 'dji_mavicpro': 0.9999903440475464, 'dji_phantom': 1.2658721182390309e-08, 'none_uav': 7.4020667852892075e-06}}}
data中的result是本次识别的结果,probability是该结果的概率。all_predicts是六种分类的具体概率。
6_class_indices.json文件的内容需要换成你们自己识别的内容。具体结构如下:
{
    "0": "BEEBEERUN",
    "1": "DJI_INSPIRE",
    "2": "DJI_M600",
    "3": "DJI_MAVICPRO",
    "4": "DJI_PHANTOM",
    "5": "none_uav"
}
2.Java模块
Controller层代码如下:
package com.ypf.nn.controller;

import com.ypf.nn.pojo.vo.ResultVo;
import com.ypf.nn.service.impl.NNServiceImpl;
import com.ypf.nn.utils.RespBean;
import com.ypf.nn.utils.RespBeanEnum;
import org.springframework.beans.factory.annotation.Autowired;
import org.springframework.util.StringUtils;
import org.springframework.web.bind.annotation.PostMapping;
import org.springframework.web.bind.annotation.RequestMapping;
import org.springframework.web.bind.annotation.RequestParam;
import org.springframework.web.bind.annotation.RestController;
import org.springframework.web.multipart.MultipartFile;

import java.util.Objects;

@RestController
@RequestMapping("/nn")
public class NNController {

    @Autowired
    private NNServiceImpl nnService;

    @PostMapping("/recognize")
    public RespBean recognizeImage(@RequestParam("image") MultipartFile image){
        String originalFileName = StringUtils.cleanPath(Objects.requireNonNull(image.getOriginalFilename()));

        // 1 限制上传类型只能是jar或者json类型
        if (!(originalFileName.contains(".jpg")||originalFileName.contains(".png")||originalFileName.contains(".jepg"))){
            return RespBean.error(RespBeanEnum.IMAGE_FORM_ERROR);
        }
        // 2 判断文件是否为空
        if (image.isEmpty()){
            return RespBean.error(RespBeanEnum.UPLOAD_IMAGE_EMPTY);
        }

         ResultVo resultVo = nnService.recognizeImage(image);

         return RespBean.success(resultVo.getData());
    }
}
计算接口的输入是前端输入的图片。
service层的代码如下:
package com.ypf.nn.service.impl;

import com.ypf.nn.pojo.vo.ResultVo;
import com.ypf.nn.service.NNService;
import com.ypf.nn.utils.NNUtil;
import org.springframework.stereotype.Service;
import org.springframework.web.multipart.MultipartFile;

@Service
public class NNServiceImpl implements NNService {

    @Override
    public ResultVo recognizeImage(MultipartFile image) {
        ResultVo resultVo = NNUtil.callNNbyImg(image);
        return resultVo;
    }
}
service层其实没什么东西,就是调用了NNUtil模块,NNUtil主要是实现了Socket的客户端,将图片作为输入调用Python算法模块。 NNUtil具体代码如下:
package com.ypf.nn.utils;

import com.alibaba.fastjson.JSON;
import com.ypf.nn.pojo.vo.ResultVo;
import org.springframework.web.multipart.MultipartFile;

import java.io.*;
import java.net.Socket;
import java.util.Base64;

public class NNUtil {
    public static ResultVo callNNbyImg(MultipartFile image){

        // 要传输的本地图片路径地址
//        File f = new File("C:\\Users\\yangpengfei\\Desktop\\INSPIRE_10M_FLYING_ABOVE00001.png");

        String host = "127.0.0.1"; // 本机ip
        int port = 9999;
        Socket socket = null;
        try {
            socket = new Socket(host,port);

            OutputStream os = socket.getOutputStream();
//            FileInputStream imageIs = new FileInputStream(f); // 使用本地图片时打开此注释

            InputStream imageIs = image.getInputStream();

            ByteArrayOutputStream baos = new ByteArrayOutputStream();
            int length = 0;
            byte[] sendBytes = null;
            sendBytes = new byte[1024*20];
            while ((length = imageIs.read(sendBytes,0,sendBytes.length))>0){
                baos.write(sendBytes,0,length);
            }
            baos.flush();
            PrintWriter pw = new PrintWriter(os);
            pw.write(Base64.getEncoder().encodeToString(baos.toByteArray()));
            pw.flush();

            socket.shutdownOutput();  // 告诉服务端 客户端已经发送完毕

            InputStream is = socket.getInputStream();
            BufferedReader br = new BufferedReader(new InputStreamReader(is,"utf-8"));
            String info = br.readLine();

            ResultVo resultVo = JSON.parseObject(info, ResultVo.class);

            os.close();
            imageIs.close();
            pw.close();
            baos.close();

            return resultVo;

        } catch (IOException e) {
            e.printStackTrace();
        }finally {
            if (socket!=null){
                try {
                    socket.close();
                } catch (IOException e) {
                    e.printStackTrace();
                }
            }
        }

        return null;
    }


}
3.前端模块
前端界面也很简单都是使用的是antd组件,前端会产生跨域问题,可以配置一个setupProxy.js文件来解决跨域。完整代码会在文末贴出。
前端核心代码如下:
import React, { Component } from 'react'
import { message, Upload, Button, Spin, Progress } from 'antd';
import { InboxOutlined, } from '@ant-design/icons';
import { ExclamationCircleOutlined, LoadingOutlined } from '@ant-design/icons';
import axios from 'axios';


import "./App.css"

const { Dragger } = Upload;

const antIcon = (
  <LoadingOutlined
    style={{
      fontSize: 24,
    }}
    spin
  />
);

function keepNumDecimalTakeUpInteger(num) {
      num = Math.floor(num*100*1000)/1000
      return num
}


export default class App extends Component {
  state = {
    fileList: [],  // 待上传文件数组
    isLoading: false,  // 控制是否为加载中
    isResultDisplay: false,  // 控制是否显示识别结果
    allPredicts: {},   // 所有的预测结果
    result:''
  }

  // 上传文件函数
  handleChange = (info) => {
    this.setState({ fileList: info.fileList, isResultDisplay: false }) // info.fileList 保存了上传的文件列表
  }

  // 向后端请求
  handleRecognize = () => {
    const { fileList } = this.state
    this.setState({ isLoading: true })
    const formData = new FormData();//创建formData对象
    fileList.forEach(item => {
      //将fileList中每个元素的file添加到formdata对象中
      //formdata对Key值相同的,会自动封装成一个数组
      formData.append('image', item.originFileObj);
    });
    axios({
      method: 'post',
      url: 'http://localhost:3000/api/nn/recognize',
      data: formData
    }).then(res => {
      console.log(res.data.data.all_predicts)
      if (res.data.code === 200) { //上传成功后执行的函数  这段代码我写死了 其实不应该这样写的 可扩展性很差。下一版本我会改进的。
        let all_predicts = res.data.data.all_predicts;
        all_predicts.dji_inspire = keepNumDecimalTakeUpInteger(all_predicts.dji_inspire)
        all_predicts.beebeerun = keepNumDecimalTakeUpInteger(all_predicts.beebeerun)
        all_predicts.none_uav = keepNumDecimalTakeUpInteger(all_predicts.none_uav)
        all_predicts.dji_m600 = keepNumDecimalTakeUpInteger(all_predicts.dji_m600)
        all_predicts.dji_mavicpro = keepNumDecimalTakeUpInteger(all_predicts.dji_mavicpro)
        all_predicts.dji_phantom = keepNumDecimalTakeUpInteger(all_predicts.dji_phantom)
        this.setState({ isResultDisplay: true, allPredicts: all_predicts,result:res.data.data.result})

      }
    }).catch(err => {

    }).finally(
      this.setState({ isLoading: false })
    )

  }


  render() {
    const { isLoading, isResultDisplay,allPredicts,result} = this.state
    return (

      <Spin indicator={antIcon} size='large' spinning={isLoading} tip="图片识别中...">
        <div className='center' >

          <div className='header'></div>
          <div className='dragger'>
            <Dragger
              beforeUpload={() => {
                //阻止上传
                return false;
              }}
              onChange={(info) => { this.handleChange(info) }}
              maxCount={1}  // 最大上传数1
            >
              <p className="ant-upload-drag-icon">
                <InboxOutlined />
              </p>
              <p className="ant-upload-text">点击或者拖拽待识别的图片到此区域</p>
              <p className="ant-upload-hint" style={{ color: '#1890FF' }}>
                仅支持jpg、png、jepg 格式的图片
              </p>
            </Dragger>
          </div>


          <Button type='primary' style={{ marginRight: 0 }} onClick={() => { this.handleRecognize() }}>开始识别</Button>

          <div className='content' hidden={!isResultDisplay}>
            <div className='content-header'>识别结果:<span style={{ color: 'red' }}>{result}</span> </div>
            <>
              <div className='content-inline-block'>
                <div style={{ marginBottom: 5 }}>
                  BEEBEERUN
                </div>
                <Progress type="circle" percent={allPredicts.beebeerun} strokeColor={{
                  '0%': '#108ee9',
                  '100%': '#87d068',
                }} />
              </div>
              <div className='content-inline-block' >
                <div style={{ marginBottom: 5 }}>
                  DJI_INSPIRE
                </div>
                <Progress type="circle" percent={allPredicts.dji_inspire} strokeColor={{
                  '0%': '#108ee9',
                  '100%': '#87d068',
                }} />
              </div>
              <div className='content-inline-block'>
                <div style={{ marginBottom: 5 }}>
                  DJI_M600
                </div>
                <Progress type="circle" percent={allPredicts.dji_m600} strokeColor={{
                  '0%': '#108ee9',
                  '100%': '#87d068',
                }} />
              </div>
              <div className='content-inline-block'>
                <div style={{ marginBottom: 5 }}>
                  DJI_MAVICPRO
                </div>
                <Progress type="circle" percent={allPredicts.dji_mavicpro} strokeColor={{
                  '0%': '#108ee9',
                  '100%': '#87d068',
                }} />
              </div>
              <div className='content-inline-block'>
                <div style={{ marginBottom: 5 }}>
                  DJI_PHANTOM
                </div>
                <Progress type="circle" percent={allPredicts.dji_phantom} strokeColor={{
                  '0%': '#108ee9',
                  '100%': '#87d068',
                }} />
              </div>
              <div className='content-inline-block'>
                <div style={{ marginBottom: 5 }}>
                  非无人机
                </div>
                <Progress type="circle" percent={allPredicts.none_uav} strokeColor={{
                  '0%': '#108ee9',
                  '100%': '#87d068',
                }} />
              </div>
            </>
          </div>
        </div>


      </Spin>


    )
  }
}
三 代码地址
gitee地址:https://gitee.com/yang-pengfei1999/socket-nn
总结
再次声明此版本为初代版本,有些代码写的很不完善,熬了一个大夜写的。再以后的版本中会对这些代码进一步优化。
内心独白,可以跳过。上次写博客还是四月的事情一晃又是四个多月,四个多月经历了太多事情,做了很多错事。成都很大两千多万人,我不算聪明也没有什么天赋异禀,想在成都闯出一片天地就得花比别人更多的时间和熬住更多的寂寞。写代码是我热爱的事情,有一天它也会成为我吃饭的饭碗。要不断学习不断进步我才能更强,加油吧,别做那个不甘于平凡又陷于平凡的人。

