基于HOG+LBP完成特征工程,基于机器学习模型同时完成人脸识别+表情识别
这周前两天有时间我写了一篇博文,基于LBP和HOG实现人脸好表情特征的提取计算,之后分别训练了人脸识别模型和表情识别模型,在推理阶段实现了单张图像一次性人脸识别和表情识别的计算分析,但这个我前面就说了这个还是间接的实现方式,不是像深度学习那样可以通过构建训练一个多任务分类识别的模型可以实现单个模型同时完成多个任务,我在写上篇文章的时候突然想到了机器学习也有类似的技术,就是多标签分类的构建方式,这里我就是基于这样地构建形式来实现类似于深度学习模型的构建方式,能够实现单个模型同时完成多个任务。
上篇文章如下,感兴趣的话可以自行阅读:
《基于HOG、LBP完成特征工程,基于SVM/RF/XGBOOST/GBDT/CNN/DNN完成人脸识别+表情识别》
本文使用到的数据集与上文完全一致,这里就不再赘述了。
这里借助于多标签分类任务的构建方式来同时实现人脸识别和表情识别,所以就不再分别基于LBP和HOG来进行人脸特征提取和表情特征提取,而是仅仅需要对同一份图像数据集进行分别进行一次LBP特征提取和HOG特征提取即可,相应的方法与前文完全相同,这里不再赘述了。
接下来是构建数据集的和核心操作,我们需要基于数据集种图像的id和对应的所属类别label构建映射字典,之后将两部分的数据标签进行编码与合并处理。
对于表情数据表情处理核心实现如下:
emotion_dict = {}
emotion_labels = os.listdir(emotionDir)
for one_emo in os.listdir(emotionDir):
    oneDir = emotionDir + one_emo + "/"
    for one_pic in os.listdir(oneDir):
        one_label_list = [0] * len(emotion_labels)
        one_index = emotion_labels.index(one_emo)
        one_label_list[one_index] = 1
        emotion_dict[one_pic] = one_label_list
对于人脸数据集的处理也是一样的,核心实现如下所示:
face_dict = {}
face_labels = os.listdir(faceDir)
for one_face in os.listdir(faceDir):
    oneDir = faceDir + one_face + "/"
    for one_pic in os.listdir(oneDir):
        one_label_list = [0] * len(face_labels)
        one_index = face_labels.index(one_face)
        one_label_list[one_index] = 1
        face_dict[one_pic] = one_label_list
上面两部分分别完成了表情数据标签映射和人脸数据标签映射数据的构建处理,接下来就是需要将LBP和HOG提取的特征和label数据进行拼接,我这里主要实现了三种特征数据和标签数据构建方式,分别如下:
1、LBP特征+label数据
2、HOG特征+label数据
3、LBP+HOG特征+label数据
接下来分别看下每种方法的核心实现:
方法一:LBP特征+label数据
X, y = [], []
for one_pic in lbpFeature:
    one_vec = lbpFeature[one_pic]
    one_emo_label = emotion_dict[one_pic]
    one_face_label = face_dict[one_pic]
    one_label = one_emo_label + one_face_label
    X.append(one_vec)
    y.append(one_label)
lbp = {}
lbp["X"], lbp["y"] = X, y
with open("lbp.json", "w") as f:
    f.write(json.dumps(lbp))
方法二:HOG特征+label数据
X, y = [], []
for one_pic in hogFeature:
    one_vec = hogFeature[one_pic]
    one_emo_label = emotion_dict[one_pic]
    one_face_label = face_dict[one_pic]
    one_label = one_emo_label + one_face_label
    X.append(one_vec)
    y.append(one_label)
hog = {}
hog["X"], hog["y"] = X, y
with open("hog.json", "w") as f:
    f.write(json.dumps(hog))
方法三:HOG+LBP特征+label数据
X, y = [], []
for one_pic in hogFeature:
    if one_pic in lbpFeature:
        one_hog_vec = hogFeature[one_pic]
        one_lbp_vec = lbpFeature[one_pic]
        one_vec = one_hog_vec + one_lbp_vec
        one_emo_label = emotion_dict[one_pic]
        one_face_label = face_dict[one_pic]
        one_label = one_emo_label + one_face_label
        X.append(one_vec)
        y.append(one_label)
total = {}
total["X"], total["y"] = X, y
with open("total.json", "w") as f:
    f.write(json.dumps(total))
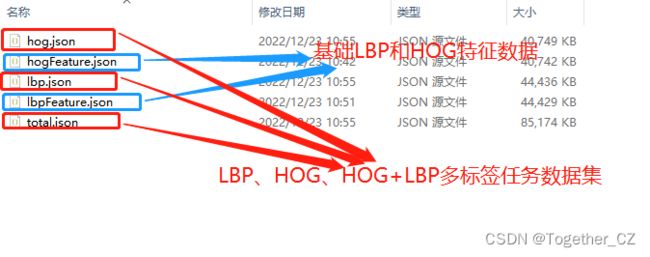
生成结果文件如下所示:
后续搭建训练机器学习模型就会使用后续拼接得到的多标签任务数据集了。
接下来我分别使用了决策树DT模型、随机森林RF模型和多层感知机MLP模型来分别进行模型搭建训练和测试评估。核心实现如下所示:
def mainModel():
    """
    DT  RF  MLP
    """
    X,y=loadData()
    model=initModel()
    X_train, X_test, y_train ,y_test = train_test_split(X, y, test_size=0.2)
    DT = DecisionTreeClassifier()
    DT.fit(X_train, y_train)
    y_pred = DT.predict(X_test)
    dict1=evaluation(y_test, y_pred)
    RF = RandomForestClassifier()
    RF.fit(X_train, y_train)
    y_pred = RF.predict(X_test)
    dict2=evaluation(y_test, y_pred)
    MLP=MLPClassifier()
    MLP.fit(X_train, y_train)
    y_pred = MLP.predict(X_test)
    dict3=evaluation(y_test, y_pred)
    #对比可视化
    comparePloter(dict1, dict2, dict3, save_path="evaluation.png")
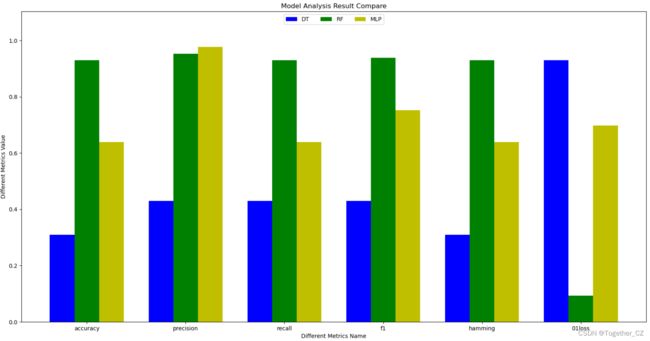
这里分别计算了:准确率、精确率、召回率、F1值、汉明得分,zero_one_loss几种评估指标,结果如下:
{
	"DT": {
		"accuracy": 0.31007751937984509,
		"precision": 0.43023255813953489,
		"recall": 0.43023255813953489,
		"f1": 0.43023255813953489,
		"hamming": 0.31007751937984498,
		"01loss": 0.9302325581395349
	},
	"RF": {
		"accuracy": 0.9302325581395349,
		"precision": 0.9534883720930233,
		"recall": 0.9302325581395349,
		"f1": 0.937984496124031,
		"hamming": 0.9302325581395349,
		"01loss": 0.09302325581395354
	},
	"MLP": {
		"accuracy": 0.6395348837209303,
		"precision": 0.9767441860465116,
		"recall": 0.6395348837209303,
		"f1": 0.7519379844961244,
		"hamming": 0.6395348837209303,
		"01loss": 0.6976744186046512
	}
}
为了更加直观地呈现不同模型的效果,这里对其进行了可视化,如下所示:
可以看到:随机森林模型相对效果还是很不错的。
为了能够实际测试使用,这里编写了对应的推理模块,核心实现如下:
def singlePredict(image_path="test.png"):
    """
    模型预测
    """
    one_img = cv2.imread(image_path)
    gray = cv2.cvtColor(one_img, cv2.COLOR_BGR2GRAY)
    faces = face_cascade.detectMultiScale(gray, 1.3, 5)
    x, y, w, h = faces[0]
    f = cv2.resize(gray[y : (y + h), x : (x + w)], (200, 200))
    cv2.imwrite("temp.jpg", f)
    hog_vec = HOGVEC(pic="temp.jpg")
    lbp_vec = LBPVEC(pic="temp.jpg")
    # 模型
    dt_result = dtModel.predict([lbp_vec]).tolist()[0]
    print("dt_result: ", dt_result)
    os.remove("temp.jpg")
    # 结果解码
    pred_list = []
    for i in range(len(dt_result)):
        if i - int(dt_result[i]) == i:
            pass
        else:
            pred_list.append(labels[i])
    print("pred_list: ", pred_list)
    print("EmotionRecognitionResult: ", map_dict[pred_list[0]])
    print("FaceRecognitionResult: ", pred_list[1])
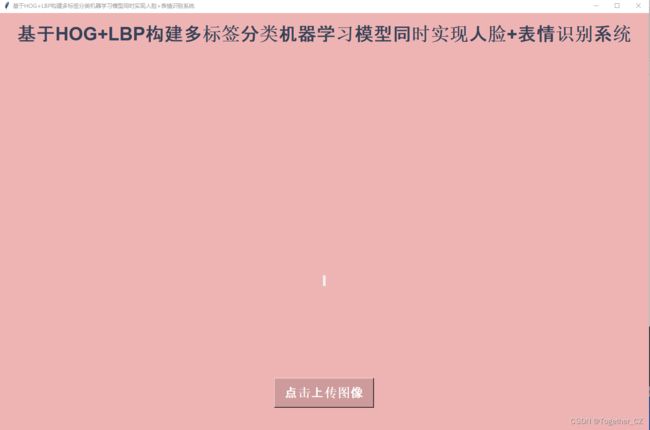
这里跟上文一样同样开发了对应的界面模块如下:
上传所需要测试计算的图像如下所示:
点击识别计算,如下所示:
这里将前面开发的DT、RF和MLP三种模型都给集成进来了。可以看到:随机选取的一张图片三种模型的测试结果都是一致的。


