数字图像处理-----卷(一)
数字图像处理(java版)
-
- 基本Swing UI组件与图像显示
- 插值算法
-
- 1、最邻近插值算法
- 2、双线性插值算法
- 3、三次卷积插值
- 点特征提取算子
-
- 1、Moravec算子
- 线特征提取算子
-
- 1、Robot算子
- 2、Sobel算子和Prewitt算子
- 3、Laplace算子
基本Swing UI组件与图像显示
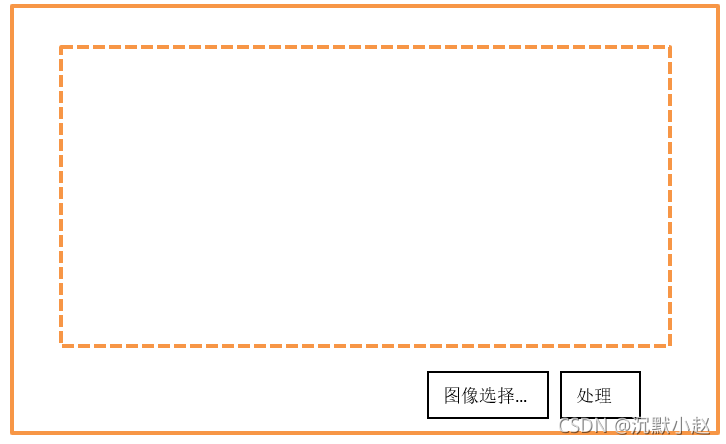
要实现的功能:
1.通过文件对话框选择图像文件,刷新JFrame中的内容面板实现图像显示。
2.通过单击【处理】按钮实现对图像的必要处理,然后刷新显示图像。
大致UI组件布局如图所示。
其中支持BufferedImage对象显示的自定义JPanel类的实现如下:
import java.awt.Graphics;
import java.awt.Graphics2D;
import java.awt.image.BufferedImage;

import javax.swing.JPanel;

public class ImagePanel extends JPanel {
	/*
	 *
	 */
	private static final long serialVersionUID = 1L;
	private BufferedImage sourceImage;
	private BufferedImage destImage;

	public ImagePanel() {

	}

	@Override
	protected void paintComponent(Graphics g) {
		Graphics g2d = (Graphics2D) g;
		g2d.clearRect(0, 0, this.getWidth(), this.getHeight());
		if (sourceImage != null) {
			g2d.drawImage(sourceImage, 0, 0, sourceImage.getWidth(), sourceImage.getHeight(), null);
			if (destImage != null) {
				g2d.drawImage(destImage, sourceImage.getWidth() + 10, 0, destImage.getWidth(), destImage.getHeight(),
						null);
			}
		}
	}

	public void process() {
//		NearestZoomFilter filter = new NearestZoomFilter();
//		BicubicZoomFilter filter = new BicubicZoomFilter();
//		BilinearZoomFilter filter = new BilinearZoomFilter();
//		filter.setDestHeight(sourceImage.getHeight() * 2);
//		filter.setDestWidth(sourceImage.getWidth() * 2);
//		RobotFilter filter = new RobotFilter();
//		filter.setUseA(false);// 使用B模板,默认为A模板
//		destImage = filter.filter(sourceImage, null);
//		LaplaceFilter filter = new LaplaceFilter();
//		MoravecFilter filter=new MoravecFilter();
//		filter.setThreshold(5000);
//		filter.setType(SobolPrewittEdgeDetector.SOBEL_TYPE);
//		filter.setDirection(SobolPrewittEdgeDetector.X_DIRECTION);
		ForstnerFilter filter=new ForstnerFilter();
		filter.setThreshold(0.75);
		filter.setWeight(133812991);
		destImage = filter.filter(sourceImage, null);

	}

	public BufferedImage getSourceImage() {
		return sourceImage;
	}

	public void setSourceImage(BufferedImage sourImage) {
		this.sourceImage = sourImage;
	}

	public BufferedImage getDestImage() {
		return destImage;
	}

	public void setDestImage(BufferedImage destImage) {
		this.destImage = destImage;
	}
}
SwingUI界面实现与JBotton按钮监听处理的类的代码如下:
import java.awt.BorderLayout;
import java.awt.Dimension;
import java.awt.FlowLayout;
import java.awt.event.ActionEvent;
import java.awt.event.ActionListener;
import java.awt.image.BufferedImage;
import java.io.File;
import java.io.IOException;

import javax.imageio.ImageIO;
import javax.swing.JButton;
import javax.swing.JFileChooser;
import javax.swing.JFrame;
import javax.swing.JOptionPane;
import javax.swing.JPanel;
import javax.swing.SwingUtilities;
import javax.swing.filechooser.FileNameExtensionFilter;

public class MainUI extends JFrame implements ActionListener {
	/*
	 *
	 */
	private static final long serialVersionUID = 1L;
	public static final String IMAGE_CMD = "选择图像...";
	public static final String PROCESS_CMD = "处理";

	private JButton imgBtn;
	private JButton processBtn;
	private ImagePanel imagePanel;

	// image
	private BufferedImage srcImage;

	public MainUI() {
		setTitle("JFrame UI - 演示");
		imgBtn = new JButton(IMAGE_CMD);
		processBtn = new JButton(PROCESS_CMD);

		// Buttons
		JPanel btnPanel = new JPanel();
		btnPanel.setLayout(new FlowLayout(FlowLayout.RIGHT));
		btnPanel.add(imgBtn);
		btnPanel.add(processBtn);

		// filters
		imagePanel = new ImagePanel();
		getContentPane().setLayout(new BorderLayout());
		getContentPane().add(imagePanel, BorderLayout.CENTER);
		getContentPane().add(btnPanel, BorderLayout.SOUTH);

		// setup listener
		setupActionListener();
	}

	private void setupActionListener() {
		imgBtn.addActionListener(this);
		processBtn.addActionListener(this);
	}

	@Override
	public void actionPerformed(ActionEvent e) {
		if (SwingUtilities.isEventDispatchThread()) {
			System.out.println("Event Dispath Thread!!");
		}
		if (srcImage == null) {
			JOptionPane.showMessageDialog(this, "请先选择图像源文件");
			try {
				JFileChooser chooser = new JFileChooser();
				setFileTypeFilter(chooser);
				chooser.showOpenDialog(null);
				File f = chooser.getSelectedFile();
				if (f != null) {

					srcImage = ImageIO.read(f);
					imagePanel.setSourceImage(srcImage);
					imagePanel.repaint();

				}
			} catch (IOException e1) {
				// TODO 自动生成的 catch 块
				e1.printStackTrace();
			}
			return;
		}
		if (IMAGE_CMD.equals(e.getActionCommand())) {
			try {
				JFileChooser chooser = new JFileChooser();
				setFileTypeFilter(chooser);
				chooser.showOpenDialog(null);
				File f = chooser.getSelectedFile();
				if (f != null) {
					srcImage = ImageIO.read(f);
					imagePanel.setSourceImage(srcImage);
					imagePanel.repaint();
				}
			} catch (IOException e1) {
				e1.printStackTrace();
			}
			imagePanel.repaint();
		} else if (PROCESS_CMD.equals(e.getActionCommand())) {
			imagePanel.process();
			imagePanel.repaint();
		}
	}

	public void setFileTypeFilter(JFileChooser chooser) {
		FileNameExtensionFilter filter = new FileNameExtensionFilter("JPG & PNG Images", "jpg", "png");
		chooser.setFileFilter(filter);
	}

	public void openView() {
		setDefaultCloseOperation(JFrame.EXIT_ON_CLOSE);
		setPreferredSize(new Dimension(800, 600));
		pack();
		setVisible(true);
	}

	public static void main(String[] args) {
		MainUI ui = new MainUI();
		ui.openView();
	}
}
为了代码的简洁,实现一个抽象类AbstractBufferedImageOp,然后会把对像素数据的读写都放在抽象类中完成,这样就实现了代码的重用,也为处理像素提供更加方便的公共方法。
AbstractBufferedImageOp类的实现代码如下:
import java.awt.Rectangle;
import java.awt.RenderingHints;
import java.awt.geom.Point2D;
import java.awt.geom.Rectangle2D;
import java.awt.image.BufferedImage;
import java.awt.image.BufferedImageOp;
import java.awt.image.ColorModel;

/**
 * A convenience class which implements those methods of BufferedImageOp which
 * are rarely changed.
 */
public abstract class AbstractBufferedImageOp implements BufferedImageOp {

	public final static double c1o60 = 1.0 / 60.0;
	public final static double c1o255 = 1.0 / 255.0;

	public BufferedImage createCompatibleDestImage(BufferedImage src, ColorModel dstCM) {
		if (dstCM == null)
			dstCM = src.getColorModel();
		return new BufferedImage(dstCM, dstCM.createCompatibleWritableRaster(src.getWidth(), src.getHeight()),
				dstCM.isAlphaPremultiplied(), null);
	}

	public Rectangle2D getBounds2D(BufferedImage src) {
		return new Rectangle(0, 0, src.getWidth(), src.getHeight());
	}

	public Point2D getPoint2D(Point2D srcPt, Point2D dstPt) {
		if (dstPt == null)
			dstPt = new Point2D.Double();
		dstPt.setLocation(srcPt.getX(), srcPt.getY());
		return dstPt;
	}

	public RenderingHints getRenderingHints() {
		return null;
	}

	public int clamp(int value) {
		return value > 255 ? 255 : (value < 0 ? 0 : value);
	}

	public double[] rgb2Hsl(int[] rgb) {
		double min, max, dif, sum;
		double f1, f2;
		double h, s, l;
		// convert to HSL space
		min = rgb[0];
		if (rgb[1] < min)
			min = rgb[1];
		if (rgb[2] < min)
			min = rgb[2];
		max = rgb[0];
		f1 = 0.0;
		f2 = rgb[1] - rgb[2];
		if (rgb[1] > max) {
			max = rgb[1];
			f1 = 120.0;
			f2 = rgb[2] - rgb[0];
		}
		if (rgb[2] > max) {
			max = rgb[2];
			f1 = 240.0;
			f2 = rgb[0] - rgb[1];
		}
		dif = max - min;
		sum = max + min;
		l = 0.5 * sum;
		if (dif == 0) {
			h = 0.0;
			s = 0.0;
		} else if (l < 127.5) {
			s = 255.0 * dif / sum;
		} else {
			s = 255.0 * dif / (510.0 - sum);
		}

		h = (f1 + 60.0 * f2 / dif);
		if (h < 0.0) {
			h += 360.0;
		}
		if (h >= 360.0) {
			h -= 360.0;
		}

		return new double[] { h, s, l };
	}

	public int[] hsl2RGB(double[] hsl) {
		// conversion back to RGB space here!!
		int tr = 0, tg = 0, tb = 0;
		double v1, v2, v3, h1;
		double s = hsl[1], l = hsl[2];
		double h = hsl[0];
		if (s == 0) {
			tr = (int) l;
			tg = (int) l;
			tb = (int) l;
		} else {

			if (l < 127.5) {
				v2 = c1o255 * l * (255 + s);
			} else {
				v2 = l + s - c1o255 * s * l;
			}

			v1 = 2 * l - v2;
			v3 = v2 - v1;
			h1 = h + 120.0;
			if (h1 >= 360.0)
				h1 -= 360.0;

			if (h1 < 60.0) {
				tr = (int) (v1 + v3 * h1 * c1o60);
			} else if (h1 < 180.0) {
				tr = (int) v2;
			} else if (h1 < 240.0) {
				tr = (int) (v1 + v3 * (4 - h1 * c1o60));
			} else {
				tr = (int) v1;
			}

			h1 = h;
			if (h1 < 60.0) {
				tg = (int) (v1 + v3 * h1 * c1o60);
			} else if (h1 < 180.0) {
				tg = (int) v2;
			} else if (h1 < 240.0) {
				tg = (int) (v1 + v3 * (4 - h1 * c1o60));
			} else {
				tg = (int) v1;
			}

			h1 = h - 120.0;
			if (h1 < 0.0) {
				h1 += 360.0;
			}
			if (h1 < 60.0) {
				tb = (int) (v1 + v3 * h1 * c1o60);
			} else if (h1 < 180.0) {
				tb = (int) v2;
			} else if (h1 < 240.0) {
				tb = (int) (v1 + v3 * (4 - h1 * c1o60));
			} else {
				tb = (int) v1;
			}
		}
		return new int[] { tr, tg, tb };
	}

	/**
	 * A convenience method for getting ARGB pixels from an image. This tries to
	 * avoid the performance penalty of BufferedImage.getRGB unmanaging the image.
	 */
	public int[] getRGB(BufferedImage image, int x, int y, int width, int height, int[] pixels) {
		int type = image.getType();
		if (type == BufferedImage.TYPE_INT_ARGB || type == BufferedImage.TYPE_INT_RGB)
			return (int[]) image.getRaster().getDataElements(x, y, width, height, pixels);
		return image.getRGB(x, y, width, height, pixels, 0, width);
	}

	/**
	 * A convenience method for setting ARGB pixels in an image. This tries to avoid
	 * the performance penalty of BufferedImage.setRGB unmanaging the image.
	 */
	public void setRGB(BufferedImage image, int x, int y, int width, int height, int[] pixels) {
		int type = image.getType();
		if (type == BufferedImage.TYPE_INT_ARGB || type == BufferedImage.TYPE_INT_RGB)
			image.getRaster().setDataElements(x, y, width, height, pixels);
		else
			image.setRGB(x, y, width, height, pixels, 0, width);
	}

	public static float[] makeKernel(float radius) {
		int r = (int) Math.ceil(radius);
		int rows = r * 2 + 1;
		float[] matrix = new float[rows];
		float sigma = radius / 3;
		float sigma22 = 2 * sigma * sigma;
		float sigmaPi2 = 2 * ImageMath.PI * sigma;
		float sqrtSigmaPi2 = (float) Math.sqrt(sigmaPi2);
		float radius2 = radius * radius;
		float total = 0;
		int index = 0;
		for (int row = -r; row <= r; row++) {
			float distance = row * row;
			if (distance > radius2)
				matrix[index] = 0;
			else
				matrix[index] = (float) Math.exp(-(distance) / sigma22) / sqrtSigmaPi2;
			total += matrix[index];
			index++;
		}
		for (int i = 0; i < rows; i++)
			matrix[i] /= total;

		return matrix;
	}
}
插值算法
1、最邻近插值算法

代码如下:
import java.awt.image.BufferedImage;
import java.awt.image.ColorModel;

public class NearestZoomFilter extends AbstractBufferedImageOp {
	private int destH; // zoom height
	private int destW; // zoom width

	public NearestZoomFilter() {
		System.out.println("最邻近插值");
	}

	public void setDestHeight(int destH) {
		this.destH = destH;
	}

	public void setDestWidth(int destW) {
		this.destW = destW;
	}

	@Override
	public BufferedImage filter(BufferedImage src, BufferedImage dest) {
		// TODO 自动生成的方法存根
		int width = src.getWidth();
		int height = src.getHeight();
		if (dest == null)
			dest = createCompatibleDestImage(src, null);
		int[] inPixels = new int[width * height];
		int[] outPixels = new int[destH * destW];
		getRGB(src, 0, 0, width, height, inPixels);
		float rowRatio = ((float) height) / ((float) destH);
		float colRatio = ((float) width) / ((float) destW);
		int index = 0;
		for (int row = 0; row < destH; row++) {
			int srcRow = Math.round(((float) row) * rowRatio);
			if (srcRow >= height) {
				srcRow = height - 1;
			}
			for (int col = 0; col < destW; col++) {
				int srcCol = Math.round(((float) col) * colRatio);
				if (srcCol >= width) {
					srcCol = width - 1;
				}
				int index2 = row * destW + col;
				index = srcRow * width + srcCol;
				outPixels[index2] = inPixels[index];
			}
		}
		setRGB(dest, 0, 0, destW, destH, outPixels);
		return dest;
	}

	public BufferedImage createCompatibleDestImage(BufferedImage src, ColorModel dstCM) {
		if (dstCM == null)
			dstCM = src.getColorModel();
		return new BufferedImage(dstCM, dstCM.createCompatibleWritableRaster(destW, destH),
				dstCM.isAlphaPremultiplied(), null);

	}
}
其中重载createCompatibleDestImage( )方法目的是创建一个放大以后的BufferedImage对象。
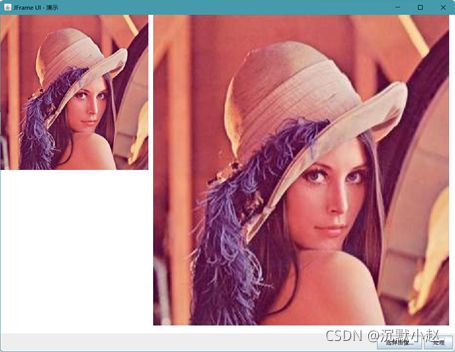
在ImagePanel的process方法添加以下几行代码,运行MainUI.java选择需要放大的图片,单击【处理】按钮查看效果。
NearestZoomFilter filter = new NearestZoomFilter();
filter.setDestHeight(sourceImage.getHeight() * 2);
filter.setDestWidth(sourceImage.getWidth() * 2);
destImage = filter.filter(sourceImage, null);
临近点插值是一种快速点插值的方法,不足之处是基于该方法产生图像明显有锯齿和模糊,不是一种很好的插值算法。
2、双线性插值算法
代码如下:
import java.awt.image.BufferedImage;
import java.awt.image.ColorModel;

public class BilinearZoomFilter extends AbstractBufferedImageOp {
	private int destH;// zoom height
	private int destW;// zoom width

	public BilinearZoomFilter() {
		System.out.println("双线性插值");
	}

	public void setDestHeight(int destH) {
		this.destH = destH;
	}

	public void setDestWidth(int destW) {
		this.destW = destW;
	}

	@Override
	public BufferedImage filter(BufferedImage src, BufferedImage dest) {
		int width = src.getWidth();
		int height = src.getHeight();

		if (dest == null)
			dest = creatCompatibleDestImage(src, null);

		int[] inPixels = new int[width * height];
		int[] outPixels = new int[destH * destW];
		getRGB(src, 0, 0, width, height, inPixels);
		float rowRatio = ((float) height) / ((float) destH);
		float colRatio = ((float) width) / ((float) destW);
		int index = 0;
		for (int row = 0; row < destH; row++) {
			int ta = 0, tr = 0, tg = 0, tb = 0;
			double srcRow = ((float) row) * rowRatio;
			// 获取整数部分坐标 row Index
			double j = Math.floor(srcRow);
			// 获取行的小数部分坐标
			double t = srcRow - j;
			for (int col = 0; col < destW; col++) {
				double srcCol = ((float) col) * colRatio;
				// 获取整数部分坐标 column Index
				double k = Math.floor(srcCol);
				// 获取列的小数部分坐标
				double u = srcCol - k;
				int[] p1 = getPixel(j, k, width, height, inPixels);
				int[] p2 = getPixel(j, k + 1, width, height, inPixels);
				int[] p3 = getPixel(j + 1, k, width, height, inPixels);
				int[] p4 = getPixel(j + 1, k + 1, width, height, inPixels);
				double a = (1.0d - t) * (1.0d - u);
				double b = (1.0d - t) * u;
				double c = (t) * (1.0d - u);
				double d = t * u;
				ta = 255;
				tr = (int) (p1[0] * a + p2[0] * b + p3[0] * c + p4[0] * d);
				tg = (int) (p1[1] * a + p2[1] * b + p3[1] * c + p4[1] * d);
				tb = (int) (p1[2] * a + p2[2] * b + p3[2] * c + p4[2] * d);
				index = row * destW + col;
				outPixels[index] = (ta << 24) | (clamp(tr) << 16) | (clamp(tg) << 8) | clamp(tb);
			}
		}
		setRGB(dest, 0, 0, destW, destH, outPixels);
		return dest;
	}

	private int[] getPixel(double j, double k, int width, int height, int[] inPixels) {
		int row = (int) j;
		int col = (int) k;
		if (row >= height) {
			row = height - 1;
		}
		if (row < 0) {
			row = 0;
		}
		if (col >= width) {
			col = width - 1;
		}
		if (col < 0) {
			col = 0;
		}
		int index = row * width + col;
		int[] rgb = new int[3];
		rgb[0] = (inPixels[index] >> 16) & 0xff;
		rgb[1] = (inPixels[index] >> 8) & 0xff;
		rgb[2] = inPixels[index] & 0xff;
		return rgb;
	}

	public BufferedImage creatCompatibleDestImage(BufferedImage src, ColorModel dstCM) {
		if (dstCM == null)
			dstCM = src.getColorModel();
		return new BufferedImage(dstCM, dstCM.createCompatibleWritableRaster(destW, destH),
				dstCM.isAlphaPremultiplied(), null);
	}
}
在ImagePanel的process方法添加以下几行代码,运行MainUI.java选择需要放大的图片,单击【处理】按钮查看效果。
		BilinearZoomFilter filter = new BilinearZoomFilter();
		filter.setDestHeight(sourceImage.getHeight() * 2);
		filter.setDestWidth(sourceImage.getWidth() * 2);
		destImage = filter.filter(sourceImage, null);
3、三次卷积插值

代码如下:
import java.awt.image.BufferedImage;
import java.awt.image.ColorModel;

public class BicubicZoomFilter extends AbstractBufferedImageOp {
	private int destH;// zoom height
	private int destW;// zoom width

	public BicubicZoomFilter() {
		System.out.println("三次卷积插值");
	}

	public void setDestHeight(int destH) {
		this.destH = destH;
	}

	public void setDestWidth(int destW) {
		this.destW = destW;
	}

	@Override
	public BufferedImage filter(BufferedImage src, BufferedImage dest) {
		// TODO 自动生成的方法存根
		int width = src.getWidth();
		int height = src.getHeight();

		if (dest == null)
			dest = creatCompatibleDestImage(src, null);

		int[] inPixels = new int[width * height];
		int[] outPixels = new int[destH * destW];
		getRGB(src, 0, 0, width, height, inPixels);
		float rowRatio = ((float) height) / ((float) destH);
		float colRatio = ((float) width) / ((float) destW);
		int index = 0;
		for (int row = 0; row < destH; row++) {
			int ta = 0, tr = 0, tg = 0, tb = 0;
			double srcRow = ((float) row) * rowRatio;
			// 获取整数部分坐标 row Index
			double j = Math.floor(srcRow);
			// 获取行的小数部分坐标
			double t = srcRow - j;
			for (int col = 0; col < destW; col++) {
				double srcCol = ((float) col) * colRatio;
				// 获取整数部分坐标 column Index
				double k = Math.floor(srcCol);
				// 获取列的小数部分坐标
				double u = srcCol - k;
				double[][] bc1 = new double[4][3];
				for (int n = 0; n < 4; n++) {
					int[][] c1 = new int[4][3];
					for (int m = 0; m < 4; m++) {
						c1[m] = getPixel(j + n - 1, k + m - 1, width, height, inPixels);
					}
					for (int d = 0; d < 3; d++) {// for RGB
						bc1[n][d] = get1DCubicValue(new double[] { c1[0][d], c1[1][d], c1[2][d], c1[3][d] }, u);
					}
				}
				double[] dRGB = new double[3];
				for (int dd = 0; dd < 3; dd++) {
					dRGB[dd] = get1DCubicValue(new double[] { bc1[0][dd], bc1[1][dd], bc1[2][dd], bc1[3][dd] }, t);
				}
				ta = 255;
				tr = (int) (dRGB[0]);
				tg = (int) (dRGB[1]);
				tb = (int) (dRGB[2]);
				index = row * destW + col;
				outPixels[index] = (ta << 24) | (clamp(tr) << 16) | (clamp(tg) << 8) | clamp(tb);
			}

		}
		setRGB(dest, 0, 0, destW, destH, outPixels);
		return dest;
	}

	// extract (1/2*delta) will get below formula
	public double get1DCubicValue(double[] p, double delta) {
		return p[1] + 0.5 * delta * (p[2] - p[0]
				+ delta * (2.0 * p[0] - 5.0 * p[1] + 4.0 * p[2] - p[3] + delta * (3.0 * (p[1] - p[2]) + p[3] - p[0])));
	}

	private int[] getPixel(double j, double k, int width, int height, int[] inPixels) {
		int row = (int) j;
		int col = (int) k;
		if (row >= height) {
			row = height - 1;
		}
		if (row < 0) {
			row = 0;
		}
		if (col >= width) {
			col = width - 1;
		}
		if (col < 0) {
			col = 0;
		}
		int index = row * width + col;
		int[] rgb = new int[3];
		rgb[0] = (inPixels[index] >> 16) & 0xff;
		rgb[1] = (inPixels[index] >> 8) & 0xff;
		rgb[2] = inPixels[index] & 0xff;
		return rgb;
	}

	public BufferedImage creatCompatibleDestImage(BufferedImage src, ColorModel dstCM) {
		if (dstCM == null)
			dstCM = src.getColorModel();
		return new BufferedImage(dstCM, dstCM.createCompatibleWritableRaster(destW, destH),
				dstCM.isAlphaPremultiplied(), null);
	}
}
同样,测试运行该类只需要如下几行代码即可:
		BicubicZoomFilter filter = new BicubicZoomFilter();
		filter.setDestHeight(sourceImage.getHeight() * 2);
		filter.setDestWidth(sourceImage.getWidth() * 2);
		destImage = filter.filter(sourceImage, null);
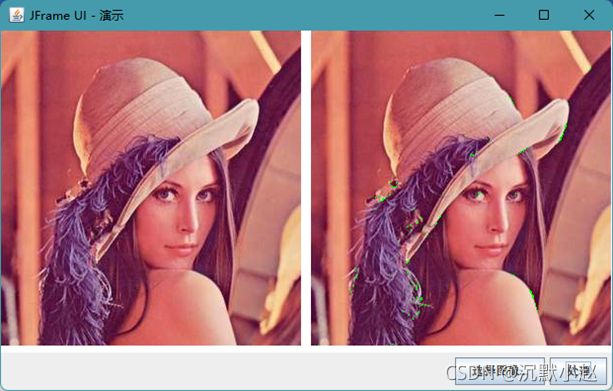
点特征提取算子
1、Moravec算子
代码如下:
import java.awt.image.BufferedImage;

public class MoravecFilter extends AbstractBufferedImageOp {
	private int threshold;

	public int getThreshold() {
		return threshold;
	}

	public void setThreshold(int threshold) {
		this.threshold = threshold;
	}

	public MoravecFilter() {
		System.out.println("Moravec算子");
	}

	@Override
	public BufferedImage filter(BufferedImage src, BufferedImage dest) {
		int width = src.getWidth();
		int height = src.getHeight();
		int w = 5;
		int k = w / 2;
		if (dest == null)
			dest = createCompatibleDestImage(src, null);
		// 初始化,获取输入图像的像素数组
		int[] inPixels = new int[width * height];
		int[] outPixels = new int[width * height];
		getRGB(src, 0, 0, width, height, inPixels);
		// 每一行、每一列的循环每个像素
		int index = 0;
		for (int row = 0; row < height; row++) {
			int ta = 0, tr = 0, tg = 0, tb = 0;
			for (int col = 0; col < width; col++) {
				index = row * width + col;
				int wV1, wV2, wV3, wV4;
				wV1 = wV2 = wV3 = wV4 = 0;
				// 计算水平(0度)方向窗内兴趣值
				for (int i = -k; i < k; i++) {// i=-2,-1,0,1
					int a = getGrayPixel(inPixels, width, height, col + i, row);
					int b = getGrayPixel(inPixels, width, height, col + i + 1, row);
					wV1 += (a - b) * (a - b);
				}
				// 计算垂直(90度)方向窗内兴趣值
				for (int i = -k; i < k; i++) {// i=-2,-1,0,1
					int a = getGrayPixel(inPixels, width, height, col, row + i);
					int b = getGrayPixel(inPixels, width, height, col, row + i + 1);
					wV2 += (a - b) * (a - b);
				}
				// 计算45度方向窗内兴趣值
				for (int i = -k; i < k; i++) {// i=-2,-1,0,1
					int a = getGrayPixel(inPixels, width, height, col + i, row + i);
					int b = getGrayPixel(inPixels, width, height, col + i + 1, row + i + 1);
					wV3 += (a - b) * (a - b);
				}
				// 计算135度方向窗内兴趣值
				for (int i = -k; i < k; i++) {// i=-2,-1,0,1
					int a = getGrayPixel(inPixels, width, height, col + i, row - i);
					int b = getGrayPixel(inPixels, width, height, col + i + 1, row - i - 1);
					wV4 += (a - b) * (a - b);
				}
				int V = Math.min(Math.min(wV1, wV2), Math.min(wV3, wV4));
				// 若兴趣值大于阈值,则将点的坐标存入数组中
				if (V > threshold) {
					tr = 0;
					tg = 255;
					tb = 0;
					outPixels[index] = (ta << 24) | (tr << 16) | (tg << 8) | tb;// 标记绿色
				} else {
					outPixels[index] = inPixels[index];
				}
			}
		}
		setRGB(dest, 0, 0, width, height, outPixels);
		return dest;
	}

	private int getGrayPixel(int[] inPixels, int width, int height, int col, int row) {
		// 循环每个输入像素获取RGB值,将计算的到的结果作为每个像素的输出像素,即完成了图像的灰度转换
		if (col < 0 || col >= width)
			col = 0;
		if (row < 0 || row >= height)
			row = 0;
		int index = row * width + col;
		int tr = (inPixels[index] >> 16) & 0xff;
		int tg = (inPixels[index] >> 8) & 0xff;
		int tb = inPixels[index] & 0xff;
		int gray = (int) (0.299 * tr + 0.587 * tg + 0.114 * tb);
		return gray;
	}
}
测试运行该类只需要如下几行代码即可:
		MoravecFilter filter=new MoravecFilter();
		filter.setThreshold(5000);
		destImage = filter.filter(sourceImage, null);
线特征提取算子
1、Robot算子
Robot算子就是检测图像边缘的卷积核(算子),而且Robot算子是从水平45°或135°两个方向进行图像边缘的寻找,对于活跃于边缘有着非常好的效果。
Robot算子及其他2×2算子对图像噪声非常敏感,但图像有噪声干扰时,边缘检测效果就会大打折扣。


代码如下:
import java.awt.image.BufferedImage;

public class RobotFilter extends AbstractBufferedImageOp {
	private boolean useA = true;

	public RobotFilter() {
		System.out.println("Robot 算子");
	}

	public boolean isUseA() {
		return useA;
	}

	public void setUseA(boolean useA) {
		this.useA = useA;
	}

	@Override
	public BufferedImage filter(BufferedImage src, BufferedImage dest) {
		int width = src.getWidth();
		int height = src.getHeight();

		if (dest == null)
			dest = createCompatibleDestImage(src, null);
		// 初始化,获取输入图像像素数组
		int[] inPixels = new int[width * height];
		int[] outPixels = new int[width * height];
		getRGB(src, 0, 0, width, height, inPixels);
		// 每一行、每一列循环每个像素
		int index = 0;
		for (int row = 0; row < height; row++) {
			int ta = 0, tr = 0, tg = 0, tb = 0;
			for (int col = 0; col < width; col++) {
				index = row * width + col;
				// 计算Robot算子,使用A模板

				if (isUseA()) {
					int[] rgb1 = getPixel(inPixels, width, height, col, row);
					int[] rgb2 = getPixel(inPixels, width, height, col + 1, row + 1);
					tr = rgb1[0] - rgb2[0];
					tg = rgb1[1] - rgb2[1];
					tb = rgb1[2] - rgb2[2];
				} else {// 使用Robot算子B模板
					int[] rgb1 = getPixel(inPixels, width, height, col + 1, row);
					int[] rgb2 = getPixel(inPixels, width, height, col, row + 1);
					tr = rgb1[0] - rgb2[0];
					tg = rgb1[1] - rgb2[1];
					tb = rgb1[2] - rgb2[2];
				}
				// clamp来计算处理计算后的结果
				outPixels[index] = (ta << 24) | (clamp(tr) << 16) | (clamp(tg) << 8) | clamp(tb);
			}
		}
		setRGB(dest, 0, 0, width, height, outPixels);
		return dest;
	}

	private int[] getPixel(int[] inPixels, int width, int height, int col, int row) {
		if (col < 0 || col >= width)
			col = 0;
		if (row < 0 || row >= height)
			row = 0;
		int index = row * width + col;
		int tr = (inPixels[index] >> 16) & 0xff;
		int tg = (inPixels[index] >> 8) & 0xff;
		int tb = inPixels[index] & 0xff;
		return new int[] { tr, tg, tb };
	}

}
测试运行该类,在ImagePanel的process方法添加以下几行代码,运行MainUI.java选择需要放大的图片,单击【处理】按钮查看效果。
		RobotFilter filter = new RobotFilter();
//		filter.setUseA(false);// 使用B模板,默认为A模板
		destImage = filter.filter(sourceImage, null);
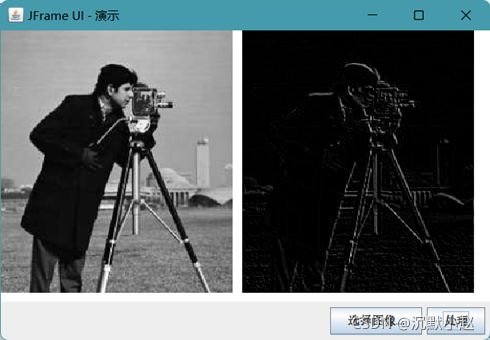
2、Sobel算子和Prewitt算子
Sobel算子和Prewitt算子都是3×3的算子,假设有如下的像素块M:

则他的X与Y方向的偏导数计算分别如下:

当系数c=1 时的到的算子为Prewitt算子:

当系数c=2 时的到的算子为Sobel算子:

基于Prewitt算子在X方向与Y方向卷积之后得到的图像效果如下:
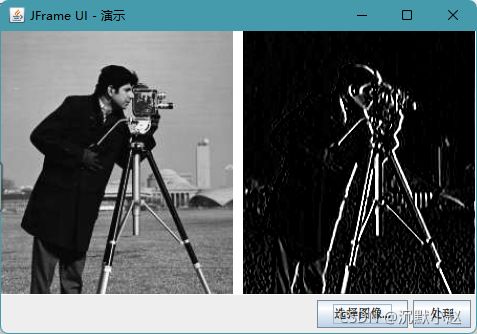
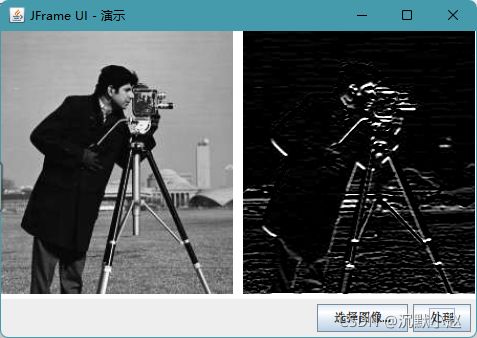
基于Sobel算子在X方向与Y方向卷积之后得到的图像效果如下:


代码如下:
import java.awt.image.BufferedImage;

public class SobolPrewittEdgeDetector extends AbstractBufferedImageOp {
	public final static int SOBEL_TYPE = 1;
	public final static int PREWITT_TYPE = 2;
	public final static int X_DIRECTION = 4;
	public final static int Y_DIRECTION = 8;
	private int type;
	private int direction;

	public SobolPrewittEdgeDetector() {
		type = PREWITT_TYPE;
		direction = X_DIRECTION;
	}

	public int getType() {
		return type;
	}

	public int getDirection() {
		return direction;
	}

	public void setType(int type) {
		this.type = type;
	}

	public void setDirection(int direction) {
		this.direction = direction;
	}

	@Override
	public BufferedImage filter(BufferedImage src, BufferedImage dest) {
		int width = src.getWidth();
		int height = src.getHeight();

		if (dest == null)
			dest = createCompatibleDestImage(src, null);
		// 初始化,获取输入图像的像素数组
		int[] inPixels = new int[width * height];
		int[] outPixels = new int[width * height];
		getRGB(src, 0, 0, width, height, inPixels);
		// 每一行、每一列的循环每个像素
		int index = 0;
		// 确定是否为Sobol算子
		int coefficient = (getType() == SOBEL_TYPE) ? 2 : 1;
		for (int row = 0; row < height; row++) {
			int ta = 0, tr = 0, tg = 0, tb = 0;
			for (int col = 0; col < width; col++) {
				index = row * width + col;
				// X方向边缘检测
				if (getDirection() == X_DIRECTION) {
					int[] a2 = getPixel(inPixels, width, height, col + 1, row - 1);
					int[] a3 = getPixel(inPixels, width, height, col + 1, row);
					int[] a4 = getPixel(inPixels, width, height, col + 1, row + 1);
					int[] a0 = getPixel(inPixels, width, height, col - 1, row - 1);
					int[] a7 = getPixel(inPixels, width, height, col - 1, row);
					int[] a6 = getPixel(inPixels, width, height, col - 1, row + 1);
					tr = (a2[0] + coefficient * a3[0] + a4[0]) - (a0[0] + coefficient * a7[0] + a6[0]);
					tg = (a2[1] + coefficient * a3[1] + a4[1]) - (a0[1] + coefficient * a7[1] + a6[1]);
					tb = (a2[2] + coefficient * a3[2] + a4[2]) - (a0[2] + coefficient * a7[2] + a6[2]);
				} else {// Y方向边缘检测
					int[] a6 = getPixel(inPixels, width, height, col - 1, row + 1);
					int[] a5 = getPixel(inPixels, width, height, col, row + 1);
					int[] a4 = getPixel(inPixels, width, height, col + 1, row + 1);
					int[] a0 = getPixel(inPixels, width, height, col - 1, row - 1);
					int[] a1 = getPixel(inPixels, width, height, col, row - 1);
					int[] a2 = getPixel(inPixels, width, height, col + 1, row - 1);
					tr = (a6[0] + coefficient * a5[0] + a4[0]) - (a0[0] + coefficient * a1[0] + a2[0]);
					tg = (a6[1] + coefficient * a5[1] + a4[1]) - (a0[1] + coefficient * a1[1] + a2[1]);
					tb = (a6[2] + coefficient * a5[2] + a4[2]) - (a0[2] + coefficient * a1[2] + a2[2]);
				}
				// clamp来处理计算后的结果
				outPixels[index] = (ta << 24) | (clamp(tr) << 16) | (clamp(tg) << 8) | clamp(tb);
			}
		}
		setRGB(dest, 0, 0, width, height, outPixels);
		return dest;
	}

	private int[] getPixel(int[] inPixels, int width, int height, int col, int row) {
		if (col < 0 || col >= width)
			col = 0;
		if (row < 0 || row >= height)
			row = 0;
		int index = row * width + col;
		int tr = (inPixels[index] >> 16) & 0xff;
		int tg = (inPixels[index] >> 8) & 0xff;
		int tb = inPixels[index] & 0xff;
		return new int[] { tr, tg, tb };
	}
}
其中参数type选择Sobel算子类型或Prewitt算子类型,参数direction决定是进行X方向边缘检测还是Y方向边缘检测。运行于测试SobolPrewittEdgeDetector类时,只需要如下几行代码:
		SobolPrewittEdgeDetector filter = new SobolPrewittEdgeDetector();
		filter.setType(SobolPrewittEdgeDetector.SOBEL_TYPE);
		filter.setDirection(SobolPrewittEdgeDetector.X_DIRECTION);
		destImage = filter.filter(sourceImage, null);
3、Laplace算子


代码如下:
import java.awt.image.BufferedImage;

public class LaplaceFilter extends AbstractBufferedImageOp {
	public LaplaceFilter() {
		System.out.println("拉普拉斯算子");
	}

	@Override
	public BufferedImage filter(BufferedImage src, BufferedImage dest) {
		int width = src.getWidth();
		int height = src.getHeight();

		if (dest == null)
			dest = createCompatibleDestImage(src, null);
		// 初始化,获取输入图像的像素数组
		int[] inPixels = new int[width * height];
		int[] outPixels = new int[width * height];
		getRGB(src, 0, 0, width, height, inPixels);
		// 每一行、每一列的循环每个像素
		int index = 0;
		for (int row = 0; row < height; row++) {
			int ta = 0, tr = 0, tg = 0, tb = 0;
			for (int col = 0; col < width; col++) {
				index = row * width + col;
				int[] a = getPixel(inPixels, width, height, col, row);
				int[] a1 = getPixel(inPixels, width, height, col, row - 1);
				int[] a3 = getPixel(inPixels, width, height, col + 1, row);
				int[] a5 = getPixel(inPixels, width, height, col, row + 1);
				int[] a7 = getPixel(inPixels, width, height, col - 1, row);
				tr = (a1[0] + a3[0] + a5[0] + a7[0]) - (a[0] * 4);
				tg = (a1[1] + a3[1] + a5[1] + a7[1]) - (a[1] * 4);
				tb = (a1[2] + a3[2] + a5[2] + a7[2]) - (a[2] * 4);
				// clamp来处理计算后的结果
				outPixels[index] = (ta << 24) | (clamp(tr) << 16) | (clamp(tg) << 8) | clamp(tb);
			}
		}
		setRGB(dest, 0, 0, width, height, outPixels);
		return dest;
	}

	private int[] getPixel(int[] inPixels, int width, int height, int col, int row) {
		if (col < 0 || col >= width)
			col = 0;
		if (row < 0 || row >= height)
			row = 0;
		int index = row * width + col;
		int tr = (inPixels[index] >> 16) & 0xff;
		int tg = (inPixels[index] >> 8) & 0xff;
		int tb = inPixels[index] & 0xff;
		return new int[] { tr, tg, tb };
	}

}
运行于测试LaplaceFilter类时,只需要如下几行代码:
		LaplaceFilter filter = new LaplaceFilter();
		destImage = filter.filter(sourceImage, null);